


I will keep this blunt. This tutorial explains how to make a usable copy of the existing Raspian installation on your SD card. There are several reasons why you may want to do this operation such as; you want exact copies of your Raspian installation to use on other raspberry Pis, you want changeable installations on various usb drives and you want a backup in case your SD card malfunctions or becomes corrupted.
Once you have built a custom Linux installation, you can copy it to a USB drive and use it on your Raspberry Pi. To get started, all you need is a formatted fat32 USB stick.
To format the USB stick in Windows,
1) Insert the usb stick into a usb port.
2) Select Start >Computer.
3) Right click the usb stick
4) Select format >fat32
5) Safely remove formatted usb stick.
To format the USB stick in Linux,
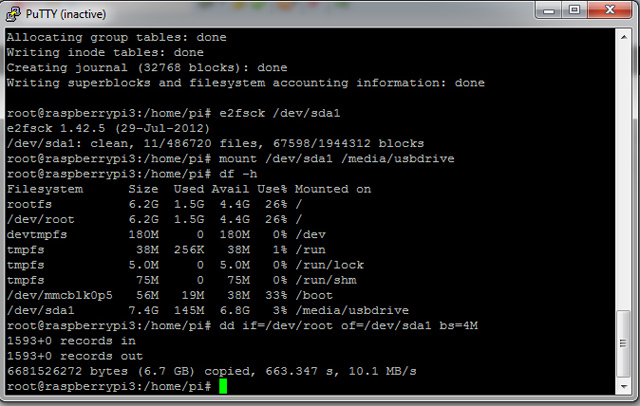
1) Insert the usb stick into a usb port. If you use Raspberry Pi (Raspian), Ubuntu or another OS it should mount right away. Check to see where it is mounted.
root@raspberrypi:/home/pi# df -h
2) Unmount the usb stick. In this case, it is mounted on /dev/sda1
root@raspberrypi:/home/pi# umount /dev/sda1
3) Format it with fdisk command unless you formatted it in Windows. If you formatted it with Windows, skip this step.
root@raspberrypi:/home/pi# fdisk /dev/sda1
4) Format it for Ext4.
root@raspberrypi:/home/pi# mkfs.ext4 /dev/sda1
5) Mount the usb drive.
root@raspberrypi:/home/pi# mount /dev/sda1 /media/usbdrive
6) Use the ‘dd’ command to move the data to the usb drive.
7) Resize the drive.These examples are show for the root user. To enable the root user on your Raspberry Pi or Linux, simply type ‘sudo -s’. Otherwise, you can always use the default user ‘pi@raspberrypi ~ $’ with sudo in front of the command.
root@raspberrypi:/home/pi# resize2fs /dev/sda1
On top of that, you may want to note that you can always open up the Linux package Gparted and show the usb device. Then, you can unmount it and resize the unallocated space to the desired partition.
8) Change this line to boot the usb next time the Pi restarts.
root@raspberrypi:/home/pi# vi /boot/cmdline.txt
or
root@raspberrypi:/home/pi# nano /boot/cmdline.txt
9) Change ‘root=/dev/root’ to ‘root=/dev/sda1’
10) You may want to make changes to the /etc/fstab file too. The code below will show to mount it upon boot.
proc /proc proc defaults 0 0 /dev/mmcblk0p8 /boot vfat defaults 0 2 /dev/mmcblk0p9 / ext4 defaults,noatime 0 1 /dev/sda1 /media/usbdrive ext4 uid=1000,noauto,user,exec 0 0

Owner of Fullstack Web Studio

Quality Coding

Digital Marketing
When Performance and Flexibility Matters
Affordable web design,custom web development and mobile apps for individuals and businesses.


Let us analyze your data and competition to acquire more traffic! Professional SEO content writer
© 2018 ALL Rights Reserved | Sitemap
Vancouver | North Vancouver | Burnaby | Richmond | Coquitlam | Port Coquitlam | Surrey | Langley | Maple Ridge | Mission | Abbotsford | Kamloops | Kelowna | Victoria | Squamish | Whistler | Pemberton