


Installing Joomla 3 can be simple. This tutorial shows the complete setup of Joomla 3.3.
1) Download Joomla from Joomla.org.
2) Extract the zip file and move the files and folders to your desired location.
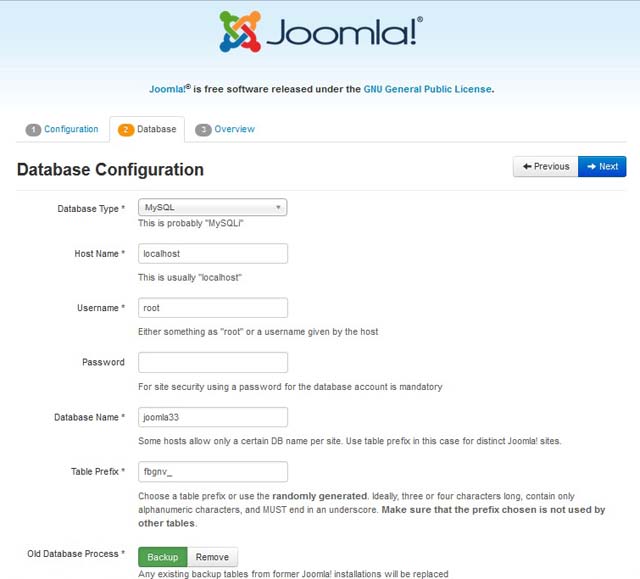
3) Create a database. It can be any name you want.
4) Open the root folder for the website in your browser. You should see the installation instructions.
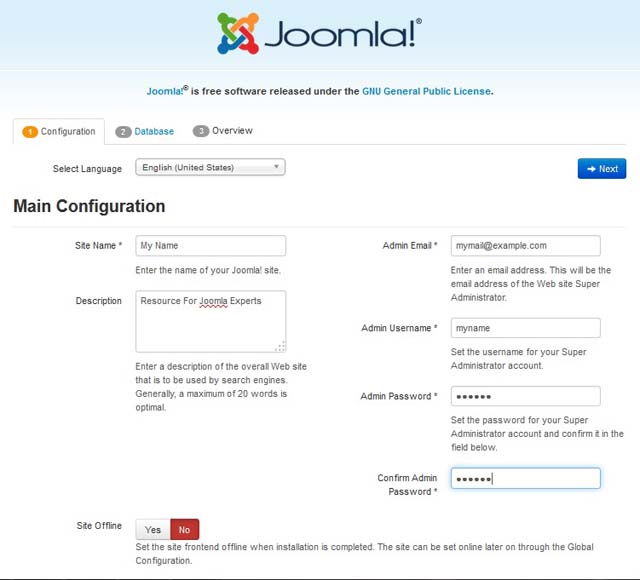
5)Setup the database.
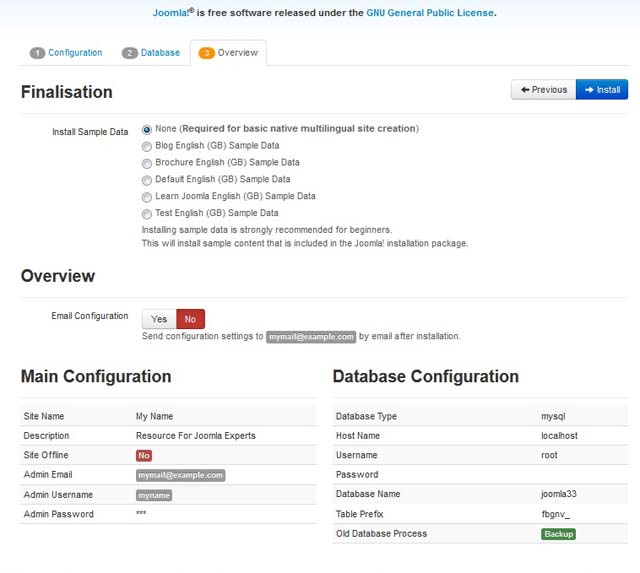
6) Check over and select install.
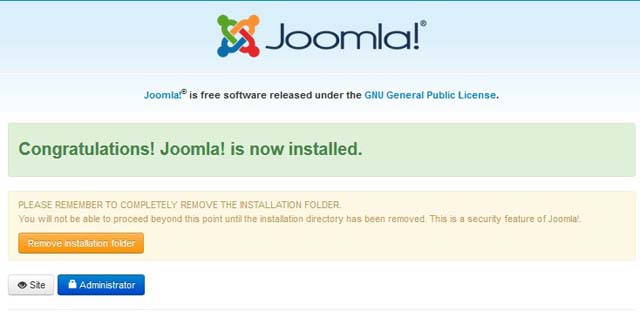
Let it install
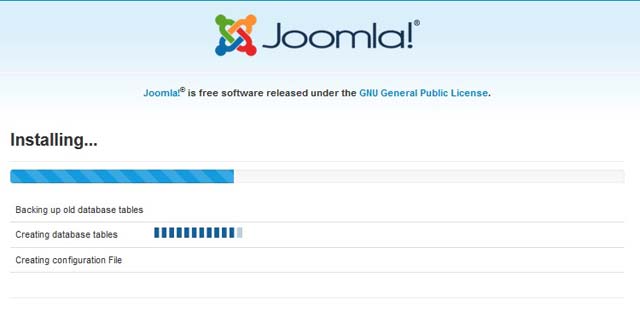
You should receive a successful image. If you have a problem, you can open the installation/sql/mysql/joomla.sql file in a text editor and do a search for ENGINE=InnoDB and replace it with ENGINE=MyIsam.
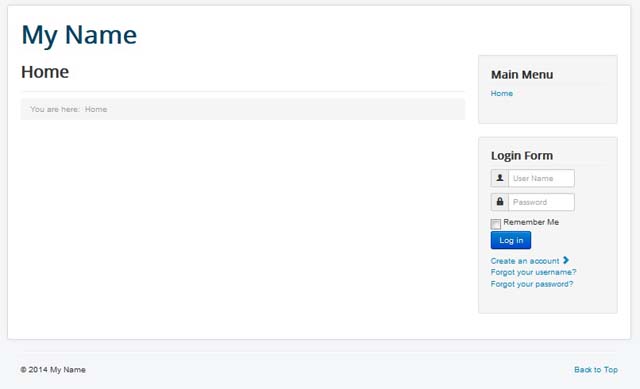
Here is the installed website at http://localhost.
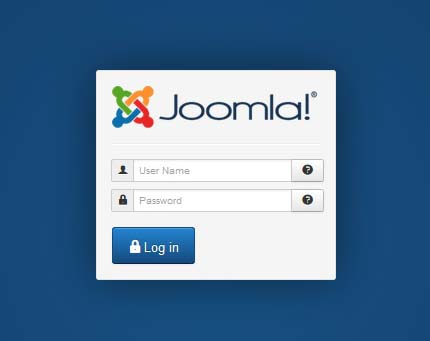
Here is the administrator backend at localhost/administrator.
When you develop a website and allow a user to have Administrator or Super Administrator privileges, you may want to alter the back end so that Extensions cannot be installed at a later date. You may have various reasons for doing so. For one, an insecure or vulnerable extension can cause problems.
Therefore, not allowing extensions to be installed can remove that threat to the file system. In addition to removing the ability to install extensions, FTP or any other protocol to connect to the host should not be allowed to the client either. Many people do not take security seriously and just see the hosting as a free for all. Then, when something goes wrong, they blame you.
1) Open administrator/components/com_installer with FTP >Rename or folder or back it up on another device or path on the server.
To remove the installation from showing up in the menu for Joomla 1.5,
2) Open administrator/modules/mod_menu/helper.php and comment the following line
//$menu->addChild(new JMenuNode(JText::_(‘Install/Uninstall’), ‘index.php?option=com_installer’, ‘class:install’));
Although Joomla can be a convenient platform to develop websites, it can be a rats nest to fix after code had been injected into your website. For this reason, it is often easiest to start over, rather than chasing after the files which are doing the damage.
In a nutshell, the procedure to fix a hacked Joomla website is shown below.
2) Install a fresh Joomla package.
3) Use the original or create a new database.
4) Dump the data from the old database to the new database.
5) FTP the old template folders into the new installation. Before doing so, it is a good idea to check over all of the code and look for strange files or code blocks.
6) Reinstall the extensions you need.
The excessive file system which is used by Joomla and other content management systems is one reason why it can be better to hand code applications and websites.
If you have a high performance website that uses limited files, it is much easier to track down malicious code. With Joomla, it can be rather easy to disguise blocks of code and backdoor scripts; especially if the website owner is uncertain about secure coding practices.
Adding an iframe to a Joomla 2.5 module can allow you place code that with made with an html or php file into the existing module. For example, you may want to recycle a php form that was made with a different php / mySQL application and use it in a Joomla page.
To add an iframe to a custom module with Joomla 2.5,
1) Select ‘Module manager’.
2) Select ‘New’.
3) Select ‘Custom HTML’.
4) Add iframe code
5) Click ‘Save’.
To allow iframes with Tiny MCE editor,
1) Select ‘Plugin Manager’
2) Select Editor – Tiny MCE
3) Under ‘Basic Options’ look for ‘Prohibited Elements’.
4) Remove iframe from the list
5) Select ‘Save’ or ‘Save and Close’.
When you work with Joomla modules, you can use installed modules or custom modules. Custom modules use the default Joomla editor and can be used to add custom code like div tags, text, images and css. However, you can use your custom modules to display an iframe from another folder, or even another website. For example, you may have a form that you built on a different website that you want to use in the Joomla module.
The code below shows how simple it is to add an iframe to a custom Joomla module. The iframe needed custom styling to remove the scrollbars and to fit properly inside the custom module. Without styling the iframe, it would have had vertcial and horizontal scrollbars which makes it lack style. With the iframe below, it was given a custom height and the border property was set to none.
<iframe style="height:420px; border:none;" src="https://www.example.com/myiframe.php"></iframe>
Joomla components are built to use within the Joomla frontend and backend. One folder within the administrator folder is used to display the component when logged into the administrator backend while another folder is located inside the components folder. Bot folders contain the name of the component; such as as com_componentname. However, the frontend files can include files from the administrator folder. The excerpt below shows the basic structure of a component.
DEFINE TOOLBARS
administrator/components/com_componentname/toolbar.componentname.html.php
DECIDE WHICH TOOLBAR TO DISPLAY
administrator/components/com_componentname/toolbar.componentname.php
BACKEND DISPLAY
administrator/components/com_componentname/controller.php
Contains component functions like public, show entries, edit, publish, save and delete
BACKEND DISPLAY
administrator/components/com_componentname/admin.componentname.php
-puts the files together
-includes files like the html file (admin.componentname.html), adds tables, instantiates the controller object and displays
default task
BACKEND DISPLAY
administrator/components/com_componentname/admin.componentname.html.php
-contains HTML_componentname class and html code for functions like editReview, showReviews, etc
FRONTEND
START
components/componentname/componentname.php
-loads tables, includes controller and instantiates the controller object, dislays default task like view all
components/componentname/controller.php
-uses display() function
-displays requested view and corresponding model
-Normally, one var is all entries and the other is a single entry with one id. Code is below to display desired view.
Jrequest::getVar(‘view’, ‘all’);
router.php
-used to give adequate views and ids
VIEWS FOLDER
-contains folders for views; such as all or a single view. The folder must not use the name view or an error will trigger.
– view files within subfolders are named view.html
All Entries
class ComponentnameViewSubfoldername extends JView {
Single Entries
class ComponentnameViewSubfoldername extends JView {
MODELS FOLDER
-contains models for a single revue or all the revues
-class name is class ModelComponentnameFilename extends JModel
-Model and and view will have matching names
The code belows how arrays can be fetched from a database with Joomla and pure php / mysql. The main differences in syntax are the databse connection variable and the naming of the database table. The two examples below clearly show the differences.
$db =& JFactory::getDBO();
$query = “SELECT name from #__mytable WHERE enabled=1 “;
$db->setQuery($query);
$rows = $db->loadAssocList();
//print_r($rows);
foreach ($rows as $row) {
echo “<br/><br/>My loadAssocList() method for the associative array loop count is <b>” .$row[‘name’].”</b> records which are enabled.<br/>”;
}
PHP / MYSQL
$query = “SELECT name from mytable WHERE enabled=1 “;
$result = mysqli_query($db, $query);
while ($row=mysqli_fetch_assoc($result)) {
$myname=$row[‘name’];
echo $myname;
}
The code belows how objects can be fetched from a database with Joomla and pure php / mysql. The main differences in syntax are the database connection variable and the naming of the database table. The two examples below clearly show the differences.
$db =& JFactory::getDBO();
$query = “SELECT name from #__mytable WHERE enabled=1 “;
$db->setQuery($query);
$rows = $db->loadObjectList();
foreach ($rows as $row) {
echo “<b>”.$row->name.”</b> records which are enabled.<br/><hr>”;
}
PHP / MYSQL
$query = “SELECT name from mytable WHERE enabled=1 “;
$result = mysqli_query($db, $query);
while ($row=mysqli_fetch_object($result)) {
$myname=$row->name;
echo $myname;
}
With decent mysql database skills, solid PHP programming skills and knowledge of the Joomla framework, you can develope Joomla modules rather quickly. The key is to build a template which can create queries and relational database queries for the tables in the Joomla framework. Once you have that, you can query and retrieve any results you want; just as though you were using php/mySQL with the exception of some slightly different methods to access the databse, objects, arrays and loops.
Once you have developed the starting module, you can test it with your desired Joomla installation. It is recommended to use various versions such as Joomla 1.5 and Joomla 2.5. Once all the versions work properly, all you really need to do is tweak the module’s default.php or modulename.php. To keep it simple, the default.php or modulename.php file will be identical for each Joomla version.
1) Performance can be slower than desired. In general, coding applications in php / mySQL is faster. Load times can be longer than wanted.
2) Creating custom extensions requires learning the Joomla framework. Editing some extensions can require knowledge of the Joomla framework.
3) Custom templating can be a lengthy process; especially making a design from a psd file.
4) From a web developer’s point of view, it can be difficult to alter when you need precise functionality or change its core functionality (like hack registration system).
5) It can be overkill for a small website that does not need too much functionality. It can significantly slow the load time vs a pure php / mySQL cms or plain old html / css.
1) Easy To learn
2) Can build an application without knowing how to code or can start with the cms and learn to code later.
3) Can extend it at anytime to add new functionality like blogs.
4) Installs in less than a couple of minutes.
5) Lots of free and commercial templates to choose from.
6) Many web developers to choose from if you need custom code.
7) Joomla community is friendly.
8) Can deploy websites quite quickly.
9) Many users and that provides plenty of documentation in Joomla Forums, other forums and books.
10) You can extend with stand-alone php / mySQL applications if desired since a good database schema is already in place.
Meanwhile, when you login to the backend, there may be an error message with the following text:
To uninstall a Joomla 1.6 / Joomla 1.7 plugin,
1) Login to Joomla backend.
2) Select Extensions >Extension Manager >Manage >Select Plugin >Uninstall.
Sometimes, the plugin may not install automatically. However, manual uninstallation is always an option.
To manually remove a plugin,
1) Goto Extensions >Extension Manager >Select Type:Plugin >Look for your plugin and what ‘Type’ it is.
2) Login to server with FTP or Cpanel
3) Look in Joomla root directory and open plugins folder.
4) Find plugin files and delete them.
5) Open up phpMyAdmin or mysql> and open the databse for your Joomla site.
6) Look in extensions table.
7) Remove plugin entry from the plugin table.
Changing the Joomla database prefix is recommended for each and every Joomla installation.
HOW TO CHANGE JOOMLA DATABASE PREFIX
Installation
Upon installation, you have an option to change the database prefixfrom jos_ to what you want. This is all there is to that.
After Installation Joomla Database Prefix Change
After a Joomla site is up and running, changing the Joomla database prefix can be a little more complicated.
To change the database prefix after installation,
1) Login to phpmyadmin.
2) Export the database as text or have it displayed in phpmyadmin. Aftyer it is displayed in phpmyadmin, copy the entire text and paste it into Notepad or Wordpad.
3) Search all text for the prefix and replace all. This will change all desired database prefixes.
Note:
You should use the underscore in the search like jos_ because any other words with that string will change; and that could be anything from a menu item to a string in article. For all intensive purposes, a database named with a string that would not be used for any other purpose (i.e. mydbnewz_) would eliminate any naming issues.
4) If your templates have the same name as your database prefix, in part or in whole, you will need to make more changes to either your template names or the templates_menu database table. Renaming them in either situation will help to make the changeover occur.
5) If you use a sef component, you may find that the template routes are incorrect. You must change this, but changing templates names is an easier option. For example, if your template was called ZZZmysite and your database was originally called ZZZmysite (then changed to ZZZnewsite) you may want to change your templates to ZZZnewsite.
Virtuemart is a fantastic store component to sell downloadable files. It allows you to take orders from registered or non-registered users and show backend information about each order. When an order is confirmed, the user will receive an email for which he can download s specific number of file(s) for a specific length of time.
If any thing went sour along the way; such as the user not receiving a download is in an email, you can always track further email in the database using
To find download id and order information from phpmyadmin,
1) Goto vm_order_user_info get name order_id and user_id.
2) Go to vm_product_download.
3) Match obvious user and order_id.
4) The desired entry shows downloadable file, how many downloads are remaining, etc
Alternatively, you can wait until we complete our administrator module which will show all users and download information.
SELECT * FROM jos_vm_product_download WHERE jos_vm_product_download.user_id=jos_vm_product_download.user_id;
or
SELECT * FROM `jos_vm_product_download` WHERE jos_vm_product_download.user_id=jos_vm_product_download.user_id;
The code to retrieve the download information of one specific user with <mysql or phpmyadmin:
SELECT * FROM jos_vm_product_download WHERE jos_vm_product_download.user_id=usersnumbergoeshere;
Installing Joomla 1.6 in wamp is very fast and simple.
1) Download Joomla
2) Make a new folder in www directory > add zip file for Joomla 1.6 installation > Extract Zip file.
3) Open phpmyadmin
4) Create a new database
5) Open localhost in web browser
6) Select language and select Next until you get to database configuration.
7) For database configuration:
a) Type: mysql
b) username:root
c) password: none
d) database name: same as you made with phpmyadmin
e) Change prefix if you want or leave it ‘as is’.
f) Select next
8) Create the administrator username and password and select ‘Next’ until installation is complete.
9) Rename or reemove installion folder when finished
Resetting a username or password with Joomla 1.6 is easy.
To reset the Joomla 1.6 username or password for any user,
1) Login to the Joomla administrator.
2) Select ‘User Manager’ icon.
3) Select a User
4) Change Login Name, if desired.
5) Change password and confirm password, if desired.
5) Select ‘Save’ or ‘Save and Close’.
If you use Joomla extensively, there will probably come a time when you lose an administrator’s password for a Joomla installation. Resetting the Joomla administrator password is a simple procedure.
How to Reset Joomla Administrator Password
To reset the Joomla administrator password with mySQL,
1) Open Putty
2) Enter root user and password.
3) Type mysql
4) Write: ‘Show Databases’.
5) Type: ‘Use The_Desired_Database_Name’ where the desired databse name is the name of the database.
6) Type: UPDATE `jos_users` SET `password` = MD5( ‘my_updated_password’ ) WHERE `jos_users`.`username` = “admin”;
Note:
If the table has a different prefix (which is recommended for security) or a different username, just substitute the values.
To reset the Joomla administrator password with phpmyadmin,
1) Open PHPmyadmin
2) Select the desired database.
3) Select query
4) 6) Type: UPDATE `jos_users` SET `password` = MD5( ‘my_updated_password’ ) WHERE `jos_users`.`username` = “admin”;
Note:
If the table has a different prefix (which is recommended for security) or a different username, just substitute the values.
To edit and use the new module,
1) Select Extensions
2) Select Module Manager
3) Click on the module of choice
4) Select position
5) Select Publish
5) Select Pages
6) Select Save
See tutorial for using a Joomla 1.6 module.
Installing a module into Joomla 1.6 is a very simple procedure.
How To Install the Module
1) Login to the administrator (http://mysite.com/administrator)
2) Select extensions > Extension Manager
3) Browse and Select File from hard drive. It will be a zip or rar file
4) Select Upload and Install
See video tutorial for Installing a Joomla 1.6 Module.
Typically, Joomla 1.6 is installed using Fantastico or from a zip file downloaded from joomla.org. Fantastico is included in many shared, VPS, or dedicated server hosting plans.
Fantastico
If Fantastico is used for a Joomla 1.6 installtion, you must have a hosting plan which includes Cpanel. Cpanel is very popular with Linux hosting. The upside to a Fantasico installation is simplicity and quickness. Just a couple mouse clicks and it is done. The downside to Fantastico is that is uses the default Joomla database prefix (_jos). For security, it is recommended to change the prefix since hackers can target the prefix.
To use Fantastico,
1) Go to Cpanel and Login
2) Click Fantastico
4) Install Joomla 1.6
Manual Installation with Zip File
The manual installation of Joomla 1.6 is very simple.
To manually install Joomla 1.6,
1) Dowload the zip file from joomla.org
2) Extract the file into the appropriate directory…such as public_html or mysite.com
3) Type the address of the new installation; such as mysite.com
4) Setup the appropriate database name, user and password
5) Remove or rename installation folder.
Manual Installation Video Tutorial
Here is avideo tutorial for installing Joomla 1.6. See tutorial.
Sometimes, using a content management system like Joomla, Drupal, or WordPress can present an eye-raising duplicate url issue.
This can happen when url strings and sef urls are indexed. Another such possibility is when a category or section is appended to the page; Thus, this is 2 separate urls. In many cases, Google will pick one.
Here is a good page regarding duplicate urls with Joomla:
Joomla and SEO
Joomla 1.6 is now the future for Joomla. From now on, most developers will develope extensions for the new version of the Joomla CMS. This article is not to reinvent the wheel, but, rather point to a solid page with the required information required to perfom such an upgrade.
Upgrading Joomla 1.5 Modules to Joomla 1.6
To upgrade a Joomla 1.5 module,
1) Open the module xml file.
2) Change the description tag by adding underscores
i.e. <description>PLEASE_GO_TO_MY_MODULE_FOR_DESCRIPTION</description>
3) If you are using a lanuguage file, the underscores must be changed there too in addition to added quotations and # changed to ;
; BWS
; Copyright (C) 2011 BWS
; License GNU/GPL
; Note : All ini files need to be saved as UTF-8
PLEASE_GO_TO_MY_MODULE_FOR_DESCRIPTION=”<div id=”holdthem”><h1>MY Module for Joomla 1.6x</h1>”
4) Convert the Parameters
a) change “<param ” with “<field “
b) change “</param>” with </field>”
c) change “<params> with “<config><fields name=”params”><fieldset name=”basic”>”
d) change “</params>” with “</fieldset></fields></config>”
e) change “<install” with “<extension “
f) change “</install>” with “</extension>”
5) The method to retrieve parameters is the same as Joomla 1.5
i.e. color:<?= $params->get(‘modtextcolor’); ?>;
Alternative Module Templates for Joomla 1.6
f you have various templates in the tmpl folder, you need to modify the main php file. For example, if your extension is mod_myextension you would edit mod_myextension.php.
The code you add to the file is shown below.
Change
Change to:
require JModuleHelper::getLayoutPath(‘mod_mymodule’,
$params->get(‘layout’, ‘default’).’_items’);
The files need names like my_second_templatefile_items.php
The code needed to add the template files in the xml file is:
More details regarding how to upgrade Joomla 1.5 extensions to Joomla 1.6 extensions can be found here.
According to a published heading on February 10, 2010 from the website joomla.org, Joomla powers 2.6% of the entire web. This is not such a surprising stat since it is a CMS and is quite flexible. With the new Joomla 1.6, it will be interesting to see how much committment carries on to extensions to Joomla 1.6. Here is a page that explains how to upgrade extensions:
Upgrading Joomla Extensions
After the release of Joomla 1.6 RC1, I had come across a significant roadblock in developing a website…. extensions. With Joomla 1.5, there was always the ability to manually insert extensions into administrator and components folders or with the backend installer.
But, with Joomla 1.6, the installer will not install Joomla 1.5 extensions without recoding installers, nor can components be manually dumped into the proper folders and using the Discover setting. The discover setting will pick up the extensions, but the component will not install.
I could only hope these issues will iron out in time, but, in the meantime it looks like Joomla 1.6 has nothing on Joomla 1.5 that has an additional ACL component.
After waiting patiently for 1 year for Joomla 1.6 to be released; RC1 finally came about. Since I had a site that needed a strong user management like Drupal, I had decided to use this version. The alternative would have been to use a Joomla component from Core PHP for $79. However, the news ACL in Joomla 1.6 looks more simpler than community ACL. Although, it is recommended to use the new simplistic RC1 for a production site, in case some security holes are found, I had decided to anyway. Since I will not allow public access to login scripts and would use Linux to block users initially, nobody would have access to frontend or backend locations where most hackers tend to buzz inconveniently. Finally, I would stay on top of any new patches just to be sure.
After first glance using Joomla 1.6 RC1, I decided to test some old templates. Issues existed immediately due to my infamiliarity with Joomla 1.6. For one, if templates are moved into the template folder they will not show up unless you go to Extenions->Extension manager->Discover->Select the template->install. I really was thankful it offered an option to allowing me to use a template without packaging it perfectly. After using Discover setting, you can go back to the template manager and make that template the default site template. I installed an older Artisteer template and it installed, but had a php error. Since I was experimenting, I did not look into the issue. But, it looked fixable.
Another template issue I had noticed was that if I went to the template manager and had any text in the ‘Filter’ box, it would not allow me to select a template. Oh well, I remember that if it happens again. That is one benefit from blogging.
After trying adding a second template manually, I had problems deleting the file. I removed the folder and tried clicking delete in the template manager, but with no success. But, I could remove it manually with php/myadmin or mysql with the command DELETE from template_styles where template = ‘templatename’;. Upon refresh in the Joomla backend; dealing with the manual installation is done.
Next issue I had was that when I tried to manually or with the installer, the templates would not install properly. I found that strange considering both methods worked previously. But, I was able to move the template folders into the master template folder and manually add an entry into the database table template_styles. After adding new entries, they show up in the template list.
Finally, I have noticed a lot of issues with templates compatible with Joomla 1.0 and Joomla 1.5 or Joomla 1.5 moved into 1.6. The only one I did not find had issues was a custom template that was very simple with a single index.php, images, css and html folders. Those templates that had OOP classes derived from commercial software like Artisteer or from a commercial template salesman were not compatible on a first test. With Artisteer, editng the functions.php file will make it work without php error. The code I added was replacing $mainframe->getMessageQueue(); with JFactory::getApplication()->getMessageQueue();. However, the css will need editing to make the template look as desired.
Therefore, if you make a custom template or edit an existing working template, you will be on the right track to building the website.

Owner of Fullstack Web Studio

Quality Coding

Digital Marketing
When Performance and Flexibility Matters
Affordable web design,custom web development and mobile apps for individuals and businesses.


Let us analyze your data and competition to acquire more traffic! Professional SEO content writer
© 2018 ALL Rights Reserved | Sitemap
Vancouver | North Vancouver | Burnaby | Richmond | Coquitlam | Port Coquitlam | Surrey | Langley | Maple Ridge | Mission | Abbotsford | Kamloops | Kelowna | Victoria | Squamish | Whistler | Pemberton