


WordPress climbed to the top of free website builders a long time ago. As a developer who watched them battle it out from the beginning, I have used the platform on many occasions. It is a very fast way to build a website that can be managed very easily and has extra features called plugins that can add extra functionality with a click of the mouse.
However, the popularity and ease does not come without a price because it is a very popular target for hackers. Here is why. First of all, the second we build a WordPress website, its default coding will output public html that leaves a footprint saying “This site is built with WordPress”. Hackers built bots to crawl websites and if they are WordPress, or a specific modified WordPress site, it will attempt an automated attack such as registration which allows the user ‘in’ to alter code as a user.
As we look around the Internet, we can find many ways to avoid these issues, like deny user registration, use safe, updated plugins, updated WordPress version and strong passwords. In addition, if there is user registration, we must ensure it is only a subscriber because if we build a site and this gets switched to admin somehow, then,new registrations will be admins and they have ‘full power’ in the WordPress backend.
The problem? Is that this is a continual, tiring game. Our website could be up and running fine, unchecked for months. Meanwhile, the day an exploit is known and becomes public, the hacker could have done his damage because we did not act fast enough top fix the exploit.
For this reason, we must stay on top of WordPress installations if we use it. Otherwise, building a strong app with Laravel Framework or html/css/js can keep exploits more at bay.
2018 is now upon us and the web is still steamrolling as the best place for online marketing. Since Internet marketing and can make or break a business, I have come up with a plan that can be used to avoid pitfalls and generate useful leads.
The 7 topics of Internet marketing discussion are SEO, SEM, content marketing, social media, ppc, Google Business Listings and Structured Data Markup. Since every website will receive traffic from various sources at different rates, I have put forward a list of the top places where you can make a presence and attract visitors and friends.
 SEO is the short hand term for search engine optimization. Most people online know the meaning of seo and tend to have a wanting to rank high organically with the search engines. With proper coding, text, images, links and document structure, this can be a pretty straightforward procedure from the start. But, it can be tricky and patience is required.
Although the ultimate outcome cannot be achieved overnight, you can acquire excellent results relatively quickly. It helps to have strong writing, coding and reporting skills in order to have an edge of the competition.
When pages are built to gain organic traction, you must remember to test for local terms to hit the desired audience. For example, a recent survey explained that 17% of people searching don’t use a local term. It also explains that 21% of youth do and a whopping 63% of older searchers do add a local term. Keep that in mind; especially if your market is an older audience, or maybe someone who prefers using a local modifier as the results without one are often irrelevant.
SEO just not mean just pleasing Google. For example, in Canada you can find estimates that ~21% of searchers use Yahoo and another 9% use Bing; which are both owned by Microsoft. Essentially, the combination can be attributed to almost 30% of web surfers. This may be slightly less than half of the queries that Google receives, but they do cater more to SEO techniques like content writing and proper coding than does Google.
Therefore, always make Yahoo and Bing a high priority because they will grade your documents an ‘A’ like a teacher while Google can make it very hard to show up and conquer the established competition. Even though that is just the way it is, your efforts will be rewarded from them too, although a different process.
 Search engine marketing and pay per click advertising can be implemented immediately in various forms. Typically, they are paid ads which are displayed when someone browses the web using specific keywords.
The ads can be used to display broad matches, phrase matches and exact matches. In addition, you can add negative keywords like free so that when people search for ‘tacos in Anaheim’ they will find you, but when they search for ‘free tacos in Anaheim’ they will not.
In rural areas, Adwords and Bing Ads are typically much more affordable and it is cost efficient to get to the top and stay there.
Asides from traditional search ads, joining paid directory websites and others listings can bring in referral traffic too.
 In general, I see online content marketing as a writer’s dream, and the most common source of marketing weakness in most websites. For whatever reason, whether it reminds someone of those dreaded University papers or a high school dropout that hated writing anything down, people just tend to want to avoid doing this and it looks as though they would rather save their writing bursts for social media where social wording is natural, short and sweet.
Since content marketing works well in all search engines; especially Yahoo and Bing which seems to make coding and content a priority, one should use this method to grab the bull by the horns and go to uncharted territory.
But, this method does not best as a marathon, rather than a short sprint. As a site is updated regularly, search engines will take notice. You will likely find that other pages and your site as a whole will show traffic increases that resemble a hot trading stock. Take away the momentum and it can drop the other direction.
Thus, creating content regularly is a key. In fact, once or twice a week is not overdoing it.
 Social media is a great place to build awareness. Again, there are some tricks to making social media be effective. Posts should be published often, and local ads and posts can be boosted from time to time as a mixture of organic and paid advertising will get the word out; especially if people follow your page.
 For any established business or new business, building a Google business listing should be automatic.
Adding Structured Data Markup to your websites can allow for alternative presentations when your site is crawled; such as displaying future events. There are various formats that can be used to display your results, but one stands out; JSON-LD. JSON-LD is a simple snippet of JSON that can be added inside script tags. The two links below can be used to create and test the markup.
https://www.google.com/webmasters/markup-helper/
https://search.google.com/structured-data/testing-tool
This post will explain how to link images, header and footer files across all folders. For example, let’s say you want to create a subfolder for seo purposes. In this case, let’s create a new folder called new-york. Meanwhile, our files in the root folder had all the css, images and javascript. Since the plan is to keep the same look, we only want to use the header and footer file from the root folder and allow those links to work perfectly.
However, if you do this and include the header to the subfolder with ‘include(“../header.php”);’, it will include that file. The issue is that the default path for the the files in the subdirectory will not link up because the path takes on the folder of the file in the new-york directory.
Luckily, there is one easy trick to allow everything to work flawlessly, thus, you only need one file in the new-york folder to utlize all css, images and js of the root folder. The simple line of code is the self closing base tag. An example is shown below with a line of code that can be added to the file in the new-york directory.
Do note that placement is critical. It should be positioned above all links to css and js; otherwise any links above it will use the path in the current directory. Both examples shown below will work.
<base href="example.com" />
<base href="/" />
As a Linux enthusiast, particularly Ubuntu for home pcs, I had decided to write this article to explain why I have really taken to Ubuntu Mate. If I could sum it up in two words, it would be Ubuntu compatibility.
Several years ago, I had an old HP laptop that came with Windows Vista for which I wanted to install Ubuntu. After installing Ubuntu 12 and 14, the graphics did not not work properly out of the box. Even with some tinkering, there was issues. But, when I installed Linux Mint, it worked fine.
However, I had used Ubuntu extensively throughout the years and really liked the forums, always kept a copy of the book ‘Ubuntu Unleashed’ close to my workstation and was brand faithful. Thus, although I liked a lot about Linux Mint, especially the GUI, it always felt like I was substituting for my favorite Linux flavor.
Hence, if you have a Linux background, you may know what I am about to say next. When I first installed Ubuntu Mate 16 in the same old laptop, everything went perfect. In addition, I really liked the GUI and color scheme.
Since then, I bought several old laptops at auctions and have installed them without any issues as well.
Finally, my new Raspberry Pi3. I bought a new 16GB micro SD card and installed the Ubuntu Mate image designed for the Raspberry Pi. Again, I was very impressed how well it performed.
That’s it, my little story about Ubuntu Mate and why I have it in four of my pcs.
The idea here is to run a Linux cron job to reset a mySQL database at the desired interval. In the case of this tutorial, the interval is every two hours.
The code below clearly shows how this can be done in its entirety. It is a cron file for the user named myUser. Although it appears that it has 4 cron sections, note that to are commented out. Also, note that the top two lines of cron commands and bottom two are for 2 different databases.
The top two cron jobs have backticks with backslashes that are required for database names with hyphens, but the latter two lines use underscores where they are not required.
So, you may notice that the top line that is commented out is nice and easy. But, you may also find that it is only useful when you want to dump data into an empty database. Thus, the uncommented option, will run two mysql commands that drop and create a database for the desired user ‘myUser’, then dumps the data from a sql file into the database.
That is all there is to it.
SHELL=”/usr/local/cpanel/bin/jailshell”
#0 */2 * * * mysql -u myUser -pmyPassword myUser_my-DB < /home/myUser/cron/db.sql >/dev/null 2>&1
0 */2 * * * mysql -u myUser -pmyPassword -e “DROP DATABASE \`myUser_my-DB\`; CREATE DATABASE \`myUser_my-DB\`”; mysql -u myUser -pmyPassword myUser_my-DB < /home/myUser/cron/db.sql >/dev/null 2>&1
#0 */2 * * * mysql -u myUser -pmyPassword myUser_my_db < /home/myUser/cron/db.sql >/dev/null 2>&1
0 */2 * * * mysql -u myUser -pmyPassword -e “DROP DATABASE myUser_my_db; CREATE DATABASE myUser_my_db”; mysql -u myUser -pmyPassword myUser_my_db < /home/myUser/cron/db.sql >/dev/null 2>&1
If you ever have used a theme or script, you will often see an element with various classes attached to that element; such as ‘<div class-=”red black”>’. As you may have already expected, the element makes reference to the red and black classes.
That is the easiest part while applying the style to the element is only a little more involved. If the single element contains 2 classes, how is the style interpreted from the stylesheet? To make this a little more clear, add the code below to the final stylesheet.
As you can see below, the element can access all 3 colors. But, the priority is top down for the single classes while the reference using .black.red takes precedence. Thus, the actual color of the text is blue even if you moved .black.red to the top. But, if you deleted .black.red and shuffled the order for .red and .black you will see that color will change to reflect the last single class.
<style>
    .black{color:black}
    .red{color:red}
    .black.red{color:blue}
</style>

<div class="red black">My Text</div>
Now, try the code below. As you can see, the color is now red, because red overrides black and the use of !important will stick unless it is overridden by another !important.
<style>
    .black{color:black}
    .red{color:red !important}
    .black.red{color:blue}
</style>

<div class="red black">My Text</div>
Finally, try the code below. As you can see, the color is blue as you may have expected.
<style>
    .black{color:black}
    .red{color:red !important}
    .black.red{color: blue !important}
</style>

<div class="red black">My Text</div>
Now, for one little twist. Move the .black.red above .black so it looks the block below. As you can see, .black.red !important overrides anything below. Also, if you had the same order without !important, the text color would be blue too.
<style>
    .black.red{color: blue !important}
    .black{color:black}
    .red{color:red !important}
</style>

<div class="red black">My Text</div>
After browsing around the web, looking a perfect solution for making all bootstrap columns the same height, I ended up crafting a custom solution because all the options I pursued were incomplete. Why incomplete? Well, using a simple Jquery solution to take the tallest column and make others the same height was short and sweet and looked great on an Ipad, Laptop and PC, but, when it came to the phone, using the largest column left too much unwanted space on the shorter column(s).
So, here is what I did. I chose the break point width of 768px to be mark where I would only want the Jquery to execute making the columns the same height. Since the columns had custom color backgrounds with text, they did need to be the same height when side by side or the layout would look off and lack symmetry.
Method A
Within the row class, the added a class called inner-top to each of the columns. In my case, it was 2 columns, but that could easily be adjusted to three, if needed. Here is a quick synopsis of the code below. The script will get the width of the window from the device being used. Do note that there are two ways to achieve this; one being $(window).width() and the other screen.width. It is important to remember that the latter actually detects your device with while the former detects browser width which in some cases could be wider than the device width.
If the device has the larger view port where columns will be shown side by side, we find the height of the desired columns of the inner-top class. The eq() method is used to get them. The first column from the top of the source code is eq(0) and the second is eq(1).
Once the dimensions are found, a simple if and else statement will apply the width from the largest column to the smaller column.
In addition, the page will reload if it is resized so that they will maintain the proper heights.
<script>
    $(document).ready(function () {

        width = $(window).width();
        //width = screen.width;
if (width > 768) { var first = $('.inner-top').eq(0).height(); var second = $('.inner-top').eq(1).height(); if (first > $('.inner-top').eq(1).height()) { $('.inner-top').eq(1).height(first); } else { $('.inner-top').eq(0).height(second); } var imageDiv = $('.inner-top img').eq(1).height(first); $('.inner-bottom').each(function (index, value) { if (index == 0) { var newHeight = $(this).height(); $('.inner-bottom').eq(1).height(newHeight); } }); } $(window).resize(function () { if ($(window).width() > width || $(window).width() < width) { window.location.href = window.location.href; } }); }); </script>
Method B
For those who find the method above a little redundant, you can use the map() method below to grab all heights of the inner-top class and make the class take on the height of the largest column.
<script>
    $( document ).ready(function() {

        width = $(window).width();

        if (width > 768) {
            var all_heights = $(".inner-top").map(function () {
                    return $(this).height();
                }).get();

         maxHeight = Math.max.apply(null, all_heights);
         $(".inner-top").height(maxHeight);

 }


 $(window).resize(function () {

 if ($(window).width() > width || $(window).width() < width) {
 window.location.href = window.location.href;
 }
 });

});

 </script>
Method C
This method uses a bootstrap class called row-eq-height. Thus, the row like
<div class="row"> becomes <div class="row row-eq-height">
In some cases, Bootstrap may not have included the class, thus, it is shown below. When using this class, you may not be home free since the row may not stack the columns on top of each other as you expect on the smaller devices. Again, you could add a simple piece of Jquery that would remove the class when the device is less than 768 px.
.row-eq-height {
    display: -webkit-box;
    display: -webkit-flex;
    display: -ms-flexbox;
    display:         flex;
}
The code to remove the class is shown below. Again, you see the window will reload in order to make it look right if someone resizes the page.
<script>
    $( document ).ready(function() {

        width = $(window).width();

        if (width < 768) {
            $(".row").removeClass("row-eq-height");

        }


        $(window).resize(function () {

            if ($(window).width() > width || $(window).width() < width) {
                window.location.href = window.location.href;
            }
        });

    });

</script>
The purpose of this article is to explain how to adapt to using angular.js for those who have a background in PHP; since angular is MVC, uses controllers, and outputs $scope variables in the HTML using {{variableName}} much like a template engine like Smarty, Twig and Blade.
If you have at least a basic understanding of object oriented PHP that is good. If you have familiarity with PHP Frameworks like Laravel or Symfony, that will likely help even more; especially for those with more experience.
Now that I brought some basics to the table, I will point you to a basic angular.js example. This explains the bare bones basics of an angular.js app using $scope, a controller and variable output in HTML.
However, another step forward in your progression is the usage of the factory() and service() methods. Here are two good examples of using these two methods.
If you look into the factory and service methods, you will see that everything starts from the controller. Within the controller, a service or factory method can be called using the name that was given to the method. This is very much like using a class with PHP and calling another function within the class. In addition, you could come across a situation(such as the latter link above) for which the controller calls a service which in turn calls a factory method.
Naming Conventions
Here is a quick lesson in naming the controller, factory and service methods.
Controller
The controller is accessed in your HTML file via the ‘ng-controller’ directive, or as you would normally here in HTML, the attribute. The ‘ng-controller’ takes place between the beginning and ending tag for which it is used; such as a div. The name of the controller is important because a name like ng-controller=”myController” means that it will reference the Javascript code where the first parameter in the method is the name of the controller.
After you look over the examples from above, this link about controllers may help clear up details regarding how a controller works. As you can see, you can add the $scope and dependencies into an array between the [] brackets and call an anonymous function. That anonymous function will allow you to run methods from a factory or service method. Alternatively, you can run a service method that can run an anonymous function using a factory method.
Ending Statements
So, to wrap things up, I hope you could absorb some of the methods to use angular.js based in the fact that you have a background in PHP. This should make the usage of angular more friendly because it takes the knowledge and essentially, many of the features of angular.js that you already know.
So, here is what you have learned. You should now know how to setup a controller in the Javascript and initiate its usage from within the HTML using the ng-controller directive.
Although the tutorial links above showed some good examples, remember that you can run a function within a controller very easily with the on-click directive. If that is not totally clear, the code below shows a simple example that calls a function within a controller.
Here is what is happening. The input box has ng-model=”myInput”. That value will be $scope.myInput in the Javsacript. When myFunc() is initiated, the function in the controller runs and a new $scope variable called $scope.outputMessage is created.
Call the Function In HTML
The Actual Function in the Javascript
Angular.js is a Javascript Framework that can be used quite effectively with single page web applications, ajax and PHP. This article will not show various methods to use angular.js. It will focus on using modules, controllers and output.
When you use Angular.js, there are three parts in the file for which you need to know about. The first and second parts take place in the head of the file. In the head, you need to include angular.js from a local or external source and you need a custom script for which you will build the custom application.
The other part takes place in the HTML code and will include the required angularjs attributes. In each application the attributes will vary; depending on what you are trying to achieve. A good place to check out what angular.js is capable of is to read the documentation at angularjs.org.
CONTROLLERS
The two methods to use controllers are shown below. Although both work, the latter method allows you to have as many controllers as you want in your HTML and they all can have corresponding code in the Javascript.
Global Controller
Using Angular Namespace, module function and controller function
Before we move on to the HTML, I am reminding you that the code block above is the Javascript that is going to be used to work with the HTML. In order for Angular.js to work, you will see that the HTML code has the attributes ng-app=”myAppName” and the attribute ng-controller=”myController”.
Those two pieces of the puzzle are very important for everything to work. If you look at the Javascript, you can see the module uses the app name and the controller uses the value from ng-controller, which is “myController”.
Finally, look at how {{name}} takes its value from $scope.name.
HTML
<body ng-app=”myAppName” ng-controller=”myController”>
<h1>Hello, {{name}}!</h1>
</body>
After that, you could add more HTML and more Javscript to accommodate another controller. The code below shows how you would make that second controller in the Javascript.
Keep in mind that when you use multiple controllers in your HTML, you can use them with closing and opening tags; such as <div></div>tags. Thus, html could resemble the code below if you added a second controller.
<body ng-app=”myAppName” >
<div ng-controller=”myController”>
<h1>Hello, {{name}}!</h1>
</div>
<div ng-controller=”secondController”>
Add custom stuff here
</div>
</body>
Those examples were quite simple. If you move on to forms, loops and other data, more, new coding is required. For example, this form to email example on a web page explains how to use Angular.js to use a function within a controller using the ng-click directive which is a lot like like onclick() with vanilla Javascript or onclick() with Jquery.
This post will demonstrate how to submit a form and email a message to the desired recipient. This lesson will use ajax with PHP and Angular.js. In addition to the form submission, a new class and a one time token are used to ensure that the form is actually submitted from the website and not through some script on a foreign machine.
How It Works
Whenever the page is loaded, the csrf class is called and a new hash, the one time token is created. That value is set as a session variable and added to a session array. Since browsers like Firefox and Chrome can handle sessions differently, creating the array ensures that if a token is created a second time, its value is stored no matter what.
The form itself is has typical angular attributes like ng-click and ng-model. As you may or may not already know, ng-model values come from the $scope.itemname created in the Javascript. Thus, when you see a tag like ng-model=”{{message}}”, you know its value comes from $scope.message in the Javascript.
Now for the action. When the form is submitted, the check_credentials() function is called.
If you look in the angular code, you will see that all form inputs, including the hidden csrf input are passed into the ajax post.
Once this code arrives to the php file, variables are set and sessions are checked to ensure that the one time token passes the test. Since the one time token is created on the server, this ensures email is not sent unless the csrf is valid.
Once the email is sent, all session variables are emptied due to the last line that shows $_SESSION = array();
Now, back to the angular.js code. Once all is successful, the original form is hidden, and a success message pops up with an image and a success message. Meanwhile, the page is not refreshed and the user experience is quite satisfying.
CSRF Class
class csrf
{
    public $csrf;
    public $session;
    public $csrf_array = array();

    public function __construct()
    {
        $csrf = hash("sha1", rand() . time() . rand());
        $_SESSION['csrf'] = $csrf;
        $session = $_SESSION['csrf'];
        $this->MakeToken($csrf, $session);
    }

    public function MakeToken($csrf, $session)
    {
        $this->csrf = $csrf;
        $this->session = $session;

        array_push($this->csrf_array, $this->csrf, $this->session);
        return $this->csrf_array;
    }

}
Top of File
<?php
    session_start();
    include("classes/csrf.php");
    $csrf = new csrf();
    $_SESSION['csrf'] = $csrf->session;
    $_SESSION['csrfs'][] = $csrf->session;
?><!DOCTYPE html>
Form
<div class="footer-widget newsletter-widget" id="message-received" ng-controller="ProjectsListCtrl" style="color:white">
    <div id="message"></div>
    <form name="myForm">
        <p><input type="text" size="40" ng-model="name" value="{{name}}" placeholder="Name"></p>
        <p><input type="text" size="40" ng-model="phone" placeholder="Phone"></p>
        <p><input type="text" size="40" name="email" ng-model="email" placeholder="Email" value="{{email}}" ng-pattern="/^[_a-zA-Z0-9]+(\.[_a-zA-Z0-9]+)*@[a-zA-Z0-9-]+(\.[a-zA-Z0-9-]+)*(\.[a-zA-Z]{2,4})$/" required></p>
        <p><textarea id="mess" placeholder="Your Message" ng-model="message" value="{{message}}"></textarea></p>
        <input type="hidden" name="csrf" ng-model="csrf" value="{{csrf}}"/>
        <button ng-click="check_credentials()">Send Message</button>
    </form>

</div>
Angular Code
<script src="https://ajax.googleapis.com/ajax/libs/angularjs/1.0.2/angular.js"></script>
<script>
angular.module('admin-projects', []);
angular.module('admin-projects').controller('ProjectsListCtrl', function($scope, $http) {
$scope.check_credentials = function () {
if ($scope.email === undefined) { alert("Webmaster says email is undefined because it did not match pattern!") }
if($scope.email.length < 5){
alert("Email is invalid");
}else{
//alert("Email is valid");
//alert($scope.csrf);
}
$scope.csrf = "<?php echo $csrf->session; ?>";
var request = $http({
method: "post",
url: "post.php",
data: {
email: $scope.email,
name: $scope.name,
message: $scope.message,
csrf: $scope.csrf
},
headers: {'Content-Type': 'application/x-www-form-urlencoded'}
});
request.success(function (data) {
$('#message-received').hide();
$('#message-received').html('<em><span style="font-size:12px; color:white">Your message has been successfully sent!</span></em> <span style="color:#FB3F43" class="glyphicon glyphicon-ok"></span><br/><img style="width:100%; border:1px solid #FB4848; border-radius:10px;" src="images/clients/myimage.jpg">').fadeIn(3000);
$scope.email = '';
$scope.name = '';
$scope.phone = '';
$scope.message = '';
});
}
});
</script>
PHP Code
session_start();
if ($_SERVER['HTTP_X_REQUESTED_WITH'] == 'XMLHttpRequest') {
    //Request identified as ajax request
} else {
    die("No direct access");
}
$postdata = file_get_contents("php://input");
$request = json_decode($postdata);
$email = $request->email;
$password = $request->name;
$subject = $request->subject;
$content = $request->message;
$csrf = $request->csrf;

$session_array = $_SESSION['csrfs'];

//echo "CSRF: ". $csrf . " and CSRF Session: " . $_SESSION['csrf'] . print_r($_SESSION['csrfs']) . print_r($_SESSION);

if ($csrf == $_SESSION['csrf'] || in_array($_SESSION['csrf'], $session_array)) {

    $to = "test@example.com";
    $headers = "From: $email" . "\r\n";
    mail($to, $subject, $content, $headers);
}

$_SESSION = array();
Laravel is a popular PHP framework and may programmers and employers like to use a framework. Using a framework encourages decent coding methods and can help keep code organized and secure.
Now that you know that you want to build a web application with Laravel, here are the essentials to get up and running.
Step # 1 Installation
So, you go to Laravel’s website or Google around, and you see that a common way to install it is by using composer. What you say? Why I can’t I just download a zip and be good to go. Well, you can actually do that by going to github and making a download. For example, you can download Laravel from Guthub at https://github.com/laravel/laravel.
However, using composer is a pretty good idea and it makes it very easy to install other frameworks like Symfony as well. So, let me help straighten you out about composer.
For Windows, you can download composer at https://getcomposer.org/download/. After that, you can open or reopen a command prompt and type composer. You will see that it works. The code below will download laravel and install it to a folder named laravel-composer. You can now build your application here.
C:\xampp\htdocs> composer create-project –prefer-dist laravel/laravel laravel-composer
Step #2 Using the Framework
After that, you will need to know how the framework operates. Let’s start by building a static webpage. In order to be able to display any page, you need to set a route for get or post requests. Since this exercise is simple, the focus will be on a get request.
routes.php located at app\Http\routes.php
Open this file and add the following code.
Route::get('test', 'TestController@get_index');
Here is the breakdown. The test parameter is the file url. Thus, the url on a localhost xamp server at home would be http://localhost/laravel5/public/test. The code before the ‘@’ symbol refers to the controller and filename located in the app\Http\Controller folder. Thus, when the url is referred to in the browser, the TestController.php and the TestController class is used. The get_index after the ‘@’ symbol refers to the method that is called within the class.
So, now, lets make a TestController.php file and write the appropriate class and methods. The simple code is shown below.
<?php
namespace App\Http\Controllers;

use App\Http\Requests;
use Auth;
use Input;
use Illuminate\Support\Facades\Redirect;
use Illuminate\Support\Facades\Validator;
use Illuminate\Support\Facades\View;

class TestController extends Controller
{
    public $restful = true;

    public function get_index()
    {

        $title = "My Test Title";

        $data = "Foo";
        $title = "Bar";

        $myArray = array('apples','oranges');

        return View::make('test.index')
            ->with('data', $data)
            ->with('title', $title)
            ->with(array('name' =>"first", 'age' => 'last'))
            ->with('myArray',$myArray);
    }

    public function post_index()
    {
        $title = "Test page";
        $input = Input::all(); // gets all input from forms
        $rules = array('html_begin' => 'required', 'html_end' => 'required');
        $v = Validator::make($input, $rules);
        if ($v->fails()) {

            return Redirect::to('login')->with_errors($v);
        } else {

            $data = array('html_begin' => $input['html_begin'], 'html_end' => $input['html_end']);

            return View::make('test.success')
                ->with('data', $data)
                ->with('title', $title);

        }
    }

}
After the workhorse file which does the heavy lifting is finished, you can make the view file.
View Files
Look for the folder called resources\views. Now, make another folder called test. Within this folder, make a file called index.blade.php. This is the file that is rendered from the TestController. As you can see, the variables and arrays created in the controller are parsed within curly tags. For example, this is a vairable {{ $variable }} and this accesses an array item {{ $array[key] here }}.
<html>

<body><div class="row">
    <div class ="span4 offset4">
        <div>{{ $title }} add variables here {{ $name }} and parsing array is {{ $myArray[0] }} and {{ $myArray[1] }}</div>
        <div class="bs-example well-sm" style="border:1px solid #C1BFBF; width:250px; border-radius:1em; margin: 0 auto; ">


        </div>
    </div>
</div>
</body></html>
Without getting too heavy with theory, these simple points makes it easy to piece together your logic and views. Although only single templates are used in this example, you can create master templates for an application to keep separate files for headers, footers, etc.
@extends('master')
@section('content')
<div class="row"> <div class ="span4 offset4"> <div>{{ $title }} add variables here {{ $name }} and parsing array is {{ $myArray[0] }} and {{ $myArray[1] }}</div> <div class="bs-example well-sm" style="border:1px solid #C1BFBF; width:250px; border-radius:1em; margin: 0 auto; "> </div> </div> </div>@endsection
Here is explanation about what is happening above. The master template file sits only folder up from the current view file. Thus, this current file extends the master template. The content between the @section tags is displayed in the master.blade.php file because it has a line that reads @yield(‘content’). The line displays the content from the page in the exact spot.
Conclusion:
So there you have it, a simple web app. The next stage would be to setup a database that you can use for an application. When using a database, you will execute queries within your controller. The syntax is very similar to typical PHP / mySQL queries.
This article is about customizing a WordPress theme with custom html, css, javascript and php. It will not refer to plugins that can be added to themes, but, rather refer to how you can add your own code to the current template files.
For starters, your WordPress website will have a current theme that will style your home page, posts, pages and other such navigational pages like categories and archives. A good reference to see what exists in a typical WordPress page can be found at the WordPress.org website theme development.
Please keep in mind that many custom themes that are free or paid may have their own custom named files that handle specific requests; such as a page that lists of posts of a specific category, or archived pages based on the date.
To edit the pages, you need to know where they are. You have two means of editing the content; one through the WordPress backend and the other from editing files within the wp-content/themes/mythemename folder.
Method #1: WordPress backend
If you plan to use the WordPress backend, you can find them at Appearance >Editor. After you select ‘Editor’, the pages will be displayed on the right hand side of the screen. Do note, that some themes can extend another theme and that means you need to go to a parent theme in order to make your desired changes.
Once you make the changes, you can simply click the ‘Update File’ button of the bottom of the page that you are editing. If you plan to edit content this way, I recommend backing up the wp-content folder or file in order to have a disaster-proof plan.
Method #2: Files From Directory
If you navigate to the wp-content/themes/mytheme(your actual theme you are using) folder, you can edit any of these files as you want. Thus, you can open your favorite editor and code away.
This simple lesson will show how to use the Jquery serialize() function to pass all form data to an ajax file. With the serialize() function, it is very easy to pass all form data name and values to the ajax file without having to send them all separately.
I will go over this in detail. When the user inputs a name in the text input box and clicks ‘Submit it’, the Jquery .submit() method is triggered. We pass in the e into the function and use e.preventDefault() method too because you do not want the usual form submission to happen….which would be a typical post request that would reload the page.
After that, the formData variable is created and it contains the names and values from the form. Then, it is passes into Ajax for which it is sent to the ajax_1.php file.
After it arrives to the ajax_1.php file, the parse_str() function is used to make an array from that serialized data. In that array, is the first name that was entered into the text field. Thus, the value of that posted test becomes $myArray[‘myFirst’]. Remember that myFirst was the name of the input text box.
After that, it is pretty much a simple mySQL query that finds all users with that first name. Finally, the names are printed in two separate ‘div’ elements. Note that the printed text in the ajax file is handled as the msg variable in the original file.
Thus, there are two places and methods for which the same text is printed; one using vanilla javascript and the other using Jquery.
<!DOCTYPE html>
<html>
<head>
    <script src="https://ajax.googleapis.com/ajax/libs/jquery/1.12.0/jquery.min.js"></script>

    <script type="text/javascript">

        $(document).ready(function () {

            $('form').submit(function (e) {
                e.preventDefault();

                var formData = $(this).serialize();

                $.ajax({

                    type: "POST",
                    cache: false,
                    url: "ajax_1.php",
                    data: {myData: formData},

                    success: function (msg) {
                        //alert("Success!");
                        document.getElementById("vanillajs").innerHTML = msg;
                        $("div#jqueryjs").html("<p>" + msg + "</p>");

                    }

                });

            });

        });

    </script>
</head>
<body>
HTML

<form method="POST" action="" id="login">
    <input id="myFirst" type="text" name="myFirst" value=""/>
    <input id="contacted" class="contacted" type="submit" name="contacted" value="Submit it"/>
</form>

<div id="vanillajs"><b>Person info will be listed here.</b></div>

<div id="jqueryjs"><b>Person info will be listed here.</b></div>

</body>
</html>
The code below is represents the ajax_1.php which handles the data made from the original page. The code is very limited and although it shows how to handle the data, any production server would need a layer of security built around it so unauthenticated users and web robots would be unable to cause damage.
function PDO_Connect()
{
    $user = 'root';
    $pass = '';
    $PDO = new PDO('mysql:host=localhost;dbname=abook', $user, $pass);
    $PDO->setAttribute(PDO::ATTR_ERRMODE, PDO::ERRMODE_WARNING);
    return $PDO;
}

$PDO = PDO_Connect();

parse_str($_POST['myData'], $myArray);

$first = trim($myArray['myFirst']);
//echo $first;

$command = "SELECT * FROM leads WHERE firstname=TRIM(:first)";
$result = $PDO->prepare($command);
$result->bindParam(':first', $first);
$result->execute();
$rows = $result->fetchAll(PDO::FETCH_ASSOC);
//print_r($rows);
foreach ($rows as $row) {
    echo "<br/> " . $row['firstname'] . " " . $row['lastname'];
}
After many years running a blog on Joomla 1.5, I decided to migrate to the latest WordPress since it was useless without a responsive design.
I chose WordPress rather than upgrade to the latest Joomla 3.XX for many reasons. One of those reasons are that Joomla 1.5 had so many security issues that had to be addressed; even to the limit of disabling all file uploads to the website account, removing all third party editors, and more.
WordPress was also selected because it is simpler to just create a new template and code PHP however you desire.
The final deal breaker was that WordPress had free migration plugins while Joomla was going to cost.
So, here is how I made the migration that had about 800 blog posts filled with code blocks and illustrations. After all, the blog was about Lampstack development.
- Installed WordPress to a subfolder
- Installed the FG Joomla to WordPress plugin.
- Opened the Joomla configuation.php to copy the database details into the FG Joomla to WordPress plugin.
- Ran the plugin to make the upgrade. The upgrade happened very quickly and moved images, text, etc.
- Installed a desired WordPress theme that looked good with the content.
- Made minor changes to code blogs as a little formatting was lost.
Moving WordPress from a subfolder to a root folder can be very quick and easy. This example will explain how to move it from a subfolder like example.com/wordpress to the root folder example.com.
For simplicity, this tutorial will use the subfolder ‘wordpress’ for instructional purposes.
The first thing to do is copy the files from the wordpress subfolder to the root folder. This can be done with ftp or Linux command line.
Once the files are moved the root folder, logging into the new admin at example.com/wp-admin can be problematic. So, here is what you can do after you moved the files.
Login to your Cpanel or phpMyAdmin. Hopefully, you have phpMyAdmin or some other mySQL admin manager. Once you have logged in, open up your database. At this point, you will have access to all the tables.
A quick way to find the old url in database tables is to search all tables for the string like ‘example.com/wordpress’. You will then see a list of tables like wp_options. If you used a different prefix than the default, the table would be yourprefix_options. In this table, you will want to change the option_name fields which are site_url and home. They are the first two items in the list. Meanwhile, you may want to change recently_edited.
Changing Posts
Now, if you have old links you may want to update them. The code below will remove the wordpress subfolder from the url so that image links and other links will work within the current folder.
UPDATE `wp_posts`
SET `post_content` = replace(post_content, ‘example.com/wordpress’, ‘example.com’)UPDATE `wp_posts`
SET `guid` = replace(guid, ‘example.com/wordpress’, ‘example.com’)
Asides from that, you may want to check your .htaccess file and make sure rewritebase is ‘RewriteBase /’ and not ‘RewriteBase /wordpress’.
The purpose of this article is to explain several options for which to use PHP and Ajax. Ajax has been around a long a time and there are multiple reasons why a developer would want to use it.
However, what ranks it high on the list is its ability to make a call to another file and return data that can be presented on a page without the need for a refresh. The data from the requested file can be a string or data queried from a database.
But, retrieving data without refreshing is only one such advantage of Ajax. You may want to post data to the Ajax file and perform any CRUD operation like Insert, Update or Delete as well as return updated information. All this is possible with Ajax.
How is a typical Ajax Request Performed?
To start with, it often begins with a POST or GET request that sends variables to the Ajax file. Since POST is more secure and often the programmer’s choice for dealing with data from forms, the following examples will explain how to make Ajax calls with POST variables.
Although the examples in this tutorial will show how to output data on the page without a refresh, please keep in mind there are two important ways to do this. One method, is to print a string in the Ajax file while the other is to print JSON data from the Ajax file. With the former, you can easily output any desired HTML as a string and it will magically appear exactly as you code it in the called Ajax file.
However, if you decide to print(echo) JSON data from the file, you have the option to parse it and manipulate it in Jquery which can allow for many more options in terms of placing various portions of data on the page. If that sounds confusing, the examples should make it much easier to see how it is done.
Now, let’s let the examples take over. Each example consists of 2 files. One file is the page that is loaded in the browser and the Ajax file is the one that is called from the main file.
Example #1
Overview
When the button with the ‘contacted’ class is clicked, it triggers the Jquery. After the click function, the Javascript variable myurl is the value of ‘yahoo.com’.
Immediately after the variable creation, the Ajax shown by ‘$.ajax’ takes over. As you can see, it is a POST request that calls the my_ajax_print_php.php file.
This variable myurl is posted as my_variable, thus, when it arrives at the Ajax file it becomes $_POST[‘my_variable’].
Once the variable arrives at the Ajax file, you can do whatever you want with it. If you look at the file in this example, you see a potential query you can use to output data. Meanwhile, I will explain what is happening in this case since we are only going to parse an array.
The array is parsed and printed. But, keep in mind that this takes place in the success function in the main file. The entire data that was printed in the Ajax file becomes the variable msg. As you can see, that output is sent to 2 locations on the page; the first is the div element with the id ‘vanillajs’ and the second is the div element with the id ‘jqueryjs’.
Main File
<!DOCTYPE html>
<html>
<head>
    <script src="https://ajax.googleapis.com/ajax/libs/jquery/1.12.0/jquery.min.js"></script>


    <script type="text/javascript">

        $(document).ready(function () {

            $('.contacted').click(function () {

                var myurl = $(this).siblings('#myurl').val();

                $.ajax({

                    type: "POST",
                    cache: false,
                    url: "my_ajax_print_php.php",
                    data: {my_variable: myurl},

                    success: function (msg) {
                        alert("Success!");
                        document.getElementById("vanillajs").innerHTML = msg;
                        $("div#jqueryjs").html("<p>" + msg + "</p>");

                    }

                });

            });

        });

    </script>
</head>
<body>
HTML

<form method="POST" action="">
    <input id="myurl" type="hidden" name="contacted_url" value="yahoo.com"/>
    <input id="contacted" class="contacted" type="button" name="contacted" value="Submit"/>
</form>

<div id="vanillajs"><b>Person info will be listed here.</b></div>

<div id="jqueryjs"><b>Person info will be listed here.</b></div>

</body>
</html>
Ajax File
/* Query Sample
$user_id = mysqli_real_escape_string($db,$_POST[‘my_variable’]);
$command = “SELECT * FROM user WHERE id = ‘” . $user_id . “‘”;
$result = mysqli_query($db, $command);
while ($row = mysqli_fetch_array($result)) {
echo $row[‘FirstName’] . “<br/>”;
}
*/
Example #2
This next example will be very similar to the first example, except the data will be returned as JSON and manipulated with Jquery. If you look closely, the main difference is the addition of the DataType:JSON is the Ajax request and the printed data from the Ajax file uses the json_encode() function.
Asides from those two details explained above, you will see the output is more complicated. With the Ajax file, there are 2 numbers arrays that are created. Thus, each of those transforms into msg[0] and msg[1]. Within each array, there are items which take on indexed values. Thus, The number 2 from the first array is actually msg[0][1]. Always remember keys start at 0 and not 1, thus msg[0][1] is the first array with the second item.
If you look at the HTML and compare with the Jquery inside the success function, you will see why those numbers are what they are.
Main File
<!DOCTYPE html>
<html>
<head>
    <script src="https://ajax.googleapis.com/ajax/libs/jquery/1.12.0/jquery.min.js"></script>


    <script type="text/javascript">


        $(document).ready(function () {

            $('.contacted').click(function () {

                var myurl = $(this).siblings('#myurl').val();

                $.ajax({

                    type: "POST",
                    cache: false,
                    url: "my_ajax_indexed.php",
                    data: {my_variable: myurl},

                    success: function (msg) {
                        alert("Success!");
                        document.getElementById("vanillajs").innerHTML = msg[0][3];
                        $("div#jqueryjs").html("<p>" + msg[1][2] + "</p>");
                        //$( "div#jqueryjs" ).html("<p>Add here</p>");

                        jQuery.each(msg, function (key, val) {
                            alert(key + "=" + val);
                            jQuery.each(val, function (key2, val2) {
                                alert(key2 + "=" + val2);
                            });
                        });
                    },
                    dataType: "json"

                });

            });

        });

    </script>
</head>
<body>
HTML

<form method="POST" action="">
    <input id="myurl" type="hidden" name="contacted_url" value="yahoo.com"/>
    <input id="contacted" class="contacted" type="button" name="contacted" value="Submit"/>
</form>

<div id="vanillajs"><b>Person info will be listed here.</b></div>

<div id="jqueryjs"><b>Person info will be listed here.</b></div>

</body>
</html>
Ajax File
Example#3
This final example shows an associative array that is printed in the Ajax file and manipulated in the Jquery from the main file. This example is very similar to the last example since it returns a JSON string. The difference is that the arrays are associative; thus have named keys instead of numerical keys like the ones in the previous example. Like the previous example, there are two arrays that become msg[0] and msg[1]. Therefore, to access any item from the first array can be done by using msg[0] followed by the item key. Thus, the item from the second array with a key of 6 can be accessed in Jquery as msg[1].six.
Main File
<!DOCTYPE html>
<html>
<head>
    <script src="https://ajax.googleapis.com/ajax/libs/jquery/1.12.0/jquery.min.js"></script>


    <script type="text/javascript">


        $(document).ready(function () {

            $('.contacted').click(function () {

                var myurl = $(this).siblings('#myurl').val();

                $.ajax({

                    type: "POST",
                    cache: false,
                    url: "my_ajax_multi.php",
                    data: {my_variable: myurl},

                    success: function (msg) {
                        alert("Success!");
                        document.getElementById("vanillajs").innerHTML = msg[0].three;
                        $("div#jqueryjs").html("<p>" + msg[1].eight + "</p>");
                        //$( "div#jqueryjs" ).html("<p>Add here</p>");

                        jQuery.each(msg, function (key, val) {
                            alert(key + "=" + val);
                            jQuery.each(val, function (key2, val2) {
                                alert(key2 + "=" + val2);
                            });
                        });
                    },
                    dataType: "json"

                });

            });

        });

    </script>
</head>
<body>
HTML

<form method="POST" action="">
    <input id="myurl" type="hidden" name="contacted_url" value="yahoo.com"/>
    <input id="contacted" class="contacted" type="button" name="contacted" value="Submit"/>
</form>

<div id="vanillajs"><b>Person info will be listed here.</b></div>

<div id="jqueryjs"><b>Person info will be listed here.</b></div>

</body>
</html>
Ajax File
Ajax Security
The previous examples have shown how to use Ajax with simple, limited coding. But, in the real world, security should never be left out during the building process. With Ajax, sessions persist which means you can make files only accessible to authenticated uses. On top of that, you could also track what authenticated users are making Ajax requests, bit, you may find that unnecessary.
In addition, to securing your Ajax requests by using authenticated sessions, you can add a session and a hidden input to eliminate Cross Site Request Forgery since the token in the hidden input must match the session on the server, something a malicious user cannot spoof. In addition to that, you can filter any output with htmlentities() function in order to make sure that potential scripts in database fields cannot be executed.
This tutorial will use a simple example regarding how to return methods and objects from a class. Although the code is not optimal for production use, it does demonstrate a process for which the class is instantiated, and a database object is used for database queries.
Here is a summary of what is going on. The line below instantiates a new instance of the MyObject class. Since the constructor is triggered first, it runs the $this->set_connection() method.
When that method runs, it makes the property $this->connection to take on the returned value from the PDO_Connect() method.
Thus, the $PDO->connection is used to access the database. For code readability, you would likely just make a simpler connection, like that shown in the page https://fullstackwebstudio.com/locations/coding-blog/pdo-database-connection.html
In addition to the above, you can also access the the database variable using the get_connection() method and that example is at the end of the file.
class MyObjects
{

    public $var1 = "test";
    private $var2 = "test2";
    protected $var3 = "test3";
    public $connection;
    public $PDO;

    function __construct()
    {
        $this->set_connection();

    }

    function PDO_Connect()
    {
        $user = 'root';
        $pass = '';
        $PDO = new PDO('mysql:host=localhost;dbname=test', $user, $pass);
        $PDO->setAttribute(PDO::ATTR_ERRMODE, PDO::ERRMODE_WARNING);
        return $PDO;
    }


    public function set_connection()
    {
        $this->connection = $this->PDO_Connect();
    }

    public function get_connection()
    {
        return $this->connection;
    }

}


$PDO = new MyObjects();
print_r($PDO);
echo "<br/><br/>";
echo "Var1: $PDO->var1";
echo "<br/><br/>";
//var_dump($PDO->connection); //object(PDO)#2 (0) { }
//echo "<br/><br/>";
$PDO = $PDO->connection;

$command = "SELECT * FROM leads";
$result = $PDO->prepare($command);
$result->execute();

echo "<strong>Method A</strong>";

echo "<ol>";

while ($row = $result->fetch(PDO::FETCH_ASSOC)) {
    echo "<li>Name: {$row['firstname']} - {$row['lastname']}</li>";
}
echo "</ol>";

echo "<strong>Method B</strong>";

$test = new MyObjects();
$db = $test->get_connection();

$command = "SELECT * FROM leads";
$result = $db->prepare($command);
$result->execute();

echo "<ol>";

while ($row = $result->fetch(PDO::FETCH_ASSOC)) {
    echo "<li>Name: {$row['firstname']} - {$row['lastname']}</li>";
}
echo "</ol>";
So, there you are, you have purchased a PHP script, or you have found yourself in front of your coding editor with some foreign code and you are trying to piece it together.
For a decent working script, all the coding will have a logical way to mak things work, or it will not function properly. That does not mean it is as organized as you would like.
For example, you may have a script with various files of more than 1000 lines of code and they continue to cross reference methods, classes, and functions from various files.
But, when you have found the spot in your coding where you will want to make changes, alter variables, or work with session values, you can always use a few built in PHP functions to see what variables, functions, objects and sessions are available at the precise line of code.
Within the code block further on in the article, you can see a simple PHP page that has a session, function, class, variables and objects.
The functions below will explain what they do. You can reference the code to see what data they are grabbing.
1.
get_class_vars("GetThem")
Retrieve variables within the class.
2.
get_object_vars($objectvariables)
Retrieve the new object variables that are declared 'outside' of the class.
3.
get_defined_vars()
Retrieve defined variables in a page, but, it won't grab variables within a function unless that is where you use this function.
4.
get_defined_functions()
Retrieve the function in the file. You can view internal and user defined functions.
5.
print_r($_SESSION)
Retrieve the session variables in the page.
session_start();
$_SESSION['test'] = 'test';

function test(){
    $var_in_function = "var in function will not be a defined variable";
    return $var_in_function;
}

class GetThem
{
    public $var = 10;
}

var_dump(get_class_vars("GetThem")); //outputs array(1) { ["var"]=> int(10) }
echo "<br/><br/>";

$objectvariables = new GetThem();
$objectvariables->var = 20;

var_dump(get_object_vars($objectvariables)); //outputs array(1) { ["var"]=> int(20) }
echo "<br/><br/>";

$var_out = test();
print_r(get_defined_vars());
echo "<br/><br/>";

$functions = get_defined_functions();
print_r($functions['user']); // outputs Array ( [0] => test )

echo "<br/><br/>";
print_r($_SESSION); //outputs Array ( [test] => test )
You can use several methods to not allow web surfers to access files directly. One method can be done with an Apache configuration or .htaccess and another is to define a constant in a file and include the other file while making sure the constant was defined.
Method #1 Apache and .htaccess
With this method, you name your more sensitive include files with an extension like ‘.inc’, or even better ‘.inc.php’. Then, you add a little code into the .htaccess file so that it cannot be accessed directly through the browser or by bots, etc.
<Files ~ ".inc"> Order allow,deny Deny from all </Files>
Method #2 Constants
In one file, you can define the constant my_pdo and include the file you want to protect.
File #1
define('my_pdo', true); include("file2.inc.php";
File #2
In the other file, you do a simple check by adding the following code to the top. As you can see, it will die and print out a message if it is accessed directly.
if(!defined('my_pdo')) { die('Direct access not permitted'); }
With PHP, using the array_push() function and $newarray[] syntax is an easy way to make arrays from a foreach or while loops. However, both methods create indexed arrays and may not be adequate to build the array you want.
For example, you may have a loop that is pulling data from two columns in a database and you just want a simple associative array that contains the matching key and value.
The $user_array that is commented out is the same array you want from the while loop. As you can see, the value from the the ‘access_level’ column is the key and the value from the ‘name’ column is the value.
//$user_array = array(1 => 'admin', 2 => 'managers', 3 => 'members', 4 => 'public');

$command = "SELECT DISTINCT access_level, name FROM access_level";
$result = $PDO->prepare($command);
$result->execute();

$user_array = array();
while ($row = $result->fetch(PDO::FETCH_ASSOC)){
    $user_array[$row['access_level']] = $row['name'];
}
When using mySQL for PHP applications, you normally connect to a database using a function. Some popular methods are mysql_connect(), mysqli_connect()and PDO objects. This simple example will explain how to do it using PDO.
PDO has all sorts of advantages, such as binding parameters to a query so that mySQL handles the variable separately.
The following examples explain how to connect with PDO and return it from a function.
File: _pdo.php The Function
The function below creates a new object instance and return the $PDO object for making our desired queries. Above the function, the code is used to not allow direct access to the file.
Asides from knowing more code and how it works is always better than just winging it, the only editing you would need to make to the file is to provide your database name, database user and database user password. These values are created when you create a new mySQL user with the command line, or tool like Cpanel.
if(!defined('my_pdo')) {
    die('Direct access not permitted');
}

function PDO_Connect()
{
    $user = 'databaseuser';
    $pass = 'databaseuserpassword';
    $PDO = new PDO('mysql:host=localhost;dbname=mydatabasename', $user, $pass);
    $PDO->setAttribute(PDO::ATTR_ERRMODE, PDO::ERRMODE_WARNING);
    return $PDO;
}
File Connection Calling the Function
The file below defines a constant called my_pdo that will allow you to access the _pdo.php file. Remember from the last example that it is located above the function.
After that, the _pdo.php file is included. Finally, the function is called and the database object is returned. The database object, $PDO is what will be used for making all database queries.
<?php
define('my_pdo', true);
include "_pdo.php";
$PDO = PDO_Connect();
Cross Site Request Forgery, aka CSRF and XSRF can be performed by targeting an authenticated web page when a user is logged in to a site, or, the user session(s) are still valid.
A popular method to perform this kind of attack is to draw a user to a webpage, like a forum or blog comment with a link that goes to a post page; such as one that could perform a delete request. Meanwhile, since the user is authenticated via valid sessions, it will perform the task at hand.
If the post page does an automatic update or deletion, or grabs information via the url using $_GET, that makes it even worse; since filtering and other such methods are not implemented.
Now, that you see that the post request is instigated from a foreign url, there are procedures that can stop this behavior in its tracks. The method being shown below uses a class and sessions that can ensure the post from the link will not do damage. This example can be used on pages that are submitted to itself, or, those that are submitted to another page.
Here is how it works.
1. Create a class called csrf and include it on the top of the file.
include("Classes/csrf.php");
2. Add the class code into the file csrf.php.The code below will do the work.
<?php

class csrf
{
    public $csrf;
    public $session;
    public $csrf_array = array();

    public function __construct()
    {
        $csrf = hash("sha1", rand() . time() . rand());
        $_SESSION['csrf'] = $csrf;
        $session = $_SESSION['csrf'];
        $this->MakeToken($csrf, $session);
    }

    public function MakeToken($csrf, $session)
    {
        $this->csrf = $csrf;
        $this->session = $session;

        array_push($this->csrf_array, $this->csrf, $this->session);
        return $this->csrf_array;
    }

}
3. Add the code below into the form file. This code only occurs when you land on a page that is not posted, or if the $_SESSION[‘csrf’] does not exist. If the page was posted from elsewhere, it would not exist, thus, it is created.
For example, if you had a page to delete members and came there securely, it would not have any post variables. Thus, the code below runs and calls the csrf class. In the example below, the class returns the property $csrf->session and uses it to make the $_SESSION[‘csrf’] variable.
That variable was created using functions in the class.
if (count($_POST) < 1 || !isset($_SESSION['csrf'])) {
    $csrf = new csrf();
    $_SESSION['csrf'] = $csrf->session;
}
4. Wrap the database code into the check. If you are tricked into clicking this link, your page will have the code below to ensure it is not from another site.
Since the code from the previous example will create the session for validation purposes only when the page has no post variables, or it has no $_SESSION[‘csrf’] variable, it will mismatch with the form submitted elesewhere.
Therefore, if it came posted from a form that was submitted from somewhere else(Cross Site) via a form submission or Javascript automatically submitting the form when you click a link, it will arrive at your page and the session variable from your site would invalidate the form because it needs to have the same token from a hidden input field as the one you created from the csrf class.
The code below clearly shows that if there is a match, do the database stuff, and, if not, it prints that there is a token mismatch.
if (htmlspecialchars($_POST['csrf'], ENT_QUOTES, 'UTF-8') == $_SESSION['csrf']) {
///do database work
 echo "Token matched! This was not cross site!";
} else {
            echo "Token Mismatch! Reload page and start over!";
        }
            $csrf = new csrf();
            $_SESSION['csrf'] = $csrf->session;
5. Add a hidden field into the form. This line below places a value from the token that was created in the csrf class. It is a number that a fake form would not have in order to match your value from the csrf class.
<input type="hidden" name="csrf" value="<?php echo $csrf->session; ?>"/>
Extras
Now the next question you may have is, “How the heck could someone time my opened session with the link and auto form submission?”
Although this may seem like a very unlikely condition, there are many methods for which this could take place. Clever hackers can figure out what pages are visited on a network, such as wifi cafes. This can provide details about a page or script; especially if it is something common like WordPress.
It could also show details about your email address. Thus, you could be lead from a mysterious email sending you to a page that performs this operation because you feel the need to click the link.
Protect Yourself
Although web applications can be secured from the coding, you can always keep problems minimized by not trusting strange emails, logging out after using an application, and not allowing sessions to stay alive for extended periods of time. If you are logged out, the CSRF attack would have not had even had gone to the checking stage.
The min() function in a mysql query will get the lowest desired value for a given field. The example below will obtain the oldest date between ‘2012-01-02’ and now.
<?php
include('connect.inc');
$db = public_db_connect();
public_db_connect();

$command = "SELECT min(date) as date FROM table_sort WHERE date < now() AND date > '2012-01-01' ";
$result = mysqli_query($db, $command);

while ($row = mysqli_fetch_assoc($result)) {
    $date = $row['date'];
    echo $date;
}
The two examples will show how to make upper and lowercase strings using PHP and mySQL. With mySQL, it is performed in the query. With PHP, built in PHP functions are used.
<?php
include('connect.inc');
$db = public_db_connect();

$command = "SELECT DISTINCT LOWER(firstname) as first, UPPER(lastname) as last, LOWER(Email) as email FROM table_sort WHERE id >0 ORDER BY last ASC";
$result = mysqli_query($db, $command);
while ($row = mysqli_fetch_assoc($result)) {
    $firstname = $row['first'];
    $lastname = $row['last'];
    $email = $row['email'];
    echo $firstname . "-" . $lastname . "-" . $email . "<br/>";
}
<?php
include('connect.inc');
$db = public_db_connect();

$command = "SELECT DISTINCT firstname, lastname, email FROM table_sort WHERE id >0 ORDER BY lastname ASC" ;
$result = mysqli_query($db, $command);
while($row = mysqli_fetch_assoc($result)){
    $firstname = strtolower($row['firstname']);
    $lastname = strtoupper($row['lastname']);
    $email = $row['email'];
    echo $firstname."-".$lastname."-".$email."<br/>";
}
The demo will shows how to remove ‘cm’ and ‘lbs’ from strings in a table. For example, there are 2 columns in a table; one for weight and the other for height. The data in each table shows numbers like 180 cm and 175 lbs. But, for our records, we want just the numbers like 180 and 175.
The code does a 2 replacements for height and weight. As you can see, whitespace is removed and so are the ‘cm’ and ‘lbs’.
<?php
include('connect.inc');
$db = public_db_connect();

$command = "SELECT DISTINCT LOWER(firstname) as first, LOWER(lastname) as last, LOWER(Email) as email,  replace(replace(height,' ',''),'cm','') as height, replace(replace(weight,' ',''),'lbs','') as weight, date FROM table_sort WHERE id >0 ORDER BY last ASC";
$result = mysqli_query($db, $command);
while ($row = mysqli_fetch_assoc($result)) {
    $firstname = $row['first'];
    $lastname = $row['last'];
    $email = $row['email'];
    $height = $row['height'];
    $weight = $row['weight'];
    echo $firstname . "-" . $lastname . "-" . $email . "-" . $height . "-" . $weight . "<br/>";
}
The trim() is very useful to remove whitespace before and after any data; thus your strings will be precise characters. The code below shows a form. When the form is submitted, the $_POST variables are escaped and trimmed of any potential whitespace.
<?php
include('connect.inc');
$db = public_db_connect();
if (count($_POST) > 0) {

    $firstname = mysqli_real_escape_string($db, trim($_POST['firstname']));
    $lastname = mysqli_real_escape_string($db, trim($_POST['lastname']));
    $height = mysqli_real_escape_string($db, trim($_POST['height']));
    $email = mysqli_real_escape_string($db, trim($_POST['email']));
    $age = mysqli_real_escape_string($db, trim($_POST['age']));
    $weight = mysqli_real_escape_string($db, trim($_POST['weight']));
    $command2 = "INSERT INTO table_sort3 VALUES (NULL, '$lastname', '$firstname', '$email', '$height', '$age', '$weight', now()) ";
    $result2 = mysqli_query($db, $command2);
    if ($result2) {
        echo "Successsul Update!";
    }
}

?>
<form method="post" action="">
    Lastname:<input type="text" name="lastname" value=""/><br/>
    Firstname:<input type="text" name="firstname" value=""/><br/>
    Email:<input type="text" name="email" value=""/><br/>
    Height:<input type="text" name="height" value=""/><br/>
    Age:<input type="text" name="age" value=""/><br/>
    Weight:<input type="text" name="weight" value=""/><br/>
    <input type="submit" name="submit" value="Submit"/>
</form>
The following code will grab rows from a table and add the to the $members array. During each loo, the in_array() function checks and makes sure the value from the ‘id’ column is not a duplicate. The ‘continue;’ will restart the loop if a duplicate exists.
This is just a demo. In reality, the ‘id’ field would be a primary key and autoincrement, thus, the array would be unique anyhow.
<?php
include('connect.inc');
$db = public_db_connect();
$members = array();
$command = "SELECT * FROM table_sort WHERE id > 0";
$result = mysqli_query($db, $command);

while ($row = mysqli_fetch_assoc($result)) {
    $memberID = $row['id'];
    $first_name = $row['firstname'];
    $last_name = $row['lastname'];
//echo $memberID;

    if(in_array($row['id'], $members)){continue;}
    $members[] = $memberID.",".$first_name.",".$last_name;
}

print_r($members);
Here is a simple example that shows how to combine arrays with data queries from two database tables.
<?php
include('connect.inc');
$db=public_db_connect();

// names from table #1
$command = "SELECT * FROM table_sort ";
$result = mysqli_query($db, $command);

while($row = mysqli_fetch_assoc($result)){

    $firstname = $row['firstname'];
    $lastname =  $row['lastname'];
    $array_list[] = $firstname."-".$lastname;
}

// names from table #2
$command2 = "SELECT * FROM table_sort2 ";
$result2 = mysqli_query($db, $command2);

while($row = mysqli_fetch_assoc($result2)){

    $firstname = $row['firstname'];
    $lastname =  $row['lastname'];
    $array_list[] = $firstname."-".$lastname;
}

// names from table #3
$command3 = "SELECT * FROM table_sort3 ";
$result3 = mysqli_query($db, $command3);
while($row = mysqli_fetch_assoc($result3)){

    $firstname = $row['firstname'];
    $lastname =  $row['lastname'];
    $array_list[] = $firstname."-".$lastname;
}

print_r($array_list);
You can use the variable $page_title in the head section to create the page title within the meta tags. The example is shown below.
<?php
//get the url of the page with the curl() function
$my_url = curl();

$findme = 'mysite.com/category/subcategory';
$pos = strpos($my_url, $findme);

if ($pos == true) {

    $my_url_trimmed = str_replace("http://www.mysite.com/category/subcategory/", "", $my_url);

    $command = "SELECT tb1.id, tb1.col1, tb1.col2 from tablename as tb1 WHERE tb1.id='$my_url_trimmed';";
    $result = mysqli_query($db, $command);
    if ($result && mysqli_num_rows($result) > 0) {
        while ($row = mysqli_fetch_assoc($result)) {

            $space = " ";
            $gap = " | ";
            $location = $row["col1"];
            $page_title = $row["col2"] . $space . $location . $gap;

        }
    }
}

<title><?php echo $page_title; ?> </title>
Throughout the past few years, node.js has caught alot of people’s attention, including myself. So, I hope to explain in my own words, when and how I would use node.js. This is written from the perspective of a web developer who dominantly hand codes PHP, mySQL, HTML and CSS programmer.
After Googling many different queries about node.js, you often find nothing about node.js vs html. Since basic Bootstrap websites will be more efficient than using a server side language, this can be chalked up as old school technology still being the most effective, especially with caching. So, for a small website with under 8 pages and hardly any future changes, HTML would be unbeatable, at least until someone tells me convincingly different.
With all that said, I spent the better part of a week setting up node applications…including Ghost. After the usual ‘things not going real smoothly’, I did end up getting everything to work out on an Ubuntu 14 installation and learned the basic ins and outs of the setups; including startup scripts with Linux.
About The Present
When I look at these three links from w3techs.com, it shows how WordPress is still dominating market share and PHP is over 81% of the server side market share. Javascript shows only 0.2% market share and Node.js shows 0.1%.
http://w3techs.com/technologies/overview/content_management/all
http://w3techs.com/technologies/overview/programming_language/all
http://w3techs.com/technologies/details/ws-nodejs/all/all
Back to WordPress. The reason I use the WordPress example is to show that it is increasing in usage and market share. The link http://w3techs.com/technologies/details/cm-wordpress/all/all shows this.
What I am trying to get at here is that from a web developer’s perspective, there are so many WordPress and PHP sites that taking over these works or rehosting them is likely going to happen in the form of their current technology, or from using httrack to convert them to plain, old HTML. Making a makeover to Node will take more time and unlikely be appealing, especially cost-wise to a client.
So, from a typical web developer’s point of view, turning your back on popularity is not an option. On top of that, the race for better hardware is always on the up and up. So, although technology can make leaner, faster code, hardware can do the same.
And, for new websites, lean coding, strong caching(like Smarty Caching with PHP) and Varnish, and the realism that most clients are only capable of so much local traffic, I would likely not go to node.js. No only would the site take longer to build, but, the pros do not outweigh the cons.
Now, where I could use Node would be with the Ghost blogging platform because it is easy to setup, clone, and use. Also, it runs very fast and has decent documentation and templates.
When I Would Use Node JS
To put it bluntly, I would only use node.js to develop a web application that would need the ability to be very fast and handle very many users, or, with the Ghost blogging platform or newer complete applications that have a proven track record.
Typically, a custom node.js application would be a web developer’s dream application that had this potential to grow and prosper. However, realistically, this excludes almost any building of a typical small business website, or web application that would unlikely handle enough users to overload the hosting environment.
As far as custom coding goes, it would take some transition since it reminds me of a new experience with Smarty templating, using a PHP Framework, or trying to customize Joomla for the first time. Since node.js has synchronous and asynchronous ways of doing things, it is best to test and try rather than write code that will cause issues down the road.
With Cpanel and the mySQL console it is quite easy to backup a single mySQL database. But, if you have been in a situation where you are backing up a Cpanel account or have another scenario that includes multiple mySQL databases, you may find single mySQL database backups redundant.
Here is what you can do to back them all up in one shot.
Option# 1 Linux Command Line
root# mysqldump -u root -p --all-databases > /home/username/alldbs.sql
Option #2
Another option is to use a bash script and run it from the command line. Here is a link to a page that has this info.
Although it could be a hindsight or a mistake, you could have a Virtual machine that is almost out of disk space and you feel your only option is to resize it. If this is the case, this lesson will explain how you can do that.
The first step is to clone the fixed disk sized Virtual machine. The code is shown below.
In order to do this, you will need to open up the Command Prompt with administrative priviliges. For example, you may find it at All Programs >Accessories >Command Prompt. Just right click to open as an administrator.
Once you have opened it, you will need to navigate to the folder where the VBoxmanage.exe file is located. In this case, it isn located at ‘C:\Program Files\Oracle\VirtualBox’.
cd C:\Program Files\Oracle\VirtualBox
The next step is to use the clonehd command to clone a VDI file. The example is shown below and it uses 2 parameters at the end to state the VDI file type and to make it a standard VDI. A standard VDI is dynamic and resizable, unlike the original.
VBoxManage.exe clonehd "C:\Users\ted\VirtualBox VMs\Ubuntu 14_04 64-bit Clone\Ubuntu 14_04 64-bit Clone-disk1.vdi" "C:\Users\ted\VirtualBox VMs\Ubuntu 14_04 64-bit Clone\Ubuntu 14_04 64-bit Clone-disk2.vdi" --format VDI --variant Standard
Resizing the Disk Space
The command below can be used to resize the new clone into your desired size. In this case, it was made to be about 10 GB.
VBoxManage modifyhd "C:\Users\ted\VirtualBox VMs\Ubuntu 14_04 64-bit Clone\Ubuntu 14_04 64-bit Clone-disk2.vdi" --resize 10000
For more instructions, you can see a previous article about resizing dynamic disks used with Virtualbox.
2) Login to your Dynadot account.
2) Select ‘Your Account’.
3) Scroll down the page and look for Transfer Domain on the right hand side.
4) Login to GoDaddy and go to the desired domain you want to transfer. Domain Manager will have your list of domains.
5) Unlock the domain and get your AUTH code emailed to you.
6) Back at Dynadot, add the domain you want to transfer anbd put in the AUTH code.
7) At this point, you can check out the shopping cart with Dynadot.
8) Now, you will get an email from Godaddy to ‘Accept ‘ or ‘Decline’ the transfer. You obviously click ‘Accept’.
9) Finally, you just need to wait out the process.
I will keep this example short and sweet. The whole idea here is to pass the database connection into a PHP class. Within the class, the queries will execute and the results are returned as a usable string.
The Class
  class MyClass
{
    public $number;
    public $PDO;

    public function __construct($PDO)
    {
        $this->number($PDO);
    }

    public function number($PDO)
    {
        $command = "SELECT number FROM tablename WHERE id > 0 LIMIT 1 ";
        $result = $PDO->prepare($command);
        $result->execute();

        while ($row = $result->fetch(PDO::FETCH_ASSOC)) {
            $this->number = $row['number'];
        }
    }

    public function __toString()
    {
        return $this->number;
    }
}
This topic comes from a scenario for which a web developer decides to learn and understand CSS frameworks Like Bootstrap and Skeleton. After 3 years of dominantly programming PHP / mySQL applications and working mostly with static templates at work and some old school fluid templating, I began to build some responsive web applications and a handful of websites that used these frameworks.
Since the css classes were so sensitive, I kept modification of the template simple; such as removing unwanted divs that contained the ‘row’ class.
At first, I was intimidated because I remember someone with weak HTML / CSS skills struggling with it daily. With a quick look under the hood, it was quite different than typical CSS coding and the classes and new tags were unfamiliar and the floating methodology was new at the time.
Although using a CSS framework was a little intimidating at first, a light did eventually go off after coding with them on various occasions. All of a sudden, not only did these responsive frameworks make websites display so conveniently on all devices, but, actually coding a web application with them became easier with them than coding with traditional CSS.
The reason for the simplicity was the modular aspect of a CSS framework and the power of the classes. In many cases, the classes do great work and that minimalizes minor styling touch ups, if not at all. On occasion, you may want to add an id to an element that has a class, add some custom css, then move on.
Suddenly, the layout and each ‘row’ class and its subset of columns was so easy to work with and to use with PHP / mySQL.
Essentially, the bottom line is that using a Framework like Bootstrap or Skeleton can make your web pages look good and clean without taking a lot of time to achieve this effect. Thus, this allows for many instances to bypass any web design extras, asides from spending $5 here and there on Fiverr, Shutterstock and Fotolia for quality images.
Alternatively, using a framework can allow you to know how long a web designer should be able to complete tasks, if you decide to use one.
Some of the built in features to CSS frameworks are Font Awesome and icons. Using special class names will provide you with some extra styling as needed.
Below are some basic links to get you started with Bootstrap.
LINKS
Bootstrap and Skeleton Frameworks help you create responsive websites very quickly and easily. With this brief lesson, you will be shown some very basic tips for creating and working with the Bootstrap framework.
Using the Framework
In order to use the Bootstrap Framework, you need to download it from http://getbootstrap.com/ and move the core folders into your document root. Thus, you will have the three folders; css, fonts and js.
The next step is to add a link into the head of your HTML file.
<link href="css/bootstrap.min.css" rel="stylesheet">
At this point, you can start using Bootstrap. Since this is a very basic tutorial, I will attempt to explain the very basic classes that can be used to give solid, desirable, responsive results.
Container Class
The container class is the parent class that holds everything together and normally exists after the opening ‘<body>’ tag. It is a one time deal.
<div class="container">
</div>
Row Class
The row class contains a responsive group. Think of it like a class that holds one or more columns and puts them in order for a specific screen size. The first row can be used to create columns and a sidebar for the entire document.
You can have as many row classes as you want and they will present themselves to the viewer in the same order they are coded. Thus, if the first ‘row’ class has two columns and the second class has three columns, you will see all items of the first row class appear before you will see any items of the second ‘row’ class.
For example, on a home PC, you may see the first row class with 2 columns followed by the second row with 3 columns while the mobile phone user may see 7 single columns; all in order as they are coded.
In order as coded means that the first column in the ‘row’ class always appears first, followed by the second and so forth.
<div class="row">
</div>
Column Class
The column class, or classes, are children classes to the ‘row’ class. They are name with ‘col-md-*’. For example, they could named something like ‘col-md-12’, ‘col-md-6’, ‘col-md-4’.
The key to using these classes are to remember that all children classes that are used must add up to 12. For example, If you plan to have two columns, you would have two classes that are both named ‘col-md-6’. Meanwhile, a three column layout would use ‘col-md-4’.
The code belows shows a column that would expand the entire width.
<div class="col-md-12">
</div>
Putting it all together
<div class="container">

    <div class="row">

        <div class="col-md-12">
        </div>

    </div>

</div>
Other Possibilities
With those basics in mind, you can create layouts with multiple columns. To go one step further, you could make custom layouts within a row. Thus, you could have a large column that represents the main body with a class like ‘col-md-8’ and a sidebar with a class like ‘col-md-4’.
Below, is another example to create your main page and sidebar. This example uses the wrapper id, sidebar-wrapper-id and page-content-wrapper id.
<div id="wrapper">

    <!-- Sidebar -->
    <div id="sidebar-wrapper">
    </div>

    <!-- Main Page -->
    <div id="page-content-wrapper">
        <div class="container-fluid">
            <div class="row">
                <!-- Main Body Goes Here -->
            </div>
        </div>
    </div>

</div>
This tutorial will help get you up and running with the popular Bootstrap framework so that you can quickly create ad edit responsive websites using these tools.
1) Download from http://getbootstrap.com/getting-started/
The basic download will contain 3 folders; css, fonts and js while the source code will have a folder called ‘less’ which contains the ‘.less’ files for which can be coded using LESS pre-processor.
Although it is very easy to use the basic download that contains CSS files, using LESS has many advantages, especially on some projects where you want to use extra features like variables.
For example, setting a variable like @green : #1ed84a is much easier to reference than trying to remember a color for a new class or using a tool like ColorZilla to find a color.
The code below shows how easy it is to create the variable @green that can be used to represent a typical hex code #1ed84a. Two classes are shown below; one using LESS, the other using a conventional css class.
@green : #1ed84a
.my-class-less{color:@green}

.my-class-conventional{color:#1ed84a;}
When you work with LESS files, you have a couple of of options. Option number one is to add links to the document head and the other is to dowload a free compiler and do them on your own PC.
If you compile them on your own PC, they ‘.less’ file extension will get converted to the ‘.css’ format with the same name. Thus, bootstrap.less will be the working file that will create a browser copy called ‘bootstrap.css’.
<link rel="stylesheet/less" href="css/bootstrap.less">
<script src="js/less.js"></script>
After you downloaded the Source Code from the Bootstrap website, you can use your compiler right away. This will be covered shortly in detail.
To keep it simple, create a css folder within the parent folder that contains subfolders like dist, docs, fonts, grunt, js and less.
1) Open the Winless program.

The goal here is to be able to show and hide images with a single click. The code below will load the pages and its images by default. But, the viewer will have the option to hide them, or re-display them by clicking a button. The code bwlow contains the html with an image and the jquery that shows and hides it.
Jquery
Here is a quickrunover of the code below. When the ‘.hiding_them’ class is clicked, the function is triggered. Then, we check for image visibility. If the image is visible, it becomes hidden. On the contrary, hidden images will show up.
<script type="text/javascript">

        $(document).ready(function () {
            $('.hiding_them').click(function () {

                if ($('img:visible').is(":visible")) {

                    $("img").hide();
                } else {
                    $("img").show();

                }

            });
        });

    </script>
HTML
The input button has the class name ‘hdining_them’. Jquery will repond when that class is clicked.
<form id="myform" action="">
            <input class="hiding_them" type="button" name="hide_images" value="Show | Hide Images"/>

        </form>
The purpose of this tiny tutorial is to enforce how to bind parameters properly when using PDO for all of your database queries. For starters, as you have read, binding parameters to prepared statements puts potential SQL injections on the backburner. The process is rather simple. You create a query and use something like ‘:my_parameter’.
The parameter can be any variable. However, if you plan to use $_POST or $_SESSION variables, you must must set a variable equal to their value first. Thus, you plan to use a $_SESSION variable parameter like ‘$_SESSION[‘session_id’]’, you would write the code as shown below.
$my_session = $_SESSION['session_id'];
$result->bindParam(':my_session', $my_session);
You cannot write it like the code below.
$result->bindParam(':my_session', $_SESSION['session_id']);
One more point to make is that you cannot bind parameters that will not be used. As you see below, ‘:my_name’ is not used in the mySQL query.
$command = "SELECT DISTINCT id, url FROM urls WHERE enabled='1' AND user_id =:my_session";

    $result = $PDO->prepare($command);
    $result->bindParam(':my_session', $my_session)
    $result->bindParam(':my_name', $my_name);
    $result->execute();
}
Unlike the code above, the code shown below will work since the bindParam() is using all parameters that exist in the mySQL query.
$command = "SELECT DISTINCT id, url FROM urls WHERE enabled='1' AND user_id =:my_session";

    $result = $PDO->prepare($command);
    $result->bindParam(':my_session', $my_session)
    //$result->bindParam(':my_name', $my_name);
    $result->execute();
}
This tutorial will show you you can remove a table row from the page and update the alternating background colors.
Until every programming language makes almost as much sense to your first speaking language, you may want to go thorugh the code below and translate it so that you can understand the process. Well, I will even help you with that this time.
Okay, once the submit button with the ‘contacted’ class is clicked, the function does its thing. The submit button exists in each table row. Therefore, the next line basically says remove this submit button’s first table row parent. That will remove the row and that includes the button you just clicked.
Since the original row above could have a blue background and the one below a blue background, the page could look ‘yucky’ since there won’t be that nice alternating color scheme. Well, not worry because the next two lines of code give each even and odd row a new background color so that everything stays nice and uniform.
<script type="text/javascript">
    $('.contacted').click(function () {

        $(this).parents("tr").first().remove();

        /*
         Toggle table rows
         */

        $("tr:even").css("background-color", "#fff");
        $("tr:odd").css("background-color", "#E2E4FF");

    });

</script>
This tutorial will show a very simple setup to use Ajax with PHP. I will give a brief overview of the process. When the submit button with the ‘contacted’ class is clicked, the function goes to work. The myurl variable has the ‘myurl’ class and takes its value. It is the sibling of the submit button. If you look at the html, you can see the input elements are indeed siblings.
After that, the Ajax call begins. A post request takes place and the value of the ‘myurl’ variable is transfered to the my_ajax.php file. At this point, the my_ajax.php file has a new post variable called my_variable. So, when you open up the my_ajax.php file, you can write code to do whatever you want with the variable $_POST[‘my_variable’].
Jquery / Ajax
<script type="text/javascript">

    $('.contacted').click(function () {

        var myurl = $(this).siblings('#myurl').val();

        $.ajax({
            type: "POST",
            cache: false,
            url: "my_ajax.php",
            data: { my_variable: myurl },

            success: function (msg) {
//  alert("Success!");
            }
        });
    });
</script>
HTML
<form method="POST" action="">
            <input id="myurl" type="hidden" name="contacted_url" value="yahoo.com"/>
            <input id="contacted" class = "contacted" type="submit" name="contacted" value="Submit"/>
</form>
Post URL
$source_url = $_POST['my_variable'];
With this example, you will see how you can post a form when you change a value from a drop down select element.
Jquery Code
The code below can be translated to mean the following. When the ‘myclass’ class is changed from a user selecting a different option, that form is automatically submitted.
<script type="text/javascript">

    $(document).ready(function () {
        $('.myclass').change(function () {
            $(this).closest('form').trigger('submit');
        });
    });
</script>
HTML Select Element
WThe select element has a class called ‘myclass’ and its name attribute is my_item.
 <select class="myclass" name="my_item">
    <option value="all">All</option>
    <option value="1">One</option>
    <option value="2">Two</option>
</select>
Here is an example of using a Windows Program within PHP. The example will use the software called httrack.
The code belows shows how the PHP exec() function is using the httrack.exe file.
exec('C:\Users\username\Documents\AAA\WinHTTrack\httrack.exe http://' . $url . '/ -O "C:\xampp\htdocs\CLONES\' . $url . '" -%v -%e0 2>&1;');
Important:
By default, httrack install to Program Files. That white space between ‘Program’ and ‘Files’ on Windows will cause issues. So, you can copy the entire WinHTTrack folder to a path that has no whitespace. In this case, it was copied into the Documents\AAA folder.
By default, you will be able to use the service now, but, it could time out when cloning a website.
An example of a timeout is:
Fatal error: Maximum execution time of 30 seconds exceeded
To alter the timeout setting,
1. Open the file:
c:\xamp\php\php.ini
2. Change:
max_execution_time=30
Change to:
max_execution_time=120
3. Save the file and restart Apache. See setup, cloning and quick usage in action.
Linux has all sorts or neat packages you can install. Luckily, you may want to use one of them from a PHP script. This brief tutorial will explain how to do this.
The code below takes a submittted form and gathers the url into variable called $url. Then, the httrack service is used to clone the desired website.
shell_exec('/usr/local/bin/httrack http://' . $url . '/ -O "/home/username/websites/ ' . $url . '" -%v -%e0 2>&1;');
Besides PHP, you need to make modifications to the /etc/sudoers file on Linux. The change is shown below.
username ALL=NOPASSWD: /usr/local/lib/httrack,/usr/local/bin/httrack
Now, when you open the folder /home/username/websites/ you will see the new clone.
Here is a simple may to open the new cloned folder with the Linux shell:
cd *example.com
With Pro FTP, you can quickly add conditions to an FTP account. There can very a variety of reasons why you would want to limit FTP to certain files types. For example, let’s say you hired a web designer from overseas to work on a project.
Without placing file restrictions, he could potentially transfer PHP, Perl or Python files which could snoop around your system or reveal sensitive data. Or, he could create an ‘.htaccess’ file and do all sorts of undesirable stuff like allow .txt files to be interpreted as php.
With shell access, you can easily restrict the files that can be transfered with ‘PathDenyFilter’. The example below will demonstrate its usage. First of all, the line starting with ”PathDenyFilter’ is added to the file /etc/proftpd.cond. After that, the ftp services is restarted. If you attempt to transfer a file like .htacccess, or one with an extension like ‘.pl’ or ‘.php’ you will fail.
<VirtualHost 70.90.148.999> ServerName ftp.example.com AuthUserFile /etc/proftpd/example MaxClients 3 "Sorry, this ftp server has reached its maximum user count (%m). Please try again later" DirFakeGroup On ftpgroup DirFakeUser On ftpuser DefaultRoot ~ PathDenyFilter "(\\.ftpaccess|\\.htaccess|\.(pl|php))$"
Linux has many great packages that you can install use with some command line knowledge. However, there may come a time when you run to use a package and execute the commands from a web browser.
Typically, PHP functions like exec() and shell_exec() can be used to run basic commands that can navigate folders and read files.
But, what if you want to use a package and run a command within the browser? To do this, you will need to allow www-data to become sudoer user and allow it to use the package without a password. This article will explain how to do that.
By default, Apache will run with the user www-data. So, open up that /etc/sudoers file and give Apache permission to use the desired service(s). For this example, we will use the service httrack.
www-data ALL=NOPASSWD: /usr/bin/httrack
Now, we can run the exec() and shell_exec() functions to use httrack.The sample code would copy the files in root folder and skip the rest of the stuff since it only goes 1 folder deep.
<?php shell_exec('sudo httrack "http://example.com/" -O "/websites/example.com" -v -s0 --depth=1');
If you want to use the command line to setup a mySQL database without any fuss, you have landed on the right page.
Setup Database With Existing User
The next set of mySQL commands do several things. The first line is used to gain access to mySQL using the root user and password. That command is made in Linux. One authentication is approved, a database is created within the mySQL console. After that, all privileges are granted to the user my_username@localhost.
After that, the the grant tables are reloaded using teh ‘FLUSH PRIVILEGES’ command. Finally, the exit command is used to get back to the Linux command line.
 root# mysql -u root -p  Enter password:
mysql> CREATE DATABASE my_database;
mysql> USE my_database;
mysql> GRANT ALL PRIVILEGES ON my_database.* TO 'my_username'@'localhost'
mysql> FLUSH PRIVILEGES;
mysql> exit
Setup Database and User
These instructions are the same as the example above, except that a user is created. It contains only one extra command with the mySQL console.
 root# mysql -u root -p  Enter password:
mysql> CREATE DATABASE my_database;
mysql> USE my_database;
mysql> CREATE USER 'my_username'@'localhost' IDENTIFIED BY 'my_password';
mysql> GRANT ALL PRIVILEGES ON my_database.* TO 'my_username'@'localhost'
mysql> FLUSH PRIVILEGES;
mysql> exit
Once the database is setup, you can use the mySQL console or phpMyAdmin to create, update and delete databases. With phpMyAdmin, you can import sql files to load up the database.
You can also run Linux commands to dump data into it. Here is a page to reference how to dump data with Linux.
Using Acronis True Image is a great way to backup computers for web developers and programmers. Since these types of users often have multiple partitions, specific software for specific systems and perhaps many Virtual machines running on various operating systems, having a good cloning tool can make it easy to avoid the hassle of starting from scratch if s hard drive fails.
Thanks to Acronis True Image, it does have a nice feature to clone a complete disk using its clone tool. In order for this to happen, you need to have a PC with two hard drives; such as a laptop with two hard drive bays.
Although Acronis works very smoothly with Windows and will clone all partitions, including Linux, it can have its hickups when you clone systems other than Windows. But, it can be done. This tutorial will guide you through common problems and how to fix them.
After a cloning operation has completed successfully, Windows or Linux could have booting errors; especially if GRUB is fired up upon boot.
Recently, after cloning a hard drive with Linux and Windows, Linux failed to boot and Windows booted but had an annoying error.
To solve these problems, I had to match the proper UUIDs to each machine. With Linux, things are done a certain way and with Windows setting the UUID was different.
Essentially, with Windows, the UUID was updated by changing the UUID in GRUB, while Linux has a simpler commands which fixed the same problem.
This tutorial will explain how those fixes in detail.
LINUX
When I tried to boot into Linux, I received the error ALERT! /dev/disk/uuid/5467d38a-3517-4b79-9efa-8a4973852mom does not exist.
After that, I booted an Ubuntu Live USB and ran the blkid command to get all partition UUIDS.
From that list, Windows was the nfts while Linux was /dev/sda4.
With Ubuntu Live, mount the desired partition just to make sure the fields are the one you expect for the partition that is not booting.
Now that you are absolutely certain about the UUID and the partition, run the command
Now, if you run the command blkid a second time, you will see it us updated. Now reboot without the Live cd or USB and Linux should work as expected. If not, you can always update /boot/grub/grub.cfg file for the root partition, which in this case is Linux. So, if you mount the partition witrh errors and open the /boot/grub/grub.cfg file, you can change the UUIDs there. Just find the error UUID and replace it with the proper one from the blkid command.
WINDOWS
For Windows NFTS partitions, another story. You could get this error:
Although you can press a key right away and get the Windows Bootloader, it can seize after time and it is always a good idea to fix a problem anyways. If this is the case, you need to edit /boot/grub/grub.cfg Good idea to make a backup first. After that, use the blkid command again to get the ID of the Windows partition. Then, replace it with the erroneous one. Finally, run the command update-grub.
Now, all errors should be gone and you have can boot without any error messages.
With PHP, you can use NOWDOC and HEREDOC strings as opposed to traditional single quoted or double quoted strings. Using HEREDOC and NOWDOC strings can make life easier; especially when you have long strings with many single quotes, double quotes and variables.
NOWDOC
The NOWDOC string below starts with <<<‘SQL’ and end with SQL; followed by no whitespace. The name SQL was chosen since this is an SQL string. But, any other matching name like EOF could have been used in its place to yield the same results.
For large mySQL dumps such as resetting a mySQL database, using NOWDOC is an easy method to write a very long or complex query to use with a function like mysqli_query(). An example of this with our code would be:
$result = mysqli_query($db, $my_nowdoc).
<?php
$variable1b= 'test1';
$variable2 = 'test2';
$my_nowdoc = <<<'SQL'
INSERT INTO `tablename` (`blogger_id`, `blog_id`, `cat_id`, `title`, `notes`, `date_posted`, `date_deleted`) VALUES
(1, 286, 4, 'Codes-PHP-', '<p>$variable1b;</p>\r\n<p>$variable2 = 'all';</p>\r\n<p>Here is a new line</p>\r\n<p>Eventually it must cut off.</p>\r\n<p>Cut off.</p>\r\n', '2014-09-18 22:52:45', '0000-00-00 00:00:00'),
(1, 282, 2, 'Images-Width-100-Percent', '<p><a href="http://yahoo.ca">test</a>what</p>\r\n<p style="width:100%"><img src="images/promo.jpg" style="width:100%"></p>\r\n', '2014-08-27 23:37:39', '0000-00-00 00:00:00'),
(1, 303, 2, 'New-Steely-Dan-Post', '<p><img alt=\\"\\" height=\\"auto\\" src=\\"images/how-to.jpg\\" width=\\"100%\\"></p>\r\n', '2014-10-28 12:01:39', '0000-00-00 00:00:00')
SQL;

echo $my_nowdoc;
HEREDOC
The HEREDOC string below starts with <<<SQL and end with SQL; followed by no whitespace. The difference between this example and the one above is that there are no single quotes on the first line since it is those quotes that separate the NOWDOC from HEREDOC. Although the name SQL was chosen, any other matching name like EOF could have been used in its place to yield the same results.
<?php
$variable1b= 'test1';
$variable2 = 'test2';
//$my_nowdoc = <<<'SQL'
$my_heredoc = <<<SQL
INSERT INTO `raspberry_blogs` (`my_blogger_id`, `blog_id`, `cat_id`, `title`, `notes`, `date_posted`, `date_deleted`) VALUES
(1, 286, 4, 'Codes-PHP-', '<p>$variable1b;</p>\r\n<p>$variable2 = 'all';</p>\r\n<p>Here is a new line</p>\r\n<p>Eventually it must cut off.</p>\r\n<p>Cut off.</p>\r\n', '2014-09-18 22:52:45', '0000-00-00 00:00:00'),
(1, 282, 2, 'Images-Width-100-Percent', '<p><a href="http://yahoo.ca">test</a>what</p>\r\n<p style="width:100%"><img src="images/promo.jpg" style="width:100%"></p>\r\n', '2014-08-27 23:37:39', '0000-00-00 00:00:00'),
(1, 303, 2, 'New-Steely-Dan-Post', '<p><img alt=\\"\\" height=\\"auto\\" src=\\"images/how-to.jpg\\" width=\\"100%\\"></p>\r\n', '2014-10-28 12:01:39', '0000-00-00 00:00:00')
SQL;

echo $my_heredoc;
HTML HEREDOC
The example below shows how to make an HTML page into a HEREDOC string and print it.
<?php
$my_html_heredoc = <<<HTML
			<!DOCTYPE HTML>
<html>
    <head>
        <title>My Page</title>
        <meta http-equiv="content-type" content="text/html; charset=utf-8"/>
        <meta name="description" content=""/>
        <meta name="keywords" content=""/>
        <link rel="stylesheet" href="css/style.css"/>
    </head>

<body class="right-sidebar">

    <!-- Header Wrapper -->
    <div id="header-wrapper">

        <!-- Header -->
        <div id="header" class="container">

            <!-- Logo -->
            <h1 id="logo"><a href="#">MyTitle</a></h1>
                <!-- Nav -->
    <nav id="nav">
        <ul>

            <li>
                <a href="index.php">Blog</a>

            </li>
            <li>
                <a href="about.php">About</a>
            </li>
            <li class="break">
                <a href="help.php">Demo</a>
            </li>

            <li><a href="login.php">Login</a></li>
        </ul>
    </nav>

        </div>

    </div>

    <!-- Main Wrapper -->
<div class="wrapper">

    <div class="container">

        <div class="row" id="main">

            <div class="8u">

                <div><h3 class="help-h3"MySubheading</h3></div>

                <!-- BEGIN SEGMENT-->
                <div>
                    <div id="setup"><strong>How It Began</strong></div>
                    <div>Any text can go here.
                    </div>
                </div>
                <!-- END SEGMENT-->

            </div>

        <div class="my-clear"></div>
    </div>


<!-- BEGIN ALL PAGES ON WEBSITE -->
<div class="row features">

        <header>
            <h3>Use On Any Device</h3>
        </header>
        <p>Line #1</p>
        <ul class="actions">
            <li><a href="#" class="button">Next Line</a></li>
        </ul>

</div>

</div></div>

</body>
</html>
HTML;

echo $my_html_heredoc;
addslashes
-escapes some characters with backslashes.
bin2hex
-converts a binary string to hexadecimal
chop
-removes whitespace from the far right of a string
chr
-returns a specified character from a string
chunk_split
-makes smaller chunks out of the specified string
convert_cyr_string
-used to convert Cyrillic character
convert_uudecode
-used to decode a uuencoded string
convert_uuencode
-used to encode a string with a uuencode algorithm
count_chars
-used to give a count for the number of characters within a string
crc32
-used to get the crc32 checksum of a string
crypt
-creates a one way hashed password-like string
echo
-used for printing
explode
-convert a string to an array. Can separate if the string has blank spaces between words or another character like a comma.
fprintf
-used to write formatted text to a stream
get_html_translation_table
-get html entity translations for htmlspecialchars and htmlentities. Gives a nice readable list in the form of an array.
hebrev
-converts text from hebrew
hebrevc
-like hebrev function except that it will convert newlines ‘\n’ to “<br>\n”.
hex2bin
-converts a string from hexadecimal to binary
html_entity_decode
-decodes from html entities to the actual character.
htmlentities
-creates html entities from various characters; like quotes, html and symbols.
htmlspecialchars_decode
-decodes characters to their actual html code.
htmlspecialchars
-translates special characters like html, quotes and symbols into special translatable characters.
implode
-converts an array into a string. You specify the character you want to use separate the items that came from the array.
join
-alias of implode
lcfirst
-turns the first character of a string to lower case
levenshtein
-used to calculate ditsnaces between 2 strings
localeconv
-used to get numeric formatting information
ltrim
-removes whitespace from the beginning of a string
md5_file
-used to get a md5 hash from a specified file.
md5
-used to create an md5 hash of a particular string.
metaphone
-used to get a metaphone key of a string
money_format
-Get a number formatted for a specified currency
nl_langinfo
- a non Windows function that can receive the laguage and locale info. Can pass a constant into the function.
nl2br
-changes ‘\n’ to ‘<br/>’. Useful when going from running a script in the browser vs the Linux command line.
number_format
-specify decimal points in a number
ord
-returns the first character in a string as an ascii value.
parse_str
-parses a string into variables. The string that is parsed contains the usual method of writing like var1=value1&var2=value2.
print
-prints a string
printf
-prints a formatted string
quoted_printable_decode
-Makes an 8-bit string from a quoted printable string
quoted_printable_encode
-makes a quoted printable string from an 8-bit string
quotemeta
-Returns a string with backslashes around the characters
rtrim
-removes whitespace from end of a string
setlocale
-used to set locale info
sha1_file
-get the hash value for a file
sha1
-create a sha1 string from a specified string. If true, the hash is 20 charaxters; unlike the default 40 characters.
similar_text
-used to calculate the similarity between 2 strings. Matches tghe characters in the first string that are in the second string, including whitespace. Then, divides by total characters.
soundex
-used to get the soundex of a string
sprintf
-used to return a formatted string
sscanf
-used to parse input from string according to the specified format
str_getcsv
-turns a csv into an array
str_ireplace
-find and replace from a string. This is the case insesnitive version of sttr_replace() function.
str_pad
-used to add whitespace or characters to the specified side of the string. By default, it adds whitespcahe to the end of the string. The numerical parameter specifies the total length of the string.
str_repeat
-used to repeat a string the desired amount of times.
str_replace
-find and replace characters from a string.
str_rot13
-transforms string to rot13 version.
str_shuffle
-shuffles all characters to a random position.
str_split
-converts a string to an array. By default, each character is an item in the array. If you add an integer parameter, it will create an array from 0 to the specified number.
str_word_count
-used to get the word count from a string.
strcasecmp
-compares case insensitivity of two strings
strchr
-the alias of strstr() function
strcmp
-used to compare 2 strings and is case sensitive.
strcoll
-string comparison that is locale based
strcspn
-compares 2 strings and finds the length of string 1 for which there are no characters from string 2.
strip_tags
-removes html tags. Can alsom specify which pnes you do not want to strip.
stripcslashes
-strips backslashes
stripos
-find if the string exists in a string. The first parameter is the haystack and second is the needle. Remember that first position is zero. This means you need to compare as identical.
stripslashes
-used to strip backslashes from a string
stristr
-the case insensitive version of strstr()
strlen
-used to get the length of a string.
strnatcasecmp
-case insensitive function that compares strings with a “natural order” algorithm
strnatcmp
-compares strings with a “natural order” algorithm
strncasecmp
-compares two strings with a desired length.
strncmp
-compares 2 strings based on a desired amount of characters
strpbrk
-looks for a the desired characters in a string. The new string starts where the first match was made and continues to the end of the string.
strrchr
-returns the last occurence of the needle in the haystack and any characters that exist after the last occurrence.
strrev
-returns the string with the characters reversed
strripos
-finds the position of the last case insensitive occurence of the needle in the haystack.
strrpos
-finds the position of the last case sensitive occurence of the needle in the haystack.
strspn
-get the length of characters within a string as compared to a mask.
strstr
-Look for first occurrence of needle in a haystack. Haystack is the first parameter.
strtok
-used to tokenize a string
strtolower
-returns the string with all lower case characters
strtoupper
-returns the string with all upper case characters
strtr
-used to replace substrings
substr_compare
-used to compare 2 strings. Can set how many characters to compare.
substr_count
-find how may times a substring exists in a string
substr_replace
-used to replace a substring with a different set of characters
substr
-used to return part of a string
trim
-removes whitespace from the beginning and end of a string
ucfirst
-makes the first character in a string upper case
ucwords
-used to make the first character of each word uppercase
vfprintf
-used to write a formatted string to a stream
vprintf
-used to output a formatted stream
vsprintf
-used to returns a formatted string
wordwrap
-wraps a string at a specified length. Can be used to add line breaks at a specific amount of characters.
The following cheatsheet can be used to remind you of many common array functions that are used with PHP.
With .htaccess, you can override the main configuration you set with Apache. However, you can be very specific with your needs. For example, you can set a domain to have no override options in the root folder, yet, specify which folders you want to have the ability to override the main settings.
The code block below will help simplify this explanation.To make this as simple as possible, there is the default file from an Apache installation on an Ubuntu installation on an Ubuntu server. The file is located in the path /etc/apache2/sites/available/default.
As you can see, there is no option to override anything in the root folder. But, the blog folder will be given the option to override. If you have mod_rewrite enabled, you would see that it will work for all files loaded from the blog folder since it has ‘AllowOverride All’.
So, there you are. Only the files the blog folder will have the abilty to use the .htaccess file.
<Directory />
                Options FollowSymLinks
                AllowOverride None
        </Directory>
        <Directory /var/www/>
                Options Indexes FollowSymLinks MultiViews
                AllowOverride None
                Order allow,deny
                allow from all
        </Directory>

        <Directory /var/www/blog>
                Options Indexes FollowSymLinks MultiViews
                AllowOverride All
                Order allow,deny
                allow from all
        </Directory>
About mod_rewrite
When you rent a server; shared, VPS or dedicated, it lis likely that mod_rewrite is enabled by default. But, when you build your own you will likely need to enable it. At the same time, you may want to enable mod headers too.
sudo a2enmod rewrite
sudo a2enmod headers
Using .htaccess code with Apache Stanza
For the real security type, you can always keep all rules in a safe place on the server and deny any overriding with .htaccess. The code below shows code within the file called /etc/apache2/sites/available/default.
<Directory /var/www/blog-test>
                Options Indexes FollowSymLinks MultiViews
                AllowOverride None
                Order allow,deny
                allow from all

DirectoryIndex static.php index.php index.html

#Expire Header
<FilesMatch "\.(ico|pdf|flv|jpg|jpeg|png|gif|js|css|swf)$">
#ExpiresDefault "access plus 2 hours"

#ExpiresActive On
#ExpiresByType image/gif "access plus 1 month"
#ExpiresByType image/png "access plus 1 month"
#ExpiresByType image/jpeg "access plus 1 month"
#ExpiresByType text/css "access plus 1 month"
#ExpiresByType text/javascript "access plus 1 month"
#ExpiresByType application/x-javascript "access plus 1 month"
#ExpiresByType application/x-shockwave-flash "access plus 1 month"

</FilesMatch>

<IfModule mod_rewrite.c>
Options +FollowSymLinks
RewriteEngine on
RewriteBase /

RewriteCond %{REQUEST_FILENAME} !-f
RewriteCond %{REQUEST_FILENAME} !-d
RewriteRule ^(.*)\.html$ blog/index\.php?title=$1 [NC]


#RewriteCond %{REQUEST_FILENAME} !-f
#RewriteCond %{REQUEST_FILENAME} !-d
#RewriteRule ^(.*)\.html$ index\.php?title=$1 [NC]
</IfModule>

<Files ~ ".inc">
Order allow,deny
Deny from all
</Files>

<Files ~ \"\\.(inc|sql|...other_extensions...)$\">
  order allow,deny
  deny from all
</Files>

<Files 403.shtml>
order allow,deny
allow from all
</Files>
        </Directory>
As a PHP programmer, you could have one of several instances why you want a folder or subfolder to have its own custom session variable path. For one, you could have more than one folder in your public_html folder that uses the same session variables and you want to make sure that only a particular folder must use session variables specified only for that folder. An example of this could be subfolders that belong to each member or an application with a demo folder.
If you let the session variables to be accessed across all folders, the results could be disastrous since any login on the site could be used to validate any visited web page.
With that said, you have multiple options for which you can make sure that sessions cannot jump from folder to folder. Since PHP 5.3, you can place a custom php.ini file into the public_html and other folders to make specific rules. By default, this limits sessions from being used from folder to folder. However, allowing custom PHP configurations is a security risk if the wrong people can make these changes.
If you want to deny any usable custom php.ini file in order to maintain security, you will arrive at the option which allows you to create custom session paths for any folder on a website. All you need to do is add a line to the loaded php.ini file that resides on the server and set the path location where you want to do this.
The exmples below show various paths for a subfolder. Note that the root folder will store the sessions in the default location. But, the subfolder has the option to store them outside the home directory, inside the home directory and outside the public_html folder, and inside a folder within the public_html folder. Since two options are commented out, the actual path where the sessions are saved in the sessions folder with the path ‘folder-custom-sessions/sessions’.
[PATH=/home/username/public_html]
safe_mode = on

[PATH=/home/username/public_html/folder-custom-sessions] session.save_path = /home/username/public_html/folder-custom-sessions/sessions
;session.save_path = /mynewsessions
;session.save_path = /home/username/mysessions
Curl is an amazing extension that returns the source code of a desired webpage into a string. This simple tutorial will explain how you can code a simple script so that the actual website will process the form data as though you are a real visitor that submitted the form.
Let’s break down the following code. The desired url is https://example.com/login.php. Since we know the username and password, an array is created so the form can properly validate. After that, curl is initialized followed by a whack of options.
Among other things, these options options provide a referring url which make the request believe that you viewed index.php before filling out the form at login.php.
The CURLOPT_FOLLOWLOCATION is to ensure that you will be redirected to an appropriate page. Sometimes, you login and the PHP script will redirect you to a new page. Without this option, you will not be redirected and could end up with a blank page without any data.
The CURLOPT_HEADER was included so that the string adds the header details.
The CURLOPT_POST and CURLOPT_POSTFIELDS options are required to ensure that this is a post request and that it contains the adequate form fields, which in this case is the username and password. Since curl uses GET by default, it is very important to satisfy all requirements for making a POST request.
The actual string($html), is printed and contains the web page that exists after a valid login. However, if the login was invalid, you would see the page that would be returned if you sent the wrong credentials.
This example was shown with an authenticated login. However, it could be used to send data from any typical form. If you use a tool like Firebug, you can easily retrieve the post fields and create an array for the details you need to send; such as a simple contact form that requires a first name, last name, email address and phone number. On the other hand, you may only need a username, password, validate password and email address to POST to a form for which you want to submit a free membership.
 <?php

$url = 'https://example.com/login.php';
$data = array('username' => 'admin', 'password' => 'my_password');
$ch = curl_init($url);

curl_setopt($ch, CURLOPT_FOLLOWLOCATION, 1);
curl_setopt($ch, CURLOPT_HEADER, 1);
curl_setopt($ch, CURLOPT_RETURNTRANSFER, 1);
curl_setopt($ch, CURLOPT_REFERER, 'https://example.com/index.php');
curl_setopt($ch, CURLOPT_POST, true);
curl_setopt($ch, CURLOPT_POSTFIELDS, $data);
$html = curl_exec($ch);

echo $html;
If you want to see a complete list of curl options, you can find them at http://php.net/manual/en/function.curl-setopt.php.
The time has come and many functions like mysql_query are deprecated and will eventually become totally unusable as PHP evolves from version to version.
With this in mind, you have multiple options for coding or recoding your new and existing applications; especially where mySQL is concerned. For starters, you can use the mysqli extension which offers both an object oriented and procedural approach to doing this. Alternatively, you can use PDO.
If you plan to use the secure PDO or mysqli, you need to have the extension enabled in your PHP settings. It is good idea to have both enabled since you may need to use both of them with various web applications.
PDO
With PDO, you would need to rewrite a lot of code and the conversion would be quite time consuming. For new applications, you may just want to use it as your default means for writing queries.
You can see various select, insert, update and delete statements at:
https://fullstackwebstudio.com/locations/coding-blog/sqlite-vs-mysql.html
https://fullstackwebstudio.com/locations/coding-blog/connecting-to-mysql-with-pdo.html
https://fullstackwebstudio.com/locations/coding-blog/oop-login-class-with-php.html
MYSQLI
With mysqli, it is very easy to convert from functions that use mysql; such as mysql_query(), mysql_fetch_assoc(), mysql_real_escape_string(), mysql_num_rows(). The steps below will you the slight differences to make a successful conversion.
1) Do a search and replace mysql_ with mysqli_
2) Change database connection file; if necessary. The code below will work with mysqli. It is not necessary to use the function mysqli_select_db().
function db_connect() {

    $host = "localhost";
    $user = "user";
    $pw = "password";
    $database = "database_name";

    $db = mysqli_connect($host, $user, $pw, $database) or die("Cannot connect to mySQL.");

    return $db;
}

$db = db_connect();
3) Do a find and search for all mysqli_query in your code. With the mysqli_query() function you need 2 parameters; the database connection and the the query. The order is very important and opposite the mysql_query() function where the query string would be the first parameter and the optional second parameter would be the database variable.
$command = "SELECT * FROM tablename";
$result2 = mysqli_query($db, $command2);
4) Do a search for mysqli_real_escape_string. This function needs 2 parameters; unlike one that is required for mysql_real_escape_string(). The first parameter is the database variable while the second is the string.
You have had some code where this function was written within a mysql query. Now, you could filter the variable with the function outside the query. Then, you simply use the variable within the mysql query.
$password = mysqli_real_escape_string($db, $_POST['password']);
5) If you have any more trouble, you should check for errors. The errors and Google normally help solve the issues. Also, keep in mind that other lesser used functions will need the database variable parameter in order to work properly. For example, mysql_affected_rows() will need to be mysqli_affected_rows($db).
The purpose of this brief tutorial is to explain how to change an entire PHP application from an Apache server to be used on an Nginx server. The main modifications will alter PHP settings and adding old rules from your .htaccess file. Luckily, both changes only require altering two files; php.ini and /etc/nginx/sites-available/default.
PHP Changes
Open up the loaded php.ini file and change or modify the line to read the following text. The loaded php.ini file could be in a location such as /etc/php5/apache2/php.ini. There is a good change you will see a commented line that looks like ;cgi.fix_pathinfo = 1.
cgi.fix_pathinfo = 0
After that, you need to open the file /etc/nginx/sites-available/default as root. One you have done that, you can add and save the following code block. Note that this code is likely commented out. The code below shows the updated version.
location ~ \.php$ {
                fastcgi_split_path_info ^(.+\.php)(/.+)$;
        #       # NOTE: You should have "cgi.fix_pathinfo = 0;" in php.ini
        #
        #       # With php5-cgi alone:
        #       fastcgi_pass 127.0.0.1:9000;
        #       # With php5-fpm:
                fastcgi_pass unix:/var/run/php5-fpm.sock;
                fastcgi_index index.php;
                include fastcgi_params;
        }
.htaccess Changes
The main difference will be transferring the conditions and rules in the .htaccess file to make it work with Nginx. For starters, the bad news is that your .htaccess settings will not work with Nginx. The good news is that you can modify Nginx server config files very quickly and there are online tools that help convert the rules.
To make the new changes, you open the same file that you used to change the PHp settings. Once again, the file is /etc/nginx/sites-available/default. This time, you look for the code block that contains location / { }.
Finally, you can add the new rules. Two websites that can be a great help are http://www.anilcetin.com/convert-apache-htaccess-to-nginx/ and http://wiki.nginx.org/HttpRewriteModule#rewrite.
The code below shows a the conversion of some mod_rewrite rules from .htaccess to the Nginx methodology.
.htaccess Version
RewriteCond %{REQUEST_FILENAME} !-f
RewriteCond %{REQUEST_FILENAME} !-d
RewriteRule ^(.*)--(.*)\.html$ blog/index\.php?id=$1&title=$2 [NC]
Nginx Version
if (!-f $request_filename){
	set $rule_0 1$rule_0;
}
if (!-d $request_filename){
	set $rule_0 2$rule_0;
}
if ($rule_0 = "21"){
	rewrite ^/(.*)--(.*).html$ /blog/index.php?id=$1&title=$2;
}
Both simplexml_load_file(), simplexml_load_string() and SimpleXMLElement() will allow you to add nodes to an XML file.
One of the main difference between the three are that you need to use the new keyword to instantiate a SimpleXMLElement() object. On the other hand, the simplexml_load_file() and simplexml_load_string() convert the xml to a SimpleXMLElement object.
Another difference between the three is that simplexml_load_file() loads a file while the other two load a string.
The examples below show how each of them can be used to append elements. One example will add the child node and display it in the browser while the other will add the text to the desired xml file. A node will only be added to a file once, regardless of how many times you hit the page.
simplexml_load_file()
Example #1
The below will load an xml file, append another member to the root node and print it in the browser.
<?php

$filename = 'filename.xml';

$doc = simplexml_load_file($filename); // load a file

$adding = $doc->addChild('member'); // main multiple elements with nested info
$adding->addChild('id', '1234');
$adding->addChild('name', 'Name Here');
$adding->addChild('phone', 'Phone Here');
$adding->addChild('email', 'Email Here');

header('Content-Type: text/xml');
echo $doc->asXML();
Example #2
The next example will append a new member to filename.xml.
$filename = 'filename.xml';

$doc = simplexml_load_file($filename); // load a file

$adding = $doc->addChild('member'); // main multiple elements with nested info
$adding->addChild('id', '1234');
$adding->addChild('name', 'Name Here');
$adding->addChild('phone', 'Phone Here');
$adding->addChild('email', 'Email Here');

echo $doc->asXML('test.xml');
simplexml_load_string()
Example #1
This example is just like above, except that the source is a string rather than a file. The PHP functions file_get_contents() and curl() can output a file to a string.
<?php

$filename = 'filename.xml';

$filename = file_get_contents($filename);
$doc = simplexml_load_string($filename); // load a string

$adding = $doc->addChild('member'); // main multiple elements with nested info
$adding->addChild('id', '1234');
$adding->addChild('name', 'Name Here');
$adding->addChild('phone', 'Phone Here');
$adding->addChild('email', 'Email Here');

header('Content-Type: text/xml');
echo $doc->asXML();
Example #2
This little snippet get the contents of the filename.xml file and return a string. After that, a new member is added to it.
$filename = 'filename.xml';

$filename = file_get_contents($filename);
$doc = simplexml_load_string($filename); // load a string

$adding = $doc->addChild('member'); // main multiple elements with nested info
$adding->addChild('id', '1234');
$adding->addChild('name', 'Name Here');
$adding->addChild('phone', 'Phone Here');
$adding->addChild('email', 'Email Here');

echo $doc->asXML('test.xml');
SimpleXMLElement
Example #1
This case will load a string and output the existing and new elements in the browser.
$filename = 'filename.xml';

/* PAIR */
$filename = file_get_contents($filename); // make the file contents a string
$doc = new SimpleXMLElement($filename); // needs a string as parameter

$adding = $doc->addChild('member'); // main multiple elements with nested info
$adding->addChild('id', '1234');
$adding->addChild('name', 'Name Here');
$adding->addChild('phone', 'Phone Here');
$adding->addChild('email', 'Email Here');

header('Content-Type: text/xml');
echo $doc->asXML();
Example #2
This example will load a file and write the new member to the xml file.
$filename = 'filename.xml';

/* PAIR */
$filename = file_get_contents($filename); // make the file contents a string
$doc = new SimpleXMLElement($filename); // needs a string as parameter

$adding = $doc->addChild('member'); // main multiple elements with nested info
$adding->addChild('id', '1234');
$adding->addChild('name', 'Name Here');
$adding->addChild('phone', 'Phone Here');
$adding->addChild('email', 'Email Here');

echo $doc->asXML('test.xml');
The __toString magic method contains the usual double underscore in its front. It does does as its name implies since it strips object characteristics. The next PHP OOP examples should help you understand the details.
Integer Parameter
With the first code block, an integer is passed into the class via the constructor. As you can see, it is an integer before, during and after it leaves the class. But, it is no longer an object and the tests below indicate that.
<?php

class TestClass
{
    public $my_string;

    public function __construct($my_string)
    {
	    echo gettype($my_string)."<br/>";
        $this->my_string = $my_string;
		echo $this->my_string."<br/>";
    }

    public function __toString()
    {
        return $this->my_string;
    }
}

$my_array = array('test');
$class = new TestClass(58);
echo $class->my_string;
echo "<br/><br/>";
if (is_object($class->my_string)){
echo "Yes";
}
echo "<br/><br/>";
if ($class->my_string instanceof TestClass) {
   echo "Instance";
}
echo "<br/><br/>";
var_dump($class->my_string);
echo "<br/><br/>";
var_dump((string)$class->my_string);

?>
Browser Output
int(58)
string(2) “58”
String Parameter
With this example, you can see that if we use the $class->my_string it is a string without any record of its class. But, if you analyze the variable $class, you wil see that it still maintains it association to the class; even though it is a string called my_string with a value of “test”.
<?php

class TestClass
{
    public $my_string;

    public function __construct($my_string)
    {
	    echo gettype($my_string)."<br/>";
        $this->my_string = $my_string;
		echo $this->my_string."<br/>";
    }

    public function __toString()
    {
        return $this->my_string;
    }
}

$class = new TestClass('test');
echo $class;
echo "<br/><br/>";
var_dump($class);
echo "<br/><br/>";
echo var_dump($class->my_string);
echo "<br/><br/>";

if (is_object($class)){
echo "Yes";
}
echo "<br/><br/>";
if ($class instanceof TestClass) {
   echo "Instance";
}

echo "<br/><br/>";
var_dump((string)$class);
$success = settype($class, 'string');
echo (string)$class;
echo "<br/><br/>";
if (!is_object($class)){
echo "No";
}
echo "<br/><br/>";
if (!$class instanceof TestClass) {
   echo "No longer an instance";
}
?>
Browser Output
object(TestClass)#1 (1) { [“my_string”]=> string(4) “test” }
string(4) “test”
Yes
Instance
string(4) “test” test
No
No longer an instance
With PHP OOP, you can manually set and get properties when you work with your object, or, you can use the __SET and __GET magic methods which are invoked automatically after you instantiate a class.
If you want guaranteed results and plan to set property names outside the class, making your own functions will allow you to manage public, protected and private properties in this manner.
On the other hand, if you want to print or use properties from a class that are protected or private, you cannot override them with __get and __set magic methods.
The following examples should make this a little more clear.
Manual Get and Set Methods
<?php

class Manual {
public $a = "A";
protected $b = array("a" => "A", "b" => "B", "c" => "C");

public function set_var($var){
$this->b = $var;
}

public function get_var(){
return $this->b;
}

}

$m = new Manual();
$var = array("x" => "X", "y" => "Y", "z" => "Z");
//$var = "help";
$m->set_var($var);
echo $m->get_var();
echo "<br/>";
print_r($m->get_var());

?>
Now, I will go over this. The variable was set and returned. Even though the variable $b was protected, the property can be overwritten. However, the same cannot be said for the set_var() and get_var() methods since changing any one of them them to protected or private would not work, thus no value would be returned from the get_var() method.
If you uncomment the line with $var = help, you can change the value from an array to a string. As you can see with this method, $protected $b was overwritten.
Now, let’s move on and try this with __get and __set magic methods.
Magic __get and __set Methods
<?php

class magicMethod {
public $one = "A";
protected $two = array("a" => "A", "two" => "B", "c" => "C");

public $mycount = 0;

public function __get($v) {
$this->mycount = $this->mycount +1;
echo "$v";
return $this->two[$v];
}

public function __set($variable, $value){

}
}

$test = new magicMethod();
//$test->one = "TEST"; //can change
//$test->two = "foo"; //cannot change because not public scope inside class
echo $test->one.",".$test->two;

?>
Here is how this example works. The __set magic method accepts 2 parameters. Meanwhile, the __get magic method accepts and passes on a single parameter. As you can see, the magic methods invoked and printed the $v as two. After that, it printed the public property value for $one followed by the returned value of $this->two[$v].
Now, you may have originally thought that the public value of $one would be followed by the followed by the code from the magic method which output two as as $v and $this->two[$v] as the second value of the protected $two array.
But, the magic methods ran first and output the value of $v which was two. After that, $test->one was printed since it was next in line. After that, the returned value was printed. Since $one was public, it bypassed the __set and __get methods.
If you uncomment the $test->one = “TEST” and $test->two lines, you will see that you can alter the public property but have no luck changing the protected property.
Using object interfaces with PHP OOP is useful when you want to make sure a class must contain specific public functions. In other words, if you want to use an interface for a class, the class must use the method from the interface, otherwise an error will occur.
Another key point to remember with interfaces is that the class and interface code blocks must use public methods with the same amount of parameters. Although the parameters must be the same, the actual names in the interface code block is not that important, asides from good type hinting.
To use interfaces, you make a code block with the interface keyword. This is much like declaring a class, but with a different name. To use the interface conditions in a class, you add the implements keyword followed by the name. The example below should make this clear.
Example #1
<?php

interface example
{
    public function set_name($var1,$var2);
    public function get_name();
}

Class Test implements example
{
    public $var1;
    public $var2;
    public $var3;


    public function set_name($var1, $var2)
    {
        $this->var3 = $var1 . " " . $var2;

    }

    public function get_name()
    {

        return $this->var3;

    }


}

$my_test = new Test();
$my_test->set_name('Peter', 'Paul');
echo $my_test->get_name();
Browser Output
Example #2
Here is an example of code that is slightly modified from above. The only difference is the reduction of one parameter from the interface code block. Thus, ‘public function set_name($var1,$var2)’ was changed to ‘public function set_name($var1)’. The code below would trigger an error because the parameters in the class and interface are different.
interface example
{
    public function set_name($var1);
    public function get_name();
}

Class Test implements example
{
    public $var1;
    public $var2;
    public $var3;


    public function set_name($var1, $var2)
    {
        $this->var3 = $var1 . " " . $var2;

    }

    public function get_name()
    {

        return $this->var3;

    }


}

$my_test = new Test();
$my_test->set_name('Peter', 'Paul');
echo $my_test->get_name();
PHP Namespaces allow you to make reference points at the top of your file(s) so that your specific files will use the code from the namespaces. If you have matching namespaces in two files, your file will pick up the code from that with the matching namespace.
In addition to using namespaces, you can import them with the use operator.
The code examples below will show two examples. One will be a set of files with the same namespaces while the other set will have a file that imports the namespace from another file. Namespaces are case insensitive; thus my\test1 and my\TEST1 are both okay to use.
Example #1 Matching Namespaces
With this example, your main file, and the file with two constants, a function and a class both have the same namespace. Coding with matching namespaces is just like coding any other two files; except that the top line of the two files use the namespace.
Included File With Functions and Class
<?php
namespace my\TEST1;

$variable = 3;
const CONSTANT1 = 'First Constant';
define('CONSTANT2', 'Second Constant');

function my_function()
{
    global $variable;
    return CONSTANT1 . " - " . CONSTANT2 . " - " . $variable;
}

class TestClass
{
    static $test;

    public function set($val)
    {
        $this->test = $val;
    }

    public function myclass_method()
    {
        return $this->test;
    }
}

?>
Main File Executed In Browser
<?php
namespace my\TEST1;

require('file1.php');

echo $variable . "\n";
echo my_function() . "\n";
$test = new TestClass();
$test->set('James');
echo $test->myclass_method() . "\n";
?>
Example #2 Importing a Namespace
When you import a namespace, one file will have the namespace while the other will import it using the use operator. Unlike the previous example, you see that you need to add the namespace you imported when you call functions or instantiate objects.
Included File With Functions and Class
<?php
namespace my\TEST2;

$variable = 3;
const CONSTANT1 = 'First Constant';
define('CONSTANT2', 'Second Constant');

function my_function()
{
    global $variable;
    return CONSTANT1 . " - " . CONSTANT2 . " - " . $variable;
}

class TestClass
{
    static $test;

    public function set($val)
    {
        $this->test = $val;
    }

    public function myclass_method()
    {
        return $this->test;
    }
}

?>
Main File Executed In Browser
<?php
use my\TEST2;

require('file2.php');

echo $variable . "\n";
echo my\test2\my_function() . "\n";
$test = new my\TEST2\TestClass();
$test->set('James');
echo $test->myclass_method() . "\n";
?>
Main File Executed In Browser (Shorthand Version)
Unlike the example above, the code makes a shorthand version of the namespace with ‘use my\TEST2 as S’. Essentially, you just need to use ‘S\’ instead of my\TEST2.
<?php
use my\TEST2 as S;

require('file2.php');

echo $variable . "\n";
echo S\my_function() . "\n";
$test = new S\TestClass();
$test->set('James');
echo $test->myclass_method() . "\n";
?>
Browser Output
Simply put, array_diff() compares two arrays. The first parameter is the array the you will compare from. This means that you will find what is different in it than the second array parameter.
If it does not have any unique values that differ from array #2, the result is that there are no differences; regardless of how many items that the second array has that the first array does not have.
That was a mouthful, I hope it makes sense to you.
The easiest way to show this is to provide some examples which are shown below. Both examples consist of two arrays called $first and $second. Then, a $diff variable becomes an array that holds the difference.
Finally, the print_r() function will output the values that are different. For simplicity of explanation, there is only one value in the second array that does not exist in the first array. This makes it easy for you to understand the example.
Example #1
The example below shows array_diff() with the parameters swapped. As you can see, the first print_r() statement is empty but the second print_r() statement has the value ‘grape’.
 <?php
$first = array('apple','orange','banana');
$second = array('apple', 'orange','banana','grape');
$diff = array_diff($first,$second);  print_r($diff);
echo "<br/>";
$diff = array_diff($second,$first);  print_r($diff);
Browser Output
Example #2
This example changes the keys up. As you can see, the array_diff() function only compares values. The keys can be indexed numerically or associative like ‘second’ =>.
The code below shows the same arrays with different keys. As you can see, the results are the same.
 <?php
$first = array(1 => 'apple', 2 => 'orange','banana');
$second = array('first' => 'apple', 'second' => 'orange','banana','grape');
$diff = array_diff($first,$second);
print_r($diff);
echo "<br/>";
$diff = array_diff($second,$first);
print_r($diff);
Browser Output
See https://fullstackwebstudio.com/locations/coding-blog/array-diff-php.html for details on how you could use this with data from mySQL queries.
With PHP, there are many ways to increase or decrease an integer with increments. Although the concept is rather simple, the truth is that not all incrementing behaves the same way. At times, a value can be added instantly, while at other times it only takes place the next time an integer is used. Often, increments are used in loops to add to an existing value each time the loop iterates.
For example, the simple statement ‘echo ++$number’ automatically prints the new number of $number. But, ‘echo $number++’ will not print the new number. In the second case, it will only print the updated number the next time the $number variable is used. A simple way to remember this is ‘increments before update right away’ while ‘increments after update after.
Below are a simple couple of examples which show the updates before and after.
If you find this forgettful, you may want to always create the increment without printing its value. This way, you will always get the updated value when you want to use the variable.
Example
 <?php
$a = 1;
echo ++$a ." - " . $a;
echo "</br/>";
$b = 2;
echo --$b ." - " . $b;
echo "<br/>";
$a = 1;
echo $a++ ." - " . $a;
echo "</br/><br/>";
$b = 2;
echo $b-- ." - " . $b; ?>
Browser Output
Obviously, the lines which match are updated right away while those that do not only happen the next time the variable is used.
1 – 2
2 – 1
Other Ways To Increment
Asides from the methods shown above, you can create a variable and just add or decrease a desired number to its existing value. The example below show a simple loop that adds 1 to the variable each time it loops and a second loop that adds 2. The first loop runs 6 times; once each for 0,1,2,3,4,5.
The second loop only loops 3 times because after the first loop $i =2, after the second loop $i = 4 and after the third loop $i = 6. Both loops have a final value of 6.
 for($i = 0; $i <=5; $i++){
}
echo $i; //outputs 6
for($i = 0; $i <=5; $i++){ $i = $i + 1; }
echo $i; //outputs 6
With PHP, you can pass parameters into a function or you can get them inside a function using the func_get_args() function. Let me take you through the example. There are two functions.
One function will pass in the parameters and create an indexed array with those variables. After that, the $variables array is returned and shown with the print_r() function.
Since the $output variable was made equal to the function, the returned array takes on the name of the variable. Thus, that is why print_r($output) is used to print the array rather than print_r($variables).
The second function will pass in parameters, but, the function will not pass them along since there are none show between the get_parameters(). Remember, the first function passed them inside the function with pass_parameters($a,$b,$c). Hopefully, this difference is very clear for you.
Even though they are not passed into the second function, they can be accessed using the built in PHP function called func_get_args(). With func_get_args(), you will have an array of the parameters.
From calling the function with get_parameters(‘one’,’two’,’three’), the array will be those three strings. Thus, the array $variables in the second function contains those three values.
Like the first function, the array is returned and takes on the name $output. Just like the first example, your array will yield the same results with the print_r() function.
Example
<?php

function pass_parameters($a,$b,$c) {

$variables = array($a,$b,$c);

return $variables;

}

function get_parameters() {

$variables = func_get_args();

return $variables;

}


$output = pass_parameters('one','two','three');

print_r($output);

echo "<br/>";


$output = get_parameters('one','two','three');

print_r($output);
Browser Output
When you load this page in your browser, you will see the results of each identical array. Now, you have two methods in your toolkit for accessing parameters passed into a function.
The functions phpinfo() and get_loaded_extensions() will both let you know what PHP extensions are installed on your system. The code below shows how to see your extensions.
echo phpinfo();
The code below shows how to print an array of extensions with the get_loaded_extensions() function.
print_r(get_loaded_extensions());
With PHP, sha1() and md5() password functions are used in many web applications where passwords are implemented; such as scripts with login and logout functionality. In the modern era, sha1 is often used while md5 can be found in older and some modern applications.
By default, the sha1 function outputs a 40 character string while the md5 string is 32 characters. If you use the functions with the ‘true’ parameter, its cuts down the characters in half; thus sha1 is 40 characters and md5 is 16 characters. With the longer character string, it is a hexadecimal number while the shorter string is a binary number.
echo sha1('string_name'); //40 characters echo sha1('string_name, true); //20 characters
echo md5('string_name'); //32 characters echo md5('string_name', true); //16 characters
Theory About Character Values
Here a little theory about integers with PHP. Although, most applications use regular numbers like 1,2 and 3, you can use other coding means to represent numbers. Three methods shown below are hexadecimal, binary and octal notation. .
Hexadecimal
The hexadecimal format used the characters are (“0”, “1”, “2”, “3”, “4”, “5”, “6”, “7”, “8”, “9”, “A”, “B”, “C”, “D”, “E”, “F”). The f is actually 15. Some sample hexadecimals are 0x0, 0x1 and 0x1B. The actual integer values of each of these hexadecimals are 0, 1 and 27. The 27 comes from the 1 which is 16 and b which is 11. To make this easy tp remember, you can remember to carry the number when it hits 16(which is F).
Binary Values
With binary numbers, all numbers are based on the exponential value of 2. Thus, a value like 11100 is (2 to the power of 4) + (2 to the power of 3) + (2 to the power of 2) + (0*(2 to the power of 1)) + (0(2 to the power of 0)) = 28.
Octal Notation
When you hear octal, you are probably thinking the number 8. Octal notation is based on a 1-8 system and has a zero as the first decimal. To make this more clear, a number like 07 is seven, while 017 is 15. In the latter case, you have one complete 8 plus 7 from the first column. By comparison, the number 0117 if 7 + 8(1) + 8(8) = 79.
Sample
The code below shows a binary number, hexadecimal number, octal number and a regular integer. Then, all the values are added up. As you can see, PHP will out an integer. To use a binary number, you need to add 0b in front of the binary value. The ob has been available since PHP 5.4.
 <?php
$a = 0b00000110; // Binary Outputs 6
$b = 0x1F; // Hexadecimal Outputs 31
$c = 2;
$d = 011; // Octal Outputs 9
echo "a=$a b=$b c=$c d=$d<br/>";
echo $a + $b + $c +$d; // Outputs 48
?>
Browser Output
The output below is what you will see in your browser.
For whatever reason, the time could arrive when you would like to remove www from urls from your root website folder or a subdirectory. If you use the Apache server, mod_rewrite makes it easy for you to do this procedure.
The methods below show one example you could use in your root folder and another you could use in any subfolder which has its own .htaccess file. The examples will have the blocks for both http and https urls.
The first block of code below will be added to any .htaccess file where you want to make the custom rewrite conditions and rules.
The code between the <IfModule mod_rewrite.c> and </IfModule> tags is interpreted if the mod_rewrite module is enabled on the server. Usually, it is always enabled. Although the other blocks of code are outside of the mod_rewrite folder, they will be interpreted.
<IfModule mod_rewrite.c>
Options +FollowSymLinks
RewriteBase /
Options +FollowSymLinks
</IfModule>
Root Folder
HTTP
RewriteCond %{HTTP_HOST} ^www.example.com$ [NC]
RewriteRule ^(.*)$ http://example.com/$1 [R=301,L]
HTTPS
RewriteCond %{HTTP_HOST} ^www.example.com$ [NC]
RewriteCond %{HTTPS} =on
RewriteRule ^(.*)$ https://example.com/$1 [R=301,L]
Subfolder
HTTP
 # remove www
RewriteCond %{HTTP_HOST} ^www\.(.+)$ [NC]
RewriteRule ^ http://%1%{REQUEST_URI} [NE,R=301,L]
HTTPS
 # remove
www RewriteCond %{HTTP_HOST} ^www\.(.+)$ [NC]
RewriteCond %{HTTPS} =on
RewriteRule ^ http://%1%{REQUEST_URI} [NE,R=301,L]
For more information about mod_rewrite variables, you can see them at http://www.askapache.com/htaccess/mod_rewrite-variables-cheatsheet.html
More mod_rewrite Theory
Although you can move on and just add the code as it was described above, I will add a little theory into the mix.
The actual file mod_rewrite.c is C source code. You could find this file with command find / -name ‘mod_rewrite.c’ 2>/dev/null. If you wanted to check it out, you can view it with the cat command or load it into an editor. At this point, you may want to have a tuner on the language C, so that you will know more about pointers, global scope, and libraries. It is very different and more head spinning than a scripting language like PHP.
With mySQL, the NOT IN() and NOT EXISTS operators are do the opposite of their counterparts IN() EXISTS() operators. When managing databases, there may come a time when you need to build queries that will check the data in one database table and see if there is a matching value in another column of a different database table.
One example that comes to mind is to find the people that made a purchase for an item. This data could have ended up in a table like purchases_before_paypal. Then, upon purchase, you could record the user ids of the people who actually made a payment with a Paypal account.
So, if you wanted to do a check to see who did not actually pay you could use the NOT IN() or NOT EXISTS() operators to see those who made it the end of the cart without having made the Paypal transaction.
Another example is to have a table that is used to collect data from registered users and another table to check logins. This way, you can calculate who has registered, but has not logged in.
MYSQL NOT IN()
The statement below will grab rows where the id from the tablename1 table where the id from the tablename1 column is not in the userid column from the table called tablename2 table.
SELECT id FROM tablename1 WHERE tablename1.id NOT IN (SELECT userid FROM tablename2);
MYSQL NOT EXISTS()
The statement below will grab rows where the id from the tablename1 table where the id from the tablename1 column does not exist not in the userid column from the table called tablename2 table.
SELECT DISTINCT id FROM tablename1 WHERE NOT EXISTS (SELECT userid FROM tablename2 WHERE tablename2.userid = tablename1.id);
Often, when working with PHP / mySQL, you will use data that was sent from forms and data from the database. While the data is often correct, you could end up with errors and surprise output if there happened to be any whitespace before or after you string.
With a mySQL database, it can be hard to detect if a string actually has whitespace attached to it. Luckily, PHP and mySQL have functions that can be used to trim whitespace.
If you plan to insert and retrieve data from a database, using mySQL’s TRIM() function is the way to go.
Meanwhile, any of the PHP functions, trim(), ltrim and rtrim() can be used to remove whitespace from strings or retrieved data. Personally, I like to use mySQL to do the work if that is where the data is coming or going from.
MYSQL Style
 INSERT INTO tablename (id, input, date) VALUES (NULL, TRIM($input_string), now());

SELECT TRIM(input) FROM tablename where id > 1

UPDATE tablename set input = TRIM($input_string) where id = '$id'
In addition to trimming whitespace, you can command mySQL to trim text, commas and other unwanted data from the left, right or both ends of a string. The example below shows how to remove a trailing, leading and trailing and leading commas from a database field.
TRIM(TRAILING ',' FROM columnname)
TRIM(LEADING ',' FROM columnname)
TRIM(BOTH ',' FROM columnname)
More examples of using the mySQL trim function can be found at https://fullstackwebstudio.com/locations/coding-blog/MYSQL-TRIM-Function.html. In addition to the TRIM() function, the replace() function with mySQL can be used to change anything you want from a string; including removing whitespace and replacing it with nothing. More details about the mysql replace() function can be found at https://fullstackwebstudio.com/locations/coding-blog/mysql-rerplace-function.html.
PHP Style
$trimmed = trim($string);
$trimmed2 = htmlspecialchars(trim($string));
$trimmed_left = ltrim($string);
$trimmed_right = rtrim($string);
The purpose of this tutorial is to create a backup of a mySQL database. The tutorial will two methods for which this can be accomplished; one using a GUI tool called Cpanel and the other using the Linux command line. Although both methods have pros and cons, using the command line and getting to know it well will allow you to easily work on any Linux server and accomplish your goals very quickly.
Database Backup With Cpanel
To backup a database,
1) Select ‘Backup Wizard’.
2) Select Backup.
3) Select ‘mySQL Databases’.
4) Select a Database.
Note: You can click ‘Databases’ to order the databases in alphabetical order. This can become handy as you have 20-100+ databases.
5) Click OK
Non GUI Backup
Although using a GUI makes it nice and easy to backup databases. The code below can be used to backup a mySQL database and save it in a desired folder. After that, the public-html folder is made into a tar file which has all of the files and database. This type of backup can take place as a weekly cron so that you have a n updated backup of the files and database.
 root# mysqldump -u root -p mydatabase > /home/username/public_html/backup.sql
Enter Password:
root# tar -cvf mybackup.tar /home/username/public_html
One more method to backup mySQL databases is to copy them from their folder.
root# cp -R /var/lib/mysql/* /home/username/backups/
Removing duplicate rows with mySQL could be something you need to do for various reasons. One reason could be that you want to clean up your database and have unique entries. The script below is written in PHP / mySQL and can be used to remove those unwanted entries.
First, I will show the code. For those with decent PHP / mySQL skills you can just edit the mySQL statements so that they find, count and delete the duplicates from your desired table. For those who need to understand what is going on, you can see the explanation about removing the duplicate rows with mySQL.
<?php
 include('connect.inc');
 $db = public_db_connect();
if($_POST['submit']) {

$command = "SELECT id, firstname, lastname, count(*) as cnt from table_sort group by firstname, lastname having count(*)>'1' order by cnt DESC ";

$result = mysqli_query($db, $command);
while($row = mysqli_fetch_assoc($result)) {
$firstname = $row['firstname'];
$lastname = $row['lastname'];
$cnt = $row['cnt'];

$firstname_array[] = $firstname;
$lastname_array[] = $lastname;
$mix[] = $firstname.",".$lastname.",".$cnt;
}

$mix = array_unique($mix);

foreach ($mix as $item) {
$both = explode(",",$item);
$myfirst = $both[0];
$mylast = $both[1];
$number = $both[2];
$delete_amount = $number - 1;

$commandb = "DELETE FROM table_sort WHERE firstname='$myfirst' AND lastname ='$mylast' LIMIT $delete_amount ";
$resultb = mysqli_query($db, $commandb);
if($resultb){
echo "$myfirst - $mylast deleted Successfully!<br/>";
}

}
}
?>
<div style="display:block; float:left; width:45%;">

<div style="float:left; width: 150px;">Check Names<br/><br/></div>
</div><div style="clear:both;"></div>
<div><form action="<?php echo $_SERVER['PHP_SELF'].'?'. $_SERVER['QUERY_STRING'] ; ?>" method="post" style="display:visible;">
<input name="submit" type="submit" value="Delete All Duplicates"></form></div>
</div>
Code Explanation
The file ‘connect.inc’ is included. It contains a function to connect to the database and return the $db variable which will be used with the mySQL queries. Then, there is a condition that takes after a form is submitted. When the form is submitted, it simply runs the code to remove the duplicate mySQL rows.
The first query gathers the rows which have a duplicate first and lastname. So, the id, firstname, lastname and count of rows is gathered in the query. In simpler terms, all rows of duplicate data are retrieved.
The mix[] array will be the duplicates. The mix array is a new comma separated string which has every duplicate row. It contains the firstname, lastname and amount of duplicates. So, if there are two rows with John Smith, the $row[‘cnt’] would be the same for each of them. In fact, the entire comma separated string would be the same.
After the mix array is built from the while loop, a unique mix array is made to remove any duplicates from the array. Then, a foreach loop is run and iterates over each and every value from theb mix array. The explode() function is used to create another array from the comma separated value that was stored in the mix array. This allows you to have the firstname, lastname and count of duplicates. The firstname takes on the string called $myfirst while the lastname would be $mylast and the amount of duplicates would be $number.
Now, the delete query removes all the duplicate mySQL rows except one since $delete_amount is equal to the number of duplicate rows minus 1. Thus, if there are 3 duplicate rows, only 2 will be removed.
The HTML at the bottom of the code block starting with <div style=”display:block is the HTML code that shows a form so that the duplicates can be removed.
After Removing Duplicates
Once you remove the duplicates, you may want to make a custom index so that the table will not insert any entries with duplicate firstnames and lastnames. The code below shows how to do this with a simple mySQL query.
alter table table_sort add unique index(firstname, lastname);
So, you love the speed you get with Varnish, but, have suddenly noticed that you cannot login and make any changes. Although you could manage the site with phpMyAdmin, you more than likely want to login to the backend and make changes; like the high majority of WordPress users.
Well, with a little adjustment to you default.vcl file, you can easily keep those web pages in the cache while your wp-login and wp-admin pages will not be cached. If you do not make changes to your default.vcl file, you cannot login.
When you open your default.vcl file with an editor like Vim or Nano, you will add a small statement to the sub vcl_recv and sub vcl_fetch methods. The vcl_recv method takes the request once a web surfer has viewed a page, and decides what to do with that request. Of course, it depends whether or not it finds it in the cache.
If varnish finds it, it hits the cache and serves the file. If not, Apache takes over and serves the request. Once the file is retrieved, the request runs through vcl_fetch. If the file came from the cache, it is served and not cached again. If the file was a miss and delivered by Apache, it is cached and delivered.
The following examples show how exclude the wp-login and wp-admin pages from being cached.
sub vcl_rec
Here is a quick briefing about the following code. If the domain name is example.com or www.example.com and the wp-login or wp-admin pages are served, use the specific backend ip for that account. In this case, we use default2, which is a dedicated ip address.
Extra Note:
If you wanted to cache pages, you would have unset req.http.cookie; on a line above set req.backend = default2; Using unset removes cookies so Varnish can cache the object. If a page has cookies and unset is not in place, it would not cache.
elsif(req.http.host ~ "^(www\.)?example\.com" && req.url ~ "/wp-(login|admin)"){ set req.backend = default2; }
sub vcl_fetch
Hers is a quick synopsis about vcl_fetch. There is no time defined to cache an object. Therefore, Varnish will not cache the wp-login or wp-admin pages.
Extra Note:
If you did want to cache these pages, you would need to use a line between {} that says something like set beresp.ttl = 86400s;
This line tells Varnish to cache either of those pages for 86400 seconds, which is 1 day. After a day, the page would be removed from the cache.
elsif(req.http.host ~ "^(www\.)?example\.com" && req.url ~ "/wp-(login|admin)"){ }
Conclusion:
Now that you know how to use Varnish with WordPress, you can easily exclude the backend from caching while maintaining the cache on the frontend. Once you have Varnish up and running, you may want to configure it to cache everything, and make exclusions as you need them. For example, you will want to make conditions for all or some backends.
This OOP login class has a parent class called login and two child classes called Posted and Verified. The ‘Posted’ class checks and validates posted data while the ‘Validated’ class checks for a valid session session value. The classes exist in one file while the main file which appears in the browser instantiates objects based on conditions.
The codes are shown in their entirety. You can set up the databases, copy the code and should be good to go as long as php on your server can use PDO data objects.
include("class-login-PDO-form2.php");
session_start();
$_SESSION['id'] = $_SESSION['id'];
$_SESSION['login'] = $_SESSION['login'];
$_SESSION['timestamp'] = $_SESSION['timestamp'];

$username = array();
$password = array();
$myarray = array();
$myuser = array();
$mytime = array();
$my_check = array();

if ($_POST['username'] && $_POST['password']) {
    $username = $_POST['username'];
    $password = $_POST['password'];
    $my_posted = new Posted($username, $password);

} else {
##VERIFY SESSION

    $mytime = $_SESSION['timestamp'];
    $myuser = $_SESSION['id'];

    $my_posted = new Verified($myuser, $mytime);

}

echo "Is there an active session username: " . $_SESSION['login'];
echo "<br/>";
print_r($my_array);
?>
<form method="POST" action="<?php echo $_SERVER['PHP_SELF']; ?>">
    Username:<br/>
    <input type="text" name="username" value=""/><br/>
    Password:<br/>
    <input type="password" name="password" value=""/><br/>
    <input type="submit" name="submit"/>
</form>
Example #1 Login, Posted and Validated Classes
class Login
{
    private $host = "localhost";
    private $user = "username";
    private $pw = "password";
    private $database = "databasename";

    public function db_connect()
    {
        $db = new PDO('mysql:host=' . $this->host . ';dbname=' . $this->database . '', $this->user, $this->pw) or die("Cannot connect to mySQL.");

        return $db;
    }

}

class Posted extends Login
{

    private $username;
    private $password;

    function __construct($username, $password)
    {
        $this->username = $username;
        $this->password = $password;

        $login2 = new Login();
        $db = $login2->db_connect();

        $command = $db->prepare("SELECT * FROM logins_test WHERE login =:login AND password = password(:password)");
        $command->bindParam(':login', $this->username);
        $command->bindParam(':password', $this->password);
        $command->execute();
        $result = $command->fetchAll();

        foreach ($result as $row) {
            $my_array[] = $row;
        }

        if (!empty($my_array)) {
            $_SESSION['id'] = $my_array[0]['id'];
            $_SESSION['login'] = $my_array[0]['login'];
            $_SESSION['timestamp'] = time();
            echo $_SESSION['id'] . " - " . $_SESSION['login'] . " - " . $_SESSION['timestamp'];
            echo "<br/>Success<br/>";

            $mytime = $_SESSION['timestamp'];
            $myuser = $_SESSION['id'];
            $command = "INSERT INTO logins_validate VALUES (NULL,:user_id, :time_current)";
            $command1 = $db->prepare($command);
            $command1->bindParam(':user_id', $myuser);
            $command1->bindParam(':time_current', $mytime);
            $command1->execute();

        } else {
            echo "Wrong username or password!";
        }

    }

}

class Verified extends Login
{

    private $mytime;
    private $myuser;

    function __construct($mytime, $myuser)
    {
        $this->mytime = $mytime;
        $this->myuser = $myuser;

        $login3 = new Login();
        $db = $login3->db_connect();

        $command = $db->prepare("SELECT * FROM logins_validate WHERE user_id =:login AND time_check = :mytime");
        $command->bindParam(':login', $this->myuser);
        $command->bindParam(':mytime', $this->mytime);
        $command->execute();
        $result = $command->fetchAll();

        foreach ($result as $row) {
            $my_check[] = $row;
        }

        if (!empty($my_check)) {
            echo "<br/>Session is validated!";
            ## ADD CUSTOM CODE HERE
        } else {
            echo "<br/>Session is not validated!";
            ## ADD CUSTOM CODE HERE
        }
    }

}
Example #2 Login, Posted and Validated Classes
The example below is very similar to the example above, except that it has a stronger object oriented approach. Go over both code blocks to see understand the varying syntax. After all, OOP if fun.
class Login
{
    private $host = "localhost";
    private $user = "username";
    private $pw = "password";
    private $database = "database_name";

    public function db_connect()
    {
        $db = new PDO('mysql:host=' . $this->host . ';dbname=' . $this->database . '', $this->user, $this->pw) or die("Cannot connect to mySQL.");

        return $db;
    }
}

class Posted extends Login
{

    private $username;
    private $password;
    private $result;
    private $my_array;

    function __construct($username, $password)
    {
        $this->username = $username;
        $this->password = $password;

        $this->login2 = new Login();
        $this->db = $this->login2->db_connect();

        $command = $this->db->prepare("SELECT * FROM logins_test WHERE login =:login AND password = password(:password)");
        $command->bindParam(':login', $this->username);
        $command->bindParam(':password', $this->password);
        $command->execute();
        $result = $command->fetchAll();
        $this->result = $result;

        //var_dump($result);
        $my_array = array();
        foreach ($this->result as $row) {

            $my_array[] = $row;
        }

        $this->my_array = $my_array;
        if (!empty($this->my_array)) {
            $_SESSION['id'] = $this->my_array[0]['id'];
            $_SESSION['login'] = $this->my_array[0]['login'];
            $_SESSION['timestamp'] = time();
            echo $_SESSION['id'] . " - " . $_SESSION['login'] . " - " . $_SESSION['timestamp'];
            echo "<br/>Success<br/>";

            $this->mytime = $_SESSION['timestamp'];
            $this->myuser = $_SESSION['id'];
            $command = "INSERT INTO logins_validate VALUES (NULL,:user_id, :time_current)";
            $command1 = $this->db->prepare($command);
            $command1->bindParam(':user_id', $this->myuser);
            $command1->bindParam(':time_current', $this->mytime);
            $command1->execute();

        } else {
            echo "Wrong username or password!";
        }

    }

}

class Verified extends Login
{

    protected $mytime;
    protected $myuser;
    private $result;
    private $my_check;

    function __construct($myuser, $mytime)
    {
        $this->myuser = $myuser;
        $this->mytime = $mytime;

        //echo $this->mytime . "<br/>";
        //echo $this->myuser . "<br/>";

        $this->login3 = new Login();
        $this->db = $this->login3->db_connect();

        $command = $this->db->prepare("SELECT * FROM logins_validate WHERE user_id =:login AND time_check = :mytime");
        $command->bindParam(':login', $this->myuser);
        $command->bindParam(':mytime', $this->mytime);
        $command->execute();
        $result = $command->fetchAll();

        $this->result = $result;

        $my_check = array();
        foreach ($result as $row) {
           $my_check[] = $row;
        }

        $this->my_check = $my_check;

        if (!empty($this->my_check)) {
            echo "<br/>Session is validated!";
            ## ADD CUSTOM CODE HERE
        } else {
            echo "<br/>Session is not validated!";
            ## ADD CUSTOM CODE HERE
        }
    }

}
Create The Databases
CREATE TABLE IF NOT EXISTS `logins_test` (
  `id` int(10) unsigned NOT NULL AUTO_INCREMENT,
  `login` varchar(12) NOT NULL,
  `password` varchar(42) NOT NULL,
  `activation` varchar(40) DEFAULT NULL,
  `date_deactivated` datetime NOT NULL,
  PRIMARY KEY (`id`),
  UNIQUE KEY `login` (`login`)
) ENGINE=InnoDB  DEFAULT CHARSET=latin1 AUTO_INCREMENT=2 ;


CREATE TABLE IF NOT EXISTS `logins_validate` (
  `id` int(11) NOT NULL AUTO_INCREMENT,
  `user_id` int(11) NOT NULL,
  `time_check` int(11) unsigned NOT NULL,
  PRIMARY KEY (`id`)
) ENGINE=MyISAM  DEFAULT CHARSET=latin1 AUTO_INCREMENT=6 ;
The PHP OOP login code comes in two parts. One file is the class that connects to the database while the main file uses PDO objects to select and insert data.
Here is rundown of how it works. You have two main conditions; you have posted a login or you have not. If you post data by logging in, you will be successful or not. The code creates output based on success and failure.
Now, if there are no posted variables, you will either have a valid session or not. Validity is checked by matching the unix timestamp of your session variable against that of the value in the database. This way, only a valid timestamp will allow you to access sensitive code. Since PHP is more secure on some servers than others, this approach to check is taken.
Main File
include("class-login-PDO-form.php");
session_start();
$_SESSION['id'] = $_SESSION['id'];
$_SESSION['login'] = $_SESSION['login'];
$_SESSION['timestamp'] = $_SESSION['timestamp'];

$login = new Login();
$db = $login->db_connect();

//var_dump($db);
$username = array();
$password = array();
$myarray = array();
$myuser = array();
$mytime = array();
$my_check = array();

if ($_POST['username'] && $_POST['password']) {

    ##QUERY Sample#1
//$username = mysql_real_escape_string($_POST['username']);
//$password = mysql_real_escape_string($_POST['password']);
//$command = $db->prepare("SELECT * FROM logins_test WHERE login ='$username' AND password = password('$password')");

    ##QUERY Sample#2
    $username = $_POST['username'];
    $password = $_POST['password'];
    $command = $db->prepare("SELECT * FROM logins_test WHERE login =:login AND password = password(:password)");
    $command->bindParam(':login', $username);
    $command->bindParam(':password', $password);
    $command->execute();
    $result = $command->fetchAll();

    foreach ($result as $row) {
        $my_array[] = $row;
    }

    if (!empty($my_array)) {
        $_SESSION['id'] = $my_array[0]['id'];
        $_SESSION['login'] = $my_array[0]['login'];
        $_SESSION['timestamp'] = time();
        echo $_SESSION['id'] . " - " . $_SESSION['login'] . " - " . $_SESSION['timestamp'];
        echo "<br/>Success<br/>";

        $mytime = $_SESSION['timestamp'];
        $myuser = $_SESSION['id'];
        $command = "INSERT INTO logins_validate VALUES (NULL,:user_id, :time_current)";
        $command1 = $db->prepare($command);
        $command1->bindParam(':user_id', $myuser);
        $command1->bindParam(':time_current', $mytime);
        $command1->execute();

    } else {
        echo "Wrong username or password!";
    }
} else {
##VERIFY SESSION

    $mytime = $_SESSION['timestamp'];
    $myuser = $_SESSION['id'];

    $command = $db->prepare("SELECT * FROM logins_validate WHERE user_id =:login AND time_check = :mytime");
    $command->bindParam(':login', $myuser);
    $command->bindParam(':mytime', $mytime);
    $command->execute();
    $result = $command->fetchAll();

    foreach ($result as $row) {
        $my_check[] = $row;
    }

    if (!empty($my_check)) {
        echo "<br/>Session is validated!";
        ## ADD CUSTOM CODE HERE
    } else {
        echo "<br/>Session is not validated!";
        ## ADD CUSTOM CODE HERE
    }
}

echo "Is there an active session username: " . $_SESSION['login'];
echo "<br/>";
print_r($my_array);
?>
<form method="POST" action="<?php echo $_SERVER['PHP_SELF']; ?>">
    Username:<br/>
    <input type="text" name="username" value=""/><br/>
    Password:<br/>
    <input type="password" name="password" value=""/><br/>
    <input type="submit" name="submit"/>
</form>
Login Class
class Login
{
    private $host = "localhost";
    private $user = "username_goes_here";
    private $pw = "password_goes_here";
    private $database = "database_name_goes_here";

    /* function __construct()
    {

    }*/

    public function db_connect()
    {
        $db = new PDO('mysql:host=' . $this->host . ';dbname=' . $this->database . '', $this->user, $this->pw) or die("Cannot connect to mySQL.");

        return $db;
    }

}
Databases
The two databases used in this exercise can be created with code below.
CREATE TABLE IF NOT EXISTS `logins_test` (
  `id` int(10) unsigned NOT NULL AUTO_INCREMENT,
  `login` varchar(12) NOT NULL,
  `password` varchar(42) NOT NULL,
  `activation` varchar(40) DEFAULT NULL,
  `date_deactivated` datetime NOT NULL,
  PRIMARY KEY (`id`),
  UNIQUE KEY `login` (`login`)
) ENGINE=InnoDB  DEFAULT CHARSET=latin1 AUTO_INCREMENT=2 ;


CREATE TABLE IF NOT EXISTS `logins_validate` (
  `id` int(11) NOT NULL AUTO_INCREMENT,
  `user_id` int(11) NOT NULL,
  `time_check` int(11) unsigned NOT NULL,
  PRIMARY KEY (`id`)
) ENGINE=MyISAM  DEFAULT CHARSET=latin1 AUTO_INCREMENT=6 ;
This simple tutorial has a very small class and lots of procedural code. Click this link if you want to see some more advanced PHP OOP Login classes.
If you want to return a variable from a function, you have choices. The two methods discussed in this tutorial will be returning a global variable and returning a non-global variable.
Here is how the first code snippets works. The subtract function is called and it passes in 2 parameters. Then, the global modifier is used to make the $total variable have a global scope. After that, the $total variable is given a value, and finally, it is returned. As you can see, the variable behaves just as though it was created outside of the function and both echo statements are printed. If you did not have the global scope, the variable $total would be undefined and nothing would print.
function subtract($x,$y){
    global $total;
    $total = 101;

    return $total;

}

//prints the total
subtract(1,2);
echo "<br/>";

//prints the total
echo $total."<br/>";

if ($total == 101){
    echo "Hi";
}
Output
Returning Non-Global Variable
With example below, a variable is created and it is equal to the function and its parameters. In this case, the variable takes on the returned value from the subtract function.
function subtract($x,$y){
   // global $total;
    $total = 101;

    return $total;

}

//prints the total
$total = subtract(1,2);
echo "<br/>";

//prints the total
echo $total."<br/>";

if ($total == 101){
    echo "Hi";
}
Now that you have had some fun, you may want to expand on more PHP variable scope with PHP OOP.
The PHP ‘=’ equal sign is commonly used to create variables and arrays. Asides from that, you will you often encounter the ‘==’ equal sign which is often used in statements and to compare values. If you ever receive an error with unexpected ‘=’, you should check for the mispelling. A tip to avoid errors is to use a good PHP IDE like PHPStorm. These editors are smart and they can find errros that you can change before you even test the script in your browser.
Anyways, the example below shows an error. It also shows code that causes the error and how to fix it.
The error above is the impropper usage of a ‘=’ sign. One such error could be in an if statement when ‘=’ should have been ‘==’.
For example:
should be
if($var==22) {do this}
Atutor is an LMS built with PHP mySQL. Technically, LMS is an abbreviation for Learning Management System. Two examples of learning management systems are Moodle and ATutor. that can be used to manage students and teachers. Atutor is a good choice for your learning management system since it starts you off strong built-in features; such as messaging, creating courses and almost unlimited expandability options.
Atutor can be hosted on servers which use php and mySQL. During installation, Atutor does a check for your server and shows any compatibility issues you may have. Chances are, you will be okay.
1) Download the zip file from atutor.ca
2) Unzip the file.
3) Upload the folder to its desired location.
4) Create a database and user for Atutor.
5) Open the website; such as example.com/ATutor.
6) Follow installation instructions.
Note: You may need to manually create a content folder.
The lighweight PHP / mySQL application called Atutor LMS can be used for your learning management system. The themes can be found in your themes folder. Many other files which you may want to edit are located in the include folder.
The files which may require editing are header.tmpl.php and footer.tmpl.php. Themes can easily be altered and edited with a little css know-how. The file style.css, which is located in the theme’s folder is where you may want to alter the layout. Neveretheless, there are two more files which have significant affect on the website; header.inc.php and footer.inc.php. These two files are located in the ínclude ‘folder’.
By default, ATutor upzips with the name Atutor. You can FTP the folder into a desired website or folder. However, there are a couple of small changes that need to be made for the website to function properly.
Changes:
1) Open include/config.inc.php2)
Change:
define(‘AT_CONTENT_DIR’, ‘/home/user/public_html/example.com/ATutor/content/’);
Change To:
define(‘AT_CONTENT_DIR’, ‘/home/user/public_html/example.com/newname/content/’);
3) Open mysql database table AT_config
Change the session path:
ie)
Change:
/ATutor/
Change to:
/newname/
Building modules with ATutor is a straight forward process. They have a module called ‘Hello World’ can than can be used as an example.
Here are a few notes to creating an ATutor module:
Basically find and replace module names:
For example, you would open the files below and change HelloWorld, helloworld, hello_world to mymodulename. Just keep the cases in tact and it you have a module with a new name in a couple of minutes.
UPPER CASE
index_instructor.php
BOTH CASES
module.php
index_mystart.php
index_admin.php
To start using the module,
1) FTP the folder into the modules folder.
2) Install the folder as an admin.
3) Enable the module.
4) Edit the module. Custom PHP scripts and coding can be used to give almost any desired feature you want to add.
After you have a new module, you will more than likely make changes to all index files; like index_mystart.php and index_admin.php. The module.php file is used to add pages which can be accessed through links, etc. The module.sql file can be edited to add custom database tables and data.
There could come a time when you want type a quick query that will find duplicate values in a column. For example, you could have multiple values for an IP address or you could be checking how many times a user has logged into an account.
The code below can be used to find duplicate email addresses in a table where the column name is email. The query below searches for the records that exists more than once. Simply change the number 1 to a higher number for filtering.
SELECT * FROM tablename WHERE email IN (SELECT email FROM tablename GROUP BY email HAVING count(email) > 1) ORDER BY email ASC;
If you just want to make a quick count of the duplicates in a column, you can use the one-liner shown below.
SELECT COUNT(*), columname FROM tablename GROUP BY columname HAVING COUNT(*) > 1
Sorting arrays in PHP can be done with various functions. A multitude of sort functions can be found at PHP.net. One very common function to sort an array is with the simple sort() function.
Use PHP sort() function in its own line to sort an array. For example, date and datetime entries could be sorted by ascending. The sort function is placed on a line on its own after the original array is made. As you can see below, the array is sorted in alphabetical order.
$myarray = array("one", "two", "three");
sort($myarray);
print_r($myarray);   //yields Array (     [0] => one     [1] => three     [2] => two )
Depending upon your needs you may need to use a different sort function; since some will sort by key and some will sort by value. For example, take a look at the associative array below.The example below is sorted by key using ksort().
 $myarray = array("one" => "first", "two" => "second", "three" => "third");
ksort($myarray);
print_r($myarray);     //yields Array (     [one] => first     [three] => third     [two] => second )
PHP Switch is a method that outputs a specific case depending on the value of a variable. It is another method which is similar to using if, else if and else statements.
The switch statement below looks for the value of the variable $var which is the variable $run which is ‘running’. Since the case is ‘running’, the output is ‘hello’.
$var = 25;
$run = 'running';
$var = $run;
switch ($var) {
    case 25:
        echo "hi ";
        break;
    case 'running':
        echo "hello ";
        break;
    default:
        echo "default";
        break;
}
So, you have a mySQL table and you want to copy it. Although there are various methods to copy a table, the one shown below will demonstrate how to copy a mysql table in its entirety, including all data and structure.
Not only will the code below preserve the data, it will maintain the autoincrement field if it exists.
create table tablename2 like tablename1;
insert into tablename2 select * FROM tablename1;
The file_exists() function can be used to determine if a file exists. Once you know the condition, you can execute the code based on that result.
The code belows checks to see if there is a file called login.inc that is located one directory down from the current directory. If the file exists, it is included. Otherwise, the file login.inc that is located in the same directory is included.
$login_file = '../login.inc';
 	if (file_exists($login_file)) {
 	include('../login.inc');
 	}else{
 	include('login.inc');
 	}
When you use mySQL databases and manage them with phpMyAdmin, you must be careful about the collation. If you try to do a join and the collation is different with two tables, you can get an error and will have to change one of the table’s collation in order to receice your expected mySQL query results.
The example below shows the phpMyAdmin error which explains that the collations are an illegal mix. After that, it is explained that you could change the collation of the utf_general_ci table to utf_unicode_ci. For simplicity, it is always easiest to design all of your database tables and indexed columns with uniform collations in order to avoid errors.
PHPMYADMIN ERROR #1267 - Illegal mix of collations (utf8_general_ci,IMPLICIT) and (utf8_unicode_ci,IMPLICIT) for operation Solution Collate the tables ie) Change utf_general_ci to utf_unicode_ci
The array_diff() function in PHP is used to compare two arrays. After two arrays are compared, you will have an indexed array of results with all of the items that only belong to one of the two compared arrays.
## GET FIRST ARRAY
$command = "SELECT * FROM table1 ";
$result = mysqli_query($db, $command);
while($row = mysql_fetch_assoc($result)) {
$id = $row['ID'];
$ID1[] = $id;
}

## GET SECOND ARRAY
$command2 = "SELECT * FROM table2 ";
$result2 = mysqli_query($db, $command2);
$rows_count = mysqli_num_rows($result2); if($rows_count >0) { while($row = mysqli_fetch_assoc($result2)) { $id = $row['id']; ## MAKE AN ARRAY OF ALL $id2[] = $id; } } else{ $id2[]=0; } ## COMPARE THE DIFFERENCE OF THE 2 TABLES AND GET THE DATES NOT FILLED IN FOR EACH ID $result_final = array_diff($1id, $id2);
The code below is about as simple as it gets to show how public, protected and private properties can be accessed.
As you can see, the parent class ‘tag’ has a public, protected and private property. After the $test object is instantiated with the line $test = new Form(); the constructor runs. As you can see, it only outputs the public and protected properties. On the bottom of the page, only the public property ‘$test->name’ will print.
class Tag
{

    public $name = "Peter";
    protected $name2 = "Paul";
    private $name3 = "Mary";


}

class Form extends Tag
{

    function __construct()
    {
        echo $this->name;
        echo $this->name2;
        echo $this->name3;
    }


}

$test = new Form();
echo "<br>";

echo $test->name. " \n";
echo $test->name2. " \n";
echo $test->name3. " \n";
When you are using protected properties, they can be accessed with subclasses. However, if you want to print a protected variable from its parent class after you instantiate an object, you will receive a warning message.
The easiest way to explain this is to show the following example. As you can see, if you instantiate an object in the subclass and run a protected method from its parent, you will have access to all properties in the parent class and be able to return it. The reason for this is that the subclass has access to the method of the parent class. Then, the parent class method has access to all properties. However, if the method was private, you would not be able to use the method from the child class.
Besides that, you can output a property from the parent class using echo $test->name;. But, you will not be able to print a protected or private property from the instantiated Form() object. Therefore, printing $test->name2 gives you nothing.
All in all, the usage of public, protected and private properties and methods are what make OOP PHP such a well, organized technique for writing disciplined code.
class Tag
{

    public $name = "Peter";
    protected $name2 = "Paul";
    private $namethree = "Mary";
    private $myvar = "test";

    public function fromparent()
    {
        echo "hey public";
    }

    private function fromprivateparent()
    {
        echo "hey private";
    }

    protected function fromprotectedparent()
    {
        echo "Hey protected variable called: ";
        //$this->myvar = "testin";
        return $this->myvar;
    }

}

class Form extends Tag
{

    public $test = '';

    function __construct()
    {
        $this->test = new Tag();
        $this->myvar2 = $this->test->fromprotectedparent();
        return $this->myvar2;
    }


}

$test = new Form();
echo $test->myvar2 . " \n";
echo "\n";

echo $test->name. " \n";
echo $test->name2. " \n";
The whole essence of this brief tutorial is to emphasize that fact that protected functions cannot be used by an unrelated class. However, they can be used by a child class. With that said, the block of code will allow you to see a public function that is displayed in another class but the protected function will not. If you changed the line of code protected function from_unrelated_protected() to public function from_unrelated_protected() you will see that the function would work and display output since it is public.
class Tag
{

    public $a;
    public $b;
    public $c;

    public function from_unrelated_class()
    {
        echo "hey public";
    }

    public function from_unrelated_public()
    {
        echo "Hey public variable called: ";
        $this->myvar = "testin";
        return $this->myvar;
    }

    protected function from_unrelated_protected()
    {
        echo "Hey protected variable called: ";
        $this->myvar = "testin";
        return $this->myvar;
    }


}

class Form
{

    public $test = '';

    function __construct()
    {
        $this->test = new Tag();
        $this->myvar2 = $this->test->from_unrelated_public();
        return $this->myvar2;
    }

    function get_protected(){
        $this->test2 = new Tag();
        $this->myvar3 = $this->test2->from_unrelated_protected();
        return $this->myvar3;
    }


}

$test = new Form();
echo $test->myvar2;
echo $test->get_protected();
Output

If you do change the line of code:
protected function from_unrelated_protected()
to:
public function from_unrelated_protected()
you will see that the function will display output.
Properties and methods come in the form of public, private and protected. Public means any class can use them. Meanwhile, private properties can only be used by the class where they are declared and protected properties can be used by the class that defines them and their subclasses.
The code below shows how a subclass can call a protected function from its parent class from the constructor. The property from the parent class is returned from the function. After that, this variable is returned. The code near the bottom $test = new Form(); instantiates the object. The property is printed using echo $test->myvar2;
<?php

class Tag
{

    public $a;
    public $b;
    public $c;

    public function fromparent()
    {
        echo "hey public";
    }

    private function fromprivateparent()
    {
        echo "hey private";
    }

    protected function fromprotectedparent()
    {
        echo "Hey protected variable called: ";
        $this->myvar = "testin";
        return $this->myvar;
    }

}

class Form extends Tag
{

    public $test = '';

    function __construct()
    {
        $this->test = new Tag();
        $this->myvar2 = $this->test->fromprotectedparent();
        return $this->myvar2;
    }


}

$test = new Form();
echo $test->myvar2;

?>
Output
With PHP, you can use call_user_func to call a function and use its parameters. The example below will demonstrate how it can be used with the str_replace() function. Under that, you will see how to use str_replace() to retrieve the same results.
In the first block, you will see that the function ‘str_replace’ is the first parameter, while the second, third and fourth parameters are those used by the str_replace function. So, if you use str_replace() on its own, your parameters are find, replace, from string while the call_user_func() is the function name, find, replace, from string.
$a = 'testin';
$replaced = call_user_func('str_replace', 'in', '', $a);
echo $replaced . "\n";
$a = 'testin';
$replaced = str_replace("in", '', $a);
echo $replaced . "\n";
Example #2
Here is a another example that uses a custom function called my_test(). Again, like the example above, it shows a tradition way to receive the desired results and the technique using call_user_func(). With this example, one variable is passed into the function and the same variable is returned with a new name. Finally, the variable is printed.
function my_test($input){
return $input;
}
$input = my_test('Bohemia');
echo $input . "\n";
$example = call_user_func('my_test', 'Bohemia');
echo $example . "\n";
Example #3
This example is similar to the one above, except that two parameters are into the function; one called ‘Bohemia2’ and the $example variable that was created from the previous example.
function my_test2($input, $second) {
return $input . $second;
}
$input2 = my_test2('Bohemia2', $example);
echo $input2 . "\n";
$example2 = call_user_func('my_test2', 'Bohemia2', $example);
echo $example2 . "\n";
Output
I am not sure what got into me one week, but, I sure had Fiverr fever. At the time, I was focusing on SEO and decided to see what five bucks would buy me. After reading various blogs and forums, I obviously did not expect much since more reviews were on the negative side. But, curiosity got the better of me, so I pulled out that credit card and made many back to back payments. I bought some PR 8 and PR 9 backlinks links, 150 edu backlinks and two SEO reports.
If you are still reading, you may wondering, how did things go? Well, the advertised handmade made links looked almost authentic, but not quite. The links were the same in all sources and looked machine generated, aside from the link address. I though he was using some auto mechanisms for slamming out so many $5 specials. But, they were ok.
The large volume .edu links were horrible; everything from not looking natural to a spinner that had no idea what it was talking about. After seeing the result, I only hoped my ranking would not be jeopardized. Never again would I use that service, even if I was paid to do so.
Fiverr SEO Reports
I did pay $10 for 2 SEO reports from top sellers and recommended vendors. One vendor, who had ranked well gave me an excel file that looked like it was made very quickly with Google Adwords, then, added a few columns based on the output. This was a waste and nothing that I do not do often myself. Another $5 down the tube.
Let Ther Be Light
However, I did find one vendor that provided a good detailed report. All I had to do was give them 1-3 keywords. They sent me a report of my website and the main competitors. This was done with decent software which can be moderately costly. I would certainly use this vendor again, unless there came a time when I wanted to pay $70 / month for similar software that analyzed my website and the competition. So, if you will need less than 15 reports a month, this can be a very valuable service since you obtain good results.
When you use classes and OOP, you have various ways to return values. Asides from using OOP, you can also call functions and execute them without object scope.
With the Form class below, the values returned are ‘added’, ‘test2’, ‘gedit’, ‘test2’ and ‘apple’.
The first value ‘added’ was passed into the be() method and echoed within the function. The second value ‘test2’ was returned from the be() method. Both of these values are delivered from the code echo $test->be(‘added’);
The third value ‘gedit’ came about from the set_var() and get_var() methods. The line echo “<br/>New Value: ” . $test2->get_var(); caused it to be printed.
The fourth value ‘test2’ came about by using the instance name and its property name. Thus, $this->b used within the class can be output as $test2->b from outside the class; as long as there is an instance $test2. The $test2 instance was instantiated with $test2 = new Form();
Finally, ‘apple’ was printed using Form::be(‘apple’); If you look at the image, you will see a warning because this method has no object scope; thus return $this->b; does nothing. From a procedural programmers point of view, using the scope resultion operation is similar to using a regular procedural PHP function. Note, if you comment Form::be(‘apple’); you will see that you can return a variable from the class just as you would with procedural PHP. The line $procedural = Form::be_procedural(‘orange’); will return the variable.
class Tag {

    public $aa = "";
    public $bb = "";
    public $dd = "";

   }

class Form extends Tag {

    public $a = "test";
    public $b = "test2";
    public $d = "testd";

    public function be($c) {
        echo $c . "<br/>";
        return $this->b;
    }

    public function be_procedural($c) {
        echo $c . "<br/>";
        return $c;
    }

    public function set_var($value) {
        $this->new_value = $value;
    }

    public function get_var() {
        return $this->new_value;
    }

}

$test = new Form('one', 'two');

echo $test->be('added');
echo "<hr>";


$test2 = new Form();
$test2->set_var('gedit');
echo "<br/>New Value: " . $test2->get_var();
echo "<br/>B Function: ". $test2->b."<br/>";
?>
<hr>
<?php
//NO OBJECT SCOPE
Form::be('apple');
$procedural = Form::be_procedural('orange');
echo $procedural;
?>
Browser Output

MYSQL allows you to use several methods to find a precise string in a database column. A quick method is to use the LIKE ‘%mystring%’. This method will return any string which begins or ends with mystring. This can be quite useful for searching, but, if you want to output data that only has the precise match of ‘mystring’ in a sentence, then, you will need to find a regular expression.
REGEXP
The sample coding below will be used to modify all characters in a column to lowercase while the REGEXP operator will then find the match. The object of this exercise is to gather all articles from two categories that contain the text ‘OOP’ or ‘object oriented programming’ and display them with links back to their articles.
As you can see, mySQL uses ‘[[:space:]]’ as whitespace; unlike the usual \s* you would use in PHP or PERL. You may want to note that if you added ‘[[:space:]]’ in front of the word ‘object’, you would not select the data from the fulltext field if there were html characters in front of the object word. An example of characters in front would be an article that had a link on the words object oriented programming.
$command = "SELECT bc.id, bc.title, bc.alias as alias, bc.created as created, pl.permalink as permalink FROM prefix_content as bc, prefix_categories as bcat, prefix_myblog_permalinks as pl WHERE bc.sectionid='6' AND bc.catid IN(70,83) AND bcat.id=bc.catid AND (LOWER(bc.fulltext) REGEXP '[[:<:]]oop[[:>:]]' || LOWER(bc.fulltext) REGEXP 'object[[:space:]]oriented[[:space:]]programming' ) AND bc.state = 1 AND pl.contentid=bc.id ORDER BY bc.created DESC";
$result = mysqli_query($db, $command);
This class can be used to output desired data from a Json string. Here is how it works. The Json string is fed into the constructor within the ParseJson class. Then, the public convert_to_array() function is called while passing in the $this->jsonString property.
Within the function, the Json string is decoded and array is returned. The array takes on the instance name and becomes $my_json->myarray. Thus, the loop which resides outside of the class parses the array using $my_json->myarray as $key => $val.
Class ParseJson
{

    public $jsonString;

    function __construct($json_string)
    {
        $this->jsonString = $json_string;
        $this->convert_to_array($this->jsonString);
    }

    public function convert_to_array($json_string)
    {
        // The second parameter in json_decode has a value of true. This is required to end up with an array.
        $this->myarray = array(json_decode($json_string, true));
        return $this->myarray;

    }


}

$json_string = '[{"A":"MyName","B":"www.example.com","C":"www.example.com/2/"},{"A":"MyName","B":"www.example.ca/","C":"www.example.ca/2/"}]';

$my_json = new ParseJson($json_string);

//print_r($my_json->myarray);

$i = 0;
foreach ($my_json->myarray as $key => $val) {
    $i = $i + 1;

    foreach ($val as $key2 => $val2) {
        echo $key2 . "-" . $val2['B'] . "<br/><br/>";
    }
}
?>
There could come a time, when you have a Json string and you want to parse it as a regular array. There are many reasons why you could have this particular Json string.
For example, recently, I was examining the links of some high ranked websites for specific keywords and wanted to make an attempt to compete for those keywords. After analyzing their titles, content, keywords, headings and other factors, I finally came to the dreaded links. I was able to gather all of their incoming links, but, they were contained in a Json string.
So, at this point, I made a quick parser that could decode the Json string to a PHP array. Then, the array is parsed with PHP. Actually, I used a nested foreach loop to parse the value from a specific key.
The snippet below shows how easily this can be done.
<?php
error_reporting(0);
$var = '[{"A":"MyName","B":"www.example.com","C":"www.example.com/2/"},{"A":"MyName","B":"www.example.ca/","C":"www.example.ca/2/"}]';

// The second parameter in json_decode has a value of true. This is required to end up with an array.
$myarray = array(json_decode($var, true));

//print_r($myarray);

$i = 0;
foreach ($myarray as $key => $val) {
    $i = $i + 1;

    foreach ($val as $key2 => $val2) {
        echo $key2 . "-" . $val2[B] . "\n";
    }
}
?>
Browser Output
1-www.example.ca/
Learning how to do mySQL joins is essential to anybody who needs to use mySQL on a regular basis. Since many web applications use joins in the coding, knowing what is happening is essential to troubleshooting and saving time when you need to make a customization.
A MYSQL join is a very simple concept. If you want to tie database tables together, they need matching keys. As long as every table has at least one key that matches another table, you can join data from one table to another and voila, you have custom output.
Where will I find mySQL Joins?
Web applications like Worpdress, Magento, Open Cart, Prestashop, Joomla, Drupal and so many more use mySQL joins. If you ever advance to the point where you can write custom PHP / mySQL applications using procedural code or OOP, you will more than likely write lots of mySQL queries. With practice, you will be able to avoid mistakes and understand the coding. It will make your workflow much easier and you will know read the code more as though it is your first speaking language.
If you cannot make sense of joins or do not care to improve your mySQL, you could end up spending a lot of time to do a simple task. An example of this is when someone installs a WordPress website with very little coding skills. One day, a client could want to make some larger upgrades that involve coding mySQL joins and you will be lost. You could lose the client too if he senses your lack of skills.
MYSQL JOIN EXAMPLES
Here are some examples of mySQL joins in this blog:
This article will explain how to develop a website. The methods explained may not be suitable for all users, but, the could enable you to start with a blank editor at point A and end up with a completed website at point B which loads at example.com.
To build a web site will need a domain name, the website files and database(if using a database) and hosting. The domain name must point to the location where the website is hosted. For example, you can point the nameservers for example.com to ns1.example.com and ns2.example.com.
Those are the basics to having a website on the web. However, I could go on about hosting and files until you would be so bored reading this you would be missing the good stuff which is about to come.

The Files
As far as the files go, they could be written from a professional programmer or they could be a commercial template with the words and images swapped. This area is wide open and the skill range can be huge. The coding could be php, C#, Java, Python, html, css, Jquery and mySQL… to name a few. For a noob, you may only use a template and edit the HTML files and swap images.
The Hosting
Cheap is a good way to start since traffic needs to be earned and it can take quite a while to have so much that you need a better service.
Full Stack Web Developer
Getting to the expert zone of things, you would have an overall grasp of the Linux server, SEO, programming in multiple languages and some graphic design skills. Of course, you may have weaknesses.
As a full stack web web developer, you possess the skills to oversee all parts of a project and manage all who are involved.
For example, you could be a Linux and PHP / mySQL expert that does the heavy lifting and website set up. At this point, you have many options to complete a project. You could use a system like Smarty templating and outsource the design work. You can put the jobs up for bid, or use a service like Fiverr. You could send a rough image to graphic artist on Fiverr and get a $5 job that is a good as a local web designer who thinks it is worth $50.
Since the web design work and imagery has so many options for you to use, the full stack web developer can pick and choose what SEO and design work to hire that will save lots of time and yield good results. This is efficiency.
This tutorial is a bare bones login class that can be used to connect to a database so that you can execute custom queries. It consists of two files; one contains the actual Login class while the other file will instantiate a new object and gather a variable from that class.
Rundown
The login class has four private properties; $host, $user, $pw and database. The class also uses the constructor which accepts the four arguments. These argumments are set as the properties.
The non-class file sets values for the variables that are passed into a new instantiated object. The code for this is $login = new Login($host, $user, $pw, $database);
Finally, the $db variable is returned using the db_connect() method. Now, the $db variable can be used to query the database. An example query shows how this occurs.
Login Class(class-login.php)
class Login
{
    private $host;
    private $user;
    private $pw;
    private $database;


    function __construct($host, $user, $pw, $database)
    {
        $this->host = $host;
        $this->user = $user;
        $this->pw = $pw;
        $this->database = $database;
    }


 function db_connect() {

 $host = "localhost";
 $user = "user";
 $pw = "password";
 $database = "database_name";

 $db = mysqli_connect($host, $user, $pw, $database) or die("Cannot connect to mySQL.");

 return $db;
}

}
Other File(login.php)
include("class-login.php");

$host = "localhost";
$user = "username";
$pw = "password";
$database = "database_name";

$login = new Login($host, $user, $pw, $database);

$db = $login->db_connect();

var_dump($db);

$command = "SELECT * FROM tablename ORDER BY id ASC LIMIT 1";
$result = mysqli_query($db, $command);

while ($row = mysqli_fetch_assoc($result)) {
    echo substr($row['name'], 0, 1000);
}
The purpose of this two small code snippets is to provide a very lean, simple database connection class that you can use to query your mySQL database using PDO(PHP Data Objects). The coding consists of a pair of files; one of which is the class and the other which is the file which instantiates an object that provides a useful $db variable which can be used to make the queries.
Overview
A new object is instantiated and the database parameters are passed into the constructor. After the parameters are passed in, the db_connect() method is called and it returns the $db. The class does the work of creating a new instance of the PDO object and then returns it with the name $db. Now, $db can be used to do select, insert, update and delete statements. Since you are using a PDO object, you stick with the various methods that are available with the class; such as the execute() method.
Class File
class DatabaseConnect
{
    private $host;
    private $user;
    private $pw;
    private $database;


    function __construct($host, $user, $pw, $database)
    {
        $this->host = $host;
        $this->user = $user;
        $this->pw = $pw;
        $this->database = $database;
    }


    public function db_connect()
    {
        $db = new PDO('mysql:host=' . $this->host . ';dbname=' . $this->database . '', $this->user, $this->pw) or die("Cannot connect to mySQL.");

        return $db;
    }

}
Other File
include("class-login-PDO.php");

$host = "localhost";
$user = "username";
$pw = "password";
$database = "database_name";

$login = new DatabaseConnect($host, $user, $pw, $database);

$db = $login->db_connect();

var_dump($db);

$command = $db->prepare("SELECT * FROM cms");
$command->execute();
$result = $command->fetchAll();

foreach ($result as $row) {
    $my_array[] = $row;
}

print_r($my_array);
So there you are, you have setup that ecommerce store with a platform like Magento, Prestashop or Open Cart. After some time using and testing your website, you may have noticed you would like to upgrade the performance.
On the other hand, you may be researching your platform and want to know how to make a website that is fast and handle lots of traffic. Out of the box, Open Cart could be a great solution since it seems to run very fast right out of the box. Meanwhile, Prestashop and Magento, both of which have great features, may be slow loading and need fine tuning for a good, production website.
With that said, the rest fo the tutorial will explain how to upgrade the performance using PHP Memcache and the Linux Memcached server. For starters, this tutorial assumes you have them both working. if you do not, you can complete those steps at the web page https://fullstackwebstudio.com/locations/coding-blog/php-memcache-and-linux-memcached.html.
Magento
After Memcache is working, you can make Magento use it by altering the local.xml file in the /app/etc folder. An example snippet can be found at siteground.com/tutorials/supercacher/magento_memcached.htm. For Magento, that is all there is to do.
Prestashop
To use Memcache with Prestashop, login as the administrator. Then, select Advanced Parameters >Performance. After that, you add the server IP address and port and Save it. That is all there is to it.
Open Cart
Open Cart has many commercial Memcached options. You simply pay a few dollars, install a plugin and follow instructions from the plugin developer. Plugins can be found at http://www.opencart.com/index.php?route=extension/extension&filter_search=memcache.
Although the plugins are not free, do not let that discourage you from using Open Cart. It has its own caching system you can use when you install it and it is a very fast ecommerce application. Until you receive an abundance of traffic, you may never even need to consider using the Memcached server.
If you grow into a situation where your store receives so much traffic that you want to use Memcached, $25 should not break the bank.
Monitoring Memcached
The Linux command shown below can be used to view hits and other Memcached data.
root# memcached-tool 127.0.0.1:11211 stats
If you have a new page that you want crawled you can speed up the process using Google Webmaster Tools. At one time, a typical webmaster may have built a static or dynamic web page, or blog post and wondered how long it will take for Google to crawl the page. Often, it can be just a matter of days; especially if you are adding fresh content on a regular basis.
However, if you use Google’s webmaster tools, you can have that page indexed within minute(s). The simple steps for doing this are shown below. All you need to do is login to Webmaster Tools before performing the following sequence of events.
Once you have logged in to Webmaster Tools, you click the website link. In this case, the link is fullstackwebstudio.com/locations/coding-blog.
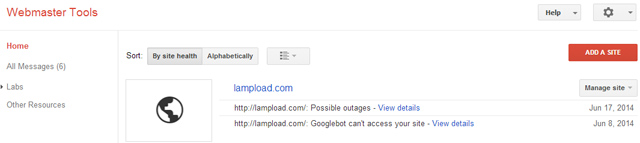
After the next page opens, you select ‘Crawl’ > ‘Fetch as Google’.
Finally, you add the url into the input box and select ‘Fetch’. After you select ‘Fetch’, you click the ‘Submit to Index’ button that is displayed after you select ‘Fetch’. Once you have done that, select the radio button “Crawl only this URL” and click ‘Go’.
At this point, you can begin to browse Google for your new web page.
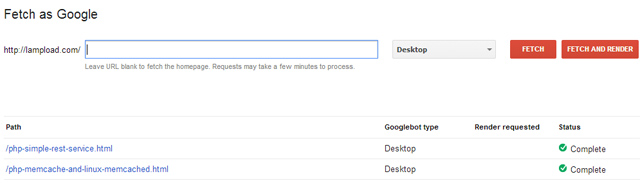
This tutorial is a simple, lean-coded rest service that can be used to allow users to access specific data. Like other APIs from Flickr and other websites, you can sign up for an API that you can use on your own website. Normally, you add your username and password into a file and you are good to go.
Often, your API can accept an input and return an array of results. This tutorial will show how an authenticated user can access an array of data from your website using this rest service. It consists of three files; a client script, your server script and an .htaccess file.
Here is what is happening. When the client runs the file, it sends a curl request to the restful.php file. See the htaccess file below if you are confused why it is this file. It uses this file because the ‘s’ in the url becomes a $_GET variable. Once curl hits the page, it checks for the $_GET string and post variables.
Then, the condition is met and the output array is delivered by via an encoded JSON variable. Since curl returns a string, encoding the data with JSON and decoding in the client script will allow you to keep the array intact.
As you can see, the client can parse the array and do whatever he wants with it. In a real world rest service, you could query a database and return an array of results to a client based on the member’s privilege.
In addition to that, the client could have a search box where they input strings of text for searching. Then, the restful.php file could create an array or an error based on the input.
Client File
$url = 'http://example.com/foldername/s';
$curl = curl_init($url);
$curl_post_data = array(
    "username" => 1,
    "password" => 'password1',
);
curl_setopt($curl, CURLOPT_RETURNTRANSFER, true);
curl_setopt($curl, CURLOPT_POST, true);
curl_setopt($curl, CURLOPT_POSTFIELDS, $curl_post_data);
$curl_response = curl_exec($curl);
curl_close($curl);

$array = json_decode(trim($curl_response), TRUE);
print_r($array);
Server File
$var = array();
$var = htmlentities($_GET['name']);
if ($var == 's') {
    if ($_POST['username'] == 10 && $_POST['password'] == 'password1') {
        $myarray = array(1, 2, 3, 4, 5, 6, $var);
        echo json_encode($myarray);
    } else {
        $myarray = array(100, 101, 102, 103, 104, $var);
        echo json_encode($myarray);
    }
} else if ($var == 'st') {
    if ($_POST['username'] == 10 && $_POST['password'] == 'password1') {
        $myarray = array(1, 2, 3, 4, 5, $var);
        echo json_encode($myarray);
    } else {
        $myarray = array(100, 101, 102, 103, $var);
        echo json_encode($myarray);
    }
}
HTACCESS File
Options +FollowSymlinks
RewriteEngine On
RewriteCond %{REQUEST_FILENAME} !-d
#RewriteRule ^([a-zA-Z_-]+)$ restful.php?name=$1 [nc,qsa]
RewriteRule ^([A-Za-z_0-9]*)$ restful.php?name=$1 [nc,qsa]
Using Memcache with PHP programming allows you to cache output and mySQL queries. Essentially, you can cache whatever you want. There are obvious benefits to caching; like retrieving web pages mush faster while using less server resources. If you dig some data up around the web, you will see that some very large websites use memcached.
In order to use memcache with php you need to install the memcached server on your Linux system and you need to install memcache module for PHP. There are zillions of tutorials which explain how to do this. You can Google your operating system and find the method for your chosen Linux distro.
Installing memcached server from source can be a solution if quick installation methods like ‘sudo apt-get install memcached’ or ‘yum install memcached’ fail. One tutorial can be found at http://www.cyberciti.biz/faq/howto-install-memcached-under-rhel-fedora-centos/. Another memcached server method is shown below. Be patient and you will have a successful installation.
Sample Memcached Server Installation
root# Install memcached pecl
root# yum install memcached php-pecl-memcache
Once you have memcached installed and working you can start and stop its services with the following commands:
root# /etc/init.d/memcached start
root# /etc/init.d/memcached stop
root# /etc/init.d/memcached restart
In addition to running the service, you can use chkconfig to start it upon boot.
To add the service to chkconfig,
root# /sbin/chkconfig --add memcached
To see if the service was added to chkconfig,
root# /sbin/chkconfig --list memcached
memcached           0:off   1:off   2:off   3:off   4:off   5:off   6:off
To add the service to start upon boot,
root# /sbin/chkconfig memcached on
To check that the service was changed with chkconfig,
root# /sbin/chkconfig --list memcached
memcached           0:off   1:off   2:on    3:on    4:on    5:on    6:off
Installing memcache for PHP can also be done via the command or using EasyApache with Web Host Manager.
Alternatively, you can install memcache from source. An example installation is shown below. The ‘foldername’ is one you choose and the path can be added to the php.ini file; which will be explained later in this tutorial.
root# mkdir tmp
root# cd tmp
root# wget http://pecl.php.net/get/memcache-2.2.7.tgz
root# tar -zxvf memcached-2.2.7.tgz
root# cd memcached-2.2.4
root# phpize && ./configure --enable-memcache && make
Find where php stores it modules from php.ini ie) /usr/local/lib/php/extensions/foldername
Copy modules/memcache.so to /usr/local/lib/php/extensions/foldername
root# cp modules/memcache.so /usr/local/lib/php/extensions/foldername
Once you have installed memcache you may have to add the extension to your php.ini file. Below are two methods that will point to the memcache.so file; one uses a typical path and the other uses the absolute path. In some cases, you will need to use the absolute path in order to make it usable.
extension = "memcache.so"
extension = "/usr/local/lib/php/extensions/foldername/memcache.so"
To see if memcache is usable you can use the command echo phpinfo(); and find memcache in the list.

Finally, if you are still with me, you try some simple scripts below to test your memcache. To make things easy, the cache is only set for 30 seconds so that you can see your data does in fact cache. If you hit a page on the first go, you should receive the first query from mySQL.
On the second go, you should receive the query from memcache. After 30 seconds, you can try again and it should hit mySQL again. On a production site, you probably want to set the cache for longer time periods.
Code
include('../public.inc'); //include the file that connects to database
session_start();
$db = connect();


/**
 * First Simple Example
 */

$mem = new Memcache();
$mem->addServer('localhost', 11211);
$mem->set('key', 'my_cached_string', 0, 30);
$test = $mem->get('key');
var_dump($test);
echo "<br/>";


/**
 * Second Simple Example
 */

$mem_instance = new Memcache();
$mem_instance->addServer('localhost', 11211);

$query = "SELECT * FROM tablename ORDER BY id ASC LIMIT 1";
$command2 = mysqli_query($db, $query);
$my_key = "KEY" . sha1("CAN BE ANYTHING. DUMMY FUNCTION SO THE GET METHOD WON'T FAIL");
//GET QUERY KEY
$result = $mem_instance->get($my_key);

if (!$result) {
    $command = "SELECT * FROM tablename ORDER BY id ASC LIMIT 1";
    $result = mysqli_query($db, $command);
    $row = mysqli_fetch_assoc($result);
    // SET QUERY KEY
    $mem_instance->set($my_key, $row, 0, 30);
    echo "Result from mysql<br/>";
    return false;
}

echo "Result from memcache:<br/>";
echo var_dump($result);
return 0;

?>
In a addition to memcached, you can use the mysql query cache to cache queries too. On top of all of this, you can use the Varnish cache which will bypass all of this and pull a cached Varnish page.
Troubleshooting Memcached Server
If you are testing the memcached server, you may want to flush the cache. The snippet below explains how to clear it.
telnet localhost 11211
flush_all
quit
Angular JS is a Javascript framework that fits in well with Smarty templates. To use the Angular JS framework, all you need to is alter the <html> tag tag to <html ng-app>, add the script angular.min.js into the head and add ng-model tags to your form elements.
To use Angular JS with Smarty has a little twist from a basic html page. You will use literal tags around the angular js tags which look like {{ng-model value goes here}}. So, with the example below, an html file would write the output of the first name by using {{first_name}} while Smarty will look like {literal}{{first_name}}{/literal}. A you can see, the tags for Angular JS are very similar to Smarty which makes them very easy to use with Smarty templates.
The example below will show the complete usage.
.php File
<?php
if (count($_POST) > 0) {
// die("Works");
    print_r($_POST);
    echo $_POST['first_name'] . " - " . $_POST['last_name'];
}

include("libs/smarty.class.php");
$smarty = new Smarty ();

$smarty->display("includes/header.inc.tpl"); //compile and display output
$smarty->display("angular.tpl"); //compile and display output
$smarty->display("includes/footer.inc.tpl"); //compile and display output
?>
.tpl File
<!doctype html>
<html ng-app>
<head>
    <script src="https://ajax.googleapis.com/ajax/libs/angularjs/1.3.0-beta.15/angular.min.js"></script>
</head>
<body>
<div>
    <form name="job_form" method="post" action="{$smarty.server.PHP_SELF}">
        <p>First Name:</p>
        <input type="text" ng-model="first_name" name="first_name" placeholder="">

        <p>Last Name:</p>
        <input type="text" ng-model="last_name" name="last_name" placeholder="Last Name Here">
        <input type="submit" name="submit" value="Submit"/>
    </form>
    <hr>
    <h2>Direct output:</h2>

    <p>My name is {literal}{{first_name}}{/literal} {literal}{{last_name}}{/literal}!</p>
</div>
</body>
</html>
Browser Output
My name is John Smith!
Add Custom Footer
If you have a computer with a faulty Windows installation, or a pc that just runs too slow with Windows, you may want to give Linux a try. Two distributions which have a modern look feel and functionality are Ubuntu and Linux Mint. Generally speaking, you can download the iso and write the image to a USB stick or CD. Then, you allow your BIOS to boot from USB or CD and go through a typical installation.
Installing Linux does have many advantages beyond having a working system. For example, I have a desktop PC with dual hard drives. One hard drive has Windows Vista and the other Linux Mint. The performance is night and day. The Windows Vista is slower all the way around; from boot to general usage. Meanwhile, the performance of Linux Mint on that 1GB memory PC can be compared to my higher end Laptop when it runs Windows 7. The performance of Ubuntu partitions and Virtual machines on the same laptop is much faster too.
With those details in mind, you should have renewed hope with your older, malfunctioning computer. Alternatively, if you are a web developer and need a decent working machine you could skim some costs and turn somebody’s junk into your own treasure.
The key with installing Linux could be patience. In some cases, the drivers or graphics could limit your installation. For example, I recently installed Ubuntu on an old HP DV9000 and the graphics did not look desirable at first. After some tweaking, I could get my desired resolution, but the system had a few errors. Being impatient and finding this buggy, I immediately decided to install the latest Linux Mint.
This failed, even though the same version installed fine on my desktop PC. So, I decided to install the previous version of Linux Mint. Ten minutes later, all went well. So, if you don’t want to get down and dirty with command-lining, but just want a usable faster Internet surfing device, it should not take you long to be up and running.
Another area where you could have issues with Linux is networking. In some cases, your pc will work upon installation, while at other times the Internet connectivity could cause issues. If you want to be up and running with Ethernet or wireless, a no-brainer solution is to buy USB wireless or USB network adapters that are plug and play compatible with Linux. Then, you can just plugin them in and go.
Otherwise, you may need to find and install drivers. Personally, I find ordering a few of each on Ebay for around $5 each is worth the savings of hunting down and installing drivers. Another option, if you have at least 1 wireless network adapter, is to connect to the Internet and hopefully download your desired driver.
So there you go. The above lesson for converting the Windows machine to a Linux machine had been covered. I would like to remind you that the key points you should remember are to install a Linux installation that works perfectly upon installation. The only minor change you should have to make is to alter the screen resolution. If this is not possible or you have errors, move on and find one that does work better. In addition to that, having external wireless or ethernet adapters will make your Internet connections painless experience.
Smarty templates allow you two methods to include files. One method would be to use your ‘.php’ file and the other is to use the ‘.tpl’ file.
Method A
.php File
include("libs/smarty.class.php");
$smarty = new Smarty ();

$smarty->display("includes/header.inc.tpl");
$smarty->display("include.tpl");
$smarty->display("includes/footer.inc.tpl");
.tpl File
<p>
Here is some text from the main file.
</p>
Method B
.php File
include("libs/smarty.class.php");
$smarty = new Smarty ();

//$smarty->display("includes/header.inc.tpl");
$smarty->display("include.tpl");
//$smarty->display("includes/footer.inc.tpl");
.tpl File
{include file='includes/header.inc.tpl'}
<p>
Here is some text from the main file.
</p>
{include file='includes/footer.inc.tpl'}
Same Browser Output From Both Methods
Here is some text from the main file.
Add Custom Footer
Whether you build a simple website or web application with Smarty, you want to use functions. With Smarty, you have two options for which you can use them.
For one, you can code them into your existing ‘.php’ file and use them from there since a function will will either output a print statement, or return a string or array.
Your second option is to call them from within the design(.tpl) file. You are able to successfully call and use functions using the Smarty {insert} tag. An example is shown below.
Function
This simple function will print the text Hello World, create a variable called $new_world and return it from the function. All functions will have ‘smarty_insert_‘ precede the actual function name, which in this case is called hello_world.
 <?php
function smarty_insert_hello_world(){
echo "Hello world";
$new_world = " is returned ";
return $new_world;
}
.php File
The ‘.php’ file includes a template header, main file and footer file. The function.tpl is the one which is relevant for this tutorial and its usage will explained.
include("libs/smarty.class.php");
$smarty = new Smarty ();
$smarty->display("includes/header.inc.tpl");
$smarty->display("function.tpl");
$smarty->display("includes/footer.inc.tpl");
?>
.tpl File
The {insert} tag below will call the function hello_world from the file functions.inc. After that, the returned variable will take on the name {$function_tag_name}.
<p> {insert name="hello_world" assign="function_tag_name" script="functions.inc"} {$function_tag_name} from the function. </p>
Output
The second line of output came from the ‘.tpl’ file. The top and bottom lines are just the header and footer file where the main menu and footer file can be created for all pages of the web application.
Add Header Code HereHello world is returned from the function.
Add Custom Footer
Smarty templates allow you to declare and use variables with various methods. two popular methods are to use the assign() method within the ‘.php’ file or to use a configuration file. Since this tutorial will explain how to use a configuration file to create variables and create syntax to output them with the ‘.tpl’ files, it is assumed that you have some familiarity with the assign() method. If not, you can find some details at https://fullstackwebstudio.com/locations/coding-blog/smarty-template-for-php.html that show how to assign variables with the assign() method.
Using a configuration file is simple. You declare all of your global variables and section variables. When you access variables from the config file, you use the syntax {config_load file=’config.conf’} or {config_load file=’config.conf’ section=’mySection’}. When you output variables from a configuration file, they use the syntax {#variableName#}, unlike {$variablename} that is used with the assign() method.
config.conf File
This file has 3 global variables. In addition to that, there are two distinct sections that have their own variables; my_section1 and my_section2. The examples below show various ways for which you can assign variables. Like Python, Smarty allows you to declare variables without the need for a semi-colon at the end.
# global vars
var1 = "Double Quotes No semicolon"
var2 = 'Single Quotes No semi-colon'
var3 =  'Single and semi-colon';

#Section vars
[my_section1]
var4 = 500
var5 = "String in my_section1";

[my_section2]
var6 = "String in my_section2";
config.tpl File
This file shows three different loads for the configuration file. To show how it works, The code is used to output all variables from all sections. As you can see in the first example using {config_load file=’config.conf’}, only the global variables will output.
When the next load {config_load file=’config.conf’ section= “my_section1”} takes place, all the global variables and the variables from my_section1 can be accessed.
Finally, when {config_load file=’config.conf’ section= “my_section2”} is loaded, you see all variables. This may, or not be what you expected. But, since all variables had been loaded with the {config_load} tag, they are all usable.
{config_load file='config.conf'}
<p> Here are all variables:<br/><ol><li>{#var1#} <li>{#var2#}</li> <li>{#var3#}</li> <li>{#var4#}</li> <li>{#var5#}</li> <li>{#var6#}</li></ol></p>
As you can see, only the global variables output. Variables var4, var5 and var6 must have their section added to the config_load. The example below shows the opposite. It will only display variables that belong the appropriate section.
<hr>

{config_load file='config.conf' section= "my_section1"}
<p> When you declare a section, you can output all global variables and variables that belong to that section. <br/><br/>Here are all variables in in my_section :<br/><ol><li>{#var1#} <li>{#var2#}</li> <li>{#var3#}</li> <li>{#var4#}</li> <li>{#var5#}</li> <li>{#var6#}</li></ol></p>
<p>As you can see, var6 has no value since it belongs to my_section2.</p>
<hr>Finally, here is the usage of two sections.<br/>

{config_load file='config.conf' section= "my_section2"}
<br/><ol><li>{#var1#} <li>{#var2#}</li> <li>{#var3#}</li> <li>{#var4#}</li> <li>{#var5#}</li> <li>{#var6#}</li></ol>
Here is how the output is displayed in the browser.
Add Header Code Here
Here are all variables:
As you can see, only the global variables output. Variables var4, var5 and var6 must have their section added to the config_load. The example below shows the opposite. It will only display variables that belong the appropriate section.
When you declare a section, you can output all global variables and variables that belong to that section.
Here are all variables in in my_section :
As you can see, var6 has no value since it belongs to my_section2.
Finally, here is the usage of two sections.
Add Custom Footer
Moving updated files from one server to another server can be done with few Linux commands. To move or backup files to another server, you could create a tar or zip file on one server. Then, you can use SCP to move the tar or zip file to the foreign server. After it reaches its destination, you extract it.
From a backup point of view, it only makes sense to backup the folder to a new server when the files change. In this case, you can run a cron job that checks for file modification, and only creates and sends the backup when there are updated files. You could make this check at any desired interval that you want; from hourly to daily to weekly.
The server which will store the backups can have a cron job that checks for a new backup tar or zip file within a specific directory. Then, if its date is within a specified time interval, you can run a command to extract the tar or zip file.
Make the Backup on Host Machine
The one-liner below shows how to check and make a backup tar ball for all of the new files within 1 day.
root# find /home/username/public_html/foldername -type f -mtime -1 | xargs tar -czf foldername.tar
Moving tar file to New Server
root# scp -P 22 /home/username/Desktop/foldername.tar test@example.com:/home/username/public_html/foldername.tar
Restore the Backup On Slave Machine
The line below shows how to extract the tar file from the machine which stores the backups. It will only overwrite the old files which have been modified and leave the rest intact.
root# tar -xvf foldername.tar
Alternatively, you could run the following code with a cron job. It will look for the file to see if it is less than 1 day old. If it is, the tar file is extracted. If it is not, output is redirected to the black hole ‘> /dev/null 2>&1’. With this bash command, the find command is run. After that, the ‘&&’ operator represents the if statement and the ‘||’ operator represents the else statement.
//Test
root# [ `find /home/username/public_html/foldername.tar -type f -mtime -1` ] && tar -xvf  /home/username/public_html/foldername.tar || echo "File is within 1 day"

//Production
root# [ `find /home/username/public_html/foldername.tar -type f -mtime -1` ] && tar -xvf  /home/username/public_html/foldername.tar || > /dev/null 2>&1
One more method to check the file created date and extract it if it is within 1 day old is shown below. This technique uses a single command. It looks for the file that was created within one day, then runs the ‘-exec’ action which is another linux command.
root# find /home/username/public_html/foldername.tar -type f -mtime -1 -exec tar -xvf /home/username/public_html/foldername.tar \;
The steps above can be used to backup and move new files. But, to do it automatically, you need to run cron jobs that use these commands as bash scripts. Also, you need to use SSH keys to transfer the files via SCP without a password or the transfer will not happen.
One of the main reasons you may have chosen the Smarty template engine with PHP is that you want to separate the logical coding from the design coding. For example, the logic may be coded by your trusted developer, but, you want the flexibility with your options for the web design. Since you may outsource the design work to one or more people, your system could adapt into one for which you would limit file access to each individual with restricted access.
Smarty templates is perfect for this situation since you could create a folder with the file permissions of 750 for the designer. With Linux, it is done with the simple command chmod 750 myfolder. These permissions mean that the designer can edit and upload files, but, the files will not run in the browser because the ‘world’ does not have this permission.
However, the logic ‘.php’ file that exists in another can be executed in the browser and will be in a folder with the usual, adequate permissions of 755; which is the default for any new folder you create in a public_html directory or www. With that said, Smarty will compile the templates as you expect and you will see the output you would expect.
Checklist:
Logic Coder(.php files): 755
Design(.tpl) files: 750
Now that you have made arrangements for the designer to have designated folders for which to keep working files, you could run a simple cron job to track any changes that have occured in the folders. This way, you can keep tabs on work progress and security. You could use a tool to view the changes from previous work too.
Regardless of all the arguments about using a template engine like Smarty, separating logical coders from designers is one large benefit that can have multiple advantages for increasing productivity and file security. If everything you read thus far in this article is not enough to convince you of Smarty’s advantages, I will add a few more examples where it can have value.
Case #1 Outsourcing Design
From a web development point of view, more than 90% of all websites are completed by a company within 80 km. This number was published in the ‘Web Design Business Kit’ from Sitepoint. This means, being local has its advantages since people want to be close to those who do their work.
Now, for the advantage. There are many new companies who come and go in the web design business and many low-balling companies that work on the cheap. With this mind, you can remain competitive by coding high performance web pages and applications, while outsourcing the design work. Now, you can maintain a high performance website while cutting costs on design.
Case #2 SEO
Now that a project is up and running, you always have the option to outsource the SEO work to another person or company; especially if the modifications are made within the ‘.tpl’ files.
This tutorial will show the steps that can be used to backup a mySQL database, move it to a new server and restore it. Although this can be done very quickly with GUIs like Cpanel and phpMyAdmin, the tutorial explanations use the Linux command line. After all, if you want to do synched backups automatically with Cron jobs, the GUI cannot do that for you.
Simple One Time Move
//Copy It
username# mysqldump -u root -p mydb > mydb.sql
or with password
useraname# mysqldump -u root -pAddPasswordHere mydb > mydb.sql

Move It
scp -P 22 /home/username/Downloads/mydb.sql test@example.com:/home/test/public_html/mydb.sql

//Restore it
Create database, if necessary
mysql -u root -pAddPasswordHere -e "create database mydb"

//Add the tables
mysql -u root -pAddPasswordHere mydb < mydb.sql
Continual Backups
This setup can be used if you want to empty and overwrite existing databases. Unlike the example above, the -e flag allows you to write single or multiple mySQL commands. With the example below, the database is destroyed, recreated and dumped with a fresh set of data.
You could run a cron job on one host that will move the sql file to the new server. Meanwhile, you could run a cron job on the foreign host so that it dumps the desired data at your preferred time(s). In addition to these commands, you will need to use ssh keys so you can SCP the file without using a password.
//Copy It
username# mysqldump -u root -p mydb > mydb.sql
or with password
useraname# mysqldump -u root -pAddPasswordHere mydb > mydb.sql

//Move It
scp -P 22 /home/username/Downloads/mydb.sql test@example.com:/home/test/public_html/mydb.sql

//Restore it
mysql -u root -pAddPasswordHere -e "drop database if EXISTS mydb; create database mydb;" ;mysql -u root -pAddPasswordHere mydb < mydb.sql
Although this article is targeted at copying and restoring mySQL databases, moving files to another server can be done with similar methods. For example, you could create a tar or zip file on one server, SCP the file to another server and extract it when it reaches its destination.
Using OOP with the Smarty template engine can be done with relative ease; especially if you have a decent understanding of OOP to begin with. If words like scope, public, private, constructor, inherit, class, methods and properties do not strike a chord, then, you may want to strengthen your OOP skills before you go one step further and adapt them to Smarty templates.
Now for the fun part. Let’s create some classes within the ‘.php’ file and make them output as expected using Smarty’s advanced features. Again, like previous examples, it is easier if you can see the codes and test your pages with your browser. The two files are shown below.
.php File
Here is the file which does the heavy lifting. The file starts with the usual instantiation of the Smarty class. Then, there are the two classes; Tag and its child class called Form. Underneath both classes, an object for each class was instantiated using the new() operator. For example, the Form class was instantiated with $test = new Form(‘one’,’two’,”);.
After that, the assignByRef() was used to allow us to assign an objects named my_object and my_tag. The second parameter contains the recent object that was created. In our example, the second parameters are $test and $test2. Unlike OOP without Smarty, the $test object now will be used with the ‘.tpl’ file under the new name $my_object.
So, if you are to use pure PHP, you would just write $test->be(‘add input here’) whereas in the .tpl file it will look like $my_object->be(‘add input here’).
Change the return value form the be() method to see your various values which you can output.
<?php include_once("libs/smarty.class.php");
$smarty = new smarty();

class Tag {
public $a = "test";
public $b = "test2";
public $d = "testd";

function __construct($a, $b) {
}

public function fromparent(){
echo "hey public";
}

private function fromprivateparent(){
echo "hey private";
}

protected function fromprotectedparent(){
echo "hey protected";
}
}

class Form extends Tag {
function __construct($a, $b) {
parent::__construct($a, $b);
$this->a = $a;
$this->b = $b;
}
public function be($c) {
//return $this->b;
//return $this->d;
return $c;     }
}

$test = new Form('one','two','');
$test2 = new Tag('required','also required');
$smarty->assignByRef('my_object', $test);
$smarty->assignByRef('my_tag', $test2);
$smarty->display("object.tpl");
.tpl File
Here is the file which will output data from the classes. As you can see, they use special tags. The tags below will output two methods from the two classes.
 <html>
<head>
<title>Job Application Form</title>
<meta http-equiv="Content-Type" content="text/html; charset=UTF-8" />
<body>
{* output assigned object *}
{$my_object->be('from template')} <br/>
{$my_tag->fromparent()}
</body> </html>
This might come as a surprise to write such an article, but it could help with your journey as a web developer / programmer. The main reason I would even suggest such a title or this advice can be put in the next simple sentence. All coding can be learned much more effectively if it is presented to you in a form that you learn best.
Before we get to your writing, let’s start with something you can relate to… good teacher and bad teacher. For example, I remember taking Calculus back in the day when one teacher was in his own world and nobody really knew what he was talking about. To make things worse, the text book he chose was written by an author who just could not get through to the masses.
After the semester, I switched to a professor that was great communicator that kept everyone interested. In addition to that, he wrote the textbook which just made sense. Now, the outcome should be obvious and I will state the obvious. Since the second teacher had made learning easier and enjoyable, the concepts stuck and my grade was significantly better.
So, with that said, I will continue explaining why your should blog or write. The main reason is that your notes and methods probably make the best fit for your learning. Therefore, if you read or learn from another source and it is off the grid from your normal methodology, you may want to create a better resource you can always come back to. Here is where you can create a code snippet and great blog post that not only will help others and yourself, but, it will save you time in the future when you need to use it again. If there is one thing a web developer will do in the future it is doing something very similar to what he had already done.
Asides from structured learning and a better resource, your blogging and writing could help supplement your career choice and drive targetted traffic your way.
Although writing and blogging can accelerate your skills, it does not mean that other sources are invaluable.. just the opposite. It is always good to learn how to see through the eyes of another and know what the coding does. The more code you read from other sources, the better you will be at handing all sorts of coding from various web applications, frameworks and content management systems. Eventually, the coding suprises will become fewer and far between and your production will skyrocket.
Essentially, your writing should be an accellerator and your reading and curiosity should better your knowledge.
This Smarty form will contain some of the usual form elements like input text, radio buttons, text boxes, select drop down menus and a submit button. This sample is a mock for a job application form. If you go through both files, you can see how the variables, arrays and code is set in the ‘.php’ file and how to display it with the ‘.tpl’ file.
In addition to outputting the code, this job application form also includes some Jquery usage. So, when someone clicks on a city, it will automatically choose the appropriate state or province and country. This will give a little insight into building a custom form.
The easiest way to see what is going on is to view the page in a browser like Firefox while using Firebug. Then, you can look at these codes and match up each form element with its PHP code. For example, as you can see, the value for a drop down option is the key in the array. Also, the Smarty tag ‘ {$smarty.server.PHP_SELF}‘ is the PHP equivalent of <?php echo $_SERVER[‘PHP_SELF’]; ?>.
.php File
<?php
if(count($_POST) > 0){
// die("Works");
print_r($_POST['skills']);
echo $_POST['email'];
}

include_once("libs/smarty.class.php");
$smarty = new smarty();

$smarty->assign("name", "Add Name Here");
$smarty->assign("email", "");

$smarty->assign("phone", "");

$cities = array("California" => "Los Angeles", "Texas" => "Houston", "New York" => "New York", "BC" => "Vancouver", "Alberta" => "Edmonton");
$smarty->assign("cities", $cities);

$countries = array("United States", "Canada");
$smarty->assign("countries", $countries);

$states_provinces = array("California" =>"California", "Texas" =>"Texas", "New York" =>"New York", "BC" => "BC", "Alberta" => "Alberta");

$smarty->assign("states_provinces", $states_provinces);
$smarty->assign("state_province", NULL);

$ages = array("18-24", "25-30", "30-36", "37-45", "46-50", "50-65");
$smarty->assign("ages", $ages);

$smarty->assign('salaries', array(
1 => '$20000-$30000',
2 => '$30000-$40000',
3 => '$40000-$50000',
4 => '$50000+'));
$smarty->assign('salary_selected', 4);
$smarty->assign('skills', array('Technical / Content Writer', 'Web Designer', 'Web Developer', 'Full Stack Web Developer / Linux Admin'));
$smarty->assign("skill", array(0,3));
$smarty->display("jobs.tpl");
?>
.TPL File
<html>
<head>
<title>Job Application Form</title>
<meta http-equiv="Content-Type" content="text/html; charset=UTF-8" />
<style type="text/css">
{literal}
body, label {font-family: Verdana, Arial, Helvetica, sans-serif;
font-size: 11px;
}
{/literal}
</style>
<script src="jquery.js"></script>
</head>
{literal}
<script type="text/javascript">
$(document).ready(function() {
$( "#email" ).click(function() {
alert("Hey2");
});
$("#city option").filter(function() {
return $(this).val() == $("#state option").val();
}).attr('selected', true);
$("#city").live("change", function() {
if($(this).val() == 'New York' || $(this).val() == 'Los Angeles' || $(this).val() == 'Houston'){
$("#country option:selected").val("US").html("USA");
}else{
$("#country option:selected").val("CAN").html("CAN");
}
$("#state").val($(this).find("option:selected").attr("value"));
});
});
</script>
{/literal}
<body>
<p><strong>Job Application Form</strong></p>
<form name="job_form" method="post" action="{$smarty.server.PHP_SELF}">
<table>
<tr>
<td width="165">Name: </td>
<td width="158"><input name="name" type="text" id="name" value="{$name}"></td>
</tr>
<tr>
<td>Email: </td>
<td><input name="email" type="text" id="email" value=""></td>
</tr>
<tr>
<td>Phone: </td>
<td><input name="phone" type="text" id="phone" value=""></td>
</tr>
<tr>
<td>City: </td>
<td><select name="city" id="city">
{html_options options=$cities}
</select></td>
</tr>
<tr>
<tr>
<td>State: </td>
<td><select name="state" id = "state">
{html_options options=$states_provinces selected=$state_province}
</select></td>
</tr>
<td>Country: </td>
<td><select name="country" id="country">
{html_options options=$countries}
</select></td>
</tr>
<tr>
<td valign="top">Available Start Date: </td>
<td style="min-width:500px;">{html_select_date}</td>
</tr>
<td>Ages: </td>
<td><select name="age" id="age">
{html_options options=$ages}
</select></td>
</tr>
<tr>
<td valign="top">Salary Expectations: </td>
<td>{html_radios name="salary" options=$salaries selected=$salary_selected separator="<br />"}
</td>
</tr>
<tr>
<td valign="top">Skills: </td>
<td>
<p>{html_checkboxes name="skills" options=$skills selected=$skill separator="<br />"}</p>
</td>
</tr>
<tr>
<td><input type ="submit" name = "submit" value = "Submit" /></td>
</tr>
</table>
</form>
</body>
</html>
Literal tags which use the syntax {literal}{/literal} can be used to take the code literally within the ‘.tpl’ file, thus, not interpreting it. Two common places where you would use the literal tags are with CSS and Javascript.
CSS
<style type="text/css">
{literal}
body, label {font-family: Verdana, Arial, Helvetica, sans-serif;
font-size: 11px;
}
{/literal}
</style>
Javascript
In this example, the literal tags go around the Javascript.
{literal}
<script>
$(document).ready(function() {
$( "#email" ).click(function() {
alert("Hey2");
});
});
</script>
{/literal}
Smarty templating with PHP gives you more than one file for which you can add PHP code. The first, and obvious choice is to use code raw PHP code directly into the ‘.php’ file. However, you can code PHP into the template’s partnering ‘.tpl’ file.
Since Smarty 3.1, you must instantiate an instance of the SmartyBC class in order to be able to code PHP in the ‘.tpl’ file using the tags {php}{/php}. Essentially, your main file with the ‘.php’ will now have similar coding at the top of the file. The example snippet below shows that you will use the SmartyBC class instead of the default smarty class.
If you have done enough research, you may have read that it is not recommended to use {php}{/php} tags with the ‘.tpl’ file since the front end coder can now use them. In fact, it seems to defeat the purpose of using Smarty to begin with, which is to separate PHP coding from the design code.
.php File
//include_once("libs/smarty.class.php"); //$smarty = new smarty(); // allow php tags in the tpl file require_once('libs/SmartyBC.class.php'); $smarty = new SmartyBC();
.tpl File
Now that you can use the {php}{/php} tags in the “.tpl” file, here is an example that prints “Hello World”.
{php} echo "Hello World"; {/php}
The chkconfig command will allow you to start a service upon a boot or reboot. In most cases, it is very necessary to set this up properly so that everything will work as you want it to after a reboot. If it is not, services like Apache and mySQL will not start unless they are not instructed to do so.
With that said, the following simple set of steps can be used to start a service automatically when the Linux VPS or dedicated box is booted. The example will show how to add the service for checking, list its settings, make it start at boot time and remove it from starting at boot time.
To add the service to chkconfig,
root# /sbin/chkconfig --add monit
To see if the service was added to chkconfig,
 root# /sbin/chkconfig --list monit monit
0:off   1:off   2:off   3:off   4:off   5:off   6:off
To add the service to start upon boot,
root# /sbin/chkconfig monit on
To check that the service was changed with chkconfig,
 root# /sbin/chkconfig --list monit monit
0:off   1:off   2:on    3:on    4:on    5:on    6:off
Note: The values have for 2,3,4 and 5 are now on and this service will not run automatically upon a reboot. Those run levels of 2,3,4 and 5 are the relevant ones for the matter at at hand.
To remove the service from starting upon boot,
root# /sbin/chkconfig monit off
PHPUnit is a testing framework that can be used to find coding errors and mistakes. On simpler level, you may have had some times when you have used echo, print and die() to track down errors and bugs in your code.
Although using these techniques can help you find problems, using PHPUnit can be applied to help find issues and problems with a much broader analysis. PHPUnit has many built-in methods that you can use to find problems. Then, you can run the command line to read its output. At this point, it will help pinpoint a target of concern.
If your company or testing platform can be accessed by various users, one coder could be writing the code while the lead developer could run tests with PHPUnit to find and fix the problems of the junior developer.
When you are testing with PHPUnit, your test file will need to make a class that extends the PHPUnit_Framework_TestCase class. An example is shown below.
class MyTest extends PHPUnit_Framework_TestCase
{ }
With that said, I will now show you how to install and use PHPUnit on Linux and windows. This tutorial is intended to help getting you setup and testing in no time at all. Since using and understanding PHPUnit can take some time to use effectively, you will probably want to move on to more documentation and perhaps further reading from books.
Linux
The easiest method to use PHPUnit is to download the ‘.phar’ file and run it on your test file.
To download the phpunit.phar file,
wget https://phar.phpunit.de/phpunit.phar
chmod +x phpunit.phar
After the file is downloaded, you can run it from any folder and on any test file. A very easy way to use it is to move it to the folder with the test file(s). Then, open that folder with the Linux terminal and run the command.
php phpunit.phar my_test.php
or
php phpunit.phar /var/www/test.php
Using Pear
sudo pear channel-discover pear.phpunit.de
sudo pear install -a phpunit/PHPUnit
whereis phpunit
/usr/bin/phpunit
username@username-VirtualBox:/usr/bin$ phpunit --version
PHPUnit 4.0.17 by Sebastian Bergmann
Windows
To use PHPUnit on Windows, you only need to download the phpunit.phar file and move it into the PHP folder for your Wamp server. In this example, the file path is ‘C:\wamp\bin\php\php5.3.13’.
Then, the command is the same as described above for using Linux.
php phpunit.phar filname.php

A Few Tips
Typically, PHPUnit uses 1 file that will run checks on another file. You can use the require_once() function to include the file for testing. When you are testing classes, the file being tested will have a unique class name while the test file will use a class with the same name that will include the word Test at the end of it.
In the example below, the file for our application uses the class name ‘MyClassName’ while the testing file uses the class name ‘MyClassnameTest’.
Example Test File
<?php

require_once('FileToTest.php');

class MyClassnameTest extends PHPUnit_Framework_TestCase
{
  public function setUp(){ }
  public function tearDown(){ }

  public function testMyTestingIsValid()
  {
    // Make assertions here
  }
}
?>
Example File(FileToTest.php) and Its Class
<?php
class MyClassname
{
public $variable = "Test";

  public function returnSampleObject()
  {
    return $this->variable;
  }
}
?>
When you PHPUnit, you will use built-in methods like:
public function setUp(){ }
and
public function tearDown(){ }
On top of that, you may use one or more test methods such as;
public function testMyTestingIsValid(){}
Under normal OOP programming, these methods would not be used unless the method is called. The examples below show how the typical method is used.
$this->testMtTestingIsValid();
or
$my_new_object = new ClassName();
echo $my_new_object->testMtTestingIsValid();
But, with PHPUnit, all functions in your test file will run automatically if they have the keyword test in front of the function. So, a public method like testMyTestingIsValid() just runs and does the adequate checks on the file you included.
When you make a test, you will create an object from the class you are testing. Then, you can use assertion functions to test your results. Many assertions can be found at http://phpunit.de/manual/4.1/en/appendixes.assertions.html.
PHPUnit is a testing framework that can be used to find coding errors and mistakes. On simpler level, you may have had some times when you have used echo, print and die() to track down errors and bugs in your code.
Although using these techniques can help you find problems, using PHPUnit can be applied to help find issues and problems with a much broader analysis. PHPUnit has many built-in methods that you can use to find problems. Then, you can run the command line to read its output. At this point, it will help pinpoint a target of concern.
If your company or testing platform can be accessed by various users, one coder could be writing the code while the lead developer could run tests with PHPUnit to find and fix the problems of the junior developer.
When you are testing with PHPUnit, your test file will need to make a class that extends the PHPUnit_Framework_TestCase class. An example is shown below.
class MyTest extends PHPUnit_Framework_TestCase { }
With that said, I will now show you how to install and use PHPUnit on Linux and windows. This tutorial is intended to help getting you setup and testing in no time at all. Since using and understanding PHPUnit can take some time to use effectively, you will probably want to move on to more documentation and perhaps further reading from books.
Linux
The easiest method to use PHPUnit is to download the ‘.phar’ file and run it on your test file.
To download the phpunit.phar file,
wget https://phar.phpunit.de/phpunit.phar chmod +x phpunit.phar
After the file is downloaded, you can run it from any folder and on any test file. A very easy way to use it is to move it to the folder with the test file(s). Then, open that folder with the Linux terminal and run the command.
php phpunit.phar my_test.php or php phpunit.phar /var/www/test.php
Using Pear
sudo pear channel-discover pear.phpunit.de sudo pear install -a phpunit/PHPUnit
whereis phpunit /usr/bin/phpunit
username@username-VirtualBox:/usr/bin$ phpunit --version PHPUnit 4.0.17 by Sebastian Bergmann
Windows
To use PHPUnit on Windows, you only need to download the phpunit.phar file and move it into the PHP folder for your Wamp server. In this example, the file path is ‘C:\wamp\bin\php\php5.3.13’.
Then, the command is the same as described above for using Linux.
php phpunit.phar filname.php
A Few Tips
Typically, PHPUnit uses 1 file that will run checks on another file. You can use the require_once() function to include the file for testing. When you are testing classes, the file being tested will have a unique class name while the test file will use a class with the same name that will include the word Test at the end of it.
In the example below, the file for our application uses the class name ‘MyClassName’ while the testing file uses the class name ‘MyClassnameTest’.
Example Test File
<?php require_once('FileToTest.php'); class MyClassnameTest extends PHPUnit_Framework_TestCase { public function setUp(){ } public function tearDown(){ } public function testMyTestingIsValid() { // Make assertions here } } ?>
Example File(FileToTest.php) and Its Class
<?php class MyClassname { public $variable = "Test"; public function returnSampleObject() { return $this->variable; } } ?>
When you PHPUnit, you will use built-in methods like:
public function setUp(){ } and public function tearDown(){ }
On top of that, you may use one or more test methods such as;
public function testMyTestingIsValid(){}
Under normal OOP programming, these methods would not be used unless the method is called. The examples below show how the typical method is used.
$this->testMtTestingIsValid(); or $my_new_object = new ClassName(); echo $my_new_object->testMtTestingIsValid();
But, with PHPUnit, all functions in your test file will run automatically if they have the keyword test in front of the function. So, a public method like testMyTestingIsValid() just runs and does the adequate checks on the file you included.
When you make a test, you will create an object from the class you are testing. Then, you can use assertion functions to test your results. Many assertions can be found at http://phpunit.de/manual/4.1/en/appendixes.assertions.html.
Installing Joomla 3 can be simple. This tutorial shows the complete setup of Joomla 3.3.
1) Download Joomla from Joomla.org.
2) Extract the zip file and move the files and folders to your desired location.
3) Create a database. It can be any name you want.
4) Open the root folder for the website in your browser. You should see the installation instructions.
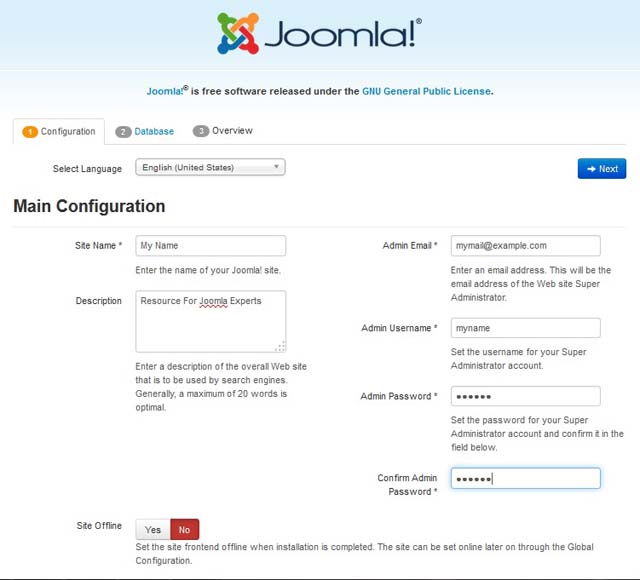
5)Setup the database.
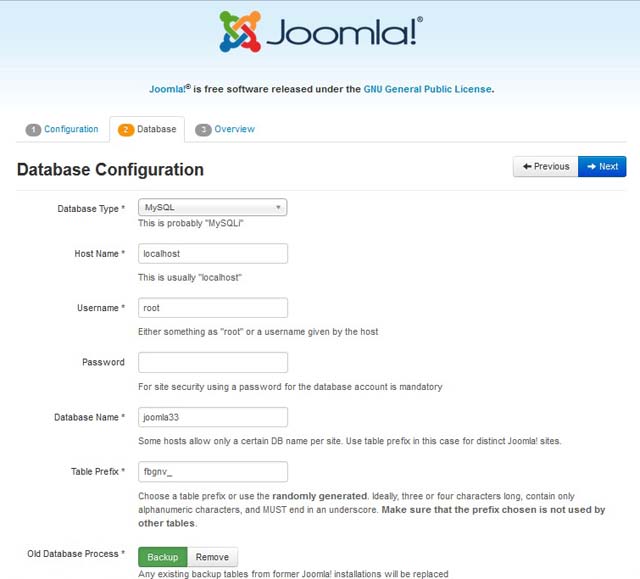
6) Check over and select install.
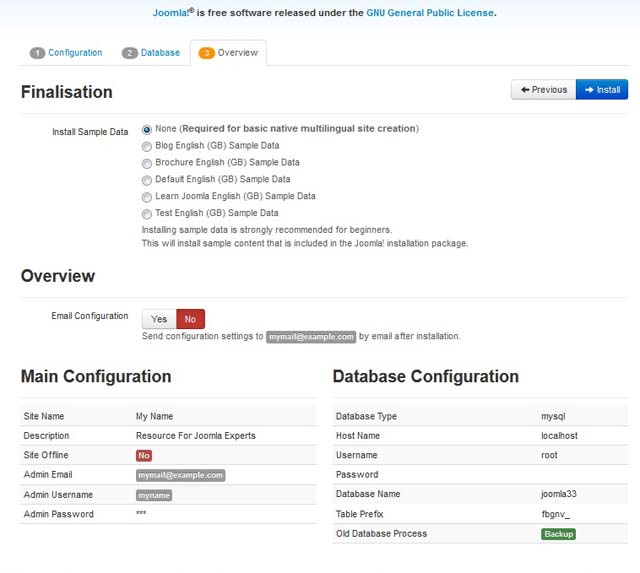
Let it install
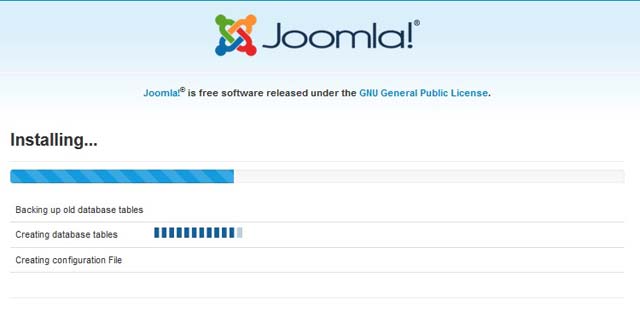
You should receive a successful image. If you have a problem, you can open the installation/sql/mysql/joomla.sql file in a text editor and do a search for ENGINE=InnoDB and replace it with ENGINE=MyIsam.
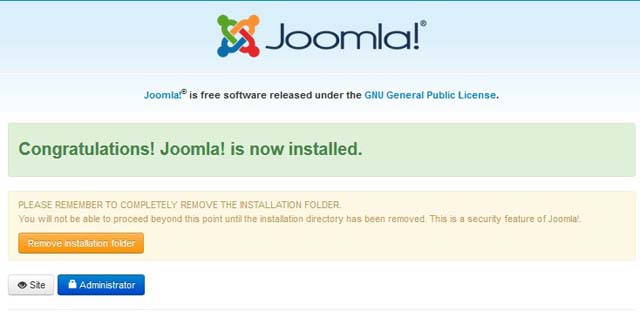
Here is the installed website at http://localhost.
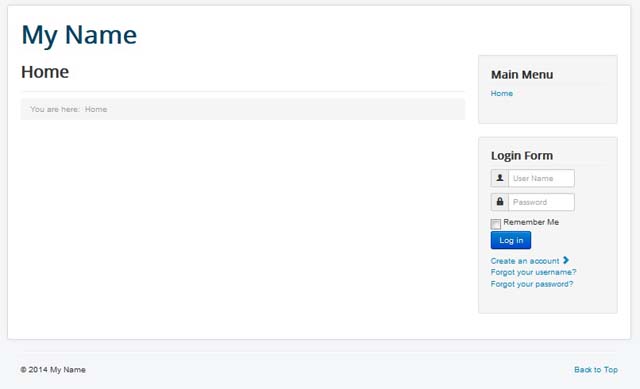
Here is the administrator backend at localhost/administrator.
When you develop a website and allow a user to have Administrator or Super Administrator privileges, you may want to alter the back end so that Extensions cannot be installed at a later date. You may have various reasons for doing so. For one, an insecure or vulnerable extension can cause problems.
Therefore, not allowing extensions to be installed can remove that threat to the file system. In addition to removing the ability to install extensions, FTP or any other protocol to connect to the host should not be allowed to the client either. Many people do not take security seriously and just see the hosting as a free for all. Then, when something goes wrong, they blame you.
1) Open administrator/components/com_installer with FTP >Rename or folder or back it up on another device or path on the server.
To remove the installation from showing up in the menu for Joomla 1.5,
2) Open administrator/modules/mod_menu/helper.php and comment the following line
//$menu->addChild(new JMenuNode(JText::_(‘Install/Uninstall’), ‘index.php?option=com_installer’, ‘class:install’));
When you begin a new web project using PHP(and likely mySQL), it makes real sense to use the right tool for the job. In this situation, the tool refers to the application that will be the heart of the project. Since the project at hand will be a CMS, I will exclude any PHP Framework like Symfony or Zend, and focus entirely on content management systems.
Now that the discussion has narrowed to a CMS, this can be split between open source, commercial and proprietary.
Open Source
In general terms, most open source content management systems(CMS) are free and include household names like WordPress, Joomla and Drupal. They are all very popular and can be used to create websites both large and small. If you plan to specialize and use one of them for multiple projects; you can become efficient with using them. However, you could find that they are not coded as lean as you would like and can actually cause more hours of work for smaller projects.
As time went on and my experience with these systems had passed, I began to notice many undesirable reasons for using these systems. For one, the web had too many bots that would hit or target these systems; before and after exploits had been exposed. Bots do slow a site down and many will hit urls that will update your database or send email to you from comments and registrations. You will have to make customizations to keep out the crap.
In addition to that, the filesystems were so huge and changed so frequently that they became a good hiding place for malicious files. In other words, if a malicious file could access a database or the filesystem, it could be hard to find in the rat’s nest of a large installation. At this point, you would have to monitor them yourself with custom scripts. So, when you receive the email from your ISP about a Joomla or WordPress exploit, your unforeseen workload could stare you right in the face.
As a hand-coding PHP developer, I preferred to just code PHP and mySQL without having to create plugins and extensions. When one file could do the job, I could have ended up making four. I did not like doing more than I had to.
Now, for something really undesirable. As time marches on, a CMS version will die and not have any more security updates. In addition to that, new PHP updates on the server will spring errors on pages since the CMS site could be using obsolete PHP functions. Now, there is some serious update work. For some, this could be a good resource to pull more dollars from the clients, while others will find this horribly inconvenient. Also, as versions are updated, old installed extensions and plugins could fail too.
Although the above spiel can sound a little negative, it is something to consider for the short and long run. If you plan to build a website with endless possibilities and so that your clients can update the website, you may want to go that course. If the website will not grow immensely and needs specific coding, you may want to go a custom route.
Although some performance specs had been mentioned above, you could always tune your server and use a strong caching system or a proxy like Varnish or Squid. Varnish will help to make a slow site very quick.
Finally, if you still plan to a CMS like WordPress or Joomla for your website, you could custom code PHP / mySQL. With WordPress, you can create a template file and add pure PHP / mySQL into that template. With Joomla, you could copy the source code from your web page and place it in a subfolder. Then, you could code anything you want into the ‘.php’ file.
Commercial CMS
A commercial CMS is a product like Expression Engine. They cost a few dollars and come with support. Some can cost under $100 and some run over $10,000.
Proprietary CMS
A proprietary CMS is an in-house coded CMS that is used by a company. It can take quite some time to code, but it can have many advantages such as performance, faster completion times and allows you to code within your desired style. By contrary, an open source CMS will have its own methods for customizations and you would need to work within these limits.
From experience, I was lead to the path of creating a custom proprietary CMS since I wanted much better performance and a system that could build a web page in record time, and be easier for a client to use. In addition to that, I wanted to be able to move an HTML / CSS / JS website into a CMS very quickly. Since CMS’ like WordPress and Joomla were my previous systems of choice, I would make sure that the results I wanted would be much simpler with an in-house solution.
When you code small or larger web applications and websites from scratch, one of the first things you do is create a custom header and footer file. In addition to that, you could create a custom sidebar as well. The custom files allow you to eliminate redundancy since your single header and footer file will be displayed on each and every page. So, if you decided to add a page on the main menu, you simply add it to the header file.
Making these files with Smarty is very simple. For starters, let’s assume you already have a single logic(.php) and a single presentation(.tpl) file which dispalys the entire web page. At this point, you will still use both files. But, you will need to create the new header and footer file. Both of these files will use the (.tpl) extension. Now, all you have to do call the display() method within the logic file in order to display the custom header and footer.
The code snippet below comes from the bottom of the logical file called main.php. This code can be added to any new page for which you will want to resuse the same header and footer file. The includes directory was created inside the root folder for the website.
$smarty->display("includes/header.inc.tpl"); //display output $smarty->display("main.tpl"); //display output $smarty->display("includes/footer.inc.tpl"); //display output
The ‘includes’ folder can also be used for functions and classes. Or, you could make and use any folders for which you find neat and tidy, or necessary based on the complexity of the application. For example, one person may only want the includes folder, while another would have an includes, functions and classes folder.
When you use Smarty templates, you could be hard coding or retrieving arrays from a database query. In most situations, your logic ‘.php’ file will create the arrays and the ‘.tpl’ file will be used for presenting the arrays within HTML. The easiest way to show how this can be done is to show you a sample ‘.php. file and a ‘.tpl’ file.
The example uses 4 arrays; $leads, $myarray, $myarray1, $myarray2 and $myarray3. After all arrays have been created, they are assigned Smarty template variables. This must be done or the ‘.tpl’ file cannot use them. Once they are assigned, the display() method calls the ‘.tpl’.
Since the variables can now be used with the ‘.tpl’ file, several foreach loops are created for each array. As you code and test the examples, you will gain some methods for which you can display arrays in foreach loops.
Logic(.php file)
require_once(SMARTY_DIR . 'Smarty.class.php');
$smarty = new Smarty();

$leads = array("John","Paul","George");

$myarray = array("key" => "Blue Jays", "key2"=> "Giants", "key3" => "Rangers");
$myarray2 = array("Blue Jays", "Giants", "Rangers");
$myarray3 = Array(Array ( "id" => "1",
    "lastname" => "Smith", "firstname" => "John", "email" => "js@example.com", "phone" => "5555666" , "subject" => "A", "notes" => "Lots", "date" => "2012-01-01" ), Array( "id" => "2",
    "lastname" => "Jones", "firstname" => "Paul", "email" => "paul@example.com", "phone" => "5555555" , "subject" => "B", "notes" => "None", "date" => "2012-01-02" ));

$smarty->assign("leads",$leads);
$smarty->assign("myarray",$myarray);
$smarty->assign("myarray2",$myarray2);
$smarty->assign("myarray3",$myarray3);
$smarty->display("smarty.tpl"); //compile and display output
Presentation (.tpl file)
{foreach item=lead from=$leads}
<div style="width:40%;">
<strong>Profile of {$lead}</strong>

</div>

{/foreach}
<br/>
{foreach from=$myarray key="key" item="value"}
<div style="width:40%;">
<strong>Item is {$key}{$value}</strong>

</div>

{/foreach}
<br/>
{foreach from=$myarray2 key="key" item="value"}
<div style="width:40%;">
<strong>Item is {$key}{$value}</strong>

</div>

{/foreach}
Browser Output
Item is keyBlue Jays
Item is key2Giants
Item is key3Rangers
Item is 0Blue Jays
Item is 1Giants
Item is 2Rangers
Profile of John Smith
First Name: John
Last Name: Smith
Phone: 5555666
Email: js@example.com
Profile of Paul Jones
First Name: Paul
Last Name: Jones
Phone: 5555555
Email: paul@example.com
Sqlite and MYSQL are two excellent options for your next database. Although the two do more or less the same thing such as select, update, insert and delete data from a database, they each have commands that are unique and portability differences. I will get to the command details later.
For now, I would like to focus on portability because it makes a huge difference. In fact, the portability makes an Sqlite database as a great option for both Android apps and web applications.
Android App
For example, you could create an app for Google Play that uses an Sqlite database. This means, the client can download your app and use the database on their phone. Although a mySQL database can connect to a host from a mobile web page, using an Sqlite database is obviously the way to go for an Android app.
Web Applications
If you want to create a web application that will deal with many users and plenty of traffic, mySQL would likely be an option you would consider. But, if you want to make a micro application that can be easily downloaded and used quickly by the client, an Sqlite database makes this possible.
Usage
This section will detail the usage for using Sqlite and mySQL. It will focus on writing code that is compatible for both databases and expanding on some slight differences. From a PHP scripting point of view, you can easily write the same queries for both, as long as you use PDO.
The main differences in usage will be at the command line. Although the select, update, insert and delete statements will be the same, the other commands like using a database and showing tables will be different.
Below, are examples of statements that could be used in a PHP script that connects to a mySQL or Sqlite database.
Connect to Database
   function connect()
{
    global $dbh;
    $user = 'root';
    $pass = "password";

    // MYSQL CONNECT
    //$dbh = new PDO('mysql:host=localhost;dbname=mydatabase', $user, $pass);

    // SQLITE CONNECT
    $dbh = new PDO('sqlite:db/mydatabase.sqlite');
    $dbh->setAttribute(PDO::ATTR_ERRMODE, PDO::ERRMODE_EXCEPTION);

    return $dbh;
}
Select
   $command = $dbh->prepare("SELECT * FROM tablename");
    $command->execute();
    $result = $command->fetchAll();

	foreach ($result as $row) {
	$my_array[] = $row;
	}
Update
 $command = "UPDATE tablename SET var1=:var1, var2=:var2, var3=:var3 WHERE id=:id";
    $command2 = $dbh->prepare($command);
    $command2->bindParam(':var1', $var1);
    $command2->bindParam(':var2', $var2);
    $command2->bindParam(':var3', $var3);
    $command2->bindParam(':id', $id);
    $command2->execute();
Insert
    $command = "INSERT INTO tablename VALUES (NULL,:id, now())";
    $command1 = $dbh->prepare($command);
    $command1->bindParam(':id', $id);
    $command1->execute();
The Smarty Template engine is a library that PHP programmers can use so that they can separate logic from design. This quick Smarty tutorial should help minimize the confusion while you try to grasp the methods for using Smarty.
Why Separate Logic From Design?
Although separating logic from design has many benefits, one of the main benefits is that a project or page can be split between different individuals. In a workplace setting, you often have a front end web developer or web designer that will alter the ‘look’ of the website. Therefore, it makes that person’s job easier if he only edits and tests the design and avoids any data between Smarty’s {} tags.
Meanwhile, the web developer will write and alter the code that is displayed in the logic file with the ‘.php’ extension. Now, both can do their work at the same time without worrying about who is working on the file. Obviously, if both the heavy lifting backend developer and front end designer need to use the same file, there could be issues like overwriting and losing work. Simply speaking, two people on one file is not efficient, especially is both people want to work on it at the same time.
Asides from Smarty being convenient and friendly between logical and design users, it can also help maintain control of an application from a temporary front end web designer. For example, if you plan to work primarily as a web developer and outsource the design to a stranger or part time worker, you may not want the designer to have access to all the logical code and heart of the page. This way, the designer’s code is rather useless for other projects based on the current scripting.
All in all, the outsourced individual could not sabotage or steal a project; especially if he only has write access or an upload privilege on the exact design files you had contracted him to work on.
Since the spiel mentioned above explains why Smarty is beneficial, you may already be thinking when using Smarty could be overkill. Essentially, if one individual will be creating and maintaining a small PHP project, it could be much quicker to use only one file for the logic and presentation. At this point, it could be a matter of preference since one person may like minimize the files while another would like to work with two smaller files with the logic in one file and the presentation in the other file.
The Basics
To make this sound easy, I will try to explain a traditional PHP file vs using a Smarty template. A PHP file allows you to code PHP, HTML, CSS, javascript, Jquery all in one file that has the ‘.php’ extension.
Smarty, on the other hand, is used with a pair of files; a ‘.php’ file which includes the Smarty library and PHP coding and a matching ‘.tpl’ file which contains the html(and other coding like Jquery).
To keep things simple, the ‘.php’ and ‘.tpl’ files can have a matching name so it is easy to know which files belong to which without having to find the line that references the ‘.tpl’ file within the ‘.php’ file. Make sense? The ‘.tpl’ file that is used and compiled is done with the $smarty->display() method. For example, the logical PHP file called filename.php could use the filename.tpl file for output.
$smarty->display("filename.tpl");
Getting Started
To be able to use Smarty, you follow a few steps.
1) Download and unzip the file from Smarty.net.
2) Moves the files into your root folder or somewhere else on your server and write the path in your .php.ini file or in your files which will use Smarty.
The first method can be done in less than a minute. All you need to do is extract the download and move the libs folder into the location where you will create your working files. Often, this is in the public_html or example.com folder. The second method can keep the library in a more secure place; such as the /usr/local/lib/php folder.
The second method also allows all hosted domain names to have access to the library which eliminates redundant installations. The example below shows how to setup Smarty on Linux so all domains can use it.
root# cd /usr/local/lib/php root# wget smarty.net/files/Smarty-3.1.18.tar.gz root# tar xvfz Smarty-3.1.18.tar.gz root# cp -r Smarty-3.1.18/libs/* /usr/local/lib/php/smarty root# rm -R Smarty-3.1.18
3) Create a .php file and instantiate the Smarty object.
require_once("libs/smarty.class.php");
$smarty = new Smarty ();
If you plan to access Smarty from /usr/local/lib/php/Smarty you will need to add an extra line into the ‘.php’ file to create a constant that points to the path and you need to alter the require_once() function so it access the Smarty class from the adequate directory.
define('SMARTY_DIR', '/usr/local/lib/php/smarty/'); require_once(SMARTY_DIR . 'Smarty.class.php');
$smarty = new Smarty ();
Alternatively, you could also use the simple coding shown below.
require_once('/usr/local/lib/php/smarty/');
$smarty = new Smarty ();
Beyond The File Pairing
When the PHP file is requested in the browser, the ‘.tpl’ file is compiled and output. Although they are two different files, the key to working with them is to remember that all variables in the ‘.php’ file can be assigned and passed into the ‘.tpl’ file. In addition to that, you should note that any code passed into the ‘.tpl’ can be interpreted with… let’s say Smarty coding. I will make a quick list below which shows how some php code from the ‘.php’ file can be interpreted with the ‘.tpl’ file.
Setting a Variable With Logic and Output To Presentation
Variable (index.php)
$my_string = "Here is my string.";
$smarty->assign("my_string",$my_string);
Variable Output (index.tpl)
<p>{$my_string}</p>
Where To Go From Here
From the simple examples shown above, you can now use Smarty and display simple variables in the presentation file which contains the ‘.tpl’ extension. If I could sum up how to use Smarty from here on, I will attempt to do so in 1 sentence.
Variables, loops, objects and functions can be used within the ‘.tpl’ file with special syntax; often nested within curly{} brackets. I will attempt to elaborate on the one-liner. If you made an array called $myarray within the ‘.php’ file, you could run it through a foreach loop within the ‘.tpl’ file.
Foreach Loop (index.tpl)
{foreach item=myitem from=$myarray}
<p> {$myitem} </p>
{/foreach}
Calling a Function
The example below shows how to call a function and return a value. Functions called with the ‘.tpl’ are not cached. For simple practice, doing all logic code in the ‘.php’ file and only outputting in the ‘.tpl’ files makes using Smarty very simple and organized.
Functions file (my_functions.php)
function smarty_insert_my_function()
{
return "This is returned from the function";
}
index.tpl
{insert name="my_function" assign="my_returned_value" script="my_functions.php"} <p>{$my_returned_value}</p> </body>
Built-in PHP Functions
Smarty allows you to use built-in functions within the ‘.tpl’ file. There are many so I will not go into the details. But, I will show an eaxmple of the ‘.php file and ‘.tpl’ file changing the string to lower case letters.
.php $string = "AbCdE"; $string = strtolower($string); //ouputs abcde
.tpl {$string|lower}
More examples can be found at http://www.smarty.net/docs/en/language.modifiers.tpl
Extras To Get You Going
Two important factors worthy of consideration when using Smarty are its built-in functions. Although there are many, two which deserve utmost attention are {php} and {literal}.
The PHP tags {PHP}{/PHP} allows you to write good, old PHP within a the ‘.tpl’ file, while code within {literal}{/literal} will not be translated and that allows you to write plain, old HTML, Javascript and CSS within these tags. More important functions can be found at http://www.smarty.net/docs/en/language.function.php.tpl.
More Examples
The tutorial above can be used as a simple cheatsheet for using Smarty. The next set of examples are more tutorials regarding its usage.
1. Different Arrays and Foreach Loops With Smarty
2. Custom Smarty Header and Footer Files
3. Using PHP Inside “.tpl” file
4. Using CSS and Javascript Within TPL Files Using Literal tags
5. Smarty Forms and Elements
6. Object Oriented Programming With Smarty
7. Smarty Limiting File Access
8. Smarty Template Configuration Files
9. Using Functions
10. Include Files
As an individual that spends the majority of time programming PHP / mySQL, I had wanted to see what all of the Python hype was about. I have heard so many positive remarks about it for custom scripts and web programming.
However, the main reason that put it on my list for learning was the Raspberry Pi. Since python has a GPIO library, it was a great tool for taking input and delivering output with the Raspberry Pi. In fact, any tutorial I can remember that would do this used Python and the GPIO library.
Shortly after I decided to learn C, I decided to dive into Python. So, there I was, using Gedit and running code blocks on Ubuntu. Immediately, I was impressed with its lean and clean presentation.
Coming from a PHP background, I will attempt to summarize the differences I experienced.
If you have fairly strong PHP skills, you will find you can convert to a Python mindset rather easy. Even though I like Python’s simple, clean syntax, I do not plan throw away everything I have done with PHP. In fact, I would continue with PHP for web applications since I have been hand coding it for a long time and its usages makes coding a dynamic website very quick and easy. But, a new programmer could easily become efficient with Python.
However, if I ever plan to integrate a Raspberry Pi into a web page on a remote server, I would not hesitate to take advantage of its GPIO library and its ability to read or write to files or a database. This allows for many more possibilities to the creation of dynamic websites.
PHP / mySQL programmers may spend most of their time using languages that contribute to the web application. In general, this could include PHP, mySQl, Javascript(Jquery), HTML and CSS. Although these languages detail the users experience, the PHP programmer could reach a point where he would like to program with the language for which the hosting machine was created. For Linux users, that would mean C.
After one develops a keen interest with Linux and the command line tools like bash, Sed and Awk, it could be natural progression to learn C. After all, Apache and varnish were written in C. I found this the case.
Meanwhile, university students often learn C and C++ to build the strong foundation for learning other languages and it should come as no surprise why many employers seek those programmers with these skills. When I decided to learn C, I had several years with other languages like PHP, SQL and CSS. and a 775 page book about programming.
So, there I was diving into C to learn this language. After all, I had a little spare time to do this and focus on the language. Although knowing other languages and toying around with others helped in the understanding, there was some very distinct concepts and features that were new. However, many of the new concepts were minor adjustments to the base knowledge.
When going from PHP to C, many of the details were declaring variables before using them, structures, pointers, compiling code, printing text(more similar to sprintf with PHP), different loop syntax, importing C libraries, different commenting, different variable syntax and actually assigning real memory values to strings, arrays, etc. I may have left some more details out, but, the previous examples have left a string impression.
After a strong week of comittment, coding and compiling, it was well worth it. Not only was it beneficial to be able to create and have a better understanding to those C programs that will be edited, but, it helped fill in many of the holes for reading Java and Python too.
The definition for a web developer is rather broad and the skills needed to become a web developer can be very, very diverse too. Nevertheless, I will attempt to explain the skills that could be implemented by a web developer.
Please note that larger companies often hire specific people to do various coding and graphic design for a website. Therefore, defining this term ‘web developer’ can be a little more difficult. But, if the company is a freelance web developer, it can be more easily to define since one person would oversee and maintain the projects. Since a web developer will be doing and managing all entire projects, the developer is often referred to as a ‘Full Stack Web Developer’.
For the remainder of the article, the description for a web developer will be related to one freelance web developer who maintains all the websites.

Introducing Typical Progression For a Web Developer
Normally, a future web developer starts off by making basic static websites with html code. Then, other client side languages like Javascript and Jquery are introduced. After that, making dynamic websites with a server side language like PHP and a database like mySQL is implememted and PHP / mySQL is used. However, some people actually build a website based on these languages using a tool like WordPress, but, they have no idea about the code under the hood. Not having a deeper understanding will cause big limitations for building custom websites.
Once a person has strong skills with the coding previously described, he may move on to knowing more about the system where the files are stored. More often than not, that is a Linux distribution. Knowing how to navigate the file system and commanding it will really help a web developer.
Apart from the website, a web developer may want to have the ability to create mobile applications for Android and the iphone. in addition, custom apps for other web sites like Facebook could be added to the toolkit too.
For the next level, knowing a low or medium level compiling language like C can make it easy to edit and create custom Linux packages. The next section will detail the steps of progression.
The stages of progression to be able to code secure applications and edit and run the Linux system can take a while. However, persistence and a strong desire to be able to have a large array of web development tools will help make the journey an enjoyable process.
On top of all of the code and systems that will be used, a web developer will need to be able to analyze content, SEO and Google Adwords accounts. Traffic is always important and it is an ongoing procedure. There are many tools that will help the web developer analyze and deliver the desired results.
The rest of this article will go into more detail onto the topics that had been previously mentioned.
Web Development Skills
Website Coding Skills
On a basic level, a web developer should have the skills to create and maintain a database driven website. This would include knowledge of the file system and all coding for the website. For example, a website could contain PHP , mySQL, Html5, CSS, XML, Javascript and JQuery.
Meanwhile, another web developer could maintain a similar website but that person uses ASP, MSSQL, Html5, CSS, XML, Javascript and Jquery. As you can see, the main differences here are the scripting language and database.
Asides from the actual languages, there are many programmed applications that have graphical user interfaces and you may want to become familiar with them. For example, content management systems like Joomla, WordPress and Joomla and shopping carts like Magento and Prestashop use PHP , mySQL, html and css; but you actually create pages with a ‘point and click’ system. Then, you may dig into the source code for web pages and make alterations. Therefore, using these systems efficiently can be important to completing projects quickly.
Beyond The Website
After there are websites, you often have the need to create and modify email accounts. An email server will run on the hosting accounts and it will be used so that people can send and receive email from the website address.
Traffic Analysis
Once websites have been built, the web developer can use tools that analyze visitor log files (ie Awstats) or add Javascript to the website files to monitor traffic with Google Analytics. Google Analytics can allow you to view where the visitors came from, what pages are being viewed and much more.
Google Web Master Tools
Google Webmaster Tools is very valuable for users to view their impressions from organic traffic and upload sitemaps for the websites. It also has many other useful tools like ‘Fetch as Bot’ so you can see what the Google bot receives when it hits your web pages. Spam can be injected into pages and this tool can let you know if Google is receiving clean pages. Also, there are tools to check for infected pages too.
Google Adwords
Using Google Adwords can be used to bring in desired traffic and help find beneficial paid and organic keywords. Many large companies gain most of their revenue from this service.
Coding Beyond The Website
As times goes forward, it is very likely your skills will too. So, if you acquire significant traffic to your website, or find a need for which you need a custom web server setup, there will probably come a day when you will need to migrate from a shared or cloud host to a VPS or dedicated server. When this happens, your whole world as you knew it could change since you will have root access to the Linux operating system and will need to take care of this system. If you don’t want to care for the operating system, you will need to pay someone to do that for you.
With that said, having Linux System Administrator skills will mean that you will like need a decent skillset with Bash, Sed, Awk and knowledge of the Linux file system. There are courses that will teach these skills.
On top of that, you may come to a point where you will be regularly editing installed Linux packages like the Apache server and Varnish. Like a lot of Linux packages and system files, they are written in C. So, learning C would not hurt as well. If you have a fairly strong background with PHP or Perl, you will find editing C files sort of straight forward. In addition, learning C will give the deeper understanding to your Unix based operating system too.
If you want to create your own C programs and packages for Linux, building them with C is an option. After you build and compile them, you can run them like any other package.
Conclusion
As you see, the toolbox for a web developer can be rather broad. You may find a person calling himself a web developer that builds basic web pages with html / css that are stored on a shared host, or you could find one that has a more well rounded skillset using the LAMP(Linux, Apache, mySQL and PHP) stack.
Although Joomla can be a convenient platform to develop websites, it can be a rats nest to fix after code had been injected into your website. For this reason, it is often easiest to start over, rather than chasing after the files which are doing the damage.
In a nutshell, the procedure to fix a hacked Joomla website is shown below.
2) Install a fresh Joomla package.
3) Use the original or create a new database.
4) Dump the data from the old database to the new database.
5) FTP the old template folders into the new installation. Before doing so, it is a good idea to check over all of the code and look for strange files or code blocks.
6) Reinstall the extensions you need.
The excessive file system which is used by Joomla and other content management systems is one reason why it can be better to hand code applications and websites.
If you have a high performance website that uses limited files, it is much easier to track down malicious code. With Joomla, it can be rather easy to disguise blocks of code and backdoor scripts; especially if the website owner is uncertain about secure coding practices.
Varnish an http accelerator that can be installed on any Linux distro. Varnish allows your website files to be pulled from the cache if they exist. If the files do not exist, Apache, mySQL and PHP do their regular requests and load the files into the browser.
Although Varnish seems like the ultimate caching system, becoming familiar with its configurations, logging and commands can be quite a committment; especially if you run multiple dynamic websites and applications like Joomla, WordPress, Magento and custom php / mySQL scripts. However, asides from getting around those details, it kicks butt. You could see that slow loading Joomla or Drupal site loading as if it is plain html / css static files from a dedicated server. Once you see how well it performs, you probably never want to go back; unless you have some web applications that you absolutely don’t want to cache.
Installing Varnish on Centos
root# yum install varnish
Configuring Varnish
After you have installed Varnish, there are two main configuration files that you will edit; ‘/etc/varnish/default.vcl’ and ‘/etc/sysconfig/varnish’. The former file would take up most of your time, while the latter file may be rarely edited. The file ‘/etc/sysconfig/varnish’ is where you set varnish to cache to memory or disk, set the cache size, set the port for Varnish to listen on, and set the Varnish admin port. By default, many of these settings are usable. But, you will probably want to make adjustments. A lot of tips for Varnish can be found here https://www.varnish-cache.org/docs/trunk/tutorial/putting_varnish_on_port_80.html.
The other file, ‘default.vcl’ can end up getting very long and specialized. When you use the default.vcl file, you will want to make entries for every ip that is used on your server. You will also make very specific caching rules. Some examples are shown below.
The first major change that takes place is changing Apache’s default port 80 to something else which is usable.
Ip Address setup
The backends and acl will vary from server to server. Here is an example below. Another example can be found at https://gist.github.com/jeremyjbowers/1542949
backend default {
  .host = "ip#1";
  .port = "<apache new port number>";
}
backend default2 {
  .host = "ip#2";
  .port = "<apache new port number>";
}
backend default3 {
  .host = "ip#3";
  .port = "<apache new port number>";
}


 acl afirst_ip_quad_block {
"ip#1";
}
acl asecond_ip_quad_block {
"ip#2";
}
 acl athird_ip_quad_block {
"ip#3";
}
Customizations
The example below allows PHP to grab an ip with the variable $_SERVER[‘HTTP_X_FORWARDED_FOR’]. By default it is $_SERVER[‘REMOTE_ADDR’].
As a general rule, all conditions that are set in the sub vcl_recv {} and vcl_fetch() blocks. You will do most of the changes here. A good method for changing the default.vcl file is to back it up and reload it with the ‘/etc/init.d varnish reload’ command or restart varnish with ‘/etc/init.d/varnish restart’.
sub vcl_recv {
remove req.http.X-Forwarded-For;
set req.http.X-Forwarded-For = client.ip;
if (server.ip ~ afirst_ip_quad_block) {
set req.backend = default;
#return(lookup);
}
Unset a cookie and cache all images with the given extensions
if(req.http.host ~ "^(www\.)?example\.com" &&  req.url ~ "\.(jpg|jpeg|png|gif|css|js)$" ) {
unset req.http.cookie;
set req.backend = default2;
}
Do Not Cache Certain Pages
elsif (req.http.host ~ "^(www\.)?example\.com" && (req.url ~ "^/member\.php" ||
      req.url ~ "^/signup\.php" ||
      req.url ~ "^/newsletter\.php"
    ))
{
#     return(pass);
#remove req.http.cookie;
   }
Testing Varnish
With varnish, you can set custom headers and test to see if it hits or misses. A good example can be found at https://www.varnish-cache.org/trac/wiki/VCLExampleHitMissHeader.
After you have added this block, you can use Firebug with Firefox or use the network tab after inspecting the element with Google Chrome. Now, you can see the new headers and examine the hits, misses and amount of hits from the cache for that page.
Rebooting Varnish Script
The script below can be set as a cron job to restart Varnish at your desired internal.
#!/bin/bash

# Check if gedit is running
if ps aux | pgrep varnish >/dev/null 2>&1
then
    echo "Running"
else
    #echo "Stopped"
        /etc/init.d/varnish start
fi
Monitoring Varnish
You can check the activity of Varnish using the ‘varnishstat’, ‘varnishncsa’ and ‘varnishlog’. After seeing these, you can see visitors logs and see how well it caches. Once the ‘varnishncsa’ process is running, you can also write its output to your own custom log file. The command for that is varnishncsa -a -w /var/log/varnish/access.log. You can check the logrotate settings in ‘/etc/logrotate.d/varnish’ to make sure it creates rotated logs.
If you want to make sure Varnish stays up and running, you can use a service like Monit or Munit to monitor its process and make sure it goes up if somehow is not running.
Working With Varnish
If you have many websites and domains, you may find that you will edit files and want them refreshed. In order to do this with varnish, you will continually need to flush the cache for a specific url while you are conducting web maintenance.
The first line below would clear the entire cache for example.com. the second line would only remove the ‘.jpg’ files from the cache.
root# varnishadm "ban req.http.host ~ example.com"
root# varnishadm "ban req.http.host ~ example.com && req.url ~ .jpg"
Monit is a linux package that can be used to monitor and restart processes automatically if they go down. This brief article will explain how to install and configure Monit.
Installing Monit
root# yum install monit
Now that you have installed Monit, the fun begins. The main files you will access and configure are the main configuation file located at /etc/monit.conf and its log file located at /var/log/monit. All editing will take place with configuration file while the log files will show you what it has been doing and can be used for troubleshooting.
Configuring Monit
The main configuration file is located at ‘/etc/monit.conf’. You can open it in your desired editor like Vi or Nano. A shortened configuration file is shown below. This file only checks for the Apache and mySQL services. More often than not, one of these two services would be the likely culprit that brings down your website(s). Take a look at the configuration file. After the file, there is a description about ‘how it works’. When you make any changes to the monit.conf file, you need to reload the configuration file with the ‘reload monit‘ command or restart it with the ‘/etc/init.d/monit restart‘ command.
root# vi /etc/monit.conf
# set daemon mode timeout to 1 minute
# set daemon 60
# Include all files from /etc/monit.d/
include /etc/monit.d/*
How It Works
Okay, the above code shows 2 blocks for Apache and one for mySQL. Too keep it simple, Monit looks for the adequate process ids for the Apache and mySQL services on your server every 2 minutes. If it does not find them, the service(s) are restarted.
Although there are several methods you can use to connect to a mySQL database, the PDO(PHP Data Objects) method is a very good technique. For one, it is universal and can be used with Sqlite databases since it does not use any commands specific to mySQL. In addition to being universal, you can use PDO prepared statements to avoid the need to escape mySQL strings since bindParam method can do that for you.
Below is a simple example that shows how to connect to the database and make an insert statement. Other mySQL commands like Select, Update and Delete can be used by replacing the command that is shown below.
$user = '<username>';
$pass = "<add_password_here>";
$dbh = new PDO('mysql:host=localhost;dbname=username_database', $user, $pass);


$emailaddr = $_POST['email'];


$command = "INSERT INTO clients (id,email,date2) VALUES (NULL, :email, now())";
$command2 = $dbh->prepare($command);

//$command2->bindParam(':id', $myid);
$command2->bindParam(':email', $emailaddr);
//$command2->bindParam(':date2', $mydate);
$command2->execute();

//or

/*
$command2->execute(array(
    ':id'    => $myid,
    ':email' => $emailaddr,
    ':date2' => $mydate
));*/
Virtualbox makes it easy to host a website on your virtual machine. This tutorial will discuss the basic setup. It assumes you have already installed the usual Linux, Apache, PHP and mySQL. If you need help with that, please check out the page here.
Hosting at home can be easily done if you set the DNS to point to your IP address assigned by your Internet Service Provider.
After you have set the DNS, you need to run two wireless connections from your host pc. By doing this, your router will assign two local network IPs; one for each wireless connection. Note that you will want your host machine to use both wireless connections.
Now, you need to alter the settings with your Virtualbox guest machine so that it connects with one of the wireless adapters. In this case, you will use the Bridged Adapter. By default, the network adapter is set to ‘NAT’, which means it would use the same ip as your host pc. The setup is shown below.
After you have made the changes, you can boot your virtual machine. Meanwhile, you can allow port forwarding for port 80 on your router to be set to the IP address that is used by the virtual machine. You router will show its connections and you should easily find the ip for your wireless(or wired) connection. When you do find it, make sure to allow port 80 to be forwarded for that ip address.
After you have set the port forwarding, you should easily be able to access the website with http://<myipaddress>.com or http://example.com.
Using this method is an easy and quick method to host private web applications on your local virtual machine.
When you connect to the Internet with a Live CD or Live USB, your connection to your router will create its own network ip address and use the mac address based on the hardware that is used to make the wifi connection. For example, after booting Live Ubuntu, Live Kali, or another Live Linux distro, you will make an Internet connection. If you use a wifi dongle to make the Internet connection, your router will use that as the mac address for your machine. Meanwhile, if you used the built in wifi network adapter, the mac address would be something else.
To test this for yourself, you can connect a second wifi dongle and boot your Linux live distro. Then, connect to the internet with either of your network adapters. Now, open a browser and login to the router. You should be able to see the ip address and mac address for your pc. Now, disconnect from the network adapter and connect with the other one. Now, you will see a new ip address and mac address for this connection.
Virtual machines have various means for which they can connect to the Internet. This lesson will discuss how Virtualbox can be used to connect to the router with its own IP address and mac address.
By default, a virtual machine connects to the Internet with NAT. This will allow you to connect through the same IP address as your host pc, although Virtualbox technically uses the Ethernet connection to make this happen. Essentially, if you browse the Internet and use your Virtual machine to do so, you will use the same IP address and mac address as the host machine.
But, what if I want to have my own network IP address and mac address for my Virtual machine? Well, if you want your Virtual Machine to act like a stand alone computer on the network you will need to alter two settings from the Network settings.
One setting is to change the setting ‘NAT’ to ‘Bridged Adapter’.
The second setting is a little more involved since it requires the usage of a second Wireless Internet card. You can pick up a wifi dongle for about $5-10 on Ebay(or ~$15 in a store). Once you have the dongle, you may have to install software and do a system reboot. Alternatively, it could be plug and play. Once your pc reads the new wireless device, you can connect to the Internet with either of the two wireless connections.
So, if you want to connect your Virtual machine to the Internet with the wifi dongle, you select it. Now, when you run your Virtual machine, it will use the mac address of the wifi dongle.
You should note that when you look at your mac address with the ‘ifconfig’ command with your Virtual machine, it will be the one that is listed in the network. It will not be the same mac address as the wifi dongle. But, the router will use the mac address of the wifi dongle.
Wow. The question is where to start and how to finish this instructive article. Okay, I will take a deep breath and make an attempt to cover many important concepts about PHP Security. Although there are many factors to consider, I always believe that reading about this subject from credible authors is a good place to start.
Books like ‘Essential PHP Security’ and ‘Pro PHP Security’ will give you some insight into security and they could even help more experienced programmers catch something they may have missed. Although the internet is a great place to solve a problem, reading is an excellent source to discover beneficial learning that you may not be looking for.
Although I will get around to making standard security methods for PHP scripts, the first two details I will cover are making a secure connection and making your server more secure. If you don’t protect your access to the server and you don’t make your server a safe place to operate, you could be in for problems.
PHP Security From Source To End
When you build a website, you more than likely use a PC and host the website on a remote server. This means the traffic route will go from your pc to your router. After that, your ISP routes the request to your web host. Your web host could have a hop or two as well. Whether you use FTP, SFTP, http or SSH, your data will travel over this Internet highway.
Although this might not seem like securing PHP, the connection process is extremely important because your local network could be attacked and exposing passwords; which could inevitably give someone access to the server. Passwords on the network could be snatched with Wireshark or some other tool. Protocols like FTP and SSH will give yourself away. If you want to connect remotely, SSH, SSL and SFTP should be practiced for remote logins. In addition to that, Ethernet is more secure than Wireless.
PHP and The Web Server
PHP is a package that is installed on Linux. By default, it is very insecure. If you rent a VPS or dedicated server, you will more than like need to make adjustments so that you have better security. On shared hosting, you will have a configuration that you cannot change, unless your ISP makes special rules for your own account.
Dangerous PHP Functions
PHP has quite an array of functions that can create havoc. Some of these functions allow for direct access to the server. This means, a skilled Linux admin could do anything from blast email spam to adding, editing or deleting any file on your server. In other words, the user could have full control of your machine.
So, if you have a poorly configured server, any client with access to an account like Cpanel or FTP could add PHP files that can run databases and modify files. From a security point of view, you do not want that, unless the server is your own and you have no intention of anybody else being able to access the file system.
So, how do you make things safer for all users? You can customize any account so that they can only use PHP functions that will not cause problems. Alternatively, you can create custom php.ini files and add them into the public_html folders.
With PHP Suhosin, you can make sure users cannot use a php.ini file in their public_html folder to override the one you want them to use. In addition to keeping a tight grip on the PHP functions, you can monitor the php.ini file for all users and other php files to see if any changes and undesirable files are showing up on the server.

If you not allow anyone access to the public_html folders, a custom php.ini files in the public_html folder will only make login sessions available within the same folder.
The code below shows some functions which can be quite dangerous. This lines of code can be used with the Linux command line to find some nasty functions. If you find some files on your system with these functions, you may want to look into why they are they there and consider getting rid of them asap.
root# grep -RPn “(passthru|shell_exec|system|phpinfo|base64_decode|chmod|mkdir|fopen|fclose|readfile|php_uname|eval|tcpflood|udpflood|edoced_46esab)” /home/username/public_html
root# grep -RPn “(passthru|shell_exec|system|base64_decode|chmod|mkdir|readfile|php_uname|eval|tcpflood|udpflood|edoced_46esab) *\(” /home/username/public_html
PHP File Handlers
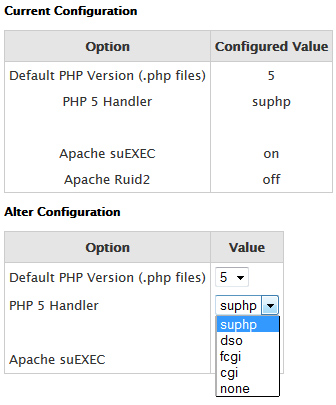
When PHP runs on the server, it uses a filehandler like suPHP, CGI, and fastCGI. If you happen to use Web Host manager, you can see your list of PHP handlers at Service Configuration >Configure PHP and suEXEC >PHP 5 Handler. You have selections in the dropdown list. If you want one that is not there, you can install and enable it with easy Apache.
For most situations, suPHP and fcgi(fast CGI) are good options and arev very popular.
suPHP
For many web hosting environments, this is the default setting. It is a very good handler that does not consume excessive memory. However, it has 1 security drawback since it allows every account to make custom php.ini files. in other words, any domain name on your server can create this file and enable any php function they want. In most cases, you don’t want this to happen, unless nobody has access to all files on the server.
Luckily, you do have the option to edit the ‘/opt/suphp/etc/suphp.conf’ file on the server to make sure nobody can create and use custom php.ini files.
To disable the ability to create custom php.ini files, change the following lines of code in the suphp.conf file that are located directly below ‘[phprc_paths]’.
;application/x-httpd-php=/usr/local/lib/ ;application/x-httpd-php4=/usr/local/php4/lib/ ;application/x-httpd-php5=/usr/local/lib/ ##change to application/x-httpd-php=/usr/local/lib/ application/x-httpd-php4=/usr/local/php4/lib/ application/x-httpd-php5=/usr/local/lib/
Now, save the file and restart Apache. Now, you can test custom php.ini files and should see that they do not work. If you use Varnish, you need to restart that service too so that the cache does not pull a cached file.
FASTCGI
Fast CGI is a PHP handler that makes it easier to customize any account or domain since you can use the php.ini sections [PATH=] and [HOST=] within the default php.ini file. FastCGI can be added with Easy Apache using Web Host Manager, or via the Linux command line. To install and build with easy Apache, go to Web Host manager and Select Easyapache >Start based on profile >Next step >Next step >Exhaustive options list >Select Mod FastCGI >Save and Build.
To use these directives, you add the sections at the end of the files and make specific rules; like the example below.
[PATH=/home/username/public_html] suhosin.executor.func.blacklist="eval,gzinflate,system,proc_open,popen,show_source,symlink,safe_mode,allow_url_fopen,base64_decode" #disable_functions="eval,gzinflate,system,proc_open,popen,show_source,symlink,safe_mode,allow_url_fopen,base64_decode"
In addition to using FASTCGI, you can install the PHP security extention called suhosin. You can install via the command line with ‘yum install php-suhosin‘ or add it with Easy Apache in Web Host Manager.
With suhosin, you can add various other settings to your custom php.ini file. An example is shown above. As you can see, there is more than one method to blacklist various php functions. The user at /home/username/public_html with use these functions while other users would use other specified blacklisted php functions. This method gives complete control over each account.
Suhosin allows many more customizable features than without. For example, if you use [HOST=] or [PATH=] sections you are limited to ‘PHP_INI_SYSTEM’. You can find a full list of directives at http://www.php.net/manual/en/ini.list.php.
As an alternative to the blacklist above, you could have whitelist functions using ‘suhosin.executor.func.whitelist’.
If you want to switch from FASTCGI to suPHP, you always disable and enable the FASTCGI module using the examples below.
sudo a2enmod fastcgi sudo a2dismod fastcgi
File Uploads
File uploading with PHP can be very useful, but, you want to make sure to only accept the proper mime type and file extension. Otherwise, it can be exploited and you could end up letting a malicious user upload nasty kiddie scripts to your website. Often, these uploaded PHP or Perl scripts use some of those functions that can do damage when they are allowed access in the wrong hands.
Unfortunately, there are many tutorials and even bestselling books with upload code that is very insecure. Although these scripts can help learn how things work, a stronger programmer could easily exploit this weakness. One possible ugly scenario could be a situation where a malicious user uploads a PHP file with a shell script that lists all your files and folders on your system. At this point, he could plant files for spamming, grabbing your database and downloading your files. When the user has your files….trouble.
If you ever have this happen to you, you want to back everything up, find and delete the nasty files. Often, the files show up at the same time since the user had a session where he was on some mission.
After you back up and delete the files, you want to change all passwords and keep tightening everything up. Make sure your system runs safely and prevent the attack from happening again. If you find files that have security issues, fix them.
Register Globals
The register_global directives should be off. If is off by default with PHP 5.3 and lower and it had been removed with PHP 5.4. Why is it so bad? It allows you to set variables in the url.
An example is shown below that creates two variables and two values. One variable is called $name and it has a value of ‘filename’ while the other one is called $owner and it has a value of ‘jack’. You could also make a variable equal to true with a url string like authorized=1.
Although using register_globals=on is bad practice, you could always make sure variables set in the url string are invalid; then reclare them and use stronger checking that makes sure these new variables are invalid.
The example below the checks for a variable’s existence. The insecure if statement just does something if the variable exists. Meanwhile, the other block removes any value given to the variable and make sure it comes from a post request. Now, the url string that set values would not have an impact in the script; even with global_variables = on since the variable values in the string would be removed and the $_GET string would not meet the posted criteria.
if($name){
// do this
}
Securing with Unset() Function
unset $name;
if($_POST[‘name’]){
// do this
}
Securing With An Array
$name = array();
if($_POST[‘name’]){
$name[‘name’] = $_POST[‘name’];
}
Sanitize User Input
Although this line is used by every tutorial going, I will use it anyway…”Never trust user input’. When you program PHP, forms and user input will be something that you will probably work with on a regular basis. The absolute basics are to sanitize user input with htmlentities(htmlspecialchars) or mysql_real_escape_string.
To sanitize a string for XSS by adding html entities into the string,
or
$var = $_POST[‘variable’]);
$sanitized_var = filter_var($var, FILTER_SANITIZE_SPECIAL_CHARS);
To sanitize a string for mySQL and prevent SQL injection,
Varnish Caching
Although Varnish is not typically included in your typical PHP security lecture, it really does wonders for session based PHP content. If Varnish is enabled on a website, the administrator logins will be useless because it will deliver the page from the cache and it will ignore any session. To use Varnish with sessions you need to unset variables and learn to edit the varnish configuration file. Since varnish does not cache files with SSL, you can have a secure login with SSL and a non-working login with non-https pages.
Don’t Show Directory Lists
There really is not much use in showing files within a directory. If you do not show the list of files, they cannot be downloaded and users cannot snoop around. A simple line in your htaccess file will prevent this from happening.
Don’t Make Enemies
With so much social interaction going around, you would be surprised where hackers and crackers could be found. They could be someone you had offended at a web hosting company, competition, or a social media stage like LinkedIn and Twitter. Knowing they are out there can help in your eliminiating any potential hangups. But, if you offend a hacker, you could cause an action against your own network. It is best not to ruffle any feathers out there.
Passwords and Publc Computers
Although it is alarming and disturbing to know other people or coworkers will try to snoop your private passwords, you may want to make sure you never use them on a public or work computer. The computer could have software that records typed text. In addition to that, some browsers like Firefox store passwords in plain text. So, you might think that logging into your https site is secure, meanwhile, your manager may go look in your cookies and find you password. Then, it could be used on another computer or to check your other logins.
The moral of the story here is to never allow any user access to your passwords. If you have to use a public computer, never save the password for future logins.
When it comes to email, spam and your clients, you may want to take control of their email limits for many reasons; much of which are very obvious. For example, you want to limit the emails that can be done with a mass emailing script from a client. If you do not control the limits, your ip and domains could find their way into blacklists. Then, you have to send nice emails telling the spam cop to remove your ip or domain name from the blacklist.
Setting the Limit For All Domains
If you have a VPS or dedicated server, you can do this with Web Host Manager. By default, Web Host Manager’s email limit is unlimited.
To set the same email limits for all domains on the server,
Setting the Limit For Specific Domains
To set a limit for one domain particular domain on the server,
In web development terms, hotlinking takes place when a remote server links to your images and uses them in their for their own purposes. Although it is a negative activity, the best way to deal with it is to not allow your content to be snatched. The easiest way to perform this task is to use Cpanel, Apache or .htaccess. The tutorial will describes these procedures with Cpanel and .htaccess.
Cpanel
With Cpanel, you can login and select ‘Hotlink Protection’. Once you read this page, you can add your domains, file extensions and enable this feature. When you enable this feature, your .htaccess has these new directives written it. Although this feature convenient, it can leave a lot of code within the htaccess file, especially if you have many addon domains within a Cpanel account.

Alter Settings
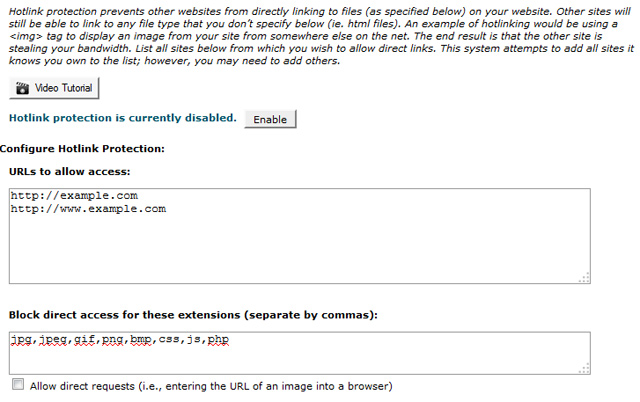
HTACCESS
Using your HTACCESS file is a very good method to fine disable hotlinking. Adding the snippet below into your .htaccess file will result in example.com and example.ca domains to have access to the image links.
HTTP
HTTPS
The example below will disable hotlinking for http and https image links. The change from above is that it checks to see if the https variable is set. In the second set of conditions, the code allows only the https version of the website to pull images.
RewriteCond %{HTTPS} =on
RewriteCond %{HTTP_REFERER} !^https://example.ca/.*$ [NC]
RewriteCond %{HTTP_REFERER} !^https://example.ca$ [NC]
RewriteRule .*\.(jpe?g|gif|bmp|png)$ – [F,NC]
When you add ‘RewriteCond’ and ‘RewriteRule’, they come in pairs with the conditions followed by the rules. You can have multiple sets of conditions and rules.
Checking and testing Hotlinking
You can test to see if your images can be hotlinked by going to the websites
http://altlab.com/hotlinkchecker.php or http://www.htaccesstools.com/test-hotlink-protection/
Its is important to make sure that no images are kept in the cache when you make a check.
Varnish users
If you use the Varnish cache, you will need to restart the service with the Linux command line or use the Varnish Admin to flush the Varnish cache, in addition to clearing the browser cache(if necessary). The Varnish admin command is shown below.
A simpler way to explain the details above is to make sure to flush every caching system. If you use only Varnish, flush it. If you use browser caching, flush it.
Extra HTACCESS Tips
Now that you have hotlinking working, you may want to make a few other minor adjustments to your image files and folders. One major detail you may want to add to make sure thaat nobody can see a list of files within a folder.
To deny users the ability to read a list of files within a directory you can add one of theb two code blocks shown below. Although both give the desired results for hiding images, the first option hides all files from being listed while the second block does not allow listing to take place.
Although PHP is primarily used for web development, it can be used to create regular desktop applications. Now that you know it is possible(and has been for quite some time), you may want to be informed about your possible options.
A few options you have are PhpDesktop, PHP-GTK, PHP Nightrain and Exeoutput. All of the previously mentioned options are free except for Exeoutput.
The remainder of this tutorial will cover the PhpDesktop and long time package PHP-GTK.
PHPDesktop
PHP is a very simple application that can be used to create a desktop application in minutes. After you download and unzip the zip file, you move the folder anywhere you want. Then, you click on the ‘exe’ file to run the application. The application itself is basically Chrome browser that can interpret typical PHP, SQL, html and css. Unlike a typical web application, it can run independently using an SQLite database file(which is included in the example).
All in all, it is essentially a web application that can run all by itself in its own folder. However, you could use a remote database if you desired. But, if you intend to have others download and use your custom desktop application you may want the portable Sqlite database since it is nice, convenient, movable file and it runs very fast.
PHPDesktop can be downloaded from Google at the url https://code.google.com/p/phpdesktop/
MYSQL vs Sqlite
Since using Sqlite is such a quality choice for your database, you will be able to use your mySQL skills and manipulate the database with a free tool like Sqlite Studio which be downloaded from their website or Sqliteman. This tool makes it very easy to run queries, create tables and alter databases to your liking.
Alternatively, you could use Linux and run the Sqlite console much like a mySQL console.
Using Sqlite with Linux Command Line
The example below explains how to access the sqlite> prompt. Its usage can be found at sites like http://www.tutorialspoint.com/sqlite/sqlite_commands.htm and http://www.sqlite.org/cli.html.
Although using Sqlite is very similar to mySQL, you should know that many mySQL queries like ‘mysqli_query’ and ‘mysqli_fetch_assoc’ will not work with Sqlite. You will need to connect to the database of your php application using PDO(PHP Data Objects). The example below will show how to connect with PDO and output the rows from a table.
In addition to querying the database, you could face other slight differences with database usage. For example, with mySQL, you could have a field with the ‘int’ type that is autoincrement. With Sqlite, you would change that type to ‘INTEGER’ and make it a primary key.
Using PDO for database connections in your projects can make it easier to port a mysql application to a Sqlite application.
$db_file = “./sqlite-database.db”;
PDO_Connect(“sqlite:$db_file”);
$command = “SELECT DISTINCT id, url FROM urls WHERE enabled=’1′ “;
$sth = $PDO->prepare($command);
$sth->execute();
$result = $sth->fetchAll();
foreach($result as $key => $val) {
$urls[] = $val[‘url’];
}
}
The code below above uses the PDO_Connect() function to connect to the database. After that, the statement is prepared, executed and an array is returned with the name ‘$result’. Finally, each element of the array is parsed and another array of each values is added to the ‘$urls’ array.
Converting a mySQL Database to Sqlite Database
If you plan to create a Sqlite database from mySQL database, you can do it easily with the linux command line. An example is shown below for making the conversion. The script mysql2sqlite.sh can be downloaded here from Github.
root# ./mysql2sqlite.sh -u username -pMyPassword database_from | sqlite3 database_to.sqlite
PHP-GTK
PHP-GTK has been around since its first release in 2001. Although the web site and code look a little dated, it still works. PHP-GTK can be downloaded from http://pigii.sourceforge.net/
PHP-GTK is very simple to use. You download the file and install it. Often, it install into your Program Files folder. Then, you can move the folder to any location you want; such as the C: folder since this is a very easy location to work with.
Once you have your working folder, you can make a ‘.cmd’ file within it. In the ‘.cmd’ file, you can add a line siimilar to the one shown below.
The line will run the php.exe file and will open the file located in the ‘demos\components’ folder. That is the basics to getting started and being able to use PHP-GTK. To build a nice, full blown application is another story.
Git is used for revision control. When you work on websites and web applications, you will often make various file edits. However, there can always come a time when you want to commit a file as a finished, or go back to a previous saved version. Git will help you maintain your file revisions.
Installing Git
1) Download Git for Windows from http://msysgit.github.io/
2) Run and Install. All default settings will work fine; like click next until it installs in program Files /GIT folder
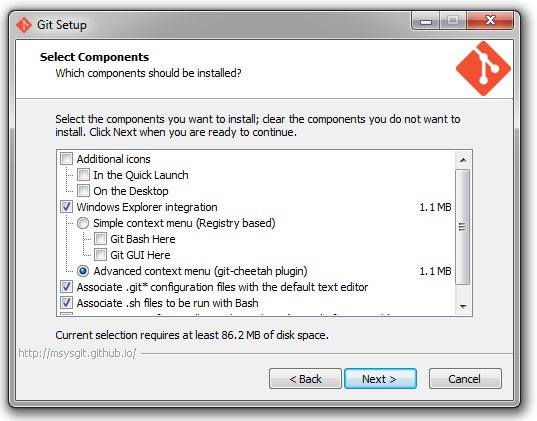
Opening Git
To open Git,
1) Start >All Programs >Git >Git Bash
or
Start >All Programs >Git >GUI
Git Help
To get help with Git,
1) Open bash >git help git
You will see an opens browser and help.
Using Git With PHPStorm
To use GIT with PHPStorm,
1) Make sure you have the settings set up for using the git.exe file.
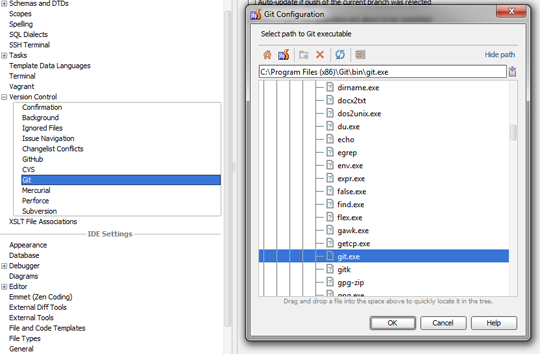
2) VSC >Import Into version Control >Create Git Repository >OK
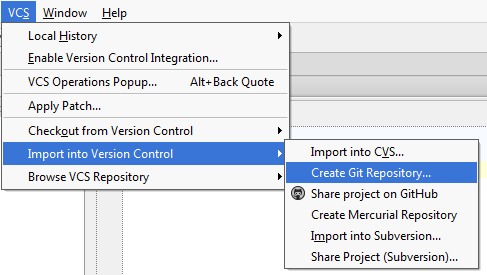
A local repository should in same folder as the current opened project
Adding Files to repository
To add a file with Git,
1) Open the file >VCS >Git >Add
Files that are added with highlight green in your list of files on the left.
Altered files will be black. Files not in Git will be reddish.
To add a file after editing,
1) VCS >Git >Add
Notes:
Committed files become black.
Committed files that are changed again bcome blue.
Committing a File to the Git Repository
To commit a file after editing,
1) >VCS >Git >Commit File >Add a comment >Select Commit
Note:
Committed files become black.
Committed files that are changed again become blue.
To view file and git versions,
1) VCS >Git >Fetch
2) VCS >Show Changes View >Right Click On file >Show Diff
You can also view the history of a file later on.
To view the history,
1) Right Click File >Git >Show History
When you develop web applications, you can use a single operating system of choice. Normally, that involves one of the big 3; Windows, Mac, or Linux. However, you may find that using more than one at the same time can be more effective and easier for your workflow than a using a single option. You can run multiple operating systems by running virtual machines with a program like VM Ware or Virtualbox. Both VM Ware and Virtualbox have free versions.
This article will explain how you may want to use two operating systems at once in order to accommodate your custom needs. Essentially, the overall criteria for knowing if you should use one or more systems at the same time is to determine which system has the best software and applications to do your desired task.
For example, you may have purchased programs like Camstasia and want to run them natively on Windows. A true Linux faithful may explain that anything you can do on Windows can be done on Linux. That may be good enough for him, but, you may just want to keep going on with your habits and use a system that is already fine-tuned. Adding Wine or another Linux package may just seem like adding another layer of complexity for a seasoned Windows user.
Windows / Mac Usages
Here a few instances where you may find running Windows or a Mac to be beneficial.
1. My software I have used for years
This is very self-explanatory. You have bought some well tuned software like Photoshop, Camstasia or Pinnacle Studio, and you are very used to how it works. This means the familiarity from opening the program, opening files and saving files is not something you are willing to adjust.
2. Word Processing
Microsoft Word does everything you want. After years of usage, you are not that interested in starting over. The free Linux alternative LibreOffice is a worthy alternative, but, it may miss the odd white space or spelling mistake.
3. Email
Linux has excellent email clients like Thunderbird. However, like many Linux programs, the usage can vary from that of Windows. In this case, you may just want to use the formula that has been working all along.
Linux Usages
If you have Linux experience with distros like Ubuntu or Centos, you will have no problem finding your way around the operating system. But, if you are new, you may experience that it is a much different beast than Windows or Mac. Linux is largely a programmer’s operating system.
Permissions on files and starting some programs can involve time spent with the command line. In all honesty, if you are new or do not have a desire to be good at Linux you may find running a second operating system an uphill battle. However, if you just want to edit and run a Lamp server, it should be rather easy to accomplish.
Nevertheless, if you are dedicated to learning and running Linux, you have a lot of powerful knowledge that can be used to be more effcicient with dedicated or VPS hosting accounts, and for using Linux at home where you find its benefits are high. Spin-offs from using Linux for a hobbyist are that you can setup home servers with Raspberry Pis that can allow you to test and run web applications and run other Linux applications.
One such application is a live motion security cam that stream live video and save swf files after motion is detected. On top of that, Linux machines and Raspberry Pis can be used to automate your house; like turning lights on and off, creating a weather station and watering plants on a schedule; all of which can be monitored in an online environment. Linux usage can go on and on.
Anyways, here a few instances where you may find running Linux to be beneficial.
1. Local Lamp Server
From a web developer point of view, Linux could stand out if you want to install and run a Lamp server. Wamp is good, but Lamp is really kick-ass. Since you will likely use Lamp online, using it locally has many benefits. As a web developer, it is an automatic arena to test scripts offline, or, to run custom applications on a localhost.
2. Using a Virtualbox For a Client
Virtualbox, by Oracle, allows you add Virtual Linux machines. Essentially, you can build an entire system that is specific to client. You can add an editor like PhpStorm, Netbeans, Gedit, and others.
Using Linux makes it easy to connect to foreign servers with the command line. Keeping a whole system to store files and run applications can make your workflow very efficient. It also makes backing up a very simple process since a Virtual Machine is essentially a large file.
Conclusion:
Under certain circumstances, using two systems can be very efficient. If you decide to avoid Linux, you may be able to make do. If you use many of its advantages like Lamp and home servers, you can get more done. Knowledge and practice of Linux is never a waste. As you learn more about it, you will be strengthening your web development and systems admin knowledge. As you can do more, more options and tasks are available to you. Being able to do more on the web is an advantage that Linux will deliver.
Finally, in addition to doing more, gaining a stronger knowledge of Linux can get you out of jams and keep your systems running smoothly. Therefore, when something does go wrong, you will have the basic troubleshooting skills to get things back to normal and find why things had gone wrong.
The Raspberry makes is a fantastic device that allows you to stream live video and record motion detection. As long you have a webcam that is compatible with the Raspberry Pi, you have the basic hardware to accomplish such a task.
In order to get started with live streaming and motion detection, you need to install the Linux package titled ‘motion’. Motion will handle the process of streaming and recording video. Normally, out of the box, it just works.
Installing Motion on Linux
apt-get install motion
Configuring Motion
After motion is installed, you will need to open a couple of files and make some simple edits. The two main files are /etc/motion/motion.conf and /etc/default/motion. Below are some code blocks that will need to be changed in order to broadcast streaming video or record motion detection.
motion.conf
daemon on webcam_localhost off control_localhost off
motion
This file, located in the /etc/default folder requires a single change.
start_motion_daemon=yes
Adjustments
After the initial options are set, you may want to customize your setup. Below, are a few examples of customization; like setting the framerate equal to that of the webcam.
//motion.conf
framerate 30 // default 1
quality 90 // default 70
Out of the box, it will record motion. But, it is sensitive to a single frame of motion. In some instances, flickering light could make it start recording a brief sequence. In order to combat this, you can increase the amount of frames that need to be contain motion.
minimum_motion_frames 5
Now that the cam actually runs and everything works, you can find the stored motion files in the directory defined by the target_dir option that is set in the motion.conf file. By default, the directory is tmp/motion.
Storing Motion Files On a USB Stick
If you run a Raspberry Pi on an SD card(in all likelihood), you may want to mount a usb stick on it so it records all motion to the usb stick. By doing this, you will cut down on writes to the sd card and keep files nice and organized.
To store images on a mounted USB stick,
1) get the USER ID
id -u pi
2) Add the user pi to fstab in order to mount for that user.
/dev/sda1 /home/pi/mount/storage vfat uid=1000,noauto,user,exec 0
3) Format a usb stick fat32
4) Mount it to a desired folder
5) Unmount it
6) Format it with mkfs.ext4. This format is critical to allow a user other than root to be able to have specified permissions with mounted media.
mkfs.ext4 /dev/sda1
7) Mount it again
8) Change folder permissions to 777
chmod 777 /home/pi/myfolder
9) Change owner to pi
chown pi:pi /home/pi/myfolder
When you can write to the mounted folders and they have the proper permissions, you can store the jpg images and swf files there.
Website Usage
Your Raspberry Pi will need a complete LAMP setup; or at least an installed web server like Apache. Once you have this, you can enable port forwarding in your router so your ip(or even a website) can be seen on the web via port 80. With port forwarding you can add other other forwarded ports to the router like 8080 and 8081, and port 22 for SSH, if desired.
By enabling an ssh port, you will be able to remote control all Linux boxes on your local network because once you can connect to one of them through the ssh port, you can easily connect to the others since they are all on the same local network.
Once you make the pages available to the outside world, you can create a web page that can be seen on the web with an src tag which embeds the streamed video. If you allow a local ip like 192.168.0.101 to be port forwarded with port 80, you make have a file like links to another inetrnal ip like 192.168.0.102.
All in all, you will use two Raspberry Pis on a local network that will be setup so that any other website can integrate the live streams into a webpage.
Then, you can use any other online webpage and add an iframe to the website url hosted at home.
GOOD REFERENCE
http://linux.die.net/man/1/motion
When you code PHP, you can use one or more editors. some are very simple, some are free and some cost money for a license. There are excellent options for every developer. Although deciding on an editor seems like a simple choice, it can easily become an ongoing pursuit to find the best editor for you that makes you comfortable and productive.
This article will contain some options and reasons why you may want to choose the best editor to suit your needs.
Beginner Tools
Simple Free Editors
Often, when a web developer learns to hand code PHP applications, an IDE can be a distraction since features like code completion and configuring your editor could be a distraction that gets in the way of understanding basic syntax, functions and loops. From experience, I found a simple quick loading editor like Notepad++ to be a very good tool to learn PHP / mySQL. Early on, I even moved from an IDE back to Notepad for a couple of years until I could easily hand code and copy and edit code rather easily.
Notepad++ had good FTP and SFTP connectivity and made scripting a simple procedure. But, eventually I found it lacked important features like code completion and text formatting. At this point, I switched back to an IDE to become more productive and give the code a ‘good look’.
Although Notepad++ is a good introductory tool, it is also a good tool for any developer to build small PHP scripts and edit other scripts since it so fast load. Also, it can be a secondary mini-script maker to work on a basic script while your IDE is open with a large project.
More Advanced Tools
Free PHP IDEs
There are various free PHP IDEs. Two popular ones that come to mind are Netbeans and Eclipse. These tools will help you automatically complete code, format your work, and make finding your classes, functions, variables, etc an easy process.
Commercial PHP IDEs
After experience with Netbeans and Eclipse, I was content and appreciative of such good free tools, but, there always seemed to be something minor that kept me looking at other options. I was a Netbeans user and liked the SFTP, projects, compatibility with Windows and Linux, code completion, highlighting, themes, custom rules and more. But, I did find it a bit slow, unappealing to look at and questionable about its formatting.
During my times of questioning, I samples many trial versions of editors like PHPStorm, PHPEd, PHP Designer and PHPEdit. On the first go around, I thought Netbeans was a fantastic free option although I liked the others too.
After months of pondering a switch, I tried PHPStorm again. Immediately, I was drawn to the look and many of its similarities to Netbeans and the many numbers of other web developers and experts that recommend its usage. So, I opened up a page of code and reformatted it with PHPStorm. Immediately, I liked the new formatting which was always something I did not care for that much with Netbeans since the margins were not aligned like I wanted.
Although the default new colors of the editor may have had an influence, I still found this polished IDE was worth having. After all, as a full time PHP / mySQL programmer / web developer, spending $100 on the most important tool is less than a minor expense.
Since PHPStorm seemed like a good fit, I made a download from the server as a final check. Before that even completed, I pulled out my credit card on the first day of the free trial and bought it. Money well spent and it makes me want to code more.
When you begin or work with server side scripting; like PHP(or Perl) and mySQL, you are often confronted with two server options; Lamp and Wamp. Lamp stands for Linux, Apache, mySQL and PHP(or Perl) and Wamp is the same except that the ‘W’ is for Windows. For many Windows users, Wamp is a simple and easy setup for which to practice PHP, mySQL and use phpMyAdmin.
In most situations, you will use lamp when you host a website on a live server. Therefore, using Lamp does have many benefits if you plan to host and administrate websites in a serious manner. For starters, you will be able to grow skills, understand how it works at it root level, and learn to master the command line. Without knowing how to use Linux and the command line, you could be in a tight spot if you plan or need to run a dedicated or VPS server.
Therefore, if you want to make overall headway and progress, you may want to use Wamp to become a proficient programmer and use Lamp to become a better programmer and system administrator. Once you gain a larger understanding of Wamp and setting up servers with Lamp, you may find Lamp is easier to configure on a custom level and you can do more with it.
Writing regular expressions allows you to make you custom matches the way you want. One particular meta character that can make pattern matching easier for large blocks of repetitive code is to add a ‘?’ after a greedy quantifier ‘*’. If you add a ‘?’ after a greedy quantifier, it will make the match as fewest times as possible. Oppositely, if you do not use a ‘?’ after a greedy quantifier it will try to make the match as many times as possible; thus you will end up with just one match since your expression will grab everything in between the first and last match.
The simplest way to show this is through the following coding samples.
The example below will match the first ‘<table>’ tag and everything in between until it finds the last ‘</table>’ tag in the document.
$data = file_get_contents('http://localhost/ebay-pi.html'); $regular_expression = '/<table\s*listingId(.*)<\/table>/si'; //Make an array of all matches preg_match_all($regular_expression,$data,$posts, PREG_SET_ORDER);
The example below will match every starting ‘<table>’ table tag to its matching ending ‘</table>’ tag. This method is often a choice for matching a pattern that occurs throughout a string(or file) and would be probably be desired for web scraping.
$data = file_get_contents('http://localhost/ebay-pi.html'); $regular_expression = '/<table\s*listingId(.*?)<\/table>/si'; //Make an array of all matches preg_match_all($regular_expression,$data,$posts, PREG_SET_ORDER);
With Linux, you must keep an eye on the system health to ensure that your hard drive space and memory do not get eaten up. If you exhaust your limit, you end up with issues like websites that cannot be viewed and the inability to login to GUIs like Web Host Manager and Cpanel.
When you do run out of memory and attempt to login to a control panel like Web Host Manager, you could see the an error message that is displayed below.
Internal Server Error 500 No response from subprocess (whostmgr (cpanel)) with exit signal: 0
Running Out of Memory
If you run out of memory, you need to login to your host with SSH and stop or kill some services; like mySQL. If you use a service like Web Host Manager and Cpanel, you may need to reboot the cpanel service to have access to your control panels.
To restart Cpanel,
/etc/init.d/cpanel restart
Once you have been able to login to Web Host Manager, you can do a graceful system reboot and hopefully your memory slide back into a usable level.
To see how much memory you have available, run the following command in the shell.
free -m
PHP is the most popular server side web programming in the world. Since it had been offered to the public back in 1995, its usage had grown tremendously. Meanwhile, its popularity continues to maintain a stronghold, regardless of the criticism from others who are always there to undermine it.
If you read enough blogs and books, you will find that its popularity emerged from PHP being easy to learn and its ability work well with html and Javascript coding. Regardless of why it became popular, you may want to ask yourself, “Why is PHP right for me?”.
The answer could easily go on indefinitely, but, a few solid reasons why PHP could be right for you are that it has a short learning curve, there is a lot of PHP tutorials, help, and support available online, most affordable web servers have it installed on their system, there is a large code base which makes it easy to find a program similar to one you want to use, and it is very easy to alter other PHP scripts when you have PHP coding skills.
So, now that you may be sold on learning PHP, the next part of this lesson will explain how to start coding with PHP. This basic PHP tutorial will cover basic syntax, printing text, variables and strings, arrays, loops and some insight regarding how to do more fancy stuff with PHP.
If you want to search our library with over hundreds of pages, you can find more PHP tutorials here.
Coding Syntax
When you use or write PHP scripts, the start of a coding can be <?php or <?. In most cases, the starting block uses the long tag <?php. The other method is called a short tag. Some servers will not allow the usage of short tags, but they all allow the usage of the ‘<?php’ tag. It is considered a good habit to code with the long tag so your script has a more ‘universal’ concept. PHP coding is done within files that have the ‘.php’ extension.
Although PHP files must have the “.php” extension, you can add HTML, Javascript, XML and CSS code blocks into your PHP. If you add HTML or other coding like Javascript outside of the PHP tags, The code will be interpreted. However, if you plan to use HTML or JavaScript within PHP tags you will need to create the code using the echo command. Normally, when you use the echo statement a string of text is inserted between single quotes or double quotes.
QUOTES
You use quotes when you want to print words, declare variables and strings. When you want to end the statement, you use a semi-colon. With PHP, you have the option to use single quotes or double quotes. In some instances they have similar behavior, but, not in others.
For example, if you use single quotes around variables, the variable will not be interpreted. But, if you use double quotes, it will. Since a variable could be something new for you, I will show a few examples using single and double quotes with variables and printing statements.
Single Quotes
Declaring a Variable
Printing text
echo ‘Hi there’;
Printing Variables
The result of the above statement is the same text that is shown between the single quotes, $variable1 and $variable2. Like I mentioned above, variables within single quotes do not get interpreted.
Double Quotes
Printing Text Within Double Quotes
Printing Variables
As you can see, the output here is much different than the same statement that had used single quotes because it actually prints the data that the variables represent.
Here is one more example that is slightly more creative. It prints variables and text using variables that are outside of quotes and strings of text that exist between quotes.
As you can see, when you echo a variable outside of the quotes, it is interpreted. If they strings of text do not contain variables, they will both output the same results.
Also, this example shown above introduces concatenation. Concatenation uses the period character ‘.’.
When you place the dot in a statement, it can be followed by another variable or a set of quotes. After a set of quotes, you can add another dot and add another variable or set of quotes. If the syntax is not proper, you will see an error when you try to view the page in a browser.
At this point, you should be able to write simple on-liners with PHP and see the output as you expect.
Here are a few more coding examples which could help you understand more about basic PHP syntax. All the syntax will look different in all of these samples even though they all display the same results.
Sample #1
Sample #2
Sample #3
PHP Arrays
You won’t get far with PHP without strong knowledge about PHP arrays. An array is a group of options. For example, an array of cars is Ford, Chevrolet, Toyota, Honda, Volkswagen, BMW and Mercedes. An array can written using array(). It contains a list of items separated by commas with values stored in quotes (with the exception of numbers). If an array value contains a number, no quotes are needed.
A tip to understanding arrays is that each item will always have a key and a value. Let’s move on and look over a few arrays to help you know more about them.
An example array of cars is shown below.
$cars = array(“Ford”, “Chevrolet”, “Toyota”, “Honda”, “Volkswagen”, “BMW”, “Mercedes”) ;
Let’s go through the top line of code. The array is called $cars. The car Ford has a key ‘0’ while the car Mercedes has a key of ‘6’. All cars in between have the ordered keys from 2-5. In case you are wondering, numerical keys always start from ‘0’, not ‘1’ like you may expect. The values are the names of the cars; such as Ford.
Now, here is another example that is equal to the example above, except that we wrote the keys and the values.
The two car samples are identical. Here is how you access a value in the array.
The output from the code about is ‘Ford’
Here is another example using the array shown above. It includes a review of some basic syntax we had covered earlier.
The output from the code about is ‘My car is a Ford’.
More detailed examples and a crash course for PHP arrays can be found at https://fullstackwebstudio.com/locations/coding-blog/PHP-Array-Primer.html.
PHP Loops Tutorial
Loops are another major component of PHP programming that a PHP programmer should learn well. Loops are repeated procedures that you run for a specified number of repetitions. The most common loops you will use with PHP are the for, foreach and while loops.
Simple For Loop
The for loop starts with the word ‘for’. After that, a pair of brackets () holds the conditions and sets a variable. There are 3 main parts within the brackets; the value of a variable(in our case $i). After the variable is set a semi-colon is added. The next criteria(on the other side of the semi-colon) with a condition that says the variable $i is less than 5. It too is separated by a semi-colon. The final criteria is the $i++; this time without a semi-colon. The $i++ is just there to allow for iteration to take place.
In a nutshell, the first value of $i is printed followed by a repeated loop until $i is no longer less than 5.
As soon as $i is not less than 5, there is no more repeated loops.
After the code is added into the round brackets, you add a set of curly brackets for which you can add any desired code. The example below should make everything clear.
The output of the above code is the printing of numbers 1-4 on separate lines.
Simple Foreach Loop
The foreach loop is often used to output values from arrays. To make this work, you use the foreach statement and throw an array into it. After you add the array name, you can add another name that your want to use for each element in the array.
Essentially, the foreach statement goes like this …. Foreach my entire array as single value in the array, do this. In the example coming up, you can see an array called $items and it will loop through all values like one, two, three and four.
Now that you have the hang of the foreach loop, you may want to try another foreach loop where a key is introduced. Earlier, in the section about arrays, you learned that each item in array has a key and a value.
The main difference with the next loop is that is contains the name of the key(which happens to be $key in this case) and a ‘=>’ which associates an array key to an array value. So, the code below will run a loop for each key and value pair; such as the key ‘First’ and its matching value of ‘one’.
Simple While Loop
While loops do repeated loops as long a s a specific condition is set. Using while loops is very popular with database programming using a database like mySQL.
The code block below will repeat as long as the value of $i is less than 5.
Here is a glimpse into the future regarding using a while loop with data returned from a MySQL database query. Here is what is going on in the next example. A query is made to select the id, firstname and age from a database table called table_sort. The mysqli_query() function runs the query. Now, the while loops runs for all rows of data within the table. The code within the while loop will run for each row of data that was fetched.
PHP OOP Tutorial Basics
OOP(Object Oriented programming) is more complicated than basic PHP programming that had been discussed in this post. OOP allows you to create objects that use classes, methods and properties. An object is like bundling up a class and being able to use its properties and methods based on accessibility. Methods in OOP are written similarly to regular PHP functions while properties are similar to variables. OOP really allows programmers to keep a tight set of rules within each class. This makes reusing classes very easy.
PHP has gone through various versions; such as PHP3, PHP4 and PHP5. Since PHP4, Object Oriented Programming (OOP) had been available so that programmers could have more coding options. With PHP OOP, programmers can create classes, methods, constructors and more.
Although OOP can seem a little complicated to learn and hand code, you may find that persistence will make this easier. Knowing OOP is valuable since many PHP scripts contain some or the majority of its code with OOP and you will not be guessing about the coding. It also makes it easier to modify an OOP script to suit your needs.
Basic OOP samples can be found here.
MYSQL Database
MYSQL is that most popular database engine that is used with PHP. Under normal working conditions, a PHP programmer will work with MySQL databases on a regular bases. All major PHP scripts like WordPress, Joomla, Magento and thousands more use PHP and MySQL. Information regarding MYSQL can be found here.
Your Bright Future
With years of practice, skill accumulation, and dedication your PHP skills can help open lots of doors. You can seek a regular 9-5 job, freelance, freelance / work fulltime and code as a hobby. Since you have so many options, you can make a switch at any time. For example, some people go the full time route in order to receive steady pay and job security, build a solid resume and build skills which will act as a stepping stone since everyday your skillet grows, so does your worth.
Since a web developer has so many options for self-employment, subcontracting and regular 9-5 work, you don’t have to stay stuck in a job that raises you pennies on the dollar when your skillset and productivity grows 100-500%. As an alternative to a 9-5 setup, your company may allow you to obtain a contract with them and you can work from home. Since your job is really a connection to a web server and done on a pc, you are not confined to a position where your physical being makes any difefernce.
In this era, employers may hire Junior PHP programmers with little experience thinking they are more likely to stay at one job. But, if you develop good PHP code, you are likely smart enough to know your worth in the marketplace.
Everything in life runs its course and always look out for yourself because your needs and interests are unique. Lucky for you, web developers can take their career anywhere since a good laptop is essentially an office.
Regardless of your working needs and desires, there is the right option for you.
Echoing heredoc. My variables and text output just fine. Variable 1 is $var1 and Variable 2 is $var2.
EOF;
$make_eof_variable = <<<EOF
Hey Variable 1 called $var1! I can add the variables within the EOF tags then output the variable anywhere on the page!
EOF;
echo $make_eof_variable;
Simple Array
This simple arrays contains
2 items. Each item has a key and a value. The first element in the array has the key ‘first’ and a value ‘myfirst’ while the second item has a key ‘second’ and value ‘mysecond’. All keys in an array have a name or a numerical value. In this example, the key is a name.
When you want to output an item in an array, you simply use the array name followed by the key that is enclosed in brackets.
$mypages = array( 'first' => 'myfirst', 'second' => 'mysecond' ); echo $mypages['first'];
Multi Dimensional Array
Although the the example below looks more confusing than the example above, the two are very similar. The main difference is that some of the items in the array called ‘myarray’ are arrays. Essentially, you have an array with some single items while the ‘multi’ item also contains an array and one of its items contains an array.
To get your desired output, you simply start with the main array and work down the ladder with the various nested keys. For example, the coding $myarray[“multi”][“dimensional”][“array”] contains the multi, dimensional and array keys which represent the value called ‘foo’.
$myarray = array(
"foo" => "bar",
42 => 24,
"multi" => array(
"dimensional" => array(
"array" => "foo"
)
)
);
var_dump($myarray["foo"]);
echo "
";
var_dump($myarray[42]);
echo "
";
var_dump($myarray["multi"]["dimensional"]["array"]);
echo $myarray["multi"]["dimensional"]["array"];
Another Multidimensional Array
This example is like the example above, except the ‘dimensional’ key contains an array with only names. The values for the array mice, cat and dog are represented with the numerical keys 0,1,2. This is the reason why printing $myarray3[“multi”][“dimensional”][1] outputs cat.
$myarray3 = array(
"multi" => array(
"dimensional" => array("mice","cat","dog")
)
);
echo "Array 3: ". $myarray3["multi"]["dimensional"][1]; // cat;
Multidimensional Array With Indexed Entries
This example is like the example above, except there are numerical keys written for the dimensional array. The values for the array mice, cat and dog are also represented with the numerical keys 0,1,2. This is the reason why printing $myarray3[“multi”][“dimensional”][1] outputs cat.
$myarray4 = array(
"multi" => array(
"dimensional" => array(0 => "a", 1 => "b", 2 => "c", "myword" => "test")
)
);
echo "Array 4: ". $myarray4["multi"]["dimensional"][1]; // cat
echo "
";
echo "Array 4b: ". $myarray4["multi"]["dimensional"]["myword"]; // cat
Accessing Elements In an Array With Numerical Keys or Named Keys
This example is like the example above, except that the numerical indexes are gone. Without a key defined with ‘=>’, any item takes on a numerical key.
$myarray5 = array(
"multi" => array(
"dimensional" => array("a", "b", "c", "myword" => "test2")
)
);
echo "Array 5: ". $myarray5["multi"]["dimensional"][1]; // cat
echo "
";
echo "Array 5b: ". $myarray5["multi"]["dimensional"]["myword"]; // cat
At this point, you should have some idea about arrays in regards to keys, values and usage.
When you move a WordPress site to a subdomain, there are a few steps that can follow to ensure that the new subdomain will look and operate and you want. The steps are outlines below.
At this point, you can open the new subdomain and see the website. It may or may not look exactly as you expect. One issue could be that the header is missing files. This can be fixed. Open the original domain and find the header image name with ‘View Source’. Do a find and replace in the database using phpmyadmin (or command line). The url for a subdomain will change in size. Believe it or not, the size is important.
Now, the website should display properly.
Yslow is an addon you can add to a browser like Firefox or Chrome so that you can analyze web pages. With the analysis, you can determine some areas that require upgrading.
When Firebug and Yslow addons are installed in Firefox, you simply open Firebug and select the Yslow Tab.
To run a Yslow check,
1) Open the desired web page.
2) Select ‘Run test’
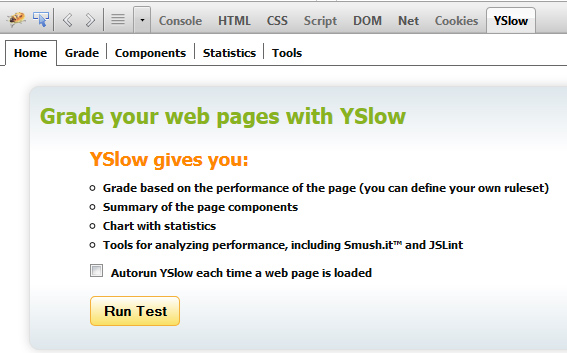
After a test is completed, you can see your score and a list of grades.
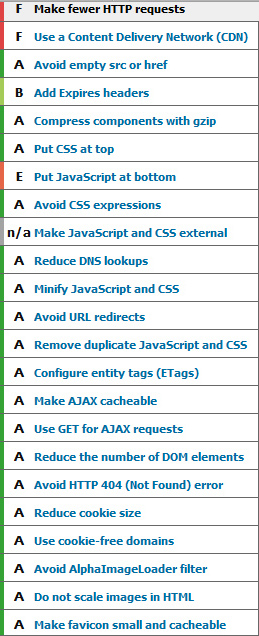
Upgrade Web Page(s)
To upgrade your web pages and get higher grades, you can select any link from the list shown above. Generally, there are a few quick fixes that can give instant results. The major changes are to add expires headers into your .htaccess file, enable compression (Cpanel can do this), minify css and javascript files, and set Etag in .htaccess file.
FileETag none
ExpiresActive On
<IfModule mod_expires.c>
ExpiresDefault “access plus 6 month”
ExpiresByType image/x-icon “access plus 6 month”
ExpiresByType image/jpeg “access plus 6 month”
ExpiresByType image/png “access plus 6 month”
ExpiresByType image/gif “access plus 6 month”
</IfModule>
Allowing visitors to cache images and files in their browser can make your website significantly faster to navigate. This post will explain how to use mod_expires and mod_headers to allow visitors to cache files in their browser. With browser caching, you can set the time for which files can be cached. The caching duration has pros and cons. For example, if you are blogging and you update content, but rarely change images, caching for long time periods can significantly decrease the load from your server and make the user’s experience much better. Alternatively, if you have a small website and make changes daily, caching for the long term can be detrimental if you want your visitors to always see the latest content.
For a larger game plan, you can use Varnish and mod_expires to keep your website running quickly.
Show Modules with Debian / Centos
Alternatively, a tool like Web Host Manager with Centos can show which Apache modules are installed and enabled. You can see that with Easy Apache.
Enable mod_expires (Debian / Ubuntu)
Now I can cache all the images on my site by adding this to .htaccess in my root directory.
1) Add code to .htaccess.
Using mod_headers
1) Enable mod_headers
To use mod_headers,
1) Add code to .htaccess file
#mod_headers
<FilesMatch “\.(ico)$”>
Header set Expires “Sat, 15 Dec 2015 20:00:00 GMT”
#Header set Cache-Control “public, max-age=3600, must-revalidate”
</FilesMatch>
<FilesMatch “\.(ico|pdf|flv|jpe?g|png)$”>
#Header set Cache-Control “public, max-age=3600, must-revalidate”
</FilesMatch>
Simple Check to See If caching Is Working
If you have Firebug and Yslow addons installed in your browser, you can fine tune your Expires Headers. All you must do is a run a Yslow test and check the Expires Headers. It will give you a grade and tell you what has ‘No Future’ expiry date. With a little tuning, you can fix the expires headers. You may need to add expires for specific file types like ‘.ico’. Or, you may need to remove links to non-existent images (or add 1 pixel transparent images to a folder). As you tune expires Headers your Yslow grade will climb instantly.
Varnish is an http accelerator (reverse proxy) that can be used to store copies of web pages that will be used to serve the web surfer instead of copying the page from the server. Essentially, websites that are delivered from the cache will display much faster than those that are not. Although Varnish can accelerate the page delivery, the ISP (Internet Service Provider) upload speed, page content, and browser caching will have very high impacts on the page load speed too.
Since Varnish can store the pages in memory, a small website that is optimized for performance can be quite efffective; especially if its size is well under the cache size that you set.
Although Varnish and a Raspberry Pi can be used to host a website under aquequate conditions, it can also be an excellent starting point to experiment with Varnish and its features before making major changes to a live server with many Virtualhosts and addon domains.
Here are the steps to setting up Varnish on the Raspberry Pi.
To install Varnish on the Raspberry Pi,
1) Become a sudoer to execute root commands.
pi@raspberrypi:# sudo -s
2) Open the /var/tmp folder
root@raspberrypi:# cd /var/tmp
3) View the files in the repository at http://repo.varnish-cache.org/source/.
4) Download a file like varnish-3.0.5.tar.gz.
5) Open the /var/tmp folder
root@raspberrypi:# wget http://repo.varnish-cache.org/source/varnish-3.0.5.tar.gz
6) Extract the file and change directory. When you compile and install from source you work from within the top folder. In this case, the folder is varnish-3.0.5.
root@raspberrypi:# tar xzf varnish-3.0.5.tar.gz root@raspberrypi:# cd varnish-3.0.5
7) Install dependencies
root@raspberrypi:# apt-get install autotools-dev autoconf libpcre3-dev libedit-dev automake libtool groff-base python-docutils pkg-config
8) Run autogen file and continue compiling and installing from source.
root@raspberrypi:# sh autogen.sh
9) Configure
root@raspberrypi:# sh configure --enable-diagnostics --enable-debugging-symbols
10) Make
root@raspberrypi:# make
11) Make install
root@raspberrypi:# make install
Note: If anything went wrong and you are doing a second attempt, run make uninstall and make clean. Make uninstall will remove the previously installed package.
12) Setup the necessary links
root@raspberrypi:# ldconfig -n /usr/local/lib/
13) Edit the configuration file default.vcl.
root@raspberrypi:# vi /usr/local/etc/varnish/default.vcl
or
root@raspberrypi:# nano /usr/local/etc/varnish/default.vcl
Note: You will need to uncomment some lines such as;
backend default { .host = "127.0.0.1"; .port = "8080"; }
Note: The port 8080 will be used by the web server.
14) Change the port from the web server. Normally, Apache or Lighttpd will use port 80. Change this to something else like port 8080.
root@raspberrypi:# vi /etc/lighttpd/lighttpd.conf
15) You can make a file to start the service or you can type or copy and paste the following command to start the Varnish service.
root@raspberrypi:# /usr/local/sbin/varnishd -f /usr/local/etc/varnish/default.vcl -a :80 -P /var/run/varnish.pid -s malloc,35m
Note:
The -f option tells Varnish where the configuration file is located. In the case, the file is located at /usr/local/etc/varnish/default.vcl
The -a option is the port that Vanish will use. In this case, Vanish will use port 80. Your router will allow port forwarding on the port.
The -P option is the PID file location which records the process id for Varnish. When you know the process id, it makes it easier to kill the service, etc.
The -s option tells where the cache is located and the size of the cache. In this case, the cache is 35m.
Find more about options at https://www.varnish-cache.org/trac/wiki/Performance.
Check if Varnish is Running
root@raspberrypi:# /usr/bin/pgrep -lf varnish

Check if Varnish is Working Properly
PHP Users can make a file called view_headers.php and use the get_headers() function to output the headers which hopefully includes some information about Varnish. The samples below show how to get headers from a URL.
print_r(get_headers("http://localhost", 1)); print_r(get_headers("https://example.org", 1)); print_r(get_headers("myIPaddress", 1));
You can run the file in a browser or via the command line. Running the PHP file at the command line is shown below.
root@raspberrypi:# php ./view_headers.php
If all goes well, the array will contain the line below. [Via] => 1.1 varnish PERL users can install the libwww-perl package to view headers.
root@raspberrypi:# apt-get install libwww-perl root@raspberrypi:# GET -Used http://localhost:80/
If all is working fine, you should something similar to the output below.
200 OK
Connection: close
Date: Sat, 11 Jan 2014 18:23:19 GMT
Via: 1.1 varnish
Age: 0
ETag: “3260290251”
Server: lighttpd/1.4.31
Vary: Accept-Encoding
Content-Type: text/html
Last-Modified: Sat, 14 Sep 2013 23:19:36 GMT
Client-Date: Sat, 11 Jan 2014 18:23:19 GMT
Client-Peer: 127.0.0.1:80
Client-Response-Num: 1
Client-Transfer-Encoding: chunked
Title: Welcome page
X-Varnish: 361868210
This little excerpt explains my experience with Magento 1.8 Community Edition. Although everything seems easy in theory; download, unzip the file, create a database and install the software, I had found it a bit a of a journey and experienced a lot of trouble shooting to get Magento to work as I had intended.
The initial install went smoothly. But, as soon as I had got into the theming with the template the client had wanted, everything changed.
Backtracking, after you install Magento, you keep a key for safe keeping. The key sample is shown below.
5e20757rrbcfe79fad6487cc0b0839a9
(Make sure you keep it in a safe place.)
Now that Magento seemed like a smooth, running machine, I installed the template as this tutorial explains.
After I had done that, I had various different password and admin issues for which I had to quickly solve my creating new users and updating passwords.
Installing with SSL seemed problematic, so, I decided to do it without and use a redirect later with .htaccess. At this point, I had done many installations.
After the template was setup, I inserted the ‘sql’ file into the database. The data needed a severe fixup. For one, the ‘core_config_data’ table needed proper named urls.
Also, the file ‘/home/username/public_html/app/code/core/Mage/XmlConnect/sql/xmlconnect_setup/upgrade-1.6.0.0-1.6.0.0.1.php’ needed to be renamed to ‘/home/username/public_html/app/code/core/Mage/XmlConnect/sql/xmlconnect_setup/upgrade-1.6.0.0-1.6.0.0.1.php_ renamed’. This file was really problematic and caused frontend and backend errors. But, after this renaming after the template installation I was at least able to see the frontend looking proper. Unfortunately, I had backend ‘logging in’ issues. To fix those issues, I altered the ‘app/code/core/Mage/Core/Model/Session/Abstract/Varien.php’ file like shown below.
At this point, I was able to login to the backend end and thought I was home free. Well, all worked well until I tried to set up the Payment methods. When I tried to alter the payment methods, I was deficient in memory. Therefore, I had to login to the server and change the PHP memory to 64M in the file php.ini. Then, I was able to make these changes. I can only imagine many users on shared hosting that run into a wall here. I assume you could alter the database tables to work around changing these settings in the backend, if you really had to.
For testing and setting prices, you can set up sandbox mode. Now, you can add categories, products, etc and test the checkout.
Rarely, does a template display the modular blocks as you want. In this case, I disabled ‘Popular Tags’ and other unwanted default blocks from appearing in the sidebar.
The sequence to disable the ‘Popular Tags’:
System > configuration > advanced > disable Mage_Tag
Although I had thought I had the currency setup, I went to the sequence below to set Canadian dollars.
General > Currency setup > Set your currency
Below, is another example of removing unwanted sidebar blocks.
System >Advanced >Remove ‘Compare Products’
By default ‘Out of stock’ .. Needed to be changed I this or it won’t show up. Alternatively, you can set the managing stock option to ‘No’.
At this point, I was happy and thought I was in the clear… until the cart would not update properly or remove items in the cart. I read through various forum posts and tried clearing the cache and clearing cache index data. But, this failed. I also tried the sequence below.
System >Cache Management >Select All >Enable > Submit
I also flushed the Magento cache. Still no luck.
With a little quick luck and research, I was directed to fix the template file shown below.
Go to app/design/frontend/default/my_template/template/checkout/cart.phtml
After this change above, the checkout worked.
Now, I was a little concerned about the importance of the earlier login issue.
Therefore, I uncommented the varien.php file and checked if logging in to the backend worked, and it did.
File:
app/code/core/Mage/Core/Model/Session/Abstract/Varien.php
Styling
At this point, it seemed like most of the storm was over and I could get down to some basic styling; such as removing unwanted blocks.
The CMS tab allowed some quick, simple, styling options. For example, I quickly changed the footer with the click and command sequence:
CMS > Static Blocks >Footer Static >Customize or (display:none)
The system tab was also useful. The sequence I used is show below.
System >configuration >General >Design tab >Add keywords, change template links, etc
Taxes and Shipping
Finally, I was able to start playing with the taxes and shipping settings.
Make a tax rule like for a country, state or province.
Here is where you need to set the Customer Tax Class, Product Tax Class, Tax Rate
Make a tax class for each area.
Manage Tax Zones and Rates
Conclusion:
After going through the events described above, I was able to run the shop effectively. Setting up and editing products, prices and taxes worked as expected.
With Ubuntu, you have a couple ways to setup cron jobs. You can run the ‘crontab -e’ from the command line or, you can edit the /etc/crontab file. The /etc/crontab file will run no matter which user is logged into the system. If you are a single user, keeping everything in this file is a valid option.
Making Cron Job
root# cd /etc root# vi crontab or username# crontab -e
Sample Cron Job That Runs Every 5 Minutes
*/5 * * * * username /usr/bin/php -f /var/www/myhtml/filename.php
Eventually, you may install a script that has a directory with multiple folders and files. Unfortunately, the files and folders had been installed with inadequate permissions. For example, you may want to set the permissions for all folders to 755 and the permissions for all files to 644. The code code below will demonstrate two simple Linux command line statements that can do this.
root# find /home/user/public_html/mycrm/cache -type d | xargs chmod -v 755 root# find /home/user/public_html/mycrmr/cache -type f | xargs chmod -v 644
MYSQL Triggers can be created in order to make an update on a database table only when a specific condition is met. With the code the code below, there are two columns in one table that can be cloned. For example, columnb can be a cloned copy of columna only when the date in the date column is in the future. Therefore, if the date is in the future for a specific entry and columna is updated; then columnb will be updated too. But, columnb will not update if the date column is in the past.
Virtual machines are operating systems that run through software which enables this to take place. For example, Virtualbox or VMware allows you to run other operating systems within its program while you are running your host operating system. The reasons why you would want to use Virtual machines can be long and exhaustive. But, this section will focus on five strong points for using virtual machines. Five reasons why you may want to run virtual machines are to try new operating systems, run old operating systems where your software is compatible or you have familiarity, easily backup and move custom setups to other machines and to run Linux and Windows (or mac and other OS) at once and testing software.
Try New Operating Systems
Within minutes, you can setup a new virtual machine and test out various operating systems. For Linux users, there are so many varied distros that you may want to have many virtual machines since they all have their strengths and weaknesses.
Run Old Operating Systems
You could need to setup an older operating system to run software which could have compatibility issues with your current software. Now, you have the option to take advantage of old and new software. Also, you may be lost with your new operating system. Therefore, running both can help you to be more efficient with your tasks.
Easily Backup and Move Custom Setups to Other Machines
So, you like to create custom setups and want them usable on other pcs. Backing up and cloning virtual machines is very quick and easy to do. In fact, you can backup 30GB virtual machines in a few minutes while saving them to an external disk for safekeeping can be done very quickly too.
Run Linux and Windows (or Mac and other OS) At Once
For many specialists like web developers, running Linux and Windows allows you to use both operating systems at once which is very convenient. You can easily flip back and forth between Linux and Windows. Personally, I like to run Windows software in Windows while using Linux virtual machines to build scripts which use both shell and php / mySQL programming.
Testing Software
For obvious reasons, using a virtual machine is a safer method to test software that is downloaded from the Internet.
So, you have spent hours and hours working with your Ubuntu Virtual machine to set it up just right. Meanwhile, your files and folders have grown to the point where you are running low on disk space. This should not have been a complete surprise since it probably has been a trend since you bought your first pc. Anyways, this post will help solve those issues and allow you to increase your disk space so you can move forward.
1) Make a clone.
2) Make sure you are not actively using the newly cloned virtual machine.
3) Increase disk space with the command prompt. This example uses Windows 7.
a) Open the folder with the Change Directory (cd) command. View images below, if necessary. cd C:\Program Files\Oracle\VirtualBox b) Run the VBoxManage file to resize the disk VBoxManage modifyhd "C:\users\ted\VirtualBox VMs\Ubuntu Resize Dec1\Ubuntu Resize Dec1.vdi" --resize 40000
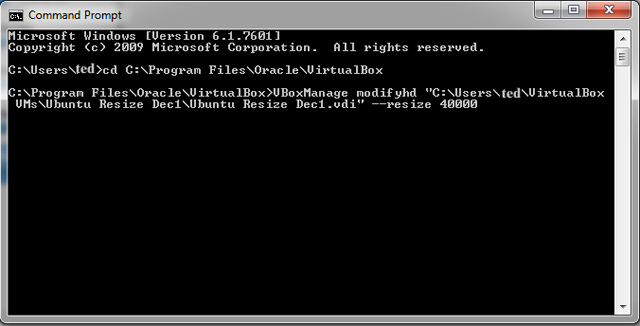
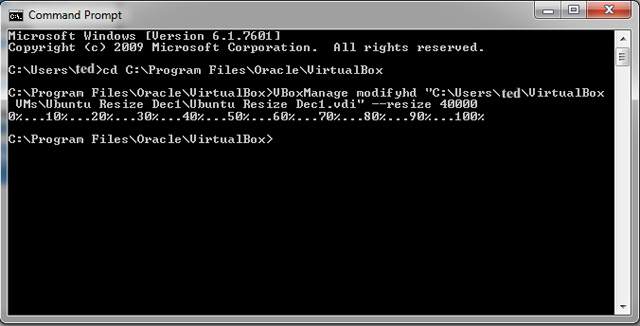
4) Download the Gparted ‘Live’ iso. The file is about 165 MB. It can be downloaded here.
5) Add the Gparted ‘Live’ iso to the Controller: IDE list.
To add Gparted Live,
a) Select the clone > Settings > Storage > Under Controller IDE select ‘Add CD/DVD Device’ > Choose Disk >Select the Gparted live iso > OK.
Note: the disk size needs to be larger than the iso file. This example uses ~ 413 MB. See images below.

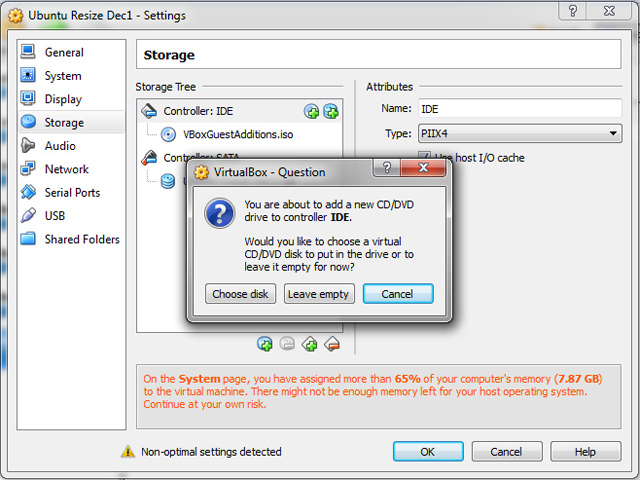

6) Start the virtual machine
Note: Gparted Live will boot
a) Select you language and all that jazz, Enlish may be somthing like 02 and your ‘GUI’ view may be something like ‘0’. Just hit ‘Enter’ on the keyboard after selecting your options.
Using Gparted
When Gparted opens, you will see the new unallocated space. In this case, 7.64 GB.
Now, here is where things get interesting because you want to increase the sda1 partition.
7) Increase the sda1 partition.
To increase the sda1 partition,
a) Delete the Logical partition (swap) > Select Apply. Make sure to run the operation.
b) Delete dev/sda2 extended partition from dev/sda > Select Apply. Make sure to run the operation.
c) Select partition /dev/sda1 >Resize / Move >
Note: Make sure to use all of the space. make sure to run the operation.
Altering the Virtual Machine Settings
8) Now, go back to your list of Virtaulbox machines and select your Virtual machine. In this example, the machine is called Ubuntu resize Dec1. Select ‘Settings’ >Storage and change Gparted from ‘Primary Master’ to something else. Change ‘VBoxGuestAdditions.iso’ to your ‘Primary Master’. The ‘Primary Master’ will be the iso which boots when you start a Virtual Machine. You want to start Ubuntu this time, not Gparted. Alternatively, you can remove gparted if you want.
9) See the new changes in disk space. When you boot into Ubuntu and open the terminal, type df -h and you should see the newly added hard drive space.
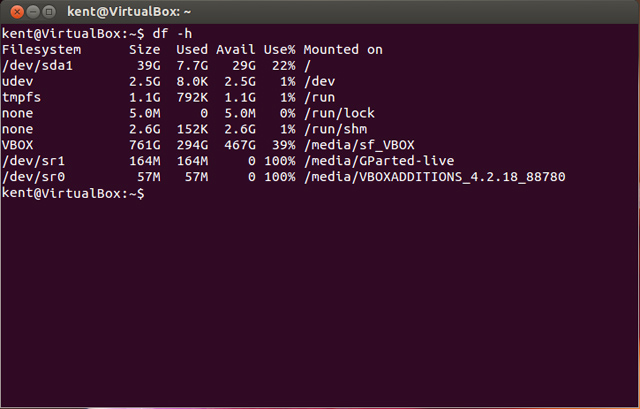
Rsync is a very good package which allows use Linux users to synchronize files and folders on the same, or different machines. The concept behind Rsync is that is only updates files that have changed in date and file size. So, from a backup point of view, it can keep an accurate live backup when you run the command to synchronize the files.
Using Rsync On Same Computer
Using Rsync On Different Computers
Potential Problems:
Permissions. When you sync the files to the slave machine the folder should have adequate permissions. For example, if you login as pi@192.168.0.115 the files will transfer into the desired folder if the files or group is owned by pi. If you login as pi and attempt to move files into a folder owned by root, the sync will not happen.
When you boot into your Linux OS, the .bashrc file, an others will load variables and aliases which can be used within the command line. There are many reasons why users will want to add variables and aliases. One of the main reasons why users want to take advantage of these aliases and variables is to cut down on typing. If you are a web developer, you may find you will have files nested inside many folders, since the default file directory is /var/www. If you like to create may projects, the directories can find a way to grow and grow.
To make an alias,
user# alias mymaindir="cd /var/www/scrapers/website/"
To make the alias usable without rebooting,
user# source ~/.bashrc
To navigate to your chosen directory,
user# mymaindir
Although Raspberry Pis might seem cheap to buy, the costs can add up by the time you add on various accessories. At the very least, you need a power supply, an SD card (hard drive) and an hdm1 cable. This brings the tally up to $70 or so; depending where you buy the supplies. After you have these basic supplies, you can can turn on your tv, start your pi and install an operating system on your SD Card. If you are lucky, you have a mouse and keyboard that is compatible with the Raspberry Pi. Otherwise, you will need a compatible keyboard and mouse which can run $20 and up. At least now, you are up and running anywhere from $70-$100.
No Internet?
The Raspberry Pi comes without Internet, so add on another $5-30 for an Ethernet cable. A cheap dollar store model is usually sufficient. A wireless usb dongle is another $15.
Conclusion:
By the time your Raspberry Pi is up and running, you can expect to pay somewhere around $100. As an owner of 3 Raspberry Pis, I still find them very useful for my intended purposes. They use very little power, take up very little space, make excellent storage devices and can run local php / mySQL scripts.
Would I buy 3 again? Yes.
Although Virtualbox allows you to build up your Linux distro, it offers so many more features.One of its great features is that is allows you to create clones. Essentially, cloning can be used as a backup mechanism for which to store copies of virtual machines. Therefore, you can easily save a machine that is detailed to your personal specifications, then, create a clone and experiment.
The image sequence below shows how to clone a virtual machine with Virtrualbox.
1) Select the machine you want to clone >Select ‘Snapshots’ >Click the sheep.
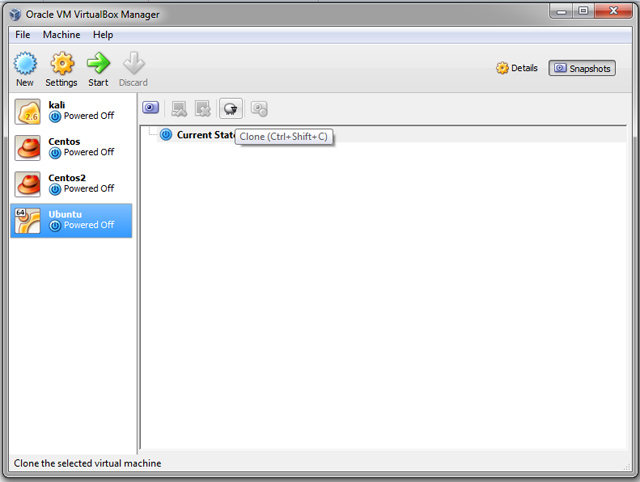
2) Name the backup.
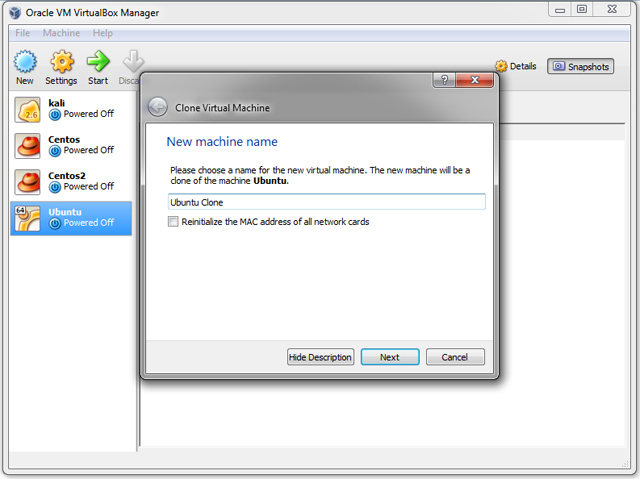
3) Make a full clone.
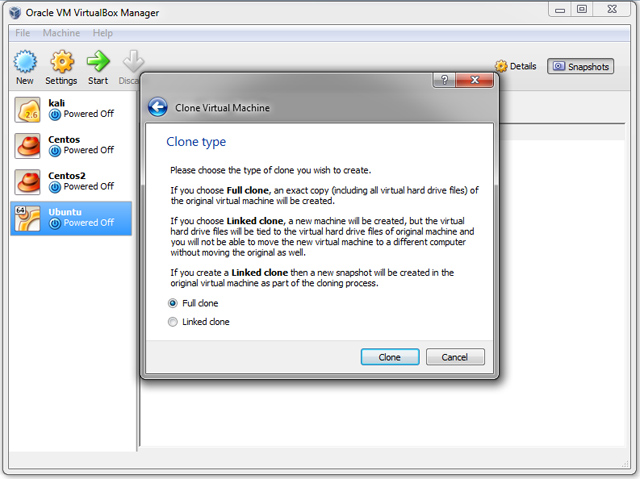
4) Let it clone.
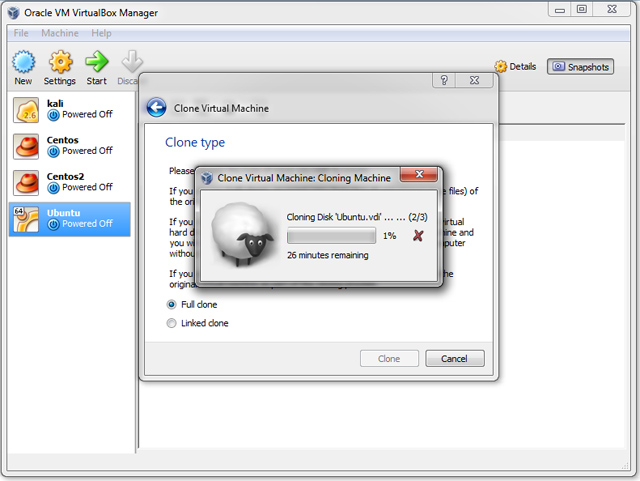
5) The new clone had been added and you can start it.
After days, months or years, you have finally come to the conclusion that you want to migrate your website to a new domain name. There are many reasons why you may want to do this such re-branding, recycling content, you need a name that reflects how the website has grown or you want to use a ‘new domain name’ that is easier to remember. Now that you have the plan, you must execute it. The move is rather quite simple and this procedure will work for any small or large php / mySQL website whether it was made with WordPress, Joomla, or a custom php / mySQL script. The process consists of five simple steps. The steps are to change the old domain name to the new one in all files, make the same name changes in the database, alter your database connection settings (if necessary), add a 301 redirect and resubmit new sitemaps.
1. File Name Changes
The first step is to do a ‘Find’ and ‘Replace’ for all occurrences of your old domain name in your files and replace it with the new domain name.
Method A
One way to do this is to ftp the files to your pc and use an editor that can search all files and folders for a specific string and replace it with the new one. For example, you search for example.com and replace it with example.net. In many cases, you can change everything at once. But, if you have large error_log files or lots of cache files it could take a while. You could remove all error_log files and cache files to save time, if necessary.
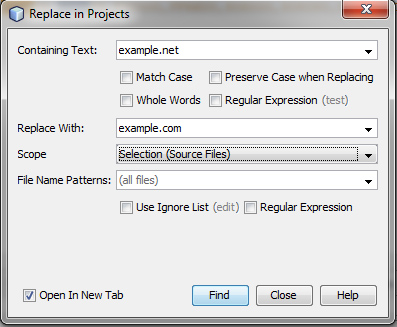
Method B
If you have Linux shell access, you can do a quick find and replace with the Linux command line. The example below will find and replace a string for all files within the directory. The example below will search for example.net and replace it with example.com. Be careful! If you screw up, you screw each occurrence up and need to fix it. However, this example shows hows effective command-lining can be.
2. Database Name Changes
Changing the occurrence of your old domain to the new one is simple. You download an uncompressed sql file and load it in an editor. Then, you do a simple find for the old domain name and replace it with the new one. After that, you can import that database into a new or existing database.
3. Alter Database Connection
If you setup up a new database on a new account or a new host, you will have a different. You must change the old username and password with the new one. If you try to view web pages with invalid credentials, your browser will show you connection errors.
4. Add a 301 in your .htaccess File
The one line below can be added to your .htaccess file so that all old urls will point to the new ones. In other words, example.net will redirect to example.com and pages like example.net/wordpress_post will redirect to example.com/wordpress_post.
5. Resubmit a New Sitemap to Google Webmaster Tools
Finally, login to your Google Webmaster Tools account and submit new sitemaps for the new domain.
Conclusion:
Out with the old, in with the new. All of your web pages that are indexed with Google (or any other search engine) will redirect to your new website. In time, your new content and old pages on the new website will be indexed. All in all, everything will go smoothly as though the move did not take place.
A mySQL event is the mySQL version of a Linux cron job. An event can be used to run a mysql query at a specified interval.The code below shows how to create an event called ‘update_log’ that will insert a row into the log table every 2 minutes.
Stored procedures require a different set of methods from typical mysql queries, but, there are only a few which need to be implemented. For example, you need to create a procedure with ‘CREATE PROCEDURE’, you use ‘BEGIN’ and ‘END’ around the declared variables and mysql query and you declare and set variables. Finally, you use a delimiter so that mysql will run all of the code; rather than an execute when it sees a semi-colon(;). The examples below show how to make simple stored procedures.
Why use stored procedures?
Using stored procedures allows a programmer to create custom mysql queries that can be used throughout variious scripts without having to hard code each and every time time. Essentially, using stored procedures can reduce redundancy.
Example #1
Example #2
Example #3
The simple code below shows how you can call a stored procedure from a php script.
Creating stored procedures in mysql can be done with phpMyAdmin or the mysql console. Obviously, this particular example will be show how to make a stored procedure with phpMyAdmin.
The code below will create a new stored procedure called new_procedure. The ‘CREATE PROCEDURE’ statement will be on the first line. The second line contains the ‘BEGIN’. Then, a variable is declared using the ‘DECLARE’ statement. The declare statement includes the datatype and size, and a default value. In this case, we declare an integer with a default value of 0. The ‘SET’ statement gives the newly declared variable a value of 10. the ‘select my_variable’ is a typical mysql query.Finally, ‘END’ is used to complete the task. It is very important that the delimiter is blank before selecting ‘Go’. After everything looks good, select ‘Go’.
CREATE PROCEDURE new_procedure()
BEGIN
DECLARE my_variable INT DEFAULT 0;
SET my_variable = 10;
select my_variable;
END;
CREATE PROCEDURE second_procedure()
BEGIN
DECLARE my_variable INT DEFAULT 0;
SET my_variable = (SELECT COUNT(*) AS cnt FROM calendar)
select my_variable;
END;
CREATE PROCEDURE third_procedure()
BEGIN
DECLARE my_variable varchar(255) DEFAULT 0;
SET my_variable = (SELECT title FROM calendar WHERE id=’3′);
select my_variable;
END;
To call a stored procedure, the statement call new_procedure() is implemented.
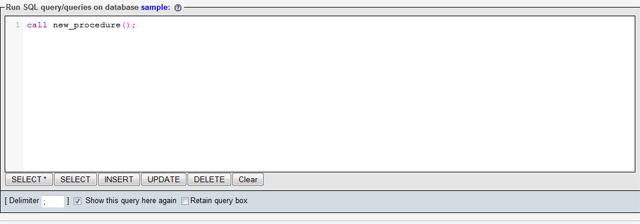
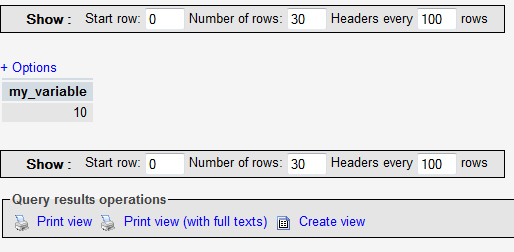
To view the stored procedure,
SHOW CREATE PROCEDURE new_procedure; Note: You may want to select 'Print view' to see the details.
Using Virtualbox is a fantastic tool for which to write custom php / mySQL scripts, while making it easy to flip back and forth between some heavy duty Windows software like Pinnacle Studio, Camstasia, Adobe Captivate and Photoshop. However, you may want to backup some files on an external usb stick, hard drive or Raspberry Pi. Personally, I like a quick and easy backup device like a Raspberry Pi that is connected to the local network so I never have to plug any thing in. But, I also like my “Sacred Files” backed up outside of the home in case of fire and theft. Starting any long-winded project over is something you never want to do.
Moving on, here is a quick method for which you can store backups from your Virtual Machine. The sequence involves using a $35 Raspberry Pi which is connected to the router with an Ethernet cable. However, it would also work fine with a wireless connection.
To transfer the file(s) to a usb stick,
2) Open an ftp client in your Windows operating system.
3) Connect to the address of your Raspberry Pi. In this case, the address is 192.168.0.130. The default user for a Raspberry Pi is ‘pi’ and the default password is ‘raspberry’. Security minded people probably change the default password within minutes after an installation.
4) Use sftp or ftp and transfer the file to your usb drive.
You could make a zip or tar ball of a folder, scp the file to your Raspberry Pi and transfer them to your usb stick in less than a minute.
Alternatively, you could create a Samba server on a Raspberry Pi for which you can transfer files to and from the Samba server.
Virtualbox works very good if you add one or more virtual machines like Ubuntu, Centos, Mint, Puppy, Kali and Windows. Normally, a new virtual machine can connect to the Internet and be run in its own world. However, the time could come when you want to go back and for between you pc and the virtual machine, and, this includes copying and pasting files from one operating system to the other. Well, here is where ‘Guest Additions’ comes into play. ‘Guest Additions’ is included with Virtual box. Alternatively, you can download and install it with the Linux command line.Once you have ‘Guest Additions’ working, you can change the appearance of the screen and copy and paste text from your pc to the virtual machine. The ‘host’ key on your computer is the [right ctrl] key.
The commands below show how to change the appearance of your Virtualbox. Host F and Host L give nice, large screens. The default screen may be host C which may not be that desirable.
To copy and paste from pc to virtual machine,
1) Select Devices >Drag and Drop >Host To Guest
2) Select Devices >Shared Clipboard >Host To Guest
If you are trying to learn a programming language and are wondering how about going about this ….. please read on. When you first try to learn a programming language, the syntax, built-in functions and loops can seem overwhelming. You may even ask yourself, “Am I supposed to know and remember all of this stuff?
The answer is yes and no. You should be able to do many tasks from memory; like querying a database, sorting loops and using functions. The more you practice, the more automatic this will become. If you try to copy and paste your way through programming, you could end up with a slower learning curve and a weaker knowledge base. If you have time and the opportunity to hand code at work or at leisure, take advantage of it.
With days, weeks and years of practice, the day will come when you can type out a relational mysql query using high performance joins with 4 database tables while a copy and paste programmer may be stuck writng good code because the coding process is not automatic. One of the keys to programming is to reduce or eliminate redundancy. Therefore, typing and enforcing propper coding practices on a ‘hand-coding’ level will leave you with very powerful skills that will make doing your tasks and custom applications a simple process.
As your local network grows with the addition of new Raspberry Pis, you may want to keep your workload minimized by using SSH between Raspberry Pis. If you use SSH to connect from Pi to Pi, you can easily move files and program any Pi quickly and efficiently.
To connect to other Raspberry Pis with SSH, you will need to have SSH enabled. The simplest way to to enable SSH is to run the command ‘raspi-config’ from the command line. Then, simply select SSH and make sure it is enabled.
Once SSH is enabled, you can easily SSH into another Raspberry Pi on your local network. An example connection is shown below.
You have the Raspberry Pi with an installed operating system and it is connected to the Internet. In this case, it does not have a monitor you will use because you simply want to access and program it from the command line. Well, once you open Putty, you can connect and use the command line in less than a minute. The following steps will demonstrate this connection.
To connect to the Raspberry Pi,
1) Open Putty (putty.exe).
2) Add the local ip address assigned by your router.

3) Login as ‘pi’. This is the default use with the Raspian operating system.
4) Type your password and hit ‘Enter’ on your keyboard. By default, the password is ‘raspberry’. You may want to change it to something stronger than that.
5) Congratulations. You are logged in and can use the command line.
I will keep this blunt. This tutorial explains how to make a usable copy of the existing Raspian installation on your SD card. There are several reasons why you may want to do this operation such as; you want exact copies of your Raspian installation to use on other raspberry Pis, you want changeable installations on various usb drives and you want a backup in case your SD card malfunctions or becomes corrupted.
Once you have built a custom Linux installation, you can copy it to a USB drive and use it on your Raspberry Pi. To get started, all you need is a formatted fat32 USB stick.
To format the USB stick in Windows,
1) Insert the usb stick into a usb port.
2) Select Start >Computer.
3) Right click the usb stick
4) Select format >fat32
5) Safely remove formatted usb stick.
To format the USB stick in Linux,
1) Insert the usb stick into a usb port. If you use Raspberry Pi (Raspian), Ubuntu or another OS it should mount right away. Check to see where it is mounted.
root@raspberrypi:/home/pi# df -h
2) Unmount the usb stick. In this case, it is mounted on /dev/sda1
root@raspberrypi:/home/pi# umount /dev/sda1
3) Format it with fdisk command unless you formatted it in Windows. If you formatted it with Windows, skip this step.
root@raspberrypi:/home/pi# fdisk /dev/sda1
4) Format it for Ext4.
root@raspberrypi:/home/pi# mkfs.ext4 /dev/sda1
5) Mount the usb drive.
root@raspberrypi:/home/pi# mount /dev/sda1 /media/usbdrive
6) Use the ‘dd’ command to move the data to the usb drive.
7) Resize the drive.These examples are show for the root user. To enable the root user on your Raspberry Pi or Linux, simply type ‘sudo -s’. Otherwise, you can always use the default user ‘pi@raspberrypi ~ $’ with sudo in front of the command.
root@raspberrypi:/home/pi# resize2fs /dev/sda1
On top of that, you may want to note that you can always open up the Linux package Gparted and show the usb device. Then, you can unmount it and resize the unallocated space to the desired partition.
8) Change this line to boot the usb next time the Pi restarts.
root@raspberrypi:/home/pi# vi /boot/cmdline.txt
or
root@raspberrypi:/home/pi# nano /boot/cmdline.txt
9) Change ‘root=/dev/root’ to ‘root=/dev/sda1’
10) You may want to make changes to the /etc/fstab file too. The code below will show to mount it upon boot.
proc /proc proc defaults 0 0 /dev/mmcblk0p8 /boot vfat defaults 0 2 /dev/mmcblk0p9 / ext4 defaults,noatime 0 1 /dev/sda1 /media/usbdrive ext4 uid=1000,noauto,user,exec 0 0
This tutorial explains how to create a static ip address for your Raspberry Pi.
The file for which you will edit is called ‘interfaces’ It is located within the /etc/network folder.
Why do I want to do this? There are many reasons why you may want to create a static ip address for a Raspberry Pi. Some of the reasons could be that you want to run a web site on a Raspberry Pi or run a cluster of Raspberry Pis. If you attempt to so this with dhcp, dynamic changing ips will make port forwarding and other setups a hassle that will need ongoing changes. Also, if you have several customized Raspberry Pis, you may like to ssh into any one of them with known ips in order to be efficient.
To access the interfaces file,
1) Open the file.
root# cd /etc/network root# vi interfaces
auto eth0 iface eth0 inet static address 192.168.0.118 netmask 255.255.255.0 gateway 192.168.0.1
When you download and write a Live Kali linux distro to a usb stick, any changes you make will not be there the next time you boot the usb stick. However, you can add persistence to the installation if you want to build on to the installation, add and edit files and add databases. The following instructions and images will guide your through the steps that are required to create the Live usb distro with persistence.
To enable persistence for a live USB installation,
1) Download Kali Linux iso.
2) Download, install and open Win32 Disk Imager
3) Write the image to the usb stick.
4) Boot the live usb stick.
5) Open the terminal.
6) Run the command gparted
7) Create a new partition. In this example, a 16 gb usb is used. As you can see below, the installation used 2.35 gb and 12gb is unallocated. The primary partition that is used is sdc. The sdc partition is the usb stick. Sda and sdb partitions are on the physical hard drive. It is critical not to select the wrong disk or you could do serious hard drive damage.
As you can see, gparted shows sdc1 uses 2.35 GB. This ia a logical partition. The unallocated space will become the sdc2 partition. Partitioning always works in a numberical sequence.
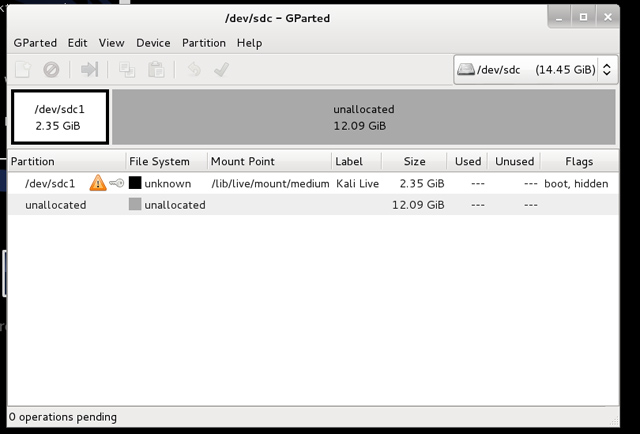
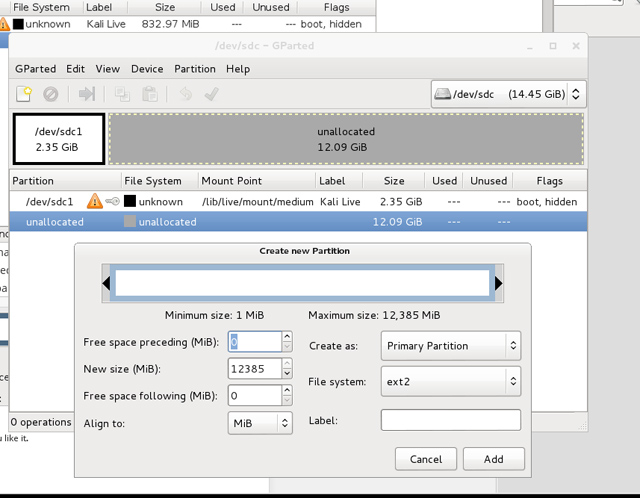
3) Select the Ext4 File System and add persistence to the Label field. Make sure unallocated is selected.
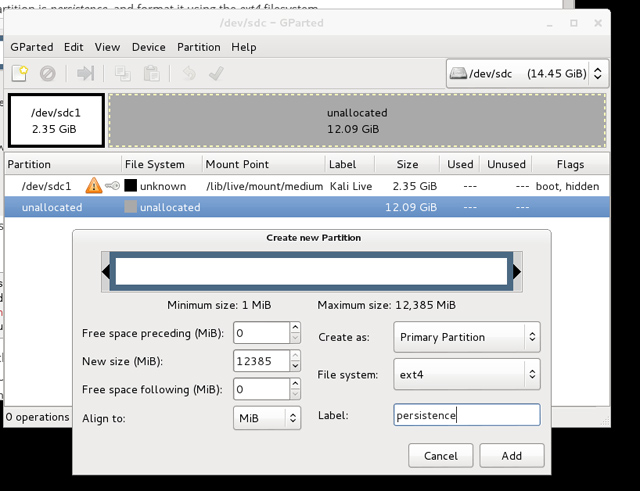
4) Select ‘Add’.
5) You now see the new partition on the list.
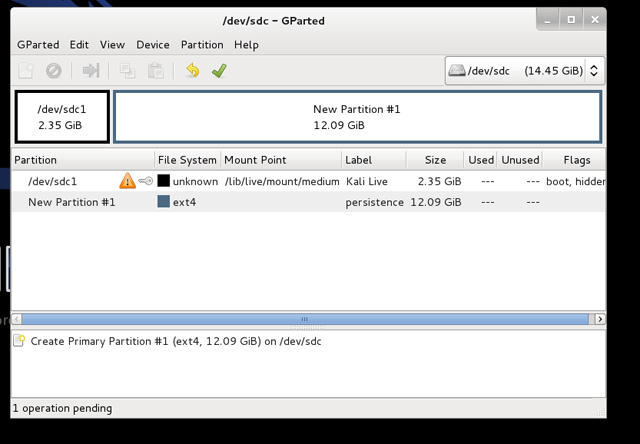
6) Run the operation.
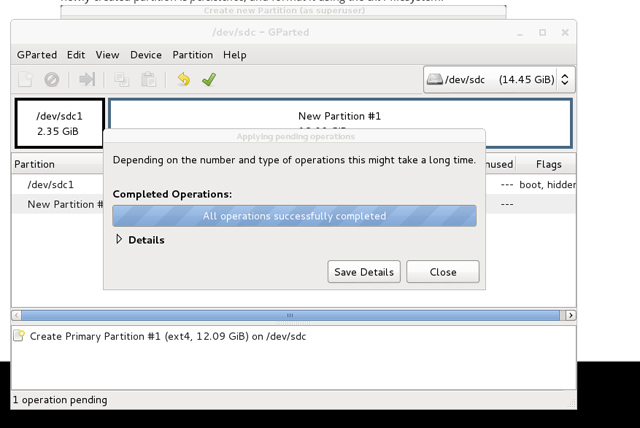
7) Select ‘Close’. Now, you see the new sdc2 partition added to the list and no pending operation.
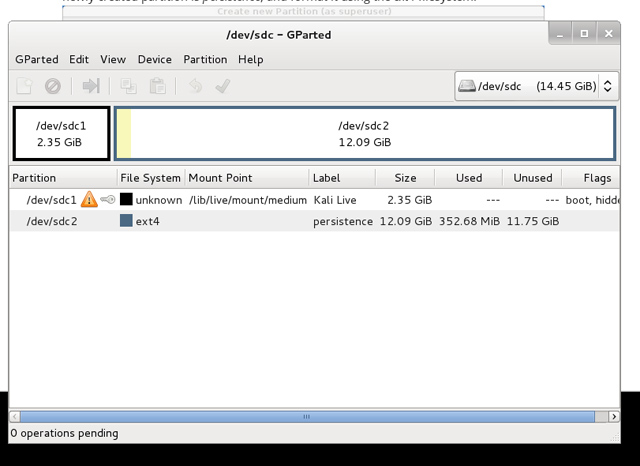
Now, you need to open a terminal and add the following commands.
What did those commands do? Firstly, you created a new directory that will be used to mount the sdc2 partition. Then, the sdc2 partition is mounted at the location /mnt/usb. The ‘echo’ command appends a new line of text to the persistence.conf file. Finally, the partition is unmounted using the ‘umount’ command.
Now, you can reboot your computer with your usb plugged. As you should know, the boot order should have usb preceding the hard drive. When Kali boots up, you can select from a list of option. But, you select the ‘Tab’ key on your computer, then the space bar, and finally type ‘persistence’.
Your Raspberry Pi should easily connect to the Ethernet easily after you have Raspian or another distro setup on your SD card. However, using wireless could be simple, or it could take a little workover. This tutorial will show how to get that wireless internet working with a plug and play wireless adapter like ‘Ourlink’.
To enable wireless connection,
1) Open network-interfaces file
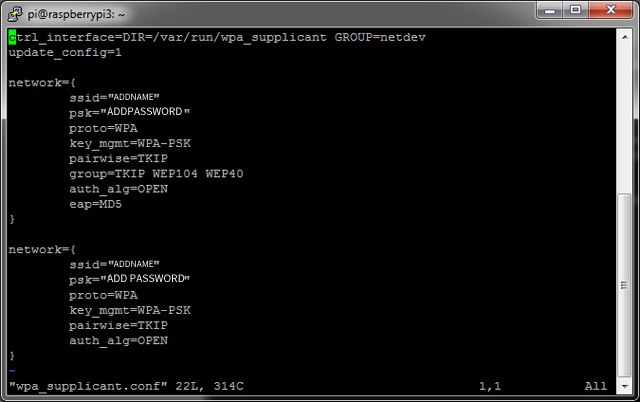
You may have multiple computers being used at home or work and you want to easily move files between them. You could have laptops, desktops, Raspberry Pis or any combination of the three. The simple solution is to use the command ‘SCP’. The commands are shown below.
The image below is unnecessary. But, it shows what happens when you try to use the cp command between two different computers on the same network. CP is used to copy files with a single computer.
Virtualbox is free software from Oracle which can be downloaded and installed on Windows that can be used to run other operating systems.
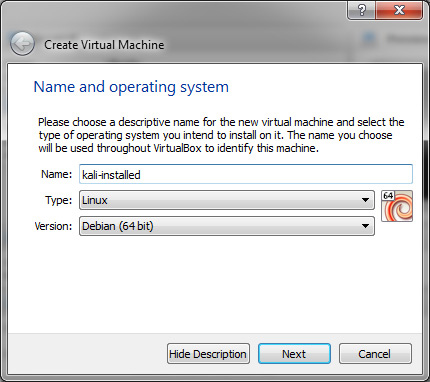
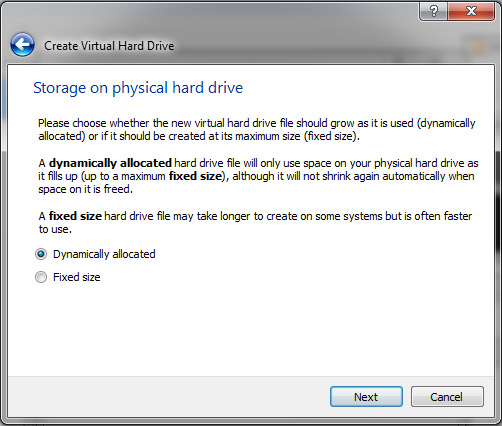
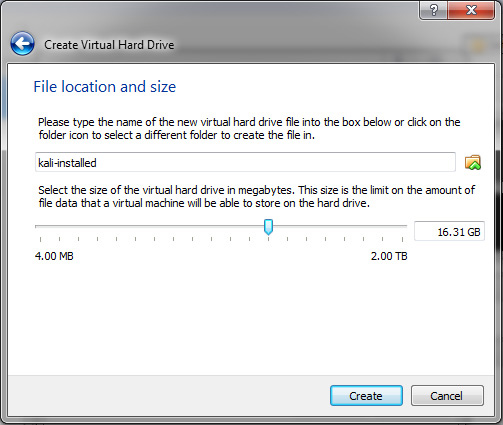
1) Select the option you want to use >Click Start

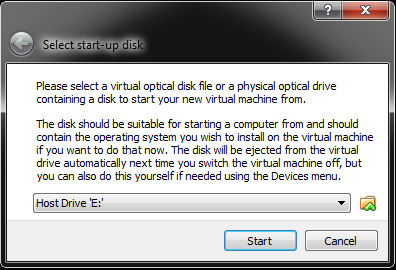
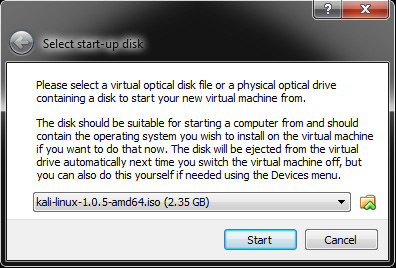
Operating System Specifics
Linux Live Distro
If you plan to use a ‘Live’ version of Linux, you can select the operating system (ie. Centos) >Settings >Storage >Select the ‘iso’ file >Select ‘Live CD/DVD’
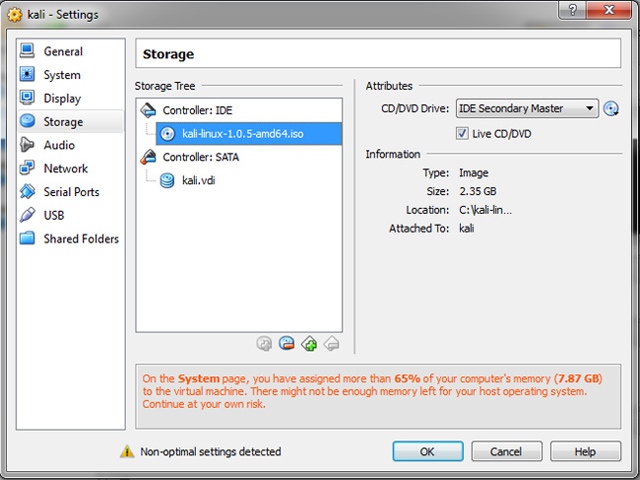
Opening a terminal with Linux allows you to command to your heart’s content. But, you may find the day has come when using one terminal at a time is just not enough. There could be many reasons for this possibility such as; you are running an application like Gedit or Caffeine that is using a process for which you do not want to quit, you want to connect to other multiple Raspberry Pis(or pcs) on your network at the same time and run separate commands on each one, and the list goes on.
Well, look no further because Terminator can allow you to open as many terminals as you want.
Installing Terminator on Ubuntu / Debian Distros
root# apt-get install terminator
Installing Terminator on Centos
root# yum install terminator
Terminator Usage
After Terminator is installed, you can open it at the command line with the ‘terminator’ command, or search for the application with a gui and open it.
To create multiple terminals,
1) Right click on the terminal
2) Select ‘Split Horizontally’
Note: The new shell will be used with the same user. Therefore, if you initially split the screen under a username like ‘mike’, the new terminal will maintain that user. But, if you switch to root, the new terminals will be used with root.
Netbeans, is a free, PHP IDE editor which can be used to build simple and large php applications in Windows and Linux. The dual operating system is a real plus for those who go back and forth between Windows and Linux partitions on a regular basis. It can be downloaded from Netbeans.
Getting Started
After downloading and installing Netbeans, you can open it up and be up and running in no time at all. You can open and edit downloaded files on your pc and send them back with an FTP program like Filezilla or WS_FTP Pro., or use FTP (SFTP) with Netbeans. If you use SFTP (FTP) with Netbeans, you can synchronize files so that any changes you make on your local pc will be changed on the web server too.
Synchronizing Files
To synchronize files,
1) Select ‘Source Files’ > Synchronize
SFTP (FTP)
To setup FTP,
1) Select ‘Source Files’ > Properties >Run Configuration
2) Fill in the details (shown below)
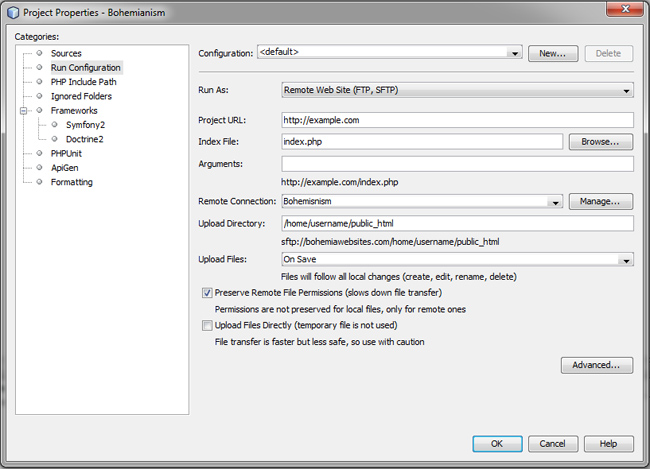
SFTP (FTP) Connection Setup and Test Connection
To setup SFTP or FTP Connection,
1) Select ‘Source Files’ > Properties >Run Configuration >Manage
2) Create a new FTP or SFTP connection and add the details(shown below) >OK
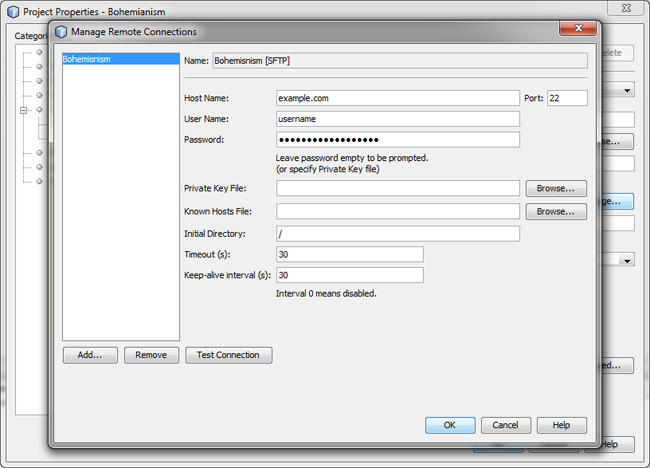
Ubuntu, or another Linux distro makes it very easy to connect to another Linux box or Raspberry Pi from your pc, a Raspberry Pi, or a Linux live usb using ssh. If you have the adequate ssh client installed, and know the passwords, you can make connect to the other machine and take over with shell commands.
Install SSH Client On Ubuntu or Linux Distro
root# sudo apt-get install openssh-client openssh-server
Connect To Remote Linux Machine With SSH
This example demonstrates how quick and easy it is to connect to a Raspberry Pi using SSH. The computer doing the connecting is Ubuntu.
root# ssh pi@192.168.0.102 pi@192.168.0.102's password: Linux raspberrypi 3.6.11+ #474 PREEMPT Thu Jun 13 17:14:42 BST 2013 armv6l
Caffeine is an application that can be used to ensure that your monitor stays active. Although you can disable the screen saver and sleep functionality, caffeine is still another option which you can use at your leisure. This way, you can open and use caffeine only when you want to make sure the monitor will not sleep and stays active. One instance you may want this to occur is for watching movies.
Install Caffeine
sudo add-apt-repository ppa:caffeine-developers/ppa sudo apt-get update sudo apt-get install caffeine
Activating Caffeine
caffeine -p &
The Raspberry Pi can be used to build many projects. This tutorial will show you how to get started with your Raspberry Pi so that you can begin to explore and create many projects of your own.
2) Download Noobs or a raw image from Raspberry Pi website. This example shows the setup with ‘Noobs’. 3) Extract the file and copy the contents on the SD card.
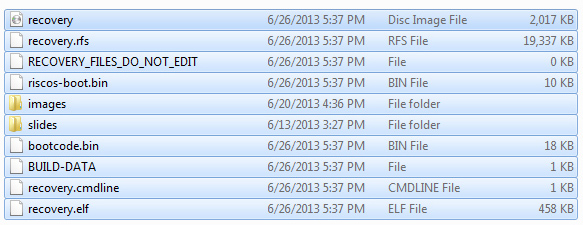
3) Connect your Raspberry Pi to a usb keyboard, a usb mouse and a tv with a HDMI connection.
4) Plug in your Raspberry Pi and install Raspbian. You can enable features like boot directly to desktop, enable ssh and more.
5) Connect an Ethernet cable to the Raspberry Pi if you want to connect to the Internet.
If you have used Ubuntu or Centos, you may find that the when you use ‘vi’, everything works as you expect right out of the box. However, this may not be the case with a Raspberry Pi. The good news, is that you can install vim and get to the zone for which you are seeking. Another option, is to use the Nano editor for which many online tutorials are based on. For others, Nano may not be preference for any one who prefers vi.
To install vim,
root# apt-get install vim
Now, you can use some favorite commands like :q, :q!, :wq and :w
This simple tutorial will explain how to use your laptop or desktop computer as the monitor for your Raspberry Pi. In this example, it is assumed that you have a monitor connected to your Raspberry Pi. If you want to connect to a Raspberry Pi that is headless (no monitor attached), you can see go to this page.
Step #1 Install XRDP on the Raspberry Pi
root# sudo apt-get install xrdp
Step #2 Open Remote Connection
Option a) (Windows) Open Windows Remote desktop access Raspberry Pi
Option b) Use SSH(Putty) and install Xming in Windows. Then, connect to the internal ip, select x11 forwarding in Putty
Install tightvnc server on any Linux or Raspberry Pi and use VNC Viewer from personal computer. If you want to use a ‘headless’ Raspberry Pi, read on. If you follow the following instructions, you can connect to your Raspberry Pi and use your monitor will deliver the Raspberry Pi desktop, even though it has no monitor connected. At this point, you can surf the Internet with Midori, use Sketch, or open a terminal to run shell commands. If you have the Raspberry Pi connected to a monitor with HDMI cable, you can go to this page for other methods for which to connect remotely.
root# sudo apt-get install tightvncserver
Select ‘Y’ when necessary and be sure to remember your password, if necessary.
To run the VN/C server,
root# vncserver :1
On a separate Linux Desktop or Windows pc, download VNC Viewer at http://www.realvnc.com/
To use VNC Viewer,
1) Open VNC viewer
2) Insert network IP address and password and connect.

You may want to install a Lighttpd server on a Raspberry Pi for many reasons. Some of the possible reasons are that you want to run a website from your home, you want to try out the Lighttpd Server, or, you want to test php scripts on your localhost.
Open your shell terminal and run the following commands to install the Lighttpd server with the ability to use php / mySQL.
Install Lighttpd root# apt-get install lighttpd Install PHP and MYSQL root# apt-get install php5-common php5-cgi php5 root# apt-get install mysql-server mysql-client Note: Hit enter on the keyboard when necessary Enable Fast CGI Module root# lighty-enable-mod fastcgi-php Reload Lighttpd root# /etc/init.d/lighttpd force-reload Test server and php file root# cd /var root# mkdir www root# chmod 755 www root# cd /var/www root# vi test.php Write a php echo statement save the file.
Test Server and File
Open http://192.168.0.109/test.php
Open in browser http://192.168.0.109

When you pass through a magazine store or browse the web, you may have come across the words ‘Raspberry Pi’. It is getting lots of attention. Being the owner of three Raspberry Pis, I will try to explain what it is. The Raspberry Pi is a microcomputer. This microcomputer is designed to use an SD card as its hard drive which runs a Linux distribution. If you browse enough websites and forums, you will see how popular ‘Raspbian’ is for the operating system of choice. This microcomputer comes with two usb ports, 1 ethernet connection, 1 HDMI connection (for tv or monitor) and a power connection (like a cell phone power connection).
This microcomputer can be used to browse the Internet and run shell command just like a computer that runs Linux, such as a desktop computer or laptop. However, the performance will not make you throw away your laptop and the Pi will not be a great option for everyday computer use. If the Pi is not a great computer and a usb stick allows me to test and run Linux on my computers, then, why on earth would I want a Raspberry Pi? Well, the Raspberry Pi can be used as a tool to test and work with home web servers or connect to hardware to output results. Here is where its strengths lie. They are excellent devices to test Linux software and applications; such as heartbeat and clusters and take up no space at all. As far as a web server goes, it can help someone make the transition from shared hosting to Linux Administration. If you can manage a server at home and use shell commands, you would be better off than just diving in to a VPS or dedicated server without any knowledge at all.
External Hardware
Many hobbyists use the Pi to connect hardware and sensors and sensors to pins which can be used to gather data with Linux programs. Then, another language like Perl, Python, or PHP / mySQL can be used to output that data.
The scp command in Linux is a fine way to download a file from a Linux Web Server. You can download a file if you know where it resides and you know the password for which to login. All you need to do is to login to the shell terminal with your pc. This example shows how it can be done with an Ubuntu PC.
The code below shows how you can download a tar file from the root directory on a Linux server to the desktop on a home PC running Ubuntu.
root# scp username@example.com:/myfile.tar /home/username/Desktop
If you plan to take your PHP / mySQL programming seriously, you will more than likely end up using the LAMP stack. LAMP stands for (Linux, Apache, PHP and MYSQL). Initially, you will need to use php and mySQL to make a database driven website. However, you should be very aware that these technologies are installed on Linux. If you use shared hosting, you will not have shell access and be able to alter and navigate the Linux file system. But, as your website(s) grow, you will eventually need a VPS or dedicated server. With a VPS or dedicated server comes responsibility. Here is where the more Linux you know, the better off you are. With knowing some Linux through practice, studying or certification, you will have much more control to knowing what is happening. In addition, Linux has various other programming languages for which you can write scripts to monitor your file system, or, add into your php scripts. Essentially, you can use shell commands, sed and awk in your php (if you really want to).
Linux Home Server
Asides from using a data center to host your websites, your Linux knowledge can extend into home usage. Linux variants like Ubuntu and Centos make great operating systems at home. In fact, you may find yourself spending more time on Ubuntu than Windows 7. Why? Linux can run much faster, boot much faster and you can create a home server to test files and even host a simple, lower traffic website. If you are familiar with Wamp (Windows, Apache, mySQL, and PHP) you may want to explore LAMP at home. Personally, I have found Lamp to be a much better experience to use than Wamp; especially using curl, pear extensions and adding custom extensions and software. Also, using Lamp at home will accelerate your knowledge for the Lamp you use with a VPS or dedicated server.
As you may spend hours and hours configuring and setting your current installation, it is a good idea to make sure that you do not lose all that hard work and customization that enables you to use your Linux variant as you wish. There are many methods for which to backup your existing installation such as, making iso files, cloning the installation with Clonezilla and good old tar files.
The examples below show how to create backups of the entire file system or parts of the file system. If you are hoping to move a server to a new machine, you could clone the entire disk and make an iso file, or you could make a fresh installation and extract the tar ball and overwrite the files. Making tar backups is much faster and easier than making an iso, especially with a larger file system.
Tar Backups
Tar backups can be used to backup the entire file system “/” or various parts of the file system.
Backup the entire file system but do not include the tar backup file root# tar cjvf ubuntu_backup.tar.bz2 --exclude=/ubuntu_backup.tar.bz2 . Backup the file system but do not include some folders (Method A) root# cd / root# tar cjvf ubuntu_backup.tar.bz2 --exclude=/ubuntu_backup.tar.bz2 --exclude=/home/username/tunes --exclude=/media --exclude=/boot --exclude=/sys --exclude=/proc --exclude=/mnt / Backup the file system but do not include some folders (Method B) root# cd / root# tar cjvf ubuntu_backup.tar.bz2 --exclude=ubuntu_backup.tar.bz2 --exclude=home/username/tunes --exclude=media --exclude=boot --exclude=sys --exclude=proc --exclude=mnt .
Checking Tar Backups
root# tar tjvf ubuntu_backup.tar.bz2 |less or root# tar tjvf ubuntu_backup.tar.bz2 | grep etc |less To move the tar file, 1) Copy and paste to usb .. or use ssh and scp the file to another machine.
Install phpmyadmin
1) sudo apt-get install phpmyadmin
Select Y when necessary
Select Apache >Enter
Configure database for phpmyadmin with dbconfig-common?
> Select Yes >Enter
Add passwords, or leave empty and click Enter
2) Open file /etc/apache2/apache2.conf
At the bottom add the line:
Include /etc/phpmyadmin/apache.conf
3) Navigate to /etc/phpmyadmin
change this line
$cfg['Servers'][$i]['host'] = $dbserver;
to:
:$cfg['Servers'][$i]['host'] = 'localhost';
to
Change
$cfg['Servers'][$i]['controluser'] = $dbuser;
$cfg['Servers'][$i]['controlpass'] = $dbpass;
to
$cfg['Servers'][$i]['controluser'] = 'root';
$cfg['Servers'][$i]['controlpass'] = '';
uncomment the line
// $cfg['Servers'][$i]['AllowNoPassword'] = TRUE;
to
$cfg['Servers'][$i]['AllowNoPassword'] = TRUE;
Restart apache and open your page in a browser to a url like:
example.com/phpmyadmin
You should be able to login with root and no password. If you login and see the databases, that is a good start. But, the security needs fixing right away.
Comment the AllowNoPassword line.
// $cfg['Servers'][$i]['AllowNoPassword'] = TRUE;
Update your mysql root password
mysqladmin -u root password your-new-password
sudo /etc/init.d/mysql restart
Update a mysql user password:
SET PASSWORD FOR root@'localhost' = PASSWORD('password');
The mysql password is the one for which you will login to phpmyadmin.
Disable root logins
$cfg['Servers'][$i]['AllowRoot'] = FALSE;
Create a new user in mysql
mysql> CREATE USER 'test'@'localhost' IDENTIFIED BY 'mypassword';
mysql> GRANT ALL PRIVILEGES ON * . * TO 'test'@'localhost';
To remove a user
mysql> DROP user 'test'@'localhost'
Your home pc or home server running Ubuntu can easily be used to send email and run many web server applications such as phpMyAdmin and Squirrelmail. This tutorial will explain how to install and use Squirrelmail with Ubuntu.
1) root# apt-get install squirrelmail squirrelmail-locales Type 'Y' 2) root# squirrelmail-configure ^C 3) root# ln -s /etc/squirrelmail/apache.conf /etc/apache2/conf.d/squirrelmail.conf Restart apache root# /etc/init.d/apache2 restart 4) Check browser to see if login shows up: http://localhost/squirrelmail/src/login.php 5) Open browser and run configtest to troubleshoot. Often, some things need to be changed. http://localhost/squirrelmail/src/configtest.php You may see errors and warnings such as; 'ERROR: Error connecting to IMAP server "localhost:143".Server error: (111) Connection refused' root# apt-get install nmap root# nmap localhost root# sudo iptables -A INPUT -p tcp --dport (143) -j ACCEPT root# iptables-save root# sudo apt-get install dovecot-postfix Run this again: http://localhost/squirrelmail/src/configtest.php You should see: Congratulations, your SquirrelMail setup looks fine to me! Try logging in: If unsuccessful, you will need to change owners and permissions root# chown daemon:daemon data root:/var/lib/squirrelmail# chmod -R 777 data root:/var/lib/squirrelmail# mkdir attachments root:/var/lib/squirrelmail# chmod -R 777 attachments root:/var/lib/squirrelmail# chown daemon:daemon attachments
Now, you need to have a non-root user that can login.
root# useradd myusername root# passwd add_password_here
At this point, you can attempt a login. If anything fails, you can find the errors in the /var/log/mail.log file. One possible error could be that the user does not have the mail directory setup in the proper location. What the error below is attempts to explain is that it cannot create mail directory. The reason for that is because the there is no /home/myusername. Under some Linux conditions and distros, the folder is created automatically. In this case, it was not.
Jul 23 11:09:59 NAME-VirtualBox dovecot: imap-login: Login: user=<myusername>, method=PLAIN, rip=127.0.0.1, lip=127.0.0.1, mpid=8117, secured Jul 23 11:09:59 NAME-VirtualBox dovecot: imap(myusername): Error: user myusername: Initialization failed: Initializing mail storage from mail_location setting failed: mkdir(/home/myusername/Maildir) failed: Permission denied (euid=1001(myusername) egid=1001(myusername) missing +w perm: /home, dir owned by 0:0 mode=0755) Jul 23 11:09:59 NAME-VirtualBox dovecot: imap(myusername): Error: Invalid user settings. Refer to server log for more information.
The code below shows how to setup the mail directory for a new user.The first step is to create the folder for the user and the second step is to create the folder for the email directory. After that, the permissions are set for that user.
root@NAME-VirtualBox:/home# mkdir myusername root@NAME-VirtualBox:/home# cd myusername root@NAME-VirtualBox:/home/myusername# mkdir Maildir root@NAME-VirtualBox:/home# chown -R myusername:myusername myusername
At this point, you will like want to send email that is authenticated. In order to do this, you need to have the DNS for your domain name point to the IP at home. To make sure email is sent through a valid email address, add this line to the bottom of main.cf file.
smtp_generic_maps = hash:/etc/postfix/generic
After that, open and create the file /etc/postfix generic and add this line.
Now, you just need to reload the postfix service and you can send email. To receive email, you need to enable port forwarding on the router so that the local network ip of your machine or Virtual machine is forwarded through port 25.
If you plan to use Ubuntu for many desktop and server applications, you will probably find the need to install Adobe Reader at some point in time. This simple installation can be done with the terminal in just a few seconds.
Installing Adobe Reader in Ubuntu From Command Line
root# wget http://ardownload.adobe.com/pub/adobe/reader/unix/9.x/9.5.1/enu/AdbeRdr9.5.1-1_i386linux_enu.deb root# sudo dpkg -i name_of_package (ie. AdbeRdr9.5.1-1_i386linux_enu.deb)
Your home pc or home server running Ubuntu can easily be used to send email and run many web server applications such as phpMyAdmin and Squirrelmail. This tutorial will explain how to install and use Squirrelmail with Ubuntu.
1) root# apt-get install squirrelmail squirrelmail-locales Type 'Y' 2) root# squirrelmail-configure ^C 3) root# ln -s /etc/squirrelmail/apache.conf /etc/apache2/conf.d/squirrelmail.conf Restart apache root# /etc/init.d/apache2 restart 4) Check browser to see if login shows up: http://localhost/squirrelmail/src/login.php 5) Open browser and run configtest to troubleshoot. Often, some things need to be changed. http://localhost/squirrelmail/src/configtest.php You may see errors and warnings such as; 'ERROR: Error connecting to IMAP server "localhost:143".Server error: (111) Connection refused' root# apt-get install nmap root# nmap localhost root# sudo iptables -A INPUT -p tcp --dport (143) -j ACCEPT root# iptables-save root# sudo apt-get install dovecot-postfix Run this again: http://localhost/squirrelmail/src/configtest.php You should see: Congratulations, your SquirrelMail setup looks fine to me! Try logging in: If unsuccessful, you will need to change owners and permissions root# chown daemon:daemon data root:/var/lib/squirrelmail# chmod -R 777 data root:/var/lib/squirrelmail# mkdir attachments root:/var/lib/squirrelmail# chmod -R 777 attachments root:/var/lib/squirrelmail# chown daemon:daemon attachments
Now, you need to have a non-root user that can login.
root# useradd myusername root# passwd add_password_here
At this point, you can attempt a login. If anything fails, you can find the errors in the /var/log/mail.log file. One possible error could be that the user does not have the mail directory setup in the proper location. What the error below is attempts to explain is that it cannot create mail directory. The reason for that is because the there is no /home/myusername. Under some Linux conditions and distros, the folder is created automatically. In this case, it was not.
Jul 23 11:09:59 NAME-VirtualBox dovecot: imap-login: Login: user=<myusername>, method=PLAIN, rip=127.0.0.1, lip=127.0.0.1, mpid=8117, secured Jul 23 11:09:59 NAME-VirtualBox dovecot: imap(myusername): Error: user myusername: Initialization failed: Initializing mail storage from mail_location setting failed: mkdir(/home/myusername/Maildir) failed: Permission denied (euid=1001(myusername) egid=1001(myusername) missing +w perm: /home, dir owned by 0:0 mode=0755) Jul 23 11:09:59 NAME-VirtualBox dovecot: imap(myusername): Error: Invalid user settings. Refer to server log for more information.
The code below shows how to setup the mail directory for a new user.The first step is to create the folder for the user and the second step is to create the folder for the email directory. After that, the permissions are set for that user.
root@NAME-VirtualBox:/home# mkdir myusername root@NAME-VirtualBox:/home# cd myusername root@NAME-VirtualBox:/home/myusername# mkdir Maildir root@NAME-VirtualBox:/home# chown -R myusername:myusername myusername
At this point, you will like want to send email that is authenticated. In order to do this, you need to have the DNS for your domain name point to the IP at home. To make sure email is sent through a valid email address, add this line to the bottom of main.cf file.
smtp_generic_maps = hash:/etc/postfix/generic
After that, open and create the file /etc/postfix generic and add this line.
Now, you just need to reload the postfix service and you can send email. To receive email, you need to enable port forwarding on the router so that the local network ip of your machine or Virtual machine is forwarded through port 25.
Clonezilla is free software that can be used to make a cloned image (iso file) of your pc. After you make the clone, it can be used to replicate other installations on other pc and be used as a backup.
Clonezilla can be downloaded from clonezilla.org. Then, you can make a live cd or usb for which you run at boot time when you want to make your clone.
Key Points To Remember
1. When you make a a clone with Clonezilla, the first disk options you select will be the destination disk where you want to save the clone. The second option will be to select the source disk you want cloned . making a mistake here can destroy your data.
2. When you restore a clone with Clonezilla, your first selection will be to select the disk which holds the iso image. Your second option will be to select the disk where you want to add the cloned image.
Cloning USB Hard Drives With Clonezilla
After you boot from CD or usb with Clonezilla, you can insert two usb drives into other usb ports. One usb will be the iso file and one will be formatted and blank. Then, you just go along with Clonezilla instructions and clone one usb drive to another usb stick. This method can be used to clone persistent Linux installations from usb to usb. In fact, you can set up a server, a website and an email server on a usb stick. This is no way to host a website, but, it is a simple and cheap method to experiment with Linux installations on disk.
Setting up a ‘Linux Home Server’ requires using a Linux installation of choice. You can use a distribution like Ubuntu, Centos, Mint, Fedora, Debian, Puppy, etc. Regardless of which distribution you decide to use, you will need Apache, mySQL and PHP installed on the system. Then, you can alter and a few files within your installation. Finally, you need to configure your router and set up a dns zone which will point to your IP address. Then, when someone looks up example.com, they will find your website. A Linux home server may not be the best solution to host multiple websites, but, it can be a great testing ground or remote streaming video source.
A Centos Linux Home Server can easily be built after installation. Using Centos as a Linux Home Server is an excellent option because it is free and it is commonly used for web hosting. Based on Red Hat, Centos is the Linux variant which can run Cpanel at hosting data-centers. Therefore, using it will help you be familiar with its file system. Since Linux file systems vary from variant to variant, using Centos at home can make using command lines and running a VPS or dedicated server much easier. This tutorial will explain how to turn the newly installed Centos Installation into a home server which can host a website like example.com.
Install Apache, mySQL and PHP 4) Install mySQL. a) $ yum install mysql-server mysql php-mysql b) Select Yes(y) when necessary. b) /etc/init.d/mysqld start 5) Login to mySQL to check it out a) # mysql > Enter Now, you have access to the mySQL console and can create and edit any database. b) To leave mySQL type: mysql>exit 6) Install php a) #yum install php a) Select Yes(y) when necessary 7) Restart the Apache service. a) # service httpd start [root@livedvd local]# cd /etc/httpd/conf/httpd.conf Open the file in text editor and scroll to the bottom Add: Include conf/conf/*.conf [root@livedvd conf]# mkdir conf [root@livedvd conf]# ls conf httpd.conf magic open conf/example.com.conf
<VirtualHost *:80>
ServerName www.example.com
ServerAlias example.com *.example.com
DocumentRoot /var/www/example.com
<Directory “/var/www/example.com”>
Order allow,deny
Allow from all
</Directory>
</VirtualHost>
Set the dns to point to your ip. You can do this with an online hosting account or free service like free dns. [root@livedvd www]# cd /var/www [root@livedvd www]# mkdir example.com [root@livedvd www]# ls Just add an index.html or index.php file to the folder and open the website in the browser. You should see your website hosted from home.
An Ubuntu Linux Home Server can be built with the server or home edition. Using Ubuntu for a Linux Home Server is an excellent option because it is free, the support and documentation is very good and updated and in general, it performs well. Furthermore, Ubuntu is such a good desktop operating system that using it as a server at the same time can offer the best of both worlds.
Install php and mysql user# sudo -s For all installations, type 'Y' when necessary root# apt-get install mysql-server mysql-client root# apt-get install apache2 root# apt-get install php5 libapache2-mod-php5 root# /etc/init.d/apache2 restart Restart server and set the config to restart automatically (often, this is already the default setting). Router Port Forwarding for your IP Test your ip in browser. Create a DNS zone for which the website points to your ip. Set the dns to point to your ip. You can do this with an online hosting account or free service like free dns.

root# /etc/apache2/apache2.conf Open the file in text editor and scroll to the bottom Add: Include conf.d/sites/*.conf Make a new folder called sites Now, open the directory /etc/apache2/conf.d and make a file for your website. For example, for the website example.com I will call the file example.com.conf. It is a good idea to give the file the same name as the top level domain since it is unique and you will be well organized. root# vi example.com.conf
Add a virtual host entry to the file:
<VirtualHost *:80>
ServerName www.example.com
ServerAlias example.com *.example.com
DocumentRoot /var/www/example.com
<Directory “/var/www/example.com”>
Order allow,deny
Allow from all
</Directory>
</VirtualHost>
Now set up the folder for the site example.com open /var/www/ root# cd /var/www root:/var/www# mkdir example.com Copy the original index.html file from www/index.html to www/example.com/index.html root# cp index.html example.com/index.html Edit the example.com/index.html so that you know it comes from this directory. Just add a simple line like "This is from example.com" Access your firewall in browser (ie 192.168.0.1) Select advanced > allow port 80 with tcp
This short, simple tutorial will explain how to install and use Clamav with Ubuntu.
To install Clamav,
Install Clam AV root# sudo apt-get install clamav Install Clam AV Automated Package root:# sudo apt-get install clamav-daemon
Clam AV Usage
To use Clamav,
1) Open the terminal 2) Run a scan Scan the home directory and recursive files and folders. root# clamscan -r /home Scan everything root# clamscan -r / Output Sample: ----------- SCAN SUMMARY ----------- Known viruses: 2304039 Engine version: 0.97.8 Scanned directories: 29545 Scanned files: 111854 Infected files: 0 Total errors: 18080 Data scanned: 3206.81 MB Data read: 6249.99 MB (ratio 0.51:1) Time: 307.823 sec (5 m 7 s) root#
Clam GUI
If you want a gui for Clam you can download it from sourceforge. The current download url is http://sourceforge.net/projects/clamtk/files/ClamTk/4.44/clamtk_4.44-1_all.deb/download.
To install the gui tool,
1) Download the file and save it. 2) Open the terminal. 3) Go to the download folder.# cd /home/user/Downloads 4) Run the command for the specific version: root# sudo dpkg -i clamtk_4.44-1_all.deb
With Ubuntu, the Universal Firewall(ufw) is install by default. You can run the command sudo ufw status to check it out. It is most like disabled.
If you want a simple gui for basic firewall rules, you can install the gui version ufgw. However, you need to have the the Universe repository enabled in order to install ufgw, which could be enabled by default. To install ufgw,
1) Open the terminal: 2) Run the command: sudo apt-get install gufw 3) When necessary, select 'Y' to complete the installation.
To use the Firewall and make rules,
1) Open System Settings >Firewall Configuation or Dash Home >Look for gufw >Select Firewall Configuration 2) Make rules. The image below shows a simple rule to allow incoming traffic to receive http requests from port 80; the web server.
1) Download from phpmyadmin website
2) Extract the file from the directory (such as /tmp directory)
tar xvjf file.bz2
3) Rename the phpmyadmin folder after it is extracted
root# mv phpMyAdmin-4.0.0-all-languages.tar.bz2 phpmyadmin
4) Move the phpadmin folder to the /var/www/html folder, or, your virtual host folder such as a website called example.com. If you have a single website it will be in the html folder.
5) Open the phpmyadmin folder
cd phpmyadmin
6) cp config.sample.inc.php config.inc.php
If mysql has no root password, you can
change
$cfg['Servers'][$i]['AllowNoPassword'] = false;
to
$cfg['Servers'][$i]['AllowNoPassword'] = true;
But, that is a security risk.
You can alter the root password by logging into mysql and changing it.
[root@livedvd phpmyadmin]# mysql -u root
Welcome to the MySQL monitor. Commands end with ; or \g.
Your MySQL connection id is 4
Server version: 5.1.69 Source distribution
Copyright (c) 2000, 2013, Oracle and/or its affiliates. All rights reserved.
Oracle is a registered trademark of Oracle Corporation and/or its
affiliates. Other names may be trademarks of their respective
owners.
Type 'help;' or '\h' for help. Type '\c' to clear the current input statement.
mysql> update mysql.user set password=PASSWORD('newpassword') WHERE user='root';
# service mysqld restart
Login to phpmyadmin
Look for errors and fix
ie)
The mbstring PHP extension was not found and you seem to be using a multibyte charset. Without the mbstring extension phpMyAdmin is unable to split strings correctly and it may result in unexpected results.
The mcrypt extension is missing. Please check your PHP configuration.
A Linux distribution can be installed directly onto a hard drive or it can be installed on a partition on the hard drive. When you partition a hard drive, you can have have the option to run either operating system when you boot the computer. The software EASEUS can be used to partition a hard drive with Windows for which the new partition can be used to install Linux. The key to partitioning a hard drive with EaseUS is to make the Linux partitions with the type ‘Ext 3’.
When you create the partition, the new Linux partition must have a status as ‘active’ and the type is ‘primary’. After you have created the partition you reboot the computer. The bios boot order should start with your installation media; such as cd or usb. Upon reboot, you will follow the simple Linux installation instructions. The only part that may need some tweaking is making sure the root ‘/’, boot and swap partitions are properly created and named.
Partitioning Tips For Linux
When you partition a hard drive to install Linux, you will need to make 3 ‘Ext’ partitions. The partitions can be made with EaseUS or they can be created when you install the iso image on the computer. One will be the large ‘root’ partition which will have the mount point ‘/’. Another partition will be the ‘boot’ partition’ that will have the mount point ‘boot’ and it will be about 200 mb in size. The final partition will be the type ‘swap’, and it should be twice the size of your computer’s memory. For example, a computer with 4gb of memory will have 8-9 GB of swap. If ou do not have the three partitions created, you will be prompted during installation that you must have them. Therefore, if this is the case, you simply create them.
Post Installation
After Linux is successfully installed, you reboot your computer (without the media installation disk or usb stick). You will be able to select your operating system of choice.
This example will demonstrate how to find files that are larger than a specified size. The example below will find files in the home directory which are larger than 20mb.
root# find /home -size +20480k -print
This tutorial will list files on your Linux system within a specific date range.
List Files Within 1 Day
root# find . -type f -mtime -1
root# find /myfolder -type f -mtime -1
List Files More Than 1 Day Old
root# find . -type f -mtime +1
root# find . -type f -mtime +1
root# find /home/user/public_html/example.com/myfolder -type f -mtime +1
This tutorial explains how to find list all files and directories on a Linux system that have a string of text within the name. The example below is looking for files or folders with database_connect in the name.
Find Text Within The Files and Folders
root# find /pathtofiles -name "database_connect*"
root# find /directory | grep "database_connect"
root# find . | grep "database_connect"
find /home/username | grep connect
This tutorial explains how to find data within files on a Linux system.
Find Text Within
root# find /pathtofiles | xargs grep "username"
This basic set of instructions can be used to remove an ip address of a device on your Linux system.
Show IP addresses.
root_user# ip addr show eth0
Remove the undesired ip.
root_user# ip addr del 192.168.0.1/21 dev eth0
Using SSH, you can find the word count of one or more files.
Word Count of A Particular File
# find . -name 'edit.php' | xargs wc -w 99 ./mobilesite/forms/system/scaffolding/views/edit.php 383 ./blogger/edit.php 164 ./edit.php 646 total
Word Count of All PHP Files
# find . -name '*.php' | xargs wc -w or # find . '*.php' | xargs wc -w
Total Word Count of All Files
find . -type f -print0 | xargs -0 cat | wc -w
When you use a Linux Live DVD like CentOS 6.3, you can easily setup and modify the Linux installation to suit your needs. However, the Live DVD or Live CD will not save any changes that are made because Live CDs or DVDs run on a virtual disk drive in memory. The benefit of using a Live installation is security against malware and its portability.
Nevertheless, you can easily take a Linux Live DVD like Centos and setup php / mySQL in minutes. Then, you restart httpd and you have a functioning localhost to test php / mySQL scripts. This tutorial expklains how to use a Live DVD to create and test php / mySQL scripts.
1) Open the console (Applications>System Tools>Konsole)
2) Change user to root
Type:
a) $ sudo passwd root
b) Add password and verify
c) $ su – root
d) Give Password > Click Enter
4) Install mySQL.
a) $ yum install mysql-server mysql php-mysql
b) Select Yes(y) when necessary.

b) /etc/init.d/mysqld start
5) Login to mySQL to check it out
a) # mysql > Enter
Now, you have access to the mySQL console and can create and edit any database.
b) To leave mySQL type:
mysql>exit
6) Install php
a) #yum install php
a) Select Yes(y) when necessary
7) Restart the Apache service.
a) # service httpd start
8) Type: localhost in a browser to see a test page.
9) Use Vi or Nano to create files and store them in the www folder. For example, the file test.php in the ww folder can be viewed in Firefox with http://localhost/test.php
To create a php page,
a) # cd /var/www/html
b) nano test.php

Sudo ‘Super User’ can be installed with Yum. The process to install sudo is shown below.
root# yum install sudo
You will be prompted to install. Select y and click ‘Enter’ on your keyboard.
root# sudo whoami root
Ctrl + Alt + f2
Ctrl + Alt + f7
Unlike the cp command, the mv command moves a file and the original file gets removed.
Moving a File
The command below will move the file from the current working directory into the username folder which is located within the home directory.
root@vps [/]# mv newtest.txt /home/username/
The ‘cp’ command can be used to copy files from one location to another. After a file is copied, there is the original file and the copied file.
Copying a File
The code below will copy the index.php file from the user directory into the current working directory which is user2
root@vps [/home/user2]# cp /home/user/index.php ./
Copying a File To a New Name
The code below will copy the oldfile file to a file named newfile
root@vps [/home/user2]# cp -r oldfile newfile root@vps [/]# cp -r newtest.txt newtest2.txt root@vps [/]# ls
Both files newtest.txt and newtest2.txt now exist.
Using the Vi Editor that comes with various Linux distributions is one of your options to create, edit and save files. Two other popular editors are Nano and Pico. Nano and Pico usage are almost identical, while Vi usage is different. This tutorial and listings of commands is for the Vi editor. Opening Vi Editor and Insert Mode
root@vps [~]# vi newfile Here is my new text ~ ~ ~ -- INSERT --
Exit Insert Mode and Enter Command Mode
1) Press 'Enter' and go to a new line 2) Press 'Esc' on the keyboard
Exit Command mode and go to Insert Mode
1) Press 'Insert' on the keyboard
Navigating the Vi Editor
1) Use the arrow keys.
Saving Files and Quitting the Editor In Command Mode
To save a file and quit in command mode, 1) Type: :wq To save a file to another name, 1) Type: :w newfilename To quit the vi editor, 1) Go to command mode. 2) Type: :q or :q!
For more commands and usage, a Vi cheatsheet can be found here.
Sometimes, during testing or typos, Linux will hang up and it will seem as though you are stuck. At this point, you probable just want to return to the prompt.
The ^C command allows you to stop the command and return to the prompt. However, if you are using an editor like Nano or Pico, you will need to exit the editor with the appropriate commands like ^X.
The jobs command can be applied to see which jobs are executing in the Linux shell.
root@vps [~]# jobs [1]+ Stopped cat
Using the pipe operator ‘|’, you can send data from program to another. This example will show how to search for all files with ‘test’ in the name. It returns the names latest, test2.txt and test3.txt.
Search the current directory for files with the string ‘test’
root@vps [~]# ls | grep test latest test2.txt test3.txt root@vps [~]#
Searching A Single File for a String
root@vps [~]# grep "kent" newfile.txt My name is kent. root@vps [~]#
Searching All Files for Strings
root@vps [~]# grep -r "kent" . ./.bash_history:ls | grep kent ./.bash_history:grep kent newfile.txt ./.bash_history:grep kent ls ./.bash_history:grep -r kent ./.bash_history:grep -r "kent" ./newfile.txt:My name is kent. root@vps [~]#
Linux uses three standard program communication streams; STDIN, STDOUT and STDERR. The three streams represent standard input, standard output and standard error. The tutorial will detail standard output. With Linux, you can create a new file with an editor, or, you can redirect output into a file. Nano Sample 1) Create the file with nano root@vps [~]# nano myfile.txt 2) Write text 3) Save file ^O 4) Exit nano ^X Standard Output Method To Create a File 1) Use > to redirect output to a file called myfile.txt root@vps [~]# echo "New text goes here" > myfile.txt Furthermore, with output streams, you can run a Linux command and output the results into a file Sample #1 1) root@vps [~]# echo $PATH > test2.txt root@vps [~]# cat test2.txt /usr/local/jdk/bin:/usr/kerberos/sbin:/usr/kerberos/bin:/usr/local/sbin:/usr/local/bin:/sbin:/bin:/usr/sbin:/usr/bin:/usr/local/bin:/usr/X11R6/bin:/root/bin Sample #2 root@vps [~]# ls -lt > test3.txt root@vps [~]# cat test3.txt total 4576 drwxr-x--- 15 root root 4096 Dec 25 08:25 ./ -rw-r--r-- 1 root root 0 Dec 25 08:25 test3.txt -rw-r--r-- 1 root root 157 Dec 25 08:23 test2.txt Adding Standard Output to a File To add a new lines to a file, 1) Type the following commands. root@vps [~]# echo "New line" >> test2.txt root@vps [~]# cat test2.txt /usr/local/jdk/bin:/usr/kerberos/sbin:/usr/kerberos/bin:/usr/local/sbin:/usr/local/bin:/sbin:/bin:/usr/sbin:/usr/bin:/usr/local/bin:/usr/X11R6/bin:/root/bin New line root@vps [~]#
The command below uses which rm to find the location of the nano editor.
root@vps [~]# which rm nano /usr/bin/nano root@vps [~]#
Note:
The editor is located in the bin folder.
Linux allows you to create aliases for commands. In this example, we will make an alias called md which can be used to run the mkdir command. If you run the command below, you will set an alias, create a new directory and see that the new directory was actually created.
alias root# md="mkdir" md test_directory ls -l
Linux has many environment variables. A few worth remembering are pwd, path, PS1, USER and VISUAL. These environment variables can be used during each session. Alternatively, you can create environment variables which will last for your SSH session.
Using Environment Variables
root@vps [~]# echo $PATH /usr/local/jdl/bin:/usr/kberos/sbin:/usr/kerberos/bin:/usr/local/sbin:/usr/local/bin:/sbin:/bin:/usr/sbin:/usr/bin:/usr/local/bin:/usr/X11R7/bin:/root/bin root@vps [~]# echo $USER root root@vps [~]# echo $VISUAL pico
Creating Environment Variables
root@vps [~]# VAR="Hello" root@vps [~]# export VAR root@vps [~]# bash root@vps [~]# echo $VAR Hello
The ‘ls’ command is one which gets used quite frequently. The ‘ls’ command is used to display files. There are many ways for which you can display files; such as ls, ls -l , ls -a, ls a* and ls -lt.
ls (lists one file for each row)
root# ls file1 .file2
ls -l (lists a long output with file permissions, date and file size)
root# ls -l -rw-r--r-- 1 root root 38473 Feb 22 2012 memcached-2.0.0b2.tgz -rw-r--r-- 1 root root 38473 Feb 22 2012 memcached-2.0.0b2.tgz.1
ls -a (lists all files including hidden files)
root# ls -a file1 .file2
ls -a (lists all files beginning with a)
root# ls a* afile .afile
ls -lt (lists all files with long output ordered by date desc)
root# ls -lt drwxr-x--- 15 root root 4096 Dec 24 22:28 ./ -rw------- 1 root root 17386 Dec 24 09:14 .bash_history
With the shell you can define your variables. When you define the variable, it is convention to use capital letters. When you want to use the variables, you add a ‘$’ in front of the variable name. You can use variables within double quotes, but, not within single quotes. In addition, you some characters cannot be used within double quotes since they take on a different meaning. Fore example, ‘!’ cannot be used within double quotes.
Declaring the Variable
root# VAR="Hello World"
Printing the Variable
root# echo $VAR Hello World root# echo "$VAR" Hello World
Changing the Linux root password can be done with a GUI like Web Host Manager, or, it can be done with SSH. The code below shows the simple procedure to change the password with the shell.
root# passwd Changing Password for user root. New UNIX Password: Add_PASSWORD_HERE (Click Enter) Retype new UNIX password: RETYPE_PASSWORD_HERE (Click Enter) passwd: all authentication tokens updated successfully.
When you have root access to your Linux hosting account, you have so many extra features that are not available with shared hosting. One of the major features is SSH access with a tool like Putty. With SSH acccess you can literally connect fromm any computer on the Internet and do whatever you want to your website. You can create, edit and delete files, reboot the server, have acomplete access to all mysql databases, and much much more.
Knowing how to navigate at the Linux root can allow you to work on a website with no extra tools. Unlike a typical pc where you need FTP software and an editor, using SSH can be your final safety net if you need to use that. Imagine going on vacation in Cancun and you lose your laptop, or it fails. If you can access your Linux server wuth SSH, you can be back to work at the nearest Internet connection.
Logging In With SSH
Putty is a simple tool which can be used to connect to the server with SSH. The tool is free to download.
To login with SSH,
1) Open Putty
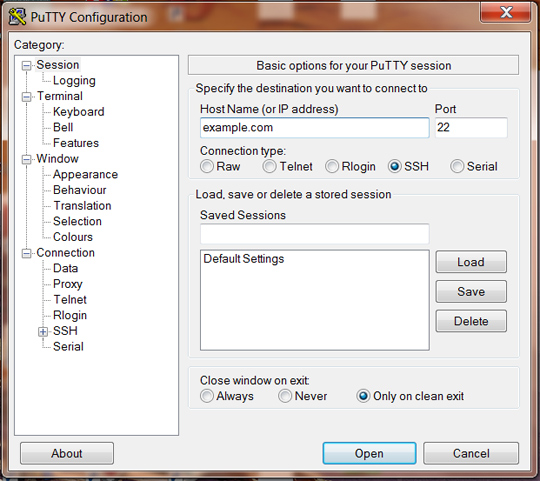
To view files in the folder
To view files within a folder,
1) Use the ls command.
Current Directory
To view the current directory,
1) Use the pwd command.
Changing Directories
To change directories,
1) Use the cd command.
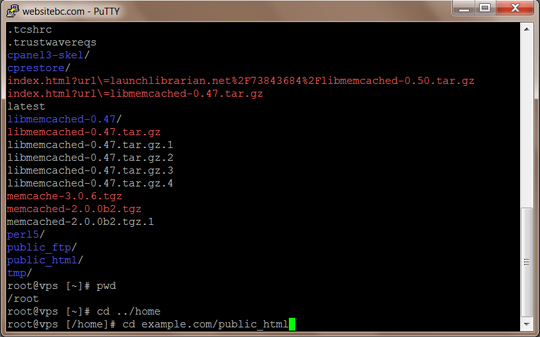
Editing and Creating Files
To view a file(but not edit),
root@vpscat [/home/user]# cat filename.txt
To view and edit a file,
1) Open nano or pico editor
2) root@vpscat [/home/user]# nano filename.txt
3) Use arrow keys to navigate.
Note: If you already have a file with Nano it opens up the file. Otherwise, the command nano filename.txt will open a blank screen and you can make the new file called filename.txt.
To save a file edited or created with Nano or Pico,
1) Click Ctrl + O on the keyboard
2) Click ‘Enter’ on keyboard
To exit Nano or Pico,
1) Click Ctrl + X on the keyboard
Removing Files
To remove files,
1) Use the rm command.
root@vpscat [/home/user]# rm filename.txt
2) You will be prompted ‘rm: remove regular file ‘filename.txt’ ?
3) Answer ‘yes’ or ‘no’
3) Hit Enter on the keyboard.
Exit SSH
To exit SSH,
1) Type: Exit
2) Hit ‘Enter’ on your keyboard.
When you want to add a SSL certificate to your website using Cpanel or web Host Manager(WHM), there are a few key points to remember. The two main points are the key and the actual SSL certificate. The two go hand in hand because the key on the web hosting account is used to create a matching SSL certificate. Then, the certifcate from the SSL company is added to your hosting account to finalize the match on the server.
In the end, the company where you buy the SSL certificate will ask for a key that was generated from your Cpanel or WHM. Then, they give you a certificate which can be used to update your key on yopour server. Now, both your SSL provider and your server have details for the key and SSL certificate. That is the main details which will deploy a usable SSL certificate.
With Web Host Manager or Cpanel, you can create SSL certificates.
Cpanel
To add an SSL certifcate to Cpanel,
1) Make sure the Cpanel account has its own dedicated ip address.
2) Select SSL TLS Manager
3) Select ‘Generate, view, or delete SSL certificate signing requests’. You will add your domain name and some other required fields like city, state and country.
4) At the bottom look for Generate.
5) Select Generate.
The CERTIFICATE SIGNING REQUEST(CSR) will have a block of code that the resembles the block of code shown belown.
Certificate Signing Request
-----BEGIN CERTIFICATE REQUEST----- MIICrDCCAZQCAQAwZzEhMB8GA1UECgwYQm9oZW1pYSBXZWJzaXRlIHNlcnZpY2Vz MQ8wDQYDVQQHDAZTYXZvbmExCzAJBgNVBAgMAkJDMQswCQYDVQQGEwJDQTEXMBUG A1UEAwwOYm9oZW1pYW5pc20uY2EwggEiMA0GCSqGSIb3DQEBAQUAA4IBDwAwggEK AoIBAQDXwOjuRrBTD7Vlc6xoeqyv0rgefUKJ+rR3RhVF4VmJgWLYvvP92Coh6V82 PDxiV6gDqG/oklloPiWxyyBPEI6UinXRHlq4UXTkLB6h011CNnCi0KtXdCSWo5xE meZI0qQmTDctYLBs3tNAuCR2k8j8v7p9poid+48BaJf0dVBIBvflLy7fYLlodM2Q 69IAhewSw4LG2XUVwmDNMjlIV+9U1oRGRsW+AXHy9Z58Jfm7V31qyhK6Xf4W9Ru3 s9bBjTKcwmpgTI2XVVWueGrByOAAFl27mFof8avwWUW5YCZHdnFp+1u5pwmrPHm2 AmPxhXpeWNjo2WrGm/JsV8eOYC63AgMBAAGgADANBgkqhkiG9w0BAQUFAAOCAQEA yM1aC3Ss3uAHo2YXWiyLSEFOArnwVZ+patyKG8iJX4shGDxYIPEDMIa6R6o5QM8+ 1goGpaxHbFKk91Z9SKbUmv3/pd4+7fd3v4r3ILveWSwFq7DQdj0pQCtrzRYChgcM fXNe5372cPQ6TYrv97eGPh/go7Gb0OTq3W9n4z8W3Kgc65wDGj8cHsFJsW5G+e+o UeE05uLPgt8loyAfRslp02O5sWPENfIf1pqJJQdGmEATd35lBantFWYR8BR+12VP 3ez6Vjw9mJyBnqNjB6V0ZGPVumFcPoNUi28kASiCseWV5yZJyWdIzAOKRVLpgVrg fRF9a/2E7pMjAIM/uWXbCw== -----END CERTIFICATE REQUEST-----
Note: The useful code begins with
—–BEGIN RSA PRIVATE KEY—–
and ends with
—–END RSA PRIVATE KEY—–
You will do nothing with the lower block of code that begins with: Private-Key: (2048 bit)
Generated Private Key
-----BEGIN RSA PRIVATE KEY----- MIIEpAIBAAKCAQEAvBO/ZbkpzfbZqq9G47OWNE/5vOgFmybqVvHOiF6olXnx+T2V YJK4eIsDjwbC5FM83Ul/06Fy/hekZOZhAYAx6X/Qb0TtbecO3BytKqERLdgIeHOR idRybVUg3dQkqrwtOKipBnw8MX52uwfC9//SGAPs1+pGZ5URkeo2dSbYZ12oC5Zy MGpfdsvHDHpSEKGEp/MOWdE9UKKbx6dJek4Icalo6YwkvwkYPwfDR/YvgbK36OAD 07VH5MyKVTyqqPfOd9UKP9kLN+IorRtYJvhKsNZ3Aj2d7l/NvlDpZ5fOzuNuSj8S C8Tziqxhi2AtEG9Wz3KxRD9JNKbOCk9UF6NJmwIDAQABAoIBAQCI2T2dALwAV6tN 3LeSGywh6EdpQtJBcHF2zf9fjrDQAqkkl8DHQjrjyxLN0Teh90cD6q8uB88Yv48o s9DFzMeEhTHepKK2IzfWxS7jI8tiNh0Dt+OgDGsuTpDZl/EOIlotLdu/EkqiIMi3 khA1b3kpbEG7YYXU/MyKBYeWeqtfma8aarI0KmmDYQu3N5fe9AiIp0o4h0mw4jTd DtZ60t35IIasWcxkDEtxX+T+I5B9hN5ysfH6KIZg2afdSZ+2I0wXA/RA9400g0Or xzZ4Z9rkJYN8jhce0LY2BTJoRIuMNiCzHQ0ugVNFNRzMh574IU17Muu9kxjJpBj2 Pzt2wN+xAoGBAPMcU7T0ouTHZ+/jzj9eoR6l/j1HqzDtg8zRTHWZN4p5BxjoTmBo bxtkNCrZw+LB/tKmP5VF/ROioqViCumOnId5mCr8FyYgnYfjxtcs002fuBHTSnUo cDQmu/g4XQxiBGlcR4no6ztF7ctU5LNi7JT+PphKDmwdFjBF8w2e17fHAoGBAMYM d1YBGUZShgVY/e+i6q4y6uQef6sLpbgQgDHOuHQ43sipVfFF5uYdpVbArKS4oWri JIu8ZqIL8S2cvllEg9RSQPpAl0+3/zwGlxI/3kHxsIxGrkBmdtukQSjmslZdcai0 IOkEgVh11OBlYP10AKC+riDQBcZFrNch6PklDmeNAoGAcJhRCIE5JH5aXBeFAYKB WuGEU7tqxRlsLqNNJzYULDULnXSSQEJ+GxCYvLPo7o/sxoEq96bXpI1xiOlUpoFf a7tcR6RD0GvQqgxLnoLrRotPxCm41XQqK205J6hrJ/4JjwanN29B60zi6oZh+dc6 PXNXaE78SQRbr3XmMQu9WycCgYEAndnTx9XKWlVuApcilryIRl3JABca9K6s4B8u vgQg2ml1kAP/vvVTCvh4DsQ1FnkeFv212TZJq0DPcuZqhOXqGPGSXqPatixWH3a1 NFN5h5/mcnfnbOb+NyQc10fAvrtt2uPvEyqHGYWZLV1AR+MMmRJB4V9MKvLfxvx9 Hw8dAwUCgYBCKVZrznuqzHQzJ66VM9Wrl6vgt0nMAUEfLK5r7Cuz3FQ5LF4GVATi 8zMOoWGExXvmZl1sQBIJeNb/zKt4Lhwy40DyZzjkvuoPiEk9+X+q/Cuc4OtcXR49 JXcA03RVcZI3XqUOgsMEYkYgWKpxV/77IEmSHPu/Lq9L745R08ZVcP== -----END RSA PRIVATE KEY----- Private Key Information Private-Key: (2048 bit) modulus: 00:bc:13:bf:65:b9:29:cd:f6:d9:aa:af:46:e3:b3: 96:34:4f:f9:bc:e8:05:9b:26:ea:56:f1:ce:88:5e: a8:95:79:f1:f9:3d:95:60:92:b8:78:8b:03:8f:06: c2:e4:53:3c:dc:f9:7f:d3:a1:32:fe:17:a4:64:e6: 61:01:80:31:e9:7f:d0:6f:44:ed:6d:e7:0e:dc:1c: ad:2a:a1:11:2d:d8:08:78:73:91:89:d4:72:6d:55: 20:dd:d4:24:aa:bc:2d:38:a8:a9:06:7c:3c:31:7e: 76:bb:07:c2:f7:ff:d2:18:03:ec:d7:ea:46:67:95: 11:91:ea:36:75:26:d8:67:5d:a8:0b:96:72:30:6a: 5f:76:cb:c7:0c:7a:52:10:a1:84:a7:f3:0e:59:d1: 3d:50:a2:9b:c7:a7:49:7a:4e:08:71:a9:68:e9:8c: 24:bf:09:18:3f:07:c3:47:f6:2f:81:b2:b7:e8:e0: 03:d3:b5:47:e4:cc:8a:55:3c:aa:a8:f7:ce:77:d5: 0a:3g:d9:0b:37:e2:28:ad:1b:58:26:f8:4a:b0:d6: 77:02:3d:9d:ee:5f:cd:be:50:e9:67:97:ce:ce:e3: 6e:4a:3f:12:0b:c4:f3:8a:ac:61:8b:60:2d:10:6f: 56:cf:72:b1:44:3f:49:34:a6:ce:0a:4f:54:17:a3: 49:9b publicExponent: 65537 (0x10001) privateExponent: 00:88:d9:3d:9d:00:bc:00:57:ab:4d:dc:b7:92:1b: 2c:21:e8:47:69:42:d2:41:70:71:76:cd:ff:5f:8e: b0:d0:02:a9:24:97:c0:c7:42:3a:e3:cb:12:cd:d1: 37:a1:f7:47:03:ea:af:2e:07:cf:18:bf:8f:28:b3: d0:c5:cc:c7:84:85:31:de:a4:a2:b6:23:37:d6:c5: 2e:e3:23:cb:62:36:1d:03:b7:e3:a0:0c:6b:2e:4e: 90:d9:97:f1:0e:22:5a:2d:2d:db:bf:12:4a:a2:20: c8:b7:92:10:35:6f:79:29:6c:41:bb:61:85:d4:fc: cc:8a:05:87:96:7a:ab:5f:99:af:1a:6a:b2:34:2a: 69:83:61:0b:b7:37:97:de:f4:08:88:a7:4a:38:87: 49:b0:e2:34:dd:0e:d6:7a:d2:dd:f9:20:86:ac:59: cc:64:0c:4b:71:5f:e4:fe:23:90:7d:84:de:72:b1: f1:fa:28:86:60:d9:a7:dd:49:9f:b6:23:4c:17:03: f4:40:f7:8d:34:83:43:ab:c7:36:78:67:da:e4:25: 83:7c:8e:17:1e:d0:b6:36:05:32:68:44:8b:8c:36: 20:b3:1d:0d:2e:81:53:45:35:1c:cc:87:9e:f8:21: 4d:7b:32:eb:bd:93:18:c9:a4:18:f6:3f:3b:76:c0: df:b1 prime1: 00:f3:1c:53:b4:f4:a2:e4:c7:67:ef:e3:ce:3f:5e: a1:1e:a5:fe:3d:47:ab:30:ed:83:cc:d1:4c:75:99: 37:8a:79:07:18:e8:4e:60:68:6f:1b:64:34:2a:d9: c3:e2:c1:fe:d2:a6:3f:95:45:fd:13:a2:a2:a5:62: 0a:e9:8e:9c:87:79:98:2a:fc:17:26:20:9d:87:e3: c6:d7:2c:d3:4d:9f:b8:11:d3:4a:75:28:70:34:26: bb:f8:38:5d:0c:62:04:69:5c:47:89:e8:eb:3b:45: ed:cb:54:e4:b3:62:ec:94:fe:3e:98:4a:0e:6c:1d: 16:30:45:f3:0d:9e:d7:b7:c7 prime2: 00:c6:0c:77:56:01:19:46:52:86:05:58:fd:ef:a2: ea:ae:32:ea:e4:1e:7f:ab:0b:a5:b8:10:80:31:ce: b8:74:38:de:c8:a9:55:f1:45:e6:e6:1d:a5:56:c0: ac:a4:b8:a1:6a:e2:24:8b:bc:66:a2:0b:f1:2d:9c: be:59:44:83:d4:52:40:fa:40:97:4f:b7:ff:3c:06: 97:12:3f:de:41:f1:b0:8c:46:ae:40:66:76:db:a4: 41:28:e6:b2:56:5d:71:a8:b4:20:e9:04:81:58:75: d4:e0:65:60:fd:74:00:a0:be:ae:20:d0:05:c6:45: ac:d7:21:e8:f9:25:0e:67:8d exponent1: 70:98:51:08:81:39:24:7e:5a:5c:17:85:01:82:81: 5a:e1:84:53:bb:6a:c5:19:6c:2e:a3:4d:27:36:14: 2c:35:0b:9d:74:92:40:42:7e:1b:10:98:bc:b3:e8: ee:8f:ec:c6:81:2a:f7:a6:d7:a4:8d:71:88:e9:54: a6:81:5f:6b:bb:5c:47:a4:43:d0:6b:d0:aa:0c:4b: 9e:82:eb:46:8b:4f:c4:29:b8:d5:74:2a:2b:6d:39: 27:a8:6b:27:fe:09:8f:06:a7:37:6f:41:eb:4c:e2: ea:86:61:f9:d7:3a:3d:73:57:68:4e:fc:49:04:5b: af:75:e6:31:0b:bd:5b:27 exponent2: 00:9d:d9:d3:c7:d5:ca:5a:55:6e:02:97:22:96:bc: 88:46:5d:c9:00:17:1a:f4:ae:ac:e0:1f:2e:be:04: 20:da:69:75:90:03:ff:be:f5:53:0a:f8:78:0e:c4: 35:16:79:1e:16:fd:b5:d9:36:49:ab:40:cf:72:e6: 6a:84:e5:ea:18:f1:92:5e:a3:da:b6:2c:56:1f:76: b5:34:53:79:87:9f:e6:72:77:e7:6c:e6:fe:37:24: 1c:d7:47:c0:be:bb:6d:da:e3:ef:13:2a:87:19:85: 99:2d:5d:40:47:e3:0c:99:12:41:e1:5f:4c:2a:f2: df:c6:fc:7d:1f:0f:1d:03:05 coefficient: 42:29:56:6b:ce:7b:aa:cc:74:33:27:ae:95:33:d5: ab:97:ab:e0:b7:49:cc:01:41:1f:2c:ae:6b:ec:2b: b3:dc:54:39:2c:5e:06:54:04:e2:f3:33:0e:a1:61: 84:c5:7b:e6:66:5d:6c:40:12:09:78:d6:ff:cc:6b: 78:2e:1c:32:e3:40:f2:67:38:e4:be:ea:0f:88:49: 3d:f9:7f:aa:fc:2b:9c:e0:eb:5c:5d:1e:3d:25:77: 00:d3:74:55:71:92:37:5e:a5:0e:82:c3:04:62:40: a0:58:aa:71:57:fe:fb:20:49:92:1c:fc:bf:2e:af: 4b:ef:8e:51:d3:c6:55:72
6) Go to your ssl provider.
7) Add your certifcate request. You will need to add your key or CSR that was generated from your web host. In this example, the key was shown above.
8) Follow instructions with the SSL provider. You may need to verify your website. The verification process will be different for each company. For example, Godaddy will give you the option to add a file to the root folder and verify that it exists while another company may send a verification email. Wait until they have made you an SSL certificate.
9) When you have an SSL certificate from the provider, it will be a ‘.crt’ file.
10) Go to Cpanel > SSL / TLS Manager >Certificates (CRT) > Click ‘Generate, view, upload, or delete SSL certificates’.
11) Paste the code into the box or upload the ‘.crt’ file.
12) Select ‘Generate’.
Details About SSL Activation
1) Go to Cpanel > SSL / TLS Manager >Activate SSL On Your WEbsite(HTTPS) >Setup a SSL certificate to work with your site. >Select Your Domain. >Make sure you have the proper key and certificate.
2) Select ‘Install Certifcate’, if necessary.
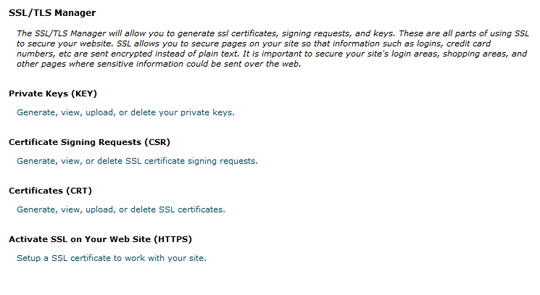
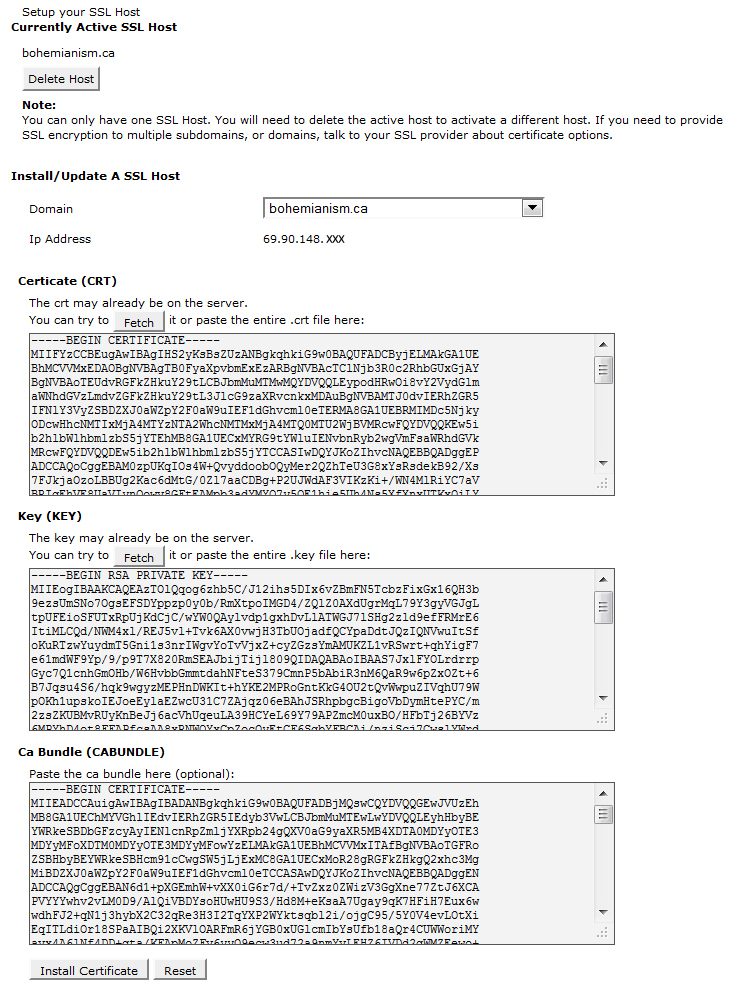
Web Host Manager
To view SSL certificates,
1) Look for SSL / TLS >Click SSL Key / Crt Manager. You can download all keys, signing requests and SSL certificates here.
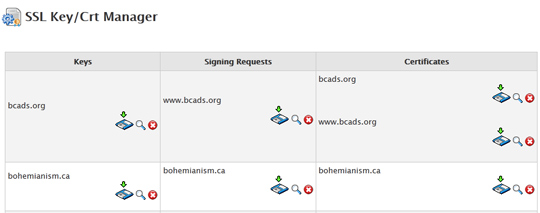
Issues
When you set up an SSL certificate, you may have made a mismatch with the key or certificate. To fix this, you can always download or make a new key. Then, you can go to your SSL provider and update the key. they will give you a new block of certificate code. The code they give is the ‘.crt’ file. This file can be used to install the proper SSL certificate with Cpanel.
Web Page Errors
As a safeguard, you can reboot the server after making changes.
Desired Results
When all goes well, you open your website with https and see the following results.

Convert InDesign CS to EPub, PDF and Kindle
When you have a completed Adobe Indesign book and want to market it for ebook sellers such as Amazon, Kobo, Nook and perhaps your own store; you will need to create various versions which include Kindle Format (AZW3), Epub, PDF and maybe mobi.
PDF Files
With all Adobe Indesign versions or Microsoft Word, you can convert the file to the pdf format. Indesign comes with the converter tool installed while Word needs you to install the addon in order to be able to convert the Word doc to pdf.
Epub Files
With Indesign CS4 and above, you can get a export all Indesign files to Epub. Indesign does a very good job at converting the files and maintaining the layout. Since the epub format is not decipherable or editable in an editor like Notepadd++, you may want to stick with Indesign which outputs almost exactly what you want. After testing various pdf to epub converters; none compare to creating an epub book with an Indesign file. However, HTML / CSS coders can always open the epub file with Notepadd++ and save it as a zip file. Then, the zip file can be extracted and you will see various folders and files which make up the epub file. The html code can be edited and adjusted as desired. After working with the files, you simply rezip the folders and files and rename the new zip file as an epub file. You must ‘Select All’ files and folders and rezip them. Do not zip the main folder which contains the files and folders. After the new zip file is created, you can edit it in Notepad and rename it to the epub format. In a nutshell, an epub file is a zip file with a different extension.
Alternatively, you can convert pdf files to epub files. Some converters can only convert into an image or text format while others can do both. Books that contain no images convert easily. Books with images is most painless with Indesign CS5 or Indesign CS6. AVS Converter does a good job at converting pdf files to epub, but you may find the layout is not as precise as you would like. However, if the pdf is all you have to start with; converting this file to epub format could be somewhere near your best option. AVS document converter can be downloaded here. Convert Article #1. Convert Article #2.
More converting tips can be found here.
Finally, when you make epub books or have them converted from a format like pdf, they may have some small errors. You can validate the code with w3c validator or Threepress and then you can fix the code errors with any text editor like Notepadd++.
More references:
Castro
Conversion extras
Kindle Format
Once you have a format like PDF or Epub, you can easily convert them to other formats with free open source software called Calibre. Calibre is available here. Alternatively, you can use other free or commercial PDF to Epub converters. See other converter.
Alternatively, you can use Amazon’s software called Kindle Gen to convert Epub files into a Kindle Book. Download Kindle Gen Here. For Indesign users, you can use a Kindle plugin to convert Indesign documents to Kindle format.“>
When you work with valuable files with Windows, yo should always keep fresh backups in case anything goes wrong on your hard drive. This will eventually save you from having to deal with a mess on a greater scale. But, if you do not, or have learned that lesson to late, you can always install software that can allow you to recover deleted or missing files. If you want to recover missing or lost Windows data files; you may want to try Stellar Phoenix Windows Data Recovery v5. This software can return you those lost files.
Almost everyone has wanted to bring back deleted or missing files at one time or another.
Converting PDF files to Word Documents can be very useful for seo and print. Since pdf files are often a finished product, converting them to Word docs can bring you back to Microsoft Word so that you can edit them again. If all you need is the text, it is very simple to copy and paste any text from a pdf file to a Word document. On the other hand, if you want to preserve the layout and include images, you will need to use a converter which costs around $30. The converter justs gives you an identical word doc file that resembles the original pdf file.
Conversion Tools
The conversion tool can be very vauable if all yoiu have is a pdf file and you want to convert it to a Word document.
One very useful conversion tool to convert the file from pdf to Word Doc is the software PDF To Word Converter for Doc.
Scraping web site data has many advantages to anyone who likes to sort through data to find a great bargain, a great job, or cheap auction item; just to mention a few. After you hear how your non-techie friends spend hours sorting through Ebay and Craigslist to find bargains, you may conclude how convenient it can be for your simple php application to scrape data and email you when it finds you the gold you are seeking.
Since many web pages will have different patterns of html to output specific categories and entries, you will need to build scrapers that can grab and analyze data at a very specific level. However, you can use one tool for scraping and alter the code of your tool when you need it to be specific for a certain page.
Website Scraping Example
Let’s assume you have already built and use a scraping tool to scrape an auction site for a specific line of digital cameras (which you plan to resell at your camera shop). Now, you want to use that tool to scrape a web page that has hotel deals in Los Angeles. Since you fly to LA frequently for business, it makes sense to get the best rate. Even sites that offer the best rates can be scraped to find absolute bargains amongst the discounted rates. Therefore, you go to the page that sorts your class of hotel and city. Once you have found the page where you get your deals, you simply alter your original scraping tool to get all those listings which have more than a 75% discount and price is less than $30. Since you run a cron job every ten minutes for your scraper, you receive the text message when the bargain lands on the page. You can go one step further and store the data in your database using its specific id and text you scrape. This way, you can do a check and the cron will only send a single text message if the item had not been stored in the database. Now, you could have a password protected web page that outputs all links to the website where you can buy the bargain.
In the end, you simply get notified about your bargains and you can open you custom page to link back to the mother website where the deal can be purchased.
Many mobile cellular phone companies allow you to send text messages to their phone numbers using email. In many cases, you simply put the phone number in the email message. For example, 5555555555@vmobile.ca would send a text message to the mobile phone number 5555555555 where a customer uses the Virgin Mobile service.
Canadian Email To Text
Other Canadian carriers where you can send text messages are;
As you can probably think, there are many instances where this could be deployed by a web developer. You could scrape websites and store data that can be used to alert you when a sweet deal comes along. Alternatively, you could mass email various employees which would keep them all updated with a generic text message. Or, you could send an email text messages to the desired recipient using the the php mail() function or SMTP.
In a nutshell, text messaging could be used for custom applications and any website where you want to make contact with the desired person(s). Since it is faster to access than email on a mobile phone and many people do not use data plans, it can be a more effective method of instant communication between the web server and the recipient.
Scraping web pages can be a very effective way to analyze data within the moment, or, over a period of time. Using regex (regular expressions) is one of the most effective ways to do this. Scraping web pages can help you analyze data in various ways. This complete scraping tutorial explains how to scrape one of my blogs by finding patterns from the source code. The basic code is setup, and it could be easily modified to scrape just about anything else.
Store Scrape
You can store data in a database and monitor prices of certain items. Then, if the price drops you can be alerted with an email telling you this. This can be considered ‘Smart Shopping’. With scraping, you can find deals that the website will not tell you about. For example, if you go to a website and browse a desired item, is there any way you can naturally be alerted when it sells for 1/2 price? Probably not. The store wants you back to shop, they don’t want to offer alerts only when items become discounted.
Auction Scrape
Another example where scraping can be valuable is to monitor auction items. You can monitor specific items at an auction site and send yourself an alert when the auction is in the final 10 minutes and the item is below a certain price. A simple cron job that runs every 15 minutes for your scraping page can do this. This method would let your scraper find the item you would want to buy at the price you want to pay when the auction is almost complete. Now, you only need to wait a few minutes to see if you can squeak in the last bid.
The key to scraping web sites like bookstores and auctions is to view the source code and find the patterns for the text you want to capture. Any site that outputs books about a certain subject or products will use a patterns to display the organized html code.
The code below was written to scrape links and page titles from one of my own blogs. I wanted to grab the title and author of each entry and display them together. This sounds easy. But, here was the process. I grabbed the web page using the file_get_contents() function. I could have used curl, but, I used the file_get_contents() function. Then, I made two regex arrays; one for the title and one for the author. Then, I created a foreach loop to parse each regex array. Although you may think that the array only contains one key, it actually contains two. The new arrays for each regex will be the entire string and the actual text you are seeking.
For now, just remember that we have 40 items in the $posts_array. We just want 2 items and to match them up. The good news is that we can easily get what we want with a little math and custom sorting.
$posts_array
The $posts_array is the main array we want to alter. We run the $posts_array through a foreach loop and discard the two items within the array we do not want.The code to skip the unwanted items is shown below. To see what we want to remove, you need to create conditions based on the html source code.
if(strpos($value,'display:none;')==true || strpos($value,'Posted by:') == true ){
continue;
}
Asides from filtering out what we don’t want, we create make a variable called $key2 which is the array key for the author which matches the $key for the article. Once the match is made, we have our value (the web page title) and the key matching author element. The code below shows how to match the $value for the page title with other element from the array using $posts_array[$key2].
if(array_key_exists($key2,$posts_array)){
// Since the link was a relative url, we use str_replace() function to make it an absolute url
$value = str_replace("blog.php","https://fullstackwebstudio.com/locations/coding-blog/bookmarks/blog.php",$value);
echo $value."-".$posts_array[$key2]."<br/>";
}else{
echo "This should not display!";
}
Entire Code
<?php
$data = file_get_contents('https://fullstackwebstudio.com/locations/coding-blog/bookmarks/blog.php');
## NOTE: each array will become a multidimensional array containing the two values. One value is the entire tag and elements between the tags and the other will be the precise match.
$regexs = array('/<div style="font-size:18px; margin-left:5px; display:none;">(.*)<\/div>/', '/<div style="margin-left:5px; margin-top:0px;">Posted by:(.*)<\/div>/'); //finds writer tags and gets content between tags WORKS
$count = 0;
foreach ($regexs as $regex) {
$count = $count + 1;
preg_match_all($regex,$data,$posts, PREG_SET_ORDER);
//print_r($posts);
//echo '<br/><br/>';
$cnt = count($posts);
$cnt_keys = count(array_keys($posts));
//echo "Yikes-".$cnt_keys."Yikes";
$loops = 0;
for($i=0; $i < $cnt; $i++){
foreach ($posts[$i] as $post) {
$loops = $loops + 1;
//view source code and customize
/*$post = str_replace('<p>','',$post);
$post = str_replace('</p>','',$post);
$post = str_replace('<p>','',$post);*/
//$post = str_replace('</a>','',$post);
$post = trim($post);
//echo $key."-".$post."<br/>";
$posts_array[] = $post;
}
}
}
//print_r($posts);
//print_r($posts_array);
//echo "Posts array count = ".count($posts_array)."<br/>";
//echo count($regexs);
echo "<br/><br/>";
foreach ($posts_array as $key => $value){
//echo "<br/>hello".$value."hello<br/>";
// Make conditions here. We want the values from the $posts_array array which do not contains 'display:none' or 'Posted By'; since they are the array elements we don't want. Viewing the source code can make this obvious. Therefore, we skip all items with display:none or with text 'Posted by:'.
if(strpos($value,'display:none;')==true || strpos($value,'Posted by:') == true ){
continue;
}
$items = count($posts_array) / 2;
// $key2 will give us the key which matches the author's name for the exact article title. Since there are 10 blog entries and 40 items in the $posts_array, we add 20 which matches the article title with the author's name.
$key2 = $key + (count($posts_array) / 2);
if($key <= $items){
if($value == ''){
echo "empty";}else{
if(array_key_exists($key2,$posts_array)){
// Since the link was a relative url, we use str_replace() function to make it an absolute url
$value = str_replace("blog.php","https://fullstackwebstudio.com/locations/coding-blog/bookmarks/blog.php",$value);
echo $value."-".$posts_array[$key2]."<br/>";
}else{
echo "This should not display!";
}
}
}
}
?>
The code below can be used to add custom code based on the browser type. Load the page within the popular browsers like Firefox, Chrome, Explorer, Safari and Opera and you will see specific output for each one. The codes can be handy if you need to make a minor css adjustment, redirect, etc.
<?php
## CHROME
if (strpos($_SERVER['HTTP_USER_AGENT'], 'Chrome') !== false){
echo "This output will only display if the browser is Google Chrome";
}
echo "<br/>";
if (strpos($_SERVER['HTTP_USER_AGENT'], 'Chrome') != false){
echo "This output will only display if the browser is Google Chrome";
}
echo "<br/>";
if (strpos($_SERVER['HTTP_USER_AGENT'], 'Chrome') == true){
echo "This output will only display if the browser is Google Chrome";
}
## FIREFOX
if (strpos($_SERVER['HTTP_USER_AGENT'], 'Firefox') !== false){
echo "This output will only display if the browser is Firefox";
}
echo "<br/>";
if (strpos($_SERVER['HTTP_USER_AGENT'], 'Firefox') != false){
echo "This output will only display if the browser is Firefox";
}
echo "<br/>";
if (strpos($_SERVER['HTTP_USER_AGENT'], 'Firefox') == true){
echo "This output will only display if the browser is Firefox";
}
## EXPLORER
if (strpos($_SERVER['HTTP_USER_AGENT'], 'MSIE') !== false){
echo "This output will only display if the browser is Explorer";
}
echo "<br/>";
if (strpos($_SERVER['HTTP_USER_AGENT'], 'MSIE') != false){
echo "This output will only display if the browser is Explorer";
}
echo "<br/>";
if (strpos($_SERVER['HTTP_USER_AGENT'], 'MSIE') == true){
echo "This output will only display if the browser is Explorer";
}
## SAFARI
if (strpos($_SERVER['HTTP_USER_AGENT'], 'Safari') !== false && strpos($_SERVER['HTTP_USER_AGENT'], 'Chrome') == false){
echo "This output will only display if the browser is Safari";
}
echo "<br/>";
if (strpos($_SERVER['HTTP_USER_AGENT'], 'Safari') != false && strpos($_SERVER['HTTP_USER_AGENT'], 'Chrome') == false){
echo "This output will only display if the browser is Safari";
}
echo "<br/>";
if (strpos($_SERVER['HTTP_USER_AGENT'], 'Safari') == true && strpos($_SERVER['HTTP_USER_AGENT'], 'Chrome') == false){
echo "This output will only display if the browser is Safari";
}
## OPERA
if (strpos($_SERVER['HTTP_USER_AGENT'], 'Opera') !== false){
echo "This output will only display if the browser is Opera";
}
?>
With PHP, you can customize your scripts by executing specific blocks of code based on the browser. The example below shows how to display code that will only output if the browser is Google Chrome.Try the code below in various browsers; including Google Chrome.
if (strpos($_SERVER['HTTP_USER_AGENT'], 'Chrome') !== false){
echo "This output will only display if the browser is Google Chrome";
}
if (strpos($_SERVER['HTTP_USER_AGENT'], 'Chrome') != false){
echo "This output will only display if the browser is Google Chrome";
}
if (strpos($_SERVER['HTTP_USER_AGENT'], 'Chrome') == true){
echo "This output will only display if the browser is Google Chrome";
}
A PHP $_GET variable actually exists when it has a distinct value or it is an empty string. For example, let’s assume you have the 3 following url strings; example.com?variable, example.com?variable= and example.com?variable=1. Of the three urls, only the third one contains characters for the valid $_GET variable.
The url with ?variable and ?variable= do set the variable; although no characters exist. The code example below would only output a value and the word ‘Hello’. Try writing the 3 variations in the url and you will see “Hello” output each time.
$valid = $_GET['variable'];
if(isset($_GET['variable'])){
echo "Hello "; echo $valid;
}
Comparing dates with PHP can be done by taking dates based on now, or using now. For example, let’s assume you want to compare all dates within the last week. The following code can be used to output all dates within 7 days. The start variable will be the date 7 days prior to the exact date right now. The $end variable is the exact date.
Getting Dates Within the Last Week
$start = date("Y-m-d", strtotime("-7 days"));
$end = date("Y-m-d");
$dates = array($start, $end, '2012-11-24', '2012-01-01');
echo $start;
echo "<br/>";
echo $end;
echo "<br/><br/><strong>Dates:</strong>";
foreach ($dates as $mydate) {
if ($mydate >= $start && $mydate <= $end) {
echo "<br/>" . $mydate;
}
}
Often, commercial PHP scripts can be purchased to fulfill required functionality on a website. The can be stand alone scripts which work by themselves, or they can be extensions, addons or plugins for other free or commercial PHP scripts / software such as Joomla, WordPress and Magento. Surfing the Internet and browsing PHP web directories will allow you find the desired script. Whether you want to run an auction, ecommerce store, social network, forum or live web feed; you will find many options to choose from. Since php is the most popular server side language on the Internet by quite soime margin, it is very likely that you will find what you need coded with this very popular programming language.
Advantages of Commercial PHP Scripts
Most of the time, commercial PHP scripts are well made, have many options, and have decent support. On the other hand, free php scripts tend not be as well built and have as good support as commercial scripts; although that is not true in all cases.
Stand Alone Commercial PHP Scripts
Some examples of stand alone PHP scripts of the commercial variety are; V-Bulletin, PHP Auction, Magento Enterprise Edition, Sugar CRM Professional and the list goes on. Stand alone PHP scripts are often coded well so that they run very fast, and / or they have a lot of power to run a sophisticated website.
Addon Commercial PHP Scripts
Some examples of commercial addon php scripts for Joomla are; Joomla SEO, sh404sef, various Virtuemart extensions and Jomsocial. Often, commercial extensions have a free version or a trial period while others do not. When the potential client experiments with the free version, they would get an idea if they would like the better, fully featured commercial version.
Free PHP Scripts
Often, simple php scripts like calculators, file uploaders and rss feed aggregators are freely available on a large scale since they are built rather quickly and are very unlikely to be sophisticated enough for a programmer to charge for them.
Free php scripts can be found at many online directories and websites. There are many simple FREE PHP scripts that have been built for specific purposes such as; files uploading, image gallries, rss feeds, cms’, mass emailing, web staistics and more. There are also many elaborate free php scripts such as WordPress, Drupal, Joomla, PHPBB, SMF Forum, OSCommerce and many more.
Custom Free PHP Scripts
Often, web developers build applications or scripts and release the code to the public. There are many reasons why a php web developer would want to release free php scripts. Some of thee reasons are; to interact and share with the public, receive lots of traffic, to give back for what they had received in the past, to help others and to advertise a commercial PHP script. Regardless of the reason why a php web programmer would give away the script, there are many good free scripts that work well right out of the box, there some that are a good start and need custom programming to make them function as desired and there are some that can waste a programmer’s time. In very little time, a good programmer should be able to spot a script that is not worth using and one that is not.
Commercial and Non Commercial PHP Scripts
Many free PHP scripts exist in directories that contain free and commercial php scripts. Free may seem like the best deal, but it may not the case. In some cases, there could be a free script that behaves very similar toi a commercial script. On the other hand, there are some commercial php scripts that do wonders for a few dollars. A $10 script could save you hours of work modifying a free php script to do the same thing. As you know more and more about programming and scipt usage, you will know when spending a few dollars is the best option for better and faster web development.
PHP Script Directories
Some of the popular php web directories to find lots of scripts are:
1) hotscripts.com
2) scripts.com
3) scriptdungeon.com
4) php.resourceindex.com
5) dbscripts.net
Session hijacking is a term that is used to describe a method for obtaining a user’s PHPSESSID. When a user logs into a PHP application, the browser will store a hash string value like’525cc0036c99f013bd17b7b91233fae4′. The same hash string matches the stored session on the server. There are several ways the user can get your sessions; such as sniffing it out on a shared network with software like ‘Wireshark’. Another method is to just get the id from a public computer and manually recreate it in another browser. The whole idea here is that if the browser PHPSESSID and the server session id will match, any user can make the website believe that you are authenticated.
As a programmer, there are several safeguards you could use to your scripts to ensure that the PHPSESSID in your browser is not so usable elswhere. You can set a session variable as your ipaddress with $_SERVER[‘REMOTE_ADDR’]. For example, $_SESSION[ip_address’] = $_SERVER[‘REMOTE_ADDR’]. Now, you can run the following code to make sure the session ip is the same as the computer ip address.
if($_SERVER[‘REMOTE_ADDR’] != $_SESSION[ip_address'] ){ die(); }
Regenerate Session ID
Another method to deter a session hijack is to use the function session_regenerate_id();. This function gives the user a new session id and makes the old session id unuseful. This function could be used in any page or script where you want to make that change.
SSL
SSL can be implemented to a website, or cpanel account to prevent session hijacking. Adding an SSL certificate can be as cheap as $35 / year.
When working with php applications, you may often use or will often find the include() statement. The include allows you to add another file into the code. It can be seen like adding new lines in the same location; except that the lines exist in a different file. When you include a file, the path of any links exist as though they are in the original file. For example, if you include a file in a folder that is up one directory, you would write the code include(“foldername/file.php”).
Now, if the foldername folder contained a folder called images, you would need to write the links in the file.php file like foldername/images/myimage.jpg. However, if the image files were located in the same folder as the original file, you would make links like myimage.jpg since the path to images references from the original file.
You can always use relative or absolute paths when you link to images.
Relative Path (no forward slash at the beginning) "myimage.jpg" or "images/myimage.jpg" Absolute Path <a href="/images/myimage.jpg"> or <a href ="/foldername/images/myimage.jpg">
A Joomla MP3 player typically comes in the extension form of a module. Essentially, a Joomla MP3 module can allow you to have your own Jukebox on your website. Although they all do the same thing, the setup can be quite different. Some will play songs from an xml playlist while some will automatically play songs that exist in the ‘song’ folder. Many Joomla mp3 players use Flash to pull mp3 songs from an an xml playlist or, the mp3 player uses parameters to retrieve songs from a specific folder. Many of the Joomla mp3 players can be customized to provide a custom color scheme and specific dimensions to achieve the desired outcome in various browsers.
A Joomla mp3 player and other Joomla modules and extensions can be found here.
Download Free Joomla MP3 Player. | See how it works
The MP3 player which is simple to use is sampled below. Its name is BOMP3. All you have to do is install the module, move mp3 files into the tunes folder, and adjust the parameters. The images below show you how the module looks and it shows you the parameters you can adjust. You can change colors, change songlists, allow the player to shuffle, play automatically, adjust volume, set custom widths and heights, hide the player and much more.
In addition to the above, you can do many things with this player. For one, you could upload 30 songs and let visitors play them every night as a radio show. Alternatively, you can add hundreds of copyrighted songs into the tunes folder and play them in a shuffled order. For those Grateful Dead Fans and their live music, they can freely be djs and not bear copyright issues because the Dead, will always be the Dead. For mobile users; you could deploy the module to play as a Iphone app or a mobile web page. This way, you take the music to go.

Adding an iframe to a Joomla 2.5 module can allow you place code that with made with an html or php file into the existing module. For example, you may want to recycle a php form that was made with a different php / mySQL application and use it in a Joomla page.
To add an iframe to a custom module with Joomla 2.5,
1) Select ‘Module manager’.
2) Select ‘New’.
3) Select ‘Custom HTML’.
4) Add iframe code
5) Click ‘Save’.
To allow iframes with Tiny MCE editor,
1) Select ‘Plugin Manager’
2) Select Editor – Tiny MCE
3) Under ‘Basic Options’ look for ‘Prohibited Elements’.
4) Remove iframe from the list
5) Select ‘Save’ or ‘Save and Close’.
When you work with numbers, you could end up with zero(s) at the beginning of a string. If you want to remove the zeros at the beginning, you can do it easily with the ltrim() function.
$variable = ltrim(var,'0');
Setting up an HTML 5 website is very simple. The typical page will have doctype declaration at the top of the page. For html 5, the doctype is ‘<!DOCTYPE HTML>’. After declaration is the opening html tag which is displayed as ‘<html>’.
After the opening html tag are the <head></head> tags. Within the head tags you can add your links to javascripts and css files.
After the head tags comes the opening body tag which is displayed as ‘<body’. After the body tag is where the typical coder goes to work. The stuff you see in the browser comes from this section. Often, tags like <div>, <p> <form> and plain old text is found here. You can select ‘View Source’ within your browser to compare the code in the page to the code you see in the browser.
The body finishes with a closing body tag which is shown as ‘</body>’.
Following the closing body tag is the closing html tag. The closing html tag looks like ‘</html>’.
That is all there is to a basic html 5 web page.
<!DOCTYPE HTML> <html> <head> <!-- all links to scripts; such as: <link rel="stylesheet" type="text/css" href="theme.css"> --> </head> <body> <!-- all content goes here; such as <div></div>, <p></p>,<ul></ul>,<form></form> and plain old text --> </body> </html>
Within the past couple of years, ‘responsive’ has been quite a buzzword around web designers and developers. Responsive web design is modern styling which presents web pages to custom fit any browser and device. It is the new method to create one website which looks great on all devices. Previous to responsive web designs, fluid templating and mobile web designs had been used to create websites based on screen widths. The concept is so good that it is very unlikely that responsive web design is a fad; but rather a new standard and methodology that should stand the test of time. However, unlike other methods; html and css coding uses new coding properties.
The easiest method to adopt to using responsive methods is to buy good, stylish responsive templates and alter them as desired. For as little as $10, you can buy templates with images and various pages of html / css styling. Furthermore, html / css templates are often very well coded and commented. Unless you have an excellent artistic talent; chances are that you cannot style like the pros who are very skilled and do it every day. Also, using pre-existing templates will allow you to complete projects and troubleshoot coding at the same time and possibly have a forum which explains how the template can be modified.
Here is an example of a responsive template used within a custom cms. View Webpage.
Open the example webpage listed above and slowly narrow the browser window. Then, view the web page on a mobile device such as the iphone. As you can see, the responsive templates adjusts top fit any window, some images shrink as the window becomes smaller, and some content just gets left out as the screen gets smaller. With this example, this responsive template was used with Sitemakin CMS. After a simple upload of the images and css; and a copy and paste of the index.html code, the template was ready for modification and the website was viewable on the web.
More advanced $_GET Variable Example
File: ABOOK/BASIC_SYNTAX/get3.php
This example shows another method for retrieving $_GET variables when a page is posted. Open this page up in a browser and click the link ‘Get Two Variables’. Now, the url string contains two variables that can be retrieved with $_GET because the url went from get3.php to get3.php?variable=5&secondvariable=6. Now, click the submit button. When the submit button is clicked, two lines of text are printed out within the condition if($_POST[‘submit’] == true) and one line is displayed from the condition if($_GET[‘secondvariable’] == true).
Note:
Unlike, the previous example, the page posts to a url with the code action=”<?php echo $_SERVER[‘PHP_SELF’].”?”.$_SERVER[‘QUERY_STRING’];?>”. This is how syntax could be written for posting a page to itself when it has a query string in the url like ‘?variable=5&secondvariable=6’. Otherwise, you could have written ‘action=”get3.php?variable=5&secondvariable=6″. However, if the $_GET variables are dynamic and can change, a static url does not do much good. Therefore, writing action=”<?php echo $_SERVER[‘PHP_SELF’].”?”.$_SERVER[‘QUERY_STRING’];?>” is the best method for self posting to urls with $_GET variables within the url.
<?php
foreach($_GET as $key => $value){
echo $key."-".$value."<br/>";
}
if($_POST['submit'] == true){
echo "Here is the value of the get variable: ".$_GET['variable']."<br/>";
echo "Here is the value of the post variable named myname: ".$_POST['myname']."<br/>";
}
if($_GET['secondvariable'] == true){
echo "Here is the value of the second get variable: ".$_GET['secondvariable']."<br/>";
}
?>
<br/>
<a href="get3.php?variable=5&secondvariable=6">Get Two Variables</a><br/><br/>
<form method ="post" action="<?php echo $_SERVER['PHP_SELF']."?".$_SERVER['QUERY_STRING'];?>" >
<input type="text" name = "myname" value = "Johnny" />
<input type="hidden" name = "req" value = "myrequest" />
<input type = "submit" name ="submit" value = "submit" />
</form>
You can finds all sorts of opinions on the web about Content management Systems vs Custom PHP Applications. On top of that, you can find many opinions that lead to one side or another. The million dollar question is: ‘Which one is better’. Now, we must define better. Better at doing what? Once the secondary question ‘Better at doing what?’ can be answered, you can break down the discussion. From a programmer’s perspective, I would lean to a custom application; unless the content management system could assemble the project together quickly. However, if quality, future customization and speed of web delivery are issues, open source content management systems would not even be a consideration.
Programmer’s Skill Level
Regardless of what option is used is limited by the programmer’s skill level. PHP / mySQL programmers who can assemble relational databases, hand code php / mySQL and can work with sessions without any hangups are a different sort than those who can install plugins and rely on built in programming. If you look at most large websites, with Joomla.org, wordpress.org, drupal.org being some of the exceptions, you do not see too many custom applications that use WordPress, Joomla or Drupal. From a custom perspective, they are too bulky and not flexible.
Custom Content Management System?
This tale is about a programmer who built a custom cms. The programmer had used WordPress, Joomla and Drupal on multiple occasions. The content management systems seemed much easier to edit and deploy than static html / css web pages. They also allow you to make dynamic websites very easily. But, they had strict rules to customization. Therefore, the programmer spent years studying and building custom websites with PHP / mySQL. After years of coding and becoming a certified php / mySQL programmer; the custom path seemed wide open. Of course, this was very hard work and patience to arrive at this level. But, it allowed to put things in perspective. The programmer had built his own cms and developed his coding style to be very productive and automatic. Asides from looking at php.net once in a while to find a new function, the rest of the coding and troubleshooting became automatic. The new cms has allowed the building of web pages to be even quicker ad faster than open source cms’ like Drupal, WordPress and Joomla. In a nutshell, customization is a higher level and can lead to better results for the short and long term. Also, custom code is reusable and the programmer’s library grows and grows; thus allowing new applications to be built much faster. Performance wise? I have not seen an open source cms perform as fast as streamlined php code and high performance mySQL queries. Then, if you throw in the templating the scale crashes to the ground. Asides from performance, templating and customization, custom PHP applications should be more secure. The code can be kept securely on a VPS or dedicated server and the public would not have access to the php code. With open source cms, security issues are always discovered and strange mySQL injections or XSS scripting can wreak havoc on a website. Secure php / mySQL programming can start with a programmer keeping the code closed source.
If you can hand code PHP / mySQL, html and CSS and create and modify database tables very quickly, there is a great chance you would not ask the million dollar question: “Which one is better”.
Get variables are variables which are passed into a url. The url will have a name and a value. With this simple example, the link is get.php?variable=5. The key is variable and the value is 5. In simplicity, $_GET[‘variable’] = 5.
<?php
foreach($_GET as $key => $value){
echo $key."-".$value."<br/>";
}
if($_GET['variable'] == '5'){
echo "Here is the value of the get variable: ".$_GET['variable']."<br/>";
}
?>
<br/>
<a href="get.php?variable=5">Get Variable</a>
This example shows more two get variables in a url. The second variable is separated with the ‘&’ sign. If a third variable is added, it would be separated with a ‘&’ sign too.
<?php
foreach($_GET as $key => $value){
echo $key."-".$value."<br/>";
}
if($_GET['variable'] == '5'){
echo "Here is the value of the get variable: ".$_GET['variable']."<br/>";
}
if($_GET['secondvariable'] == true){
echo "Here is the value of the second get variable: ".$_GET['secondvariable']."<br/>";
}
?>
<br/>
<a href="get2.php?variable=5&secondvariable=6">Get Two Variables</a>
Post variables are those which are created when a form is submitted. Typically, they have a name and a value. When the form is submitted, the names of each $_POST name is stored into an array or $_POST variables. The example demonstrates how the the three post variables $_POST[‘submit’], $_POST[‘myname’] and $_POST[‘req’] are stored and output.
<?php
foreach($_POST as $key => $value){
echo $key."-".$value."<br/>";
}
echo "<hr>";
if($_POST['req'] == 'myrequest'){
echo "Here is the value of the post variable: ".$_POST['req']."<br/>";
}
if($_POST['myname'] == true){
echo "Here is the value of the post variable: ".$_POST['myname']."<br/>";
}
?>
<br/>
<form method ="post" action="<?php echo $_SERVER['PHP_SELF'];?> " >
<input type="text" name = "myname" value = "Johnny" />
<input type="hidden" name = "req" value = "myrequest" />
<input type = "submit" name ="submit" value = "submit" />
</form>
The $_REQUEST array stores all $_POST, $_GET and $_COOKIE variables into an array. Therefore, you can use $_REQUEST to output variables and validate statements. Since you can use $_REQUEST for $_GET and $_POST variables, it can cause issues if $_GET variables and $_POST variables have the same name, but different values.
The code below shows how $REQUEST can be used to check and output $_GET and $_POST values.
<?php
foreach($_REQUEST as $key => $value){
echo $key."-".$value."<br/>";
}
if($_REQUEST['variable'] == '5'){
echo "Here is the value of the get variable<br/>";
}else if($_REQUEST['req'] == 'myrequest'){
echo "Here is the value of the post variable<br/>";
}
?>
<br/>
<a href="request.php?variable=5">Get Variable</a>
<form method ="post" action="<?php echo $_SERVER['PHP_SELF'];?> " >
<input type="hidden" name = "req" value = "myrequest" />
<input type = "submit" value = "submit" />
</form>
Adding your image to web page search results can really help your page stand out from the rest. The search results with your images will look similar to a video search result, except you will have a small 50px x 50px thumbnail image next to your article instead of a youtube video thumbnail. If visitors have liked your content, they would more than likely select your result from the results since they would recognize your image.
The sequence below explains how to add your image to Google Search results. All you need is a gmail account to login to Google profiles. Then, you can modify your settings and be ready to go.
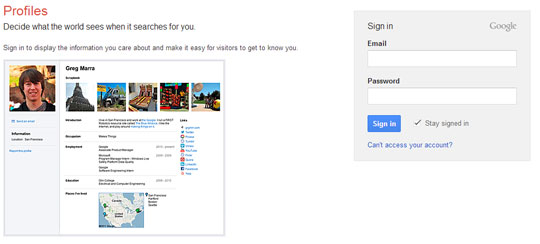
5) Fill in sex and birthdate, if necessary and upgrade.
6) Select continue and Finish.
7) Go to Google +
8) Click on your image.
9) Select ‘Edit Profile’.
10) Select ‘Contributor to’
11) Select ‘Add custom link’.
12) Add a label and a url and save. Add various urls if you want.
13) SElect ‘Done Editing’.
14) Get your Google+ id from the url.
ie) https://plus.google.com/000036140007833857990000
15) Add the following codes to your web pages or blog posts.
<a href=”https://profiles.google.com/google+_id_goes_here” rel=”me”>Google+ Profile</a>
<a href=”http://www.example.com/myblog/” rel=”author”>About Author</a>
16) Wait for Google to update your web pages with the new image(s).
My Google+ Profile | Kent Elchuk
When you work with Joomla modules, you can use installed modules or custom modules. Custom modules use the default Joomla editor and can be used to add custom code like div tags, text, images and css. However, you can use your custom modules to display an iframe from another folder, or even another website. For example, you may have a form that you built on a different website that you want to use in the Joomla module.
The code below shows how simple it is to add an iframe to a custom Joomla module. The iframe needed custom styling to remove the scrollbars and to fit properly inside the custom module. Without styling the iframe, it would have had vertcial and horizontal scrollbars which makes it lack style. With the iframe below, it was given a custom height and the border property was set to none.
<iframe style="height:420px; border:none;" src="https://www.example.com/myiframe.php"></iframe>
The following code can be used to generate separate content for 3 levels of users. One level is the public, another level is regular logged in users and the final level is the administrator. To make the login and access secure, the session variables from the login page must run through a select statement to check if they match the rows in the database table. When they do match, the if, else if and else statement displays the proper content. Since session variavbles are stored on the server, the only way to see those session variables is to have access to the folder and files which stores the session variables, or write code into a php script which displays the session variables.
session_start();
$customerId = $_SESSION['memberId'];
$customerLogin = $_SESSION['memberLogin'];
$customerPassword = $_SESSION['memberPassword'];
$command_ogin = "SELECT login, password FROM logins WHERE customer_id ='$customerId'";
$result_login = mysqli_query($db, $command_login);
$row_login = mysqli_fetch_assoc($result_login);
$mylogin = $row_login['login'];
$mypassword = $row_login['password'];
if (!(is_numeric($customerId)) || $customerLogin!=$mylogin || $customerPassword!=$mypassword ) {
// general public
}else if(is_numeric($customerId) && $customerId!=1 && $customerLogin==$mylogin && $customerPassword==$mypassword ){
// other members other than admin stuff
}else{
// distinct admin member stuff
}
Notes:
Although the method above allows security from others logging in with false credentials elsewhere, validating passwords that are sessions can be risky in some instances. For example, the following code could be added to a file (after session_start()) to display all session variables and the session id.
session_start();
$session_id = session_id();
echo $session_id;
// get stored session variables $_SESSION
foreach($_SESSION as $key => $value)
{
echo $key . " = " . $value . "
";
}
Insecure Sessions With PHP Sample
Imagine the previous code example without the check for the logged in user’s password. If this is the case, the code will only check if session variables exist and the actual values remain unchecked. For all simplicity, let’s assume the code is used with a public php script called ‘My Friendly Social Network’. With the code below, you could login to the page as an admin that is hosted on a server, then, open the same page of the script that is located in a different folder on the different server. The new page would only check for the existence of the session variables. It would not check for username or password. Now that the new page thinks you are authenticated, it leaves security at the highest risk. To make things worse, the admin of one site could easily become the admin at the other site.
if (!(is_numeric($customerId)) ) {
// general public
}else if(is_numeric($customerId) && $customerId!=1 ){
// other members other than admin stuff
}else{
// distinct admin member stuff
}
The point to remember is that session variables can be created and used in any php application. Therefore, validating session variables with database table rows for specific session variables will keep the application more secure for all members.
Note:
If the php application was custom built, not open source and not a public script, it is much more secure. You see all sorts of open source code with security risks that programmers have discovered. If nobody has access to the insecure php script above which only checks for a session variable, there is a great chance that nobody would ever know the session variables other than the administrator; especially if the session variable is quite unique. The session variable ‘z_app_cred’ would more than likely be much more secure than ‘id’; should someone be crazy enough to try and guess.
Even though the application above is not as secure as it should be, it probably would not have issues since the session variables are secretive; especially if each user must be unique. Since the actual session id for each member is different, the can only get their session id through logging in. Nevertheless, checking session variables makes the application more secure.
You can always save session variables to desired folder using the session_save_path() function. Details on saving sessions to a desired folder can be found here.
However, the php coder can work around the annoying message from the browser by adding a little code into the script. The example shows a couple of lines of code that can be added above session_start() in order to be able to go back and forth to the page when you post without any hangups.The ‘private_no_expire’ mode means that the client will not receive the expired header in the first place.
header('Cache-Control: no cache'); //no cache session_cache_limiter('private_no_expire'); // works //session_cache_limiter('public'); // works too session_start();
The php substr_count() function can be used to count occurrences of string within a string of data. For example, examine the string “I like to eat pizza at the eatery.”. There are two occurrences of the word eat. Therefore, the substr_count function could be used to count the number of times eat exists within the string.
$message = "I like to eat pizza at the eatery"; if(substr_count($message, 'eat') > 1){ echo "It exists more than once."; }
The ob_start()function turns output buffering on. ob_start is often used with either the ob_end_flush() function or ob_end_clean() function. Basically, ob_start() will not display any printed text after the function is called, unless you use the ob_end_flush() function.
Alternatively, if you use the ob_end_clean() function to close a block after using ob_start() function, the variables are available, but, the printed(echoed) text will not display.
The coding sample below demonstrates how ob_start(), ob_end_flush() and ob_end_clean() functions operate.
ob_start();
echo("Hello First!");
$output = ob_get_contents();
ob_end_clean(); // data outputs when
ob_start();
echo "Hello Second!<br/>";
ob_end_flush(); // data outputs with this function
ob_start();
echo "Hello Third!\n";
$var = "<br/>help";
ob_end_clean();
ob_start();
echo "Hello Fourth!\n";
//ob_end_clean();
echo $var."<br/>";
echo $output;
echo '<br/><br/>'.ob_get_contents(); // outputs the variables but does not echo
MYSQL password generators can be used to create mySQL password strings with the password() function. Alternatively, you can always open mysql console or phpMyAdmin and create one on the fly.
If you want to generate a mysql password click here.
Generate Password Using password() Function With mySQL or PHPMYADMIN
SELECT password('password_string');
Sha1 password generators can be used to create SHA1 password strings. Alternatively, you can always open mysql console or phpMyAdmin and create one on the fly.
If you want to generate a sha1 password click here.
Generate SHA1 Password with mySQL or PHPMYADMIN
SELECT sha1('password_string');
MD5 password generators can be used to create MD5 password strings. Alternatively, you can always open mysql console or phpMyAdmin and create one on the fly.
If you want to generate a md5 password click here.
Generate MD5 Password with mySQL or PHPMYADMIN
SELECT md5('password_string');
To save sessions with PHP, the programmer has the option to store them in the default folder specified in the php.ini file, or to create a directory and store them there. Each method to save a session has its pros and cons. Meanwhile, the browser will store the PHPSESSID cookie and the php session variables will be stored where they are specified in the php.ini file; unless you make a custom path within your php file.
By default, PHP uses a file on the server called PHP.ini which is configured to automatically store sessions for a specific time period that will correspond to the cookie stored in the browser. The cookie in the browser called PHPSESSID matches the cookie to the stored sessions so the page knows where to find them on the server.
On many Linux web hosting applications, the default session expiry takes place after 24 minutes. The number can easily be changed by editing the php.ini file and changing ‘session.gc_maxlifetime’. It starts with 1440 seconds which is 24 minutes. Changing it to 3600 would make the default session lifetime 1 hour. What does session expiry mean? This is the time for which the browser and user do not use a given web page. When a webpage is not used, the ‘garbage time’ is counted. Therefore, if your session expiry is 24 minutes and you leave you house for 23 minutes and come back to the web page, it operates as normal.
When you use the webpage, the session normally starts over. and time to run out begins when page page is not in usage. On the other hand, if you returned in 25 minutes and started to operate the web page, your session would have expired and you need to login again.
Custom Save Sessions
Somewhere along your programming, you may reach a point where you need to create sessions that override the default configuration in the php.ini file.
You could be using a shared host and have no control to change the php.ini file, or, you only want a specific application to have custom session expiry. PHP allows you the flexibility to alter the session time and to save sessions in a specific folder. The code below demonstrates how to set the session lifetime to 1 hour and to store sessions in a folder.
Here is how it goes. The ini_set() function sets the session lifetime to 1 hour. The session_save_path() function states where the session files will be stored. You can uncomment the $directory variable and echo $directory if you want to see the path for the current file.
The ini_set(‘session.gc_probability’, 1) function and parameters keeps the garbage collection enabled. Then, the old standby ‘session_start()’ begins the session. Then, there are declared variables $session_begin and $session_end which are session variables that are created after the user logs in.
When the user logs in with the password ‘test’, 3 session variables are created; $_SESSION[‘mysession’], $_SESSION[‘begin’] and $_SESSION[‘end’]. $_SESSION[‘begin’] and $_SESSION[‘end’] are UNIX timestamps. The $_SESSION[‘end’] is 1 hour later than $_SESSION[‘begin’]; thus the (60 * 60) added to it.
Finally, the session variables get destroyed when they have a value greater than the current time. The time() function gets the current time.The if statement ‘if($now > $_SESSION[‘end’])’ will destroy the session when that time comes.
<?php
ini_set('session.gc_maxlifetime', 60*60); //1 hour
//echo ini_get("session.gc_maxlifetime");
ini_get("session.gc_maxlifetime");
//$directory = dirname(__FILE__); // this is /home/user/public_html/myfolder
//echo $directory;
//session_save_path('/home/user/public_html/myfolder/store_sessions');
session_save_path('C:\wamp\www\WEB_APPLICATION\SESSIONS\store_sessions');
ini_set('session.gc_probability', 1);
session_start();
$session_begin = $_SESSION['begin'];
$session_end = $_SESSION['end'];
if($_POST['session'] == "test") {
$_SESSION['mysession'] = $_POST['session'];
if(!$session_begin || !$session_end){
$_SESSION['begin'] = time(); // taking now logged in time
$_SESSION['end'] = $_SESSION['begin'] + (60 * 60) ; // ending a session in 1 hour
}
$now = time();
echo $_SESSION['begin']."-".$_SESSION['end']."-".$now;
if($now > $_SESSION['end']){
session_destroy();
session_unset();
echo "Session ended";
}
}
$now = time();
echo "<br/>".$_SESSION['begin']."-".$_SESSION['end']."-".$now;
if($now > $_SESSION['end']){
session_destroy();
session_unset();
echo "Session ended";
}else{echo "<br/>Session still in progress";}
?>
<form method ="post"action="<?php echo $_SERVER['PHP_SELF'] ;?>">
<input type = "text" name="session" value ="" />
<input type = "submit" name="submit" value ="Submit" />
</form>
The new session file is stores in the stored_sessions folder with a name like sess_i08fdukpmpu3dbuv9smncr60i3. You can view the file with Notepad.
Contents of session file:
mysession|s:4:”test”;begin|i:1351339877;end|i:1351343477;
This exercise will show how to output all rows of table data and do a mass update at the same time using a foreach loop.The following can be used to update multiple rows
using a foreach loop. Here is how it works. All form inputs make arrays for each value. Thus, ids, firstnames, emails, etc become separate arrays when the submit button is clicked. However, what we want to do is match all keys from each array to make new arrays based on keys. For example, the first key in the id array is the id for the first element in the firstnames array. The array of ids is is run through a foreach loop. We take the key and id. Then, the $members_info array is created which uses each member’s id and its matching key to match the keys for each other array. Here is a simple explanation. Since the first member in the array will have a key for its id to be [0], we grab each other value from the other arrays where the key is [0]. The members_info array does this for each and every entry.
After all the members_info arrays are built, each member is separated into a string called $member_info. Then, we simply select this member’s id and update the table for each and every member. If new output is inserted, it gets updated. If no info changes, the data remains intact.
<?php
include ('connect.inc');
$db=public_db_connect();
if(!empty($_POST['submit'])) {
### Here we get post variables for each person
$ids = $_POST['id'];
$firstname = $_POST['firstname'];
$lastname = $_POST['lastname'];
$email = $_POST['email'];
$height = $_POST['height'];
$age = $_POST['age'];
$weight = $_POST['weight'];
$mydate = date("Y-m-d");
foreach ($ids as $key => $id){
//echo $key."-".$id."<br/>";
$members_info[] = $id.",".$firstname[$key].",".$lastname[$key].",".$email[$key].",".$height[$key].",".$age[$key].",".$weight[$key].",".$mydate;
if(!in_array($key, $firstname)){
continue;
}
}
//print_r($members_info);
#The loop below takes in account of all the rows in the table. Then an update is applied to each row; whether it is changed or not. If the row is unchanged, it updates based on the original values.
foreach ($members_info as $member_info) {
$all = explode(",",$member_info);
$id = $all[0];
$firstname = $all[1];
$lastname = $all[2];
$email = $all[3];
$height = $all[4];
$age = $all[5];
$weight = $all[6];
$command = "SELECT * FROM table_sort WHERE id='$id' ";
$result = mysqli_query($db, $command);
if (mysqli_num_rows($result) > 0) {
$command = "UPDATE table_sort SET firstname='$firstname', lastname='".addslashes($lastname)."', email='$email', height='$height', age='$age', weight='$weight' WHERE id='$id' ";
$result = mysqli_query($db, $command);
} else {
echo "There are no records!";
}
}
print_r($all_post_variables_array);
?>
<div>Directory has been updated!</div>
<?php
}
?>
<form method="post" action="<?php echo $_SERVER['PHP_SELF']; ?>" name="directory">
<div><p><input type="submit" name="submit" value="Update" /></p></div>
<div style="clear:both;"></div>
<?php
?>
<div>
<table style="width:100%;">
<tr><th>id</th><th>Last Name</th><th>First Name</th><th>Email</th><th>Height</th><th>Age</th><th>Weight</th><th>Date</th>
</tr>
<?php
################ Here we create the list of all entries from the database table and the form names use [] to create arrays of post variables for each entry.
$command = "SELECT * FROM table_sort WHERE id >0 ORDER BY id ASC ";
$result = mysqli_query($db, $command);
while ($row = mysqli_fetch_assoc($result)) {
//Remove a person if you want
//if($row['lastname'] == 'Zhang') { continue; }
$myid = $row['id'];
$first = $row['firstname'];
$last = stripslashes($row['lastname']);
$email_address = $row['email'];
$height = $row['height'];
$age = $row['age'];
$weight = $row['weight'];
$mydate = $row['date'];
echo '<tr>';
echo '<input type="hidden" name="id[]" value="'.$myid.'" />';
echo '<td>'.$myid.'</td>';
echo '<td><input type="text" name="lastname[]" style="width: 95%; padding: 3px; margin: 3px;" value="'.$last.'"/></td>';
echo '<td><input type="text" name="firstname[]" style="width: 95%; padding: 3px; margin: 3px;" value="'.$first.'"/></td>';
echo '<td><input type="text" name="email[]" style="width: 95%; padding: 3px; margin: 3px;" value="'.$email_address.'"/></td>';
echo '<td><input type="text" name="height[]" style="width: 95%; padding: 3px; margin: 3px;" value="'.$height.'"/></td>';
echo '<td><input type="text" name="age[]" style="width: 95%; padding: 3px; margin: 3px;" value="'.$age.'"/></td>';
echo '<td><input type="text" name="weight[]" style="width: 95%; padding: 3px; margin: 3px;" value="'.$weight.'"/></td>';
echo '<td><input type="text" name="date[]" style="width: 95%; padding: 3px; margin: 3px;" value="'.$mydate.'"/></td>';
echo '</tr>';
}
?>
</table>
</div>
<p><input type="submit" name="submit" value="Update" /></p>
</form>
The purpose of this tutorial is to output rows of data into input fields. Then, you can update any number of rows at the same time.
The following can be used to update multiple rows using a for loop. Here is how it works. All form inputs make arrays for each value. Thus, ids, firstnames, emails, etc become separate arrays when the submit button is clicked. To organize each array and singular member data, the id array is counted. Then, the incrementing i++ value is added to each member to make them distinct. Since each member will have all separate values from the for loop, mass updates can take place for each and every member.
<?php
include ('connect.inc');
$db=public_db_connect();
if(!empty($_POST['submit'])) {
### Here we get post variables for each person
$id = $_POST['id'];
$firstname = $_POST['firstname'];
$lastname = $_POST['lastname'];
$email = $_POST['email'];
$height = $_POST['height'];
$age = $_POST['age'];
$weight = $_POST['weight'];
$mydate = date("Y-m-d");
// count the array of ids
$count = count($id);
// shows array of ids when submitted
print_r($id);
#The loop below takes in account of all the rows in the table. Then an update is applied to each row; whether it is changed or not. If the row is unchanged, it updates based on the original values.
$i=0;
for ($i=0; $i < $count; $i++) {
// append the value of $i to each member
$id_from_loop = mysqli_real_escape_string($db, $id[$i]);
$lastname_from_loop = mysqli_real_escape_string($db, $lastname[$i]);
$firstname_from_loop = mysqli_real_escape_string($db, $firstname[$i]);
$email_from_loop = mysqli_real_escape_string($db, $email[$i]);
$height_from_loop = mysqli_real_escape_string($db, $height[$i]);
$age_from_loop = mysqli_real_escape_string($db, $age[$i]);
$weight_from_loop = mysqli_real_escape_string($db, $weight[$i]);
$command = "SELECT * FROM table_sort WHERE id='$id_from_loop' ";
$result = mysqli_query($db, $command);
if (mysqli_num_rows($result) > 0) {
$command = "UPDATE table_sort SET firstname='$firstname_from_loop', lastname='$lastname_from_loop', email='$email_from_loop', height='$height_from_loop', age='$age_from_loop', weight='$weight_from_loop' WHERE id='$id_from_loop' ";
$result = mysqli_query($db, $command);
} else {
echo "There are no records!";
}
}
?>
<div>Directory has been updated!</div>
<?php
}
?>
<form method="post" action="<?php echo $_SERVER['PHP_SELF']; ?>" name="directory">
<div><p><input type="submit" name="submit" value="Update" /></p></div>
<div style="clear:both;"></div>
<?php
?>
<div>
<table style="width:100%;">
<tr><th>id</th><th>Last Name</th><th>First Name</th><th>Email</th><th>Height</th><th>Age</th><th>Weight</th><th>Date</th>
</tr>
<?php
################ Here we create the list of all entries from the database table and the form names use [] to create arrays of post variables for each entry.
$command = "SELECT * FROM table_sort ORDER BY id ASC ";
$result = mysqli_query($db, $command);
while ($row = mysqli_fetch_assoc($result)) {
//Remove a person if you want
//if($row['lastname'] == 'Zhang') { continue; }
$myid = $row['id'];
$first = $row['firstname'];
$last = $row['lastname'];
$email_address = $row['email'];
$height = $row['height'];
$age = $row['age'];
$weight = $row['weight'];
$mydate = $row['date'];
echo '<tr>';
echo '<input type="hidden" name="id[]" value="'.$myid.'" />';
echo '<td>'.$myid.'</td>';
echo '<td><input type="text" name="lastname[]" style="width: 95%; padding: 3px; margin: 3px;" value="'.$last.'"/></td>';
echo '<td><input type="text" name="firstname[]" style="width: 95%; padding: 3px; margin: 3px;" value="'.$first.'"/></td>';
echo '<td><input type="text" name="email[]" style="width: 95%; padding: 3px; margin: 3px;" value="'.$email_address.'"/></td>';
echo '<td><input type="text" name="height[]" style="width: 95%; padding: 3px; margin: 3px;" value="'.$height.'"/></td>';
echo '<td><input type="text" name="age[]" style="width: 95%; padding: 3px; margin: 3px;" value="'.$age.'"/></td>';
echo '<td><input type="text" name="weight[]" style="width: 95%; padding: 3px; margin: 3px;" value="'.$weight.'"/></td>';
echo '<td><input type="text" name="date[]" style="width: 95%; padding: 3px; margin: 3px;" value="'.$mydate.'"/></td>';
echo '</tr>';
}
?>
</table>
</div>
<p><input type="submit" name="submit" value="Update" /></p>
</form>
This example uses a Jquery plugin called DataTables to paginate results from PHP or mySQL. For example, the results could be many items from an rss feed or rows from a mySQL query. The plugin can be dowloaded at http://datatables.net. This plugin makes it very easy to automatically sort ant amount of data into a clean, paginated, stylish table.
<?php
//session_start();
include('connect.inc');
$db= public_db_connect();
?>
<html>
<head>
<script src="//ajax.googleapis.com/ajax/libs/jquery/1.8.0/jquery.min.js" type="text/javascript"></script>
<script src="DataTables/media/js/jquery.dataTables.min.js" type="text/javascript"></script>
</head>
<script>
$(document).ready(function(){
$('#example').dataTable();
});
</script>
<?php
####can put links too.
$link1= "{$_SERVER['PHP_SELF']}?orderby=lastname";
//$my link = '<td align="left"><a href="'.$link1.'"><b>First Name</b></a></td>';
//echo $order_by;
echo '<table class="display" id="example" align="center" cellspacing="0" cellpadding="5" bgcolor="#E0606B" width="100%">
<thead><tr>
<th align="left"><b>Last Name</b>'.' '.'<a href="'.$_SERVER['PHP_SELF'].'?orderby=lastname asc"><b>asc</b></a>'.' '.'<a href="'.$_SERVER['PHP_SELF'].'?orderby=lastname desc"><b>desc</b></a></th>
<th align="left"><a href="'.$_SERVER['PHP_SELF'].'?orderby=lname"><b>First Name</b></a></th>
<th align="left"><b>Email</b></th>
<th align="left"><b>Age</b></th>
<th align="left"><b>Weight</b></th>
<th align="left"><b>Height</b></th>
<th align="left"><b>Date</b></th>
</thead></tr>';
$command = "select * from table_sort ORDER by date DESC";
$result = mysqli_query($db, $command);
$command2= "SELECT DISTINCT email, firstname, lastname, age, weight, height, date FROM table_sort ORDER BY lastname asc ";
$result2 = mysqli_query($db, $command2);
if ($result2 && mysqli_num_rows($result2) > 0) {
echo '<tbody>';
while ($row = mysqli_fetch_assoc($result2)) {
$bg =($bg=='#A7C6BA' ? '#f9f9f9' : '#A7C6BA');
echo '<tr bgcolor="' . $bg . '">
<td align="left">' .$row["lastname"]. '</td>
<td align="left">' .$row["firstname"]. '</td>
<td align="left">' .$row["email"]. '</td>
<td align="left">' .$row["height"]. '</td>
<td align="left">' .$row["age"]. '</td>
<td align="left">' .$row["weight"]. '</td>
<td align="left">' .$row["date"]. '</td>
</tr>';
}
echo '</tbody></table>';
}
?>
<div style="text-align:center;"></div>
</div>

When you work with css and many divs nested within div tags, you will often want to use the background of the parent div. The transparent background makes this fast and simple.
To inherit background within a nested div,
background:transparent;
This example uses jquery to make an Ajax call via the ‘GET’ method. This method is coded almost identically to the previous ‘POST’ sample. For example, when you select the checkbox, the Jquery change() function is triggered.
After that, if the check box is checked, a variable = 1 is created. If it is deselected, the variable becomes = 2. Then, asyncronous ajax takes places with the proper data and url. Essentially, new get variables are created when you click the checkbox. Finally, the get variables are used to update the database table with basic php / mySQL.
<?php
header('Cache-Control: no cache'); //no chache but no error
session_start();
include ("connect.inc");
$db=public_db_connect();
?>
<html>
<head>
<script src="//ajax.googleapis.com/ajax/libs/jquery/1.8.0/jquery.min.js" type="text/javascript"></script>
<script type="text/javascript">
$.ajaxSetup ({
// Disable caching of AJAX responses
cache: false
});
//alert("hi");
$(document).ready(function(){
$("input[name*='mycheckbox']").change(function(){
var variable = $(this).attr("id");
if ($(this).is(':checked')) {
var variable2 = 1;
} else {
var variable2 = 2;
}
alert(variable);
alert(variable2);
/*var dataString = 'variable=' + variable + '&variable2=' + variable2;*/
$.ajax({
type: "GET",
cache: false,
url: "ajax-get-jquery.php",
data: "variable="+variable +"&variable2="+variable2,
/*data: { variable2: "variable2" },*/
/*data: dataString,*/
success: function(msg){
alert("Success!");
/*alert(variable2);*/
}
});
});
});
</script>
</head>
<body>
<?php
$command = "SELECT * FROM ajax";
$result = mysqli_query($db, $command);
while($row = mysqli_fetch_assoc($result)){
}
$variable2 = $_GET['variable2'];
$variable = $_GET['variable'];
$command = "SELECT * FROM ajax";
$result = mysqli_query($db, $command);
while($row = mysqli_fetch_assoc($result)){
//echo $row['checking'];
}
if($_GET['variable2']){
echo $variable2;
$commandb = "UPDATE ajax SET checking='{$_GET['variable2']}' WHERE id=1";
$resultb = mysqli_query($db, $commandb) ;
} else{
$commandc = "UPDATE ajax SET checking=3 WHERE id=1";
$resultc = mysqli_query($db, $commandc) ;
}
?>
<form method ="post" action = "">
<input type= "checkbox" name="mycheckbox" id="checker" value="1" />
</form>
This example uses jquery to make an Ajax call via the ‘POST’ method. Here is how it works. When you select the checkbox, the Jquery change() function is triggered. Then, if the check box is checked, a variable = 1 is created. If it is deselected, the variable becomes = 2. Then, asyncronous ajax takes places with the proper data and url. Essentially, new post variables are created without needing to click a ‘submit’ button. Finally, the post variables are used to update the database table.
<?php
header('Cache-Control: no cache'); //no chache but no error
session_start();
include ("connect.inc");
$db=public_db_connect();
?>
<html>
<head>
<script src="//ajax.googleapis.com/ajax/libs/jquery/1.8.0/jquery.min.js" type="text/javascript"></script>
<script type="text/javascript">
$.ajaxSetup ({
// Disable caching of AJAX responses
cache: false
});
$(document).ready(function(){
$("input[name*='mycheckbox']").change(function(){
var variable = $(this).attr("id");
if ($(this).is(':checked')) {
var variable2 = 1;
} else {
var variable2 = 2;
}
alert(variable);
alert(variable2);
/*var dataString = 'variable=' + variable + '&variable2=' + variable2;*/
$.ajax({
type: "POST",
cache: false,
url: "ajax-post.php",
data: "variable="+variable +"&variable2="+variable2,
/*data: { variable2: "variable2" },*/
/*data: dataString,*/
success: function(msg){
alert("Success!");
/*alert(variable2);*/
}
});
});
});
</script>
</head>
<body>
<?php
$command = "SELECT * FROM ajax";
$result = mysqli_query($db, $command);
while($row = mysqli_fetch_assoc($result)){
}
$variable2 = $_POST['variable2'];
$variable = $_POST['variable'];
$command = "SELECT * FROM ajax";
$result = mysqli_query($db, $command);
while($row = mysqli_fetch_assoc($result)){
//echo $row['checking'];
}
if($_POST['variable2']){
echo $variable2;
$commandb = "UPDATE ajax SET checking='{$_POST['variable2']}' WHERE id=1";
$resultb = mysqli_query($db, $commandb);
} else{
$commandc = "UPDATE ajax SET checking=3 WHERE id=1";
$resultc = mysqli_query($db, $commandc) ;
}
?>
<form method ="post" action = "">
<input type= "checkbox" name="mycheckbox" id="checker" value="1" />
</form>
This tutorial shows how we can take an array of numbers from php and use it an array in Javascript. Here is how it works. We have a web page with a list of entries. Each entry has a checkbox next to it and its value is the entry’s id.
With Jquery, we use the change() function for the checkboxes. If a check box is selected or deselected and it is greater than 15, we use the alert() function to show the id of the changed checkbox.
Then, we use php / mySQL to make an array of numbers. To be useful in Javascript, we use the implode function to turn the array into a string that separates the ids with commas. Then, the $ids_string variable is the new Javascript variable that is equal to the php string.
We can use use the string, or convert it to an array with ‘myArray = new Array(ids_string);’ or ‘var myArray = $.makeArray(ids_string);’. Then, the each() function is used to sort the array.
<script type="text/javascript">
$(document).ready(function(){
$("input.check").change(function() {
var value = $(this).val();
var Class = $(this).attr('class');
if(value > 15 && Class == "check"){
$(this).css("color", "red");
alert(value);
<?
$command = "SELECT * FROM leads ";
$result = mysqli_query($db, $command);
while ($row = mysqli_fetch_assoc($result)){
//$val = $row['id'];
$val = $row['id'];
$names_array[] = $val;
}
## PHP Array to Javascript String
$ids_string = implode(",", $names_array); // create a string from the array of ids
?>
//alert ("<?php echo $ids_string; ?>");
ids_string = "<?php echo $ids_string; ?>"; // now the javascript variable is set
alert (ids_string);
// sort through string ie) if the value is in string
//PHP STRING to Javascript Array
//myArray = new Array(ids_string); //convert string to array method a
var myArray = $.makeArray(ids_string); //convert string to array method b
var myArray = ids_string.split(','); // for names
$.each(myArray, function(k, v){
alert( "Key: " + k + ", Value: " + v );
});
// sort through array and look for id in the array
}
else {
$(this).css("color", "#000000");
}
});
});
</script>
The purpose of this tutorial is to demonstrate how we can take an array from php and use it an array in Javascript. Here is the basics of the code. We have a web page with a list of entries. Each entry has a checkbox next to it and its value is the entry’s id.
With Jquery, we use the change() function for the checkboxes. If a check box is selected or deselected and it is greater than 15, we use the alert() function to show the id of the changed checkbox.
Then, we use php / mySQL to make an array of names. To be useful in Javascript, we use the implode function to turn the array into a string that separates the names with commas.
Then, the $names_string variable is the new Javascript variable that is equal to the php string. We can use use the string, or convert it to an array with ‘myArray = new Array(names_string);’ or ‘var myArray = $.makeArray(names_string);’.
Finally, the each() function is used to sort the array.
<script type="text/javascript">
$(document).ready(function(){
$("input.check").change(function() {
var value = $(this).val();
var Class = $(this).attr('class');
if(value > 15 && Class == "check"){
//$(this).css("color", "red");
alert(value);
<?
$command = "SELECT * FROM tablename ";
$result = mysqli_query($db, $command);
while ($row = mysqli_fetch_assoc($result)){
//$val = $row['id'];
$val = $row['firstname'];
$names_array[] = $val;
}
## PHP Array to Javascript String
$names_string = implode(",", $names_array); // create a string from the array of ids
?>
//alert ("<?php echo $names_string; ?>");
names_string = "<?php echo "".$names_string.""; ?>"; // now the javascript variable is set
alert (names_string);
// sort through string ie) if the value is in string
//PHP STRING to Javascript Array
//myArray = new Array(names_string); //convert string to array method a
var myArray = $.makeArray(names_string); //convert string to array method b
var myArray = names_string.split(','); // for names
$.each(myArray, function(k, v){
alert( "Key: " + k + ", Value: " + v );
});
// sort through array and look for id in the array
}
else {
$(this).css("color", "#000000");
}
});
});
</script>
The simple objective is to move all files from one folder to another another folder. The files could be images, css files, javascript files, or anything else.
Let’s analyze the code. The variable $mydir is the name of your new directory where you want to move files. If there is no directory, we make the directory with the mkdir() function. Now that the directory is in place, the files must be moved from point a to point b. The glob() function is used to make an array of all the files from the current images directory where the original images are located. Then, a foreach loop is used to move each file from the array into the new folder. The copy() function actually moves the files from one directory to another.
// images folder creation
$mydir = dirname( __FILE__ )."/html/images";
if(!is_dir($mydir)){
mkdir("html/images");
}
// Move all images files
$files = glob("images/*.*");
foreach($files as $file){
$file_to_go = str_replace("images/","html/images/",$file);
copy($file, $file_to_go);
}
When you build websites with user registration and passwords, you may find you will need to allow users to update passwords and other fields. However, there are some slight differences you must take into consideration when you update text and passwords. With text, you often use a sanitizing function like addslashes or mysql_real_escape_string() to escape the data. With passwords, you will sanitize the string with the mysql_real_escape_string() function and use a password function like sha() or md5() to convert the text into an encrypted password string.
Is is very important to note that when you work with passwords, an empty $_POST variable and a password function applied to the $_POST variable are note the same thing. The latter is actually a encrypted string.
xxx
$password = $_POST['password']; // This is empty
$password = mysql_real_escape_string($_POST['password']); // This is empty
$password = mysql_real_escape_string(sha1($_POST['password'])); // This is not empty
if(empty($password)){
echo "Posted password is empty";
}else{
echo "Posted password is not empty";
}
If you decide to create a php / mySQL application which will use a fair amount of insert, update and delete queries, you may want to use transactions with your mySQL queries. Transactions allows for data integrity. It can only help keep your data more precise. In order to use transactions, the database table storage engine should use the InnoDB.
Transactions work like this. Multiple mySQL statements will be executed only if the requirements are met. If anything is off, nothing happens.
The code below shows a simple transaction. If there is asuccess, the loop runs. If there is no success, the loop does dot show anything.
include('connect.inc');
$success = true; // transaction success
//start transaction
$command = "SET AUTOCOMMIT=0"; // this command sets mysql up to make sure that COMMIT or ROLLBACK command is used to execute a query.
$result = mysqli_query($db, $command);
$command = "BEGIN"; // this starts the transaction
$result = mysqli_query($db, $command);
$command = "SELECT id FROM table_sort ";
$result = mysqli_query($db, $command);
while($row = mysqli_fetch_assoc($result)){
$id = $row['id'];
$ids[] = $id;
echo "We got the array!";
}
if (mysqli_num_rows($result) <2) { // checking for success here
$success = false;
} else if (mysqli_num_rows($result) >2){
$success = true;
echo "We got the array!";
}
if (!$success) { // if success is false, do this
$command = "ROLLBACK"; // this command does not allow the statement "We go the array" to display if the $result is false
$result = mysqli_query($db, $command);
$error = "We've rolled back and did not create the array because something went wrong along the way.";
echo $error;
}
else {
$command = "COMMIT"; // transaction will now occur since everything went well
$result = mysqli_query($db, $command);
}
$command = "SET AUTOCOMMIT=1"; // Now, mysql continues on without transactions
$result = mysqli_query($db, $command);
With PHP, it is a great thing to be able to pass arrays or strings into an array. The following example shows a simple array being passed into function. Once the array is in the function, the print_r($members) function displays the array keys and values.
function getmembers($input){
print_r($input);
}
include('connect.inc');
$db = public_db_connect();
$command = "SELECT * FROM table_sort WHERE id < 10";
$result = mysqli_query($db, $command);
while ($row = mysqli_fetch_assoc($result)) {
$memberID = $row['id'];
$members[] = $memberID;
}
$myvar = getmembers($members);
//print_r($members);
The preg_replace() function makes it very easy to change data between a starting character and ending the character. The example code below demonstrates how it can be used to remove anything in between angle brackets(<>) and in between regular brackets.
include('connect.inc');
$db = public_db_connect();
$command = "SELECT * FROM cms ";
$result = mysqli_query($db, $command);
while($row = mysqli_fetch_assoc($result)){
$tags = $row['mid'];
echo "Look at source code:".$tags."</br/>";
$tag = preg_replace('#\<.*?\>#s', '', $tags);
echo $tag;
}
$brackets = "(in brackets)";
echo "<br/>".$brackets;
$no_brackets = preg_replace('#\(.*?\)#s', 'no brackets', $brackets);
echo "<br/>".$no_brackets;
The in_array() function for php can be quite useful at sometimes. It allows you to check if data is in an array. If there is data, you can customize the next step and if there is no match in array you can execute a different command. In simple English, it is similar to the following expression.
Expression:
“I have an orange. If there is an orange in the bag of fruit, do not add the second orange there. But, if there is not an orange, add my orange to the bag of fruit.
The code below is an example where the in_array() function is used to check an array for a matching row from the database. If it does not find a match, the row is added to the members array. If it does find a match, the loop continues without adding the row to the array.
Advanced Note
The in_array() function can be very useful and perhaps the best method to use when you need to grab the desired data from a table when you cannot sort it through mySQL. For example, in a large database application, there may not be a matching index for the table where you need to select exact data.
include('connect.inc');
$db = public_db_connect();
$command = "SELECT * FROM table_sort WHERE id > 0";
$result = mysqli_query($db, $command);
while ($row = mysqli_fetch_assoc($result)) {
$memberID = $row['id'];
$first_name = $row['firstname'];
$last_name = $row['lastname'];
//echo $memberID;
if(in_array($row['id'], $members)){continue;}
$members[] = $memberID.",".$first_name.",".$last_name;
}
print_r($members);
This tutorial below explains how you can grab a php file on the Internet and rewrite and save it as an html file using php.
Note: This tutorial must be used in a file that exists in the same directory. For example, this example grabs all website urls like page1.php, page2.php that exists in the tablename table. Then, it grabs the html content of each url that has a file within the the same folder; such as example.com/myfolder/page1.php. After the contents for the web page is grabbed, it writes a new file to a folder called html. Thefore, the original file example.com/myfolder/page1.php actually becomes example.com/myfolder/html/page1.php.
Alternatively, you could just have made a hard coded array for the urls; like
$urls = array(‘example.com/myfolder/page1.php’, example.com/myfolder/page2.php”);
## FUNCTION TO GRAB URL
function my_page_URL() {
$page_URL = 'http';
if ($_SERVER["HTTPS"] == "on") {$page_URL .= "s";}
$page_URL .= "://";
if ($_SERVER["SERVER_PORT"] != "80") {
$page_URL .= $_SERVER["SERVER_NAME"].":".$_SERVER["SERVER_PORT"].$_SERVER["REQUEST_URI"];
} else {
$page_URL .= $_SERVER["SERVER_NAME"].$_SERVER["REQUEST_URI"];
}
return $page_URL;
}
## GET WEB PAGE
## We use curl to get the url because file_get_contents() function will interpret example.com/myfile.php different than myfile.php
## if the absolute url is not grabbed and the relative url is grabbed, file_get_contents() will grab the actual file code and not ## what ouputs in a browser.
$mycurl=my_page_URL();
##GET URLS
$command = "SELECT urls FROM tablename ";
$result = mysqli_query($db, $command);
while($row = mysqli_fetch_assoc($result)){
$url = $row['url'];
$urls[] = $url;
}
##LOOP EACH PAGE
foreach($urls as $url){
//echo $url;
# we don't want the file downloads.php so we skip it from making a page called downloads.html
if($url == "downloads.php"){continue;}
echo $url;
$myurl = str_replace("make_html.php",$url,$mycurl);
$htmla = file_get_contents($myurl);
echo $htmla;
$html = str_replace(".php",".html",$url);
// echo $html;
$file = "html/".$html;
$fp = fopen($file, 'w');
fwrite($fp, $htmla);
fclose($fp);
}
Example #2 Grabbing Any Web Page and Making It HTML
## FUNCTION TO GRAB URL
function my_page_URL() {
$page_URL = 'http';
if ($_SERVER["HTTPS"] == "on") {$page_URL .= "s";}
$page_URL .= "://";
if ($_SERVER["SERVER_PORT"] != "80") {
$page_URL .= $_SERVER["SERVER_NAME"].":".$_SERVER["SERVER_PORT"].$_SERVER["REQUEST_URI"];
} else {
$page_URL .= $_SERVER["SERVER_NAME"].$_SERVER["REQUEST_URI"];
}
return $page_URL;
}
## This tutorial below explains how you can grab a php file on the Internet and rewrite and save it as an html file using php.
##GET WEB PAGE
## We use curl to get the url because file_get_contents() function will interpret example.com/myfile.php different than myfile.php
## if the absolute url is not grabbed and the relative url is grabbed, file_get_contents() will grab the actual file code and not ## what ouputs in a browser.
$mycurl=my_page_URL();
$urls = array('http://example.com/learn-web-design.php','http://example.com/services.php');
##LOOP EACH PAGE
foreach($urls as $url){
//echo $url;
# we don't want the file downloads.php so we skip it from making a page called downloads.html
if($url == "downloads.php"){continue;}
echo $url;
//$myurl = str_replace("write_new_file.php",$url,$mycurl);
$htmla = file_get_contents($url);
echo $htmla;
// echo $html;
$html = str_replace("http://example.com/","",$url);
$html = str_replace(".php",".html",$html);
$file = "html/".$html;
$fp = fopen($file, 'w');
fwrite($fp, $htmla);
fclose($fp);
}
In vast majority of php applications, one database is sufficient to run the application. However, you could encounter a situation where you need to use two database connections because you want to sink user data. One such reason could be that you want to allow a user to login into another application from the current running application. Bridging the two logins can allow applications to connect and thus; you can do more. Another reason why you may want to use another database is that you just want to grab the data from a different application.
The code below shows how you can simply connect and select data from two databases. However, you could run insert, update and delete commands from either database.
include ("connect.inc");
$db=public_db_connect();
$command_a = "SELECT * FROM table_sort WHERE id > '1' ";
$result_a = mysqli_query($db, $command_a);
while($row_a = mysqli_fetch_assoc($result_a)){
$firstnamea = trim($row_a['firstname']);
echo "From Database #1: ".$firstnamea."<br/>";
}
echo "<br/><br/>";
require ('header.inc');
$db2=public_db_connectb();
$command_b = "SELECT * FROM table_sort WHERE id > 1 ";
$result_b = mysqli_query($db2, $command_b);
while($row_b = mysqli_fetch_assoc($result_b)){
$firstnameb = $row_b['firstname'];
echo "From Database #2: ".$firstnameb."<br/>";
}
mysqli_close($db);
By now, you may know that Web Host Manager is quite a fine tool to administrate accounts and your Linux Hosting account. Having the ability to create new accounts with new cpanels allows for all sorts of web management.
Although you may want to keep all database usage and files within specific accounts, you are not required to do so. You do have the option to use databases from different accounts. For example, if you have one account called mainaccount and another account called mysecondaccount, you could connect to databases from mainaccount. The simple trick is to just use the aaccount prefix which appends to all database usernames and databases.
The examples below show how you can connect to a database from another account. You simply add the specific connection variables into your file(s).
Database Connection to mainaccount:
$host = “localhost”;
$user = “mainaccount_name”;
$pw = “add_password_here”;
$database = “mainaccount_databasename”;
Database Connection to mysecondaccount:
$host = “localhost”;
$user = “mysecondaccount_name”;
$pw = “add_password_here”;
$database = “mysecondaccount_databasename”;
Web Host Manager is a fantastic tool to order accounts and databases. Generally speaking, Web Host Manager is used to create accounts where you want to keep accounts organized and separated.
Here are various reasons why you may want to create separate accounts with Web Host Manager:
1) Some clients may require their own cpanel. Therfore, you only want them to administrate their own websites, emails and databases.
2) You want to add an SSL certificate to a specific account.
3) You want to keep a large project in one place. Addon domains and multiple databases can get messy after a while.
4) if you need more resources., tIt makes it easy to move an entire account to a new server.
Web Host Manager allows webmasters to remove addon domains from one account and move it to a new account. In fact, that order must be done first. The tutorial below explains how to perform this procedure.
Note:
You may need to make a few adjustments during or after you create the new account; such as editing the package.
To edit a package,
1) Look for packages in left column.
2) Select ‘Edit package’ >Modify >Save as desired
Update DNS Zones
You may need to update the DNS zones.
To edit a DNS zone,
1) Select ‘DNS Functions’ >Edit DNS Zone
2) Modify and save, if necessary.
GET THE SITE RUNNING
To get the new site up and running,
1) Login to the new Cpanel account.
2) Add any databases that are needed.
3) FTP all files into the new account.
4) Change any database connection files so that the new prefix and login credentials for your new account. For example, if your site was previously in an account called myname, and the new account is called newname, you will need to change all database prefixes and database names to the newname.
5) Troubleshoot the website. At this point, you should be able to open up the website in your browser.
Joomla has all sorts of plugins and methods for which to create rss feeds. All in all, the RSS feeds will have a specific url like http://example.com/Subscribe-to-blog-rss-feed.html
Once you have the link, you can use it on your page to allow your users to subscribe to your feeds. If you have good, regular content, it is a simple method to allow your subscribers to keep up to date.
Most regular bloggers have a common goal; get more traffic and more regular readers. Therefore, giving users the ability to subscribe to your RSS feeds is one such useful feature to keep them coming back. Some people like feeds and will seek your new articles. However, an additional gem is that RSS feeds on your website that are stored with Google Reader apparently gives you better rankings on your website. Since ‘Google Reader’ is the most popular method to subscribe and view feeds, this simple rss feed subscription service should not be overlooked.
This lesson explains the usage of Magpie to parse multiple rss feeds. Installing Magpie is shown here.
Firstly, the file rss_fetch.inc needs to be imported with the require() function in order to parse the feeds in the first place. Then, an array of urls is created for the various RSS feeds. Then, one at a time, the rss feed urls go through the fetch_rss() function located in the Magpie installation. Next, Magpie returns an array called $items and that data is parsed. Finally, the data is printed. Note, the feeds will output the data from the first url, then output the second url. If you want to combine the feeds and order them all like they come from the same place, please see this tutorial for parsing rss feeds.
require('magpie/rss_fetch.inc');
$urls = array('http://vancouver.en.craigslist.ca/cta/index.rss', 'http://vancouver.kijiji.ca/f-SearchAdRss?CatId=174&Location=80003');
foreach($urls as $url) {
$rss = fetch_rss($url);
foreach ($rss->items as $item ) {
$title = $item[title];
$url = $item[link];
$description = $item[description];
$date = $item['dc']['date'];
echo "<a href='".$url."'>".$title."</a>-".$description."-".$date."<br>";
//make array here
}
}
Code Samples:
Parse Single URL RSS Feed
Parse Multiple URLs RSS Feed Into a Table Part 2
This tutorial shows how to use Magpie to parse multiple rss feed. If you need to know how to install Magpie in 30 seconds, please see this RSS Feed tutorial.
Here is how php parses the multiple rss feeds. First of all, we require the file rss_fetch.inc so that we can parse the feeds in the first place. Then, we create an array of urls for the various RSS feeds. Then, one at a time, the rss feed urls go through the fetch_rss() function located in the Magpie installation. Next, Magpie returns an array called $items, and that data is parsed. Within the foreach loop, the $tot_array array is made. The array contains each item that we wanted. The array eventually got huge. The date is the first element in the array for sorting purposes. Therefore, after using the rsort() function, we got the array ordered by date descending. Finally, the $tot_array was output into a table.
require('magpie/rss_fetch.inc');
$urls = array('http://vancouver.en.craigslist.ca/cta/index.rss', 'http://vancouver.kijiji.ca/f-SearchAdRss?CatId=174&Location=80003');
foreach($urls as $url) {
$rss = fetch_rss($url);
foreach ($rss->items as $item ) {
$title = $item[title];
$url = $item[link];
$description = $item[description];
$date = $item['dc']['date'];
//make array here
$tot_array[] = $date.",".$title.",".$url.",".$description;
}
}
//print_r($tot_array);
rsort($tot_array);
echo '<table>
<thead>
<th>Title</th>
<th>Description</th>
<th>Date</th>
</thead>';
foreach($tot_array as $tot) {
$all = explode(",",$tot);
$date = date("Y-m-d",strtotime($all[0]));
$title = $all[1];
$url = $all[2];
$description = $all[3];
//echo $tot."<br/>";
echo '<tr>';
echo '<td><a href="'.$url.'">'.$title.'</a></td>';
echo '<td>'.$description.'</td>';
echo '<td>'.$date.'</td>';
echo '</tr>';
}
echo '</table>';
More Coding Samples:
Parse Single URL RSS Feed
Parse Multiple URLs From RSS Feed Part 1
This tutorial shows how to use Magpie to parse an rss feed. If you need to know how to install Magpie in 30 seconds, please see this PHP RSS Feed tutorial.
Here is how php parses the rss feed. We require the file rss_fetch.inc so that we can parse the feed. Then, we set which RSS feed url is used for the feed. Then, the rss feed url is run through the fetch_rss() function located in the Magpie installation. Then, Magpie returns an array called $items and that data is parsed. Within the foreach loop, all data for each rss feed entry is printed.
require('magpie/rss_fetch.inc');
$url = 'http://vancouver.en.craigslist.ca/cta/index.rss';
$rss = fetch_rss($url);
foreach ($rss->items as $item ) {
$title = $item[title];
$url = $item[link];
$description = $item[description];
$date = $item['dc']['date'];
echo "<a href='".$url."'>".$title."</a>-".$description."-".$date."<br>";
}
More Code Samples:
Parse Multiple URLs From RSS Feed Part 1
Parse Multiple URLs RSS Feed Into a Table Part 2
There are many methods for which xml files and rss feeds can be parsed. In a nutshell, they all take the feed or xml format and take data from organized tags and turn the output into elegant HTML.
Although many methods can be used, one freely available parser that deserves heavy consideration is Magpie.
Magpie is a low memory consuming script that can be used to parse the rss feeds. All you have to do is download the scripts, unzip the folder and move the files into a desired location.
Magpie RSS parser takes in a rss feed url and sends you back an array of items. Once you have an array, you just use good old php to do whatever you want with it.
To use Magpie,
1) Download magpie from http://magpierss.sourceforge.net/
2) Upzip folder and move into your a custom directory. Rename the folder to magpie. Initially, the unzipped folder is called something like magpierss-0.72.
3) Make another folder and add the unzipped magpie folder into it. Then, create a file called index.php.
4) Add the following code to the top of the file.
<?php
require(‘magpie/rss_fetch.inc’);
$rss = fetch_rss($url);
5)Add code to parse the desired items.
Example:
foreach ($rss->items as $item ) {
$title = $item[title];
$url = $item[link];
$description = $item[description];
$date = $item['dc']['date'];
echo "<a href='".$url."'>".$title."</a>-".$description."-".$date."<br>"; }
Code Samples:
Parse Single URL RSS Feed
Parse Multiple URLs From RSS Feed Part 1
Parse Multiple URLs RSS Feed Into a Table Part 2
From time to time, a website can shut down for several reasons. One very common reason is that the server is running out of memory. Many websites consume many resources because they are built with Joomla, WordPress, Drupal and so on. With that in mind, you may want to know how log a website went down. Well, Cpanel offers an array of methods to find that out. You can use the ‘Logs’and the features.
Method #1: Bandwidth
To see bandwidth options during hours or days,
1) Login to Cpanel.
2) Go to logs > Select ‘Bandwidth’.
3) Look for downtime.
Method #2: Error Log
To see recent errors and track when site went down,
1) Login to Cpanel.
2) Go to logs > Select ‘Error Log’.
3) Look for downtime. You can track ip and where site went down; such as memory allocation. If the ip was suspicious, you can ban it.

Method #3: Latest Visitors
To see latest vistors,
1) Login to Cpanel.
2) Go to logs > Select ‘Latest Visitors’.
3) Select ‘View’ next to the desired website.
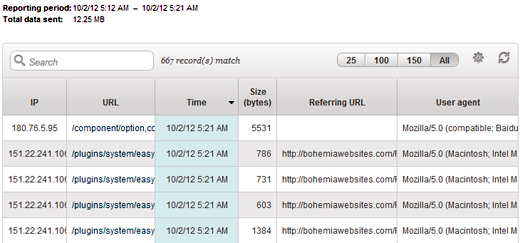
There are countless numbers of PHP scripts that are available. Some scripts require no coding experience while others do. However, coding experience will allow a developer to customize the script as he desires, and it allows the coder to apply security fixes, if necessary. With many scripts, you will always see this patch for this software and this patch for that. What this means is that the code was probably vulnerable to sql injections or xss cross scripting since online users could add malicious into a form or a url and create database changes. It is always a good idea to stay secure for obvious reasons.
One good plan of attack when installing a script is to change or customize the database prefix so that online uses do not know what it is. Often, a hacker tries to inject code into a database with a default prefix, like jos, wp, or AT. If you can simply alter your database tables to a new prefix you have just added a good layer of security.
Remove the checkmark next to display errors.
Every MYSQL tables uses a storage engine. By default, MYISAM is the default table. Howver, when you create a new table, you can set the engine to something other other than MYISAM, such as the popular option InnoDB. InnoDB makes it safe to develope web applications without hangups; whereas MYISAM has limitations.
To change a table with phpMyAdmin,
1) Open the database and select the table.
2) Select ‘Operations’.
3) Change ‘Storage Engine’
4) Select ‘Go’.
No matter where you first learn about sql injections, xss scripting, or form form handling security, one common phrase seems to popup everywhere. The phrase is “Never trust the user’s input’. This phrase can be turned around to read ‘Protect Yourself From Hackers who will try to add malice code into your forms’. With that in mind, you should always try to make your forms with code that will sanitize user input. The code below will get you off to a decent start.
### CHANGE ### SANITIZE LOGIN $my_username = mysql_real_escape_string(htmlspecialchars(trim($_POST['login']))); $my_username = mb_convert_encoding($my_username, 'UTF-8', 'UTF-8'); $my_username = htmlentities($my_username, ENT_QUOTES, 'UTF-8'); $my_password = mysql_real_escape_string(htmlspecialchars(md5(trim($_POST['password'])))); $my_password = mb_convert_encoding($my_password, 'UTF-8', 'UTF-8'); $my_password = htmlentities($my_password, ENT_QUOTES, 'UTF-8'); ### END SANITIZE
The code below shows how you can get the first and last names for users. The first output is an inner join while the second output is two while loops. It is two ways to get the same results. However, the single query looks a little cleaner. This inner join was done with two tables, but, you could use more tables if you wanted data such as login name from another table.
<?php
include('connect.inc');
$db = public_db_connect();
$command = "SELECT t1.firstname, t1.lastname FROM table_sort as t1, table_sort2 as t2 WHERE t1.id = t2.id ";
$result = mysqli_query($db, $command);
while($row = mysqli_fetch_assoc($result)){
$first = $row['firstname'];
$last = $row['lastname'];
echo "<br/>".$first."-".$last;
}
//or
//run multiple selects
$command = "SELECT id from table_sort2";
$result = mysqli_query($db, $command);
while($row = mysqli_fetch_assoc($result)){
$id = $row['id'];
$command_b = "SELECT firstname, lastname from table_sort WHERE id = '$id' ";
$result_b = mysqli_query($db, $command_b);
while($row = mysqli_fetch_assoc($result_b)){
$first = $row['firstname'];
$last = $row['lastname'];
echo "<br/>".$first."-".$last;
}
}
?>
Using join queries can make it quite convenient to retrieve data from two or more tables. However, when you use an ORDER BY or GROUP BY expression with a join it should make reference to a column from just one able. For example, you may want to order by article id from one table.
The code below shows a query that orders the data from a join based on the id order from table 1..
$command = "SELECT table1.id, table1.firstname, table1.lastname, table2.email FROM tablename1 as table1, tablename2 as table2 WHERE table1.id=table2.client_id ORDER BY table1.id ASC ";
With php programming, there many possibilities for how such skills will be applied. You could end up using open source php scripts, create custom hand-coded applications or any combination of the two.
Although the programming can move in all sorts of directions; one such fact should not be ignored. In order to create, understand and read various applications; the stronger the php / mySQL and OOP coding skills are will determine what you can handle or create.
On a custom level, using OOP or procedural PHP can be a preference. But, if you have no solid OOP skills, you will not understand how classes, objects, and methods work.
Then, when you try to modify a sscript or add a class to your program, you could be in real trouble. Asides from a solid knowledgebase, repetition and practice will make all coding flow and keep trouble shooting down to a minimum.
As a BC and Vancouver php programmer, I hope these words can offer some help or a reference point to see what PHP / mySQL programming is all about.
If you think PHP / mySQL programming is installing and using an open source application like Joomla or WordPress, you will find serious issues when it comes to customizing websites.
If you can hand code yourself, you can practically build with anything.
The purpose of the code below is to show you how you can take rows within a while loop and call a function. Then, you call another function within a function.
In the second function, you will return a string that gets stacked into a larger array.
Finally, the array is parsed outside of the loop with two foreach loops.
Sounds confusing? Code like this can be quite commonplace when you work with other people’s scripts. Therefore, knowing the logic can make life simpler for a an average or expert php programmer.
Note: You can get the same results by returning a single function as described on this page.
<?php
include('connect.inc');
$db=public_db_connect();
function second_func($var2,$date2){
global $db;
$my_values2 = $var2.",".$date2;
return $my_values2; //return a string
}
function get_data($var1,$date){
global $db;
$my_values = second_func($var1,$date);
return $my_values; //return a string
}
$command = "SELECT DISTINCT id, email FROM table_sort WHERE id IN (1,2,3,4,5,6,7) ORDER BY id ASC";
$result = mysqli_query($db, $command);
while($row = mysql_fetch_assoc($result)) {
$var1 = $row['id'];
$command2= "SELECT min(date) as date FROM table_sort WHERE id ='$var1' ORDER BY id ASC";
$result2 = mysqli_query($db, $command2);
while($row2 = mysqli_fetch_assoc($result2)){
$date = $row2['date'];
echo $var1."-".$date."<br/>";
$get_data = get_data($var1,$date);
$my_array[] = $get_data;
}
}
print_r($my_array);
foreach($my_array as $key => $value) {
echo "<br/>".$key."-".$value;
}
foreach($my_array as $key => $value) {
$all = explode(",",$value);
$id = $all[0];
$date = $all[1];
echo "<br/>".$id."-".$date;
}
?>
The purpose of the code below is to show you how you can take rows within a while loop and call a function.
Then, you call another function within a function. In the second function, you will return an array that get stacked into a larger array.
Finally, the array is parsed outside of the loop. PHP programmers can face this type of logic when they work with other people’s scripts.
Note: You can get the same results by returning a single function as described on this page.
<?php
include('connect.inc');
$db=public_db_connect();
function second_func($var2,$date2){
global $db;
$my_values2[] = $var2.",".$date2;
return $my_values2; //return an array
}
function get_data($var1,$date){
global $db;
$my_values = second_func($var1,$date);
return $my_values; //return an array
}
$command = "SELECT DISTINCT id, email FROM table_sort WHERE id IN (1,2,3,4,5,6,7) ORDER BY id ASC ";
$result = mysqli_query($db, $command);
while($row = mysqli_fetch_assoc($result)) {
$var1 = $row['id'];
$command2= "SELECT min(date) as date FROM table_sort WHERE id ='$var1' ORDER BY id ASC";
$result2 = mysqli_query($db, $command2);
while($row2 = mysqli_fetch_assoc($result2)){
$date = $row2['date'];
echo $var1."-".$date."<br/>";
$get_data = get_data($var1,$date);
$my_array[] = $get_data;
}
}
print_r($my_array);
foreach ($my_array as $key => $value) {
$value = implode(",",$value);
echo "<br/>".$key."-".$value;
$value2 = str_replace(",","-",$value);
echo "<br/>".$value2;
}
?>
The purpose of this tutorial is to explain how to return a string from a function, which will become part of an array that is created in a double while loop.
<?php
include('connect.inc');
$db=public_db_connect();
$count = 0;
function get_data($var1,$date){
global $db;
$my_values = $var1.",".$date;
return $my_values; //return a string
}
$command = "SELECT DISTINCT id, email FROM table_sort WHERE id IN (1,2,3,4,5,6,7) ORDER BY id ASC";
$result = mysqli_query($db, $command);
while($row = mysqli_fetch_assoc($result)) {
$var1 = $row['id'];
$command2= "SELECT min(date) as date FROM table_sort WHERE id ='$var1' ORDER BY id ASC";
$result2 = mysqli_query($db, $command2);
while($row2 = mysqli_fetch_assoc($result2)){
$date = $row2['date'];
echo $var1."-".$date."<br/>";
$get_data = get_data($var1,$date);
$my_array[] = $get_data;
}
}
print_r($my_array);
foreach($my_array as $key => $value) {
echo "<br/>".$key."-".$value;
}
foreach($my_array as $key => $value) {
$all = explode(",",$value);
$id = $all[0];
$date = $all[1];
echo "<br/>".$id."-".$date;
}
?>
The purpose of this tutorial is to explain how to return and array from a function, which will become part of another array. With PHP, you can return a string or array from a function. The string or array that is returned can become combined into another array.
<?php
include('connect.inc');
$db=public_db_connect();
$count = 0;
function get_data($var1,$date){
global $db;
$my_values[] = $var1.",".$date;
return $my_values; //return an array
}
$command = "SELECT DISTINCT id, email FROM table_sort WHERE id IN (1,2,3,4,5,6,7) ORDER BY id ASC ";
$result = mysqli_query($db, $command);
while($row = mysqli_fetch_assoc($result)) {
$var1 = $row['id'];
$command2= "SELECT min(date) as date FROM table_sort WHERE id ='$var1' ORDER BY id ASC";
$result2 = mysqli_query($db, $command2);
while($row2 = mysqli_fetch_assoc($result2)){
$date = $row2['date'];
echo $var1."-".$date."<br/>";
$get_data = get_data($var1,$date);
$my_array[] = $get_data;
}
}
print_r($my_array);
foreach ($my_array as $key => $value) {
$value = implode(",",$value);
echo "<br/>".$key."-".$value;
$value2 = str_replace(",","-",$value);
echo "<br/>".$value2;
}
?>
When you grab a row from a loop with php, the rows come back at you with strings. However, using the (int) cast is a method to convert the number string into an integer. For example, say you wanted to add an integer into a json function or use it for mathematical purposes. You simple add the (int) in front of the number string to make it an integer.
Read below for details.
$command = "SELECT * FROM tablename ";
$result = mysqli_query($db, $command);
while ($row = mysqli_fetch_assoc($result)) {
$myid = row['id']; // this is a string if the column is varchar
$id = (int)$myid;
$id2 = (int)trim($myid);
}
When you build a website, it has a DTD at the top of the page which declares the type of document for the web page. These days, most web pages use various declarations for html and xhtml. Below, are two code samples for the most common types of xhtml documents and the html 5 document. Aside from the DTD, the html, body and head tags are the same.
XHTML Transitional Sample
<!DOCTYPE html PUBLIC "-//W3C//DTD XHTML 1.0 Transitional//EN" "http://www.w3.org/TR/xhtml1/DTD/xhtml1-transitional.dtd"> <html xmlns="http://www.w3.org/1999/xhtml" xml:lang="en-gb" lang="en-gb" > <head></head> <body> </body> </html>
XHTML 5 Sample
<!DOCTYPE HTML> <html> <head></head> <body> </body> </html>
Making CSV files with PHP can de done very effectively. You may want to make custom lists that users can download in the form of csv files. Then, the file can be opened in Excel and the report can be presented at the next meeting.
The code below demostrates two methods for which csv files can be created.
Method A
function get_csv($values) {
return implode(',', $values) . "\n";
}
$fh = fopen('mycsv.csv','wb');
$command = "SELECT * FROM tablename ";
$result = mysqli_query($db, $command);
while($row = mysqli_fetch_assoc($result)){
$id = trim($row['id']);
$name = trim($row['name']);
$get_csv = get_csv($row);
fwrite($fh, $get_csv);
}
fclose($fh);
Method B
$fp = fopen('myfile.csv', 'wb');
// get array from while loop
$command = "SELECT * FROM tablename ";
$result = mysqli_query($db, $command);
while($row = mysqli_fetch_assoc($result)){
$id = trim($row['id']);
$name = trim($row['name']);
$vars[] = $id.",".$name;
fwrite($fh, $get_csv);
}
foreach ($vars as $field) {
// need to make array from $field string
fputcsv($fp, explode(',',$field));
}
fclose($fp);
One of the great features with PHP error checking is the error explanation. When an error does occur, the explanation often leads you straight to the solution. The next example shows an error where ‘}’was used instead of ‘]’. The example also explains how to fix the issue.
Error:
Parse error: syntax error, unexpected ‘}’, expecting ‘]’ in /home/user/public_html/file.php on line 12
// Change $_GET['id'} // Change to: $_GET['id']
When coding with PHP, you often use two symbols for the equal sign. The symbols are ‘==’ and ‘=’. However, they do not mean the same thing. When you declare variables or use mySQL queries, you always use’=’. But, when you use conditions, you must use’==’.
Here is an error that may be displayed when you use the incorrect ‘=’sign.
Parse error: syntax error, unexpected ‘=’ in /home/user/public_html/folder/file.php on line 100
The example below shows a simple error and how to fix it.
if($var=22) { echo "Hello World";} // code should be should be if($var==22) { echo "Hello world"; }
Using the min()function with mySQL permits developers to sort through a database and retrieve the lowest value. With date, the lowest value would be the earliest date entered for a specific column. The example below shows how to get the earliest date from a table where the user is the administrator.
$command = "SELECT min(date) as date FROM tablename WHERE date < now() and user='admin' ";
$result = mysqli_query($db, $command);
while ($row = mysqli_fetch_assoc($result)) {
$date = $row['date']; //echo $date;
}
<?php error_reporting (E_ALL ^ E_NOTICE);
include('connect.inc');
session_start();
$db = public_db_connect();
public_db_connect();
echo 'Convert IP Address To City and Country With PHP<br/><br/>';
$command = "SELECT ip FROM ips ";
$result = mysqli_query($db, $command);
while($row = mysqli_fetch_assoc($result)){
$user_ip = $row['ip'];
$fetch_url = 'http://api.ipinfodb.com/v3/ip-city/?key=KEY_GOES_HERE&ip='.$user_ip.'&format=xml';
//CURL OPTION TO GET FILE
/*$mycurl = curl_init();
curl_setopt($mycurl, CURLOPT_URL,$fetch_url);
curl_setopt($mycurl, CURLOPT_FAILONERROR, true);
curl_setopt($mycurl, CURLOPT_FOLLOWLOCATION, true);
curl_setopt($mycurl, CURLOPT_RETURNTRANSFER,true);
curl_setopt($mycurl, CURLOPT_TIMEOUT, 30);
//fetch url and send it to the browser
$myfile= curl_exec($mycurl);*/
//FILE_GET_CONTENTS OPTION
$myfile = file_get_contents($fetch_url);
//create the new location object
$location = new SimpleXMLElement($myfile);
// get the variables from the class
$country = $location->countryName;
$state = $location->regionName;
$city = $location->cityName;
$city_country_array[] = $city.",".$country;
}
// create an array with city and country
$count = array_count_values($city_country_array);
print_r($count);
foreach($city_country_array as $country_city) {
$all = explode(",",$country_city);
$city = $all[0];
$country = $all[1];
}
echo '<br/>';
// loop to get the city, country and values of each entry
foreach($count as $key => $value) {
echo "<br/>".$key."-".$value;
}
?>
The mySQL IN clause allows you to search through records where values match what you are seeking. The examples below demonstrate its usage with a string or numbers.
// Querying a String
$text_1 = "hello";
$text_2 = "world";
$command = "SELECT DISTINCT id, name FROM tablename WHERE id IN('$text_1','$_text2') ";
// Querying Numbers
$command = "SELECT DISTINCT id, name FROM tablename WHERE id IN(1250,1350) ";
Shadowbox is a web based application which allows users to displya text or image links that popup in a shadowbox. Shadowbox can be downloaded from shadowbox-js.com.
<link rel=”stylesheet” type=”text/css” href=”js/shadowbox.css”>
<script type=”text/javascript” src=”js/shadowbox.js”></script>
<script type=”text/javascript”>
Shadowbox.init();
</script>
4) Use the link format below to make popups for youtube video..
<a href=”http://www.youtube.com/v/abcde45t&hl=en&fs=1&rel=0&autoplay=1″ rel=”shadowbox;width=720;height=480;player-swf;” ><img src=”images/img.png” /></a>
The floor() function with php allows you to round a number down to the nearest whole number. You must take into consideration that any decimal points will be removed.
Floor Example
$numb = floor(23.5); echo $number; // output is 23 echo floor(34.67); // output is 34. echo "My answer to the math question is ".floor(99.9); // Output is My answer to the math question is 99.
The ceil() function with php allows you to round a number up to the nearest whole number. It has many benefits, but, you must take into consideration that any decimal points will be removed.
Ceiling Example
$number = ceil(21.5); echo $number; // output is 22 echo ceil(33.67); // output is 34. echo "My answer to the math question is ".ceil(100.9); // Output is My answer to the math question is 100.
With PHP, you have two options to submit a form. One option is to post it to the same page and the other is to post it to the same page. Posting it to the same page is often the easier, most tidy approach.
Posting the form to the same page
<form method = "post" action = "<?php echo $_SERVER[PHP_SELF]; ?>"> <input type="text" name = "myname" value = "" /> <input type="submit" name = "myname" value = "Submit" /> </form>
Posting the form to the same page With A Query String
The form below can be used to submit a form to itself if the string contains get variables within the url. An example of such a url would be example.com/page.php?id=1234&name=john.
<form method = "post" action = "<?php echo $_SERVER[PHP_SELF]."?".$SERVER[QUERY_STRING]; ?>"> <input type="text" name = "myname" value = "" /> <input type="submit" name = "myname" value = "Submit" /> </form>
Posting the form to a different page
The form below can be used to submit a form to another page called ‘ótherpage.php’.
<form method = "post" action = "otherpage.php"> <input type="text" name = "myname" value = "" /> <input type="submit" name = "myname" value = "Submit" /> </form>
PHP and mySQL have many built-in functions that can be used to alter all sorts of data. In some cases, there are functions in mySQL and PHP that do the same thing. For example, php and mySQL both have functions to make all text upper or lower case, remove whitespace, replace characters and encrypt strings in md5 or sha1…just to name a few.
It is good to know both. As you program, yiou will find a comfort zone and may lean on one method or another to achieve your goals. Since mySQL can be used with various programming languages like PERL or Python, strong mySQL skills and its function usage can already allow you to grasp what is happening in other code too.
The mysql query cache can be setup to cache mysql queries. For websites with large quantities of selected data; this can help performance. To set up the cache, click here.
To know what cannot be cached, read on. The mySQL query cache will not cache data that uses non-deterministic functions like now() or current_date(). Furthermore, it won’t cache transactions used with InnoDB storage engines. Although, it won’t cache some data, it could cache many other chunks of data; such as your home page or other pages on the site.
PHP has several methods for which you can add comments within you files.
The samples below show various commenting methods. Commenting is a en excellent method to troubleshoot and leave notes about your code; especially while you are learning or leaving code that may need editing by others.
A large query and two loops can be obvious to some programmers; but a line of English that states what is done can be easier to understand at first glance.
For example, 20 line of code could have a comment like ‘Get the members id and see if they have boughten any books from the PHP category within the last two weeks.’
## This sign is a comment // The double slashes comment this text /* The forward slash and asterisk at the beginning and end of a text block will be commented. This is a common method for which to create comments in many languages.*/ echo 'This text is not commented and would be the only text displayed on the page!';
With PHP, you have two options which can be used to print text, html, css and javascript. Those two commands are print and echo. Most php developers use echo, even though historically, print has been a common programming command to print in computer languages.
Echo outputs slightly faster than print and the shorter word makes it easier to read and write for programmers. Thus, it usage far outweighs print. Asides from that, using either will print text the way you intend to display it.
<?php //To use echo, echo "Here is my double quoted sentence,"; //To use print, print 'Here is my single quoted sentence';
Whether you decide to build a php / mySQL application or use an existing application, the database storage engine should be given some priority. If you plan to only allow online readers to select data from a database; MYISAM will bee fine an do the job the well. However, if you plan to do transactions or have a website that requires, or will require substantial updating, innoDB is a better a option.
With MYISAM, the engine has table locking. This means that the table is locked during an update or insert statement. If the table is used simultaneously by another user, the data cannot update. Imagine a cron job or an update is being made to the table. If a large update script is using a table, then any logged in member cannot update to it.
On the other hand, innoDB tables have row locking, which means the table is available to update for other users. Innodb tables allow php developers to use transactions on the table. With transactions, you can run a single or multiple series of updates, inserts and delete commands that will will only occur if every command was successful. With MYISAM, using transactions does not work and the last command gets executed whether you like it or not.
The example below shows how to scrape a website to get a list of all Javascript files for a specific web page.
$data = file_get_contents('http://example.com');
//$regex ='/script type="text\/javascript" src="\/media\/system\/js\/mootools.js">/'; // gets everything in script except beginning < and ending </script>
$regex = '/<script(.*)<\/script>/'; //finds all jscripts and displays everything buy beginning <script tags and ending </script> tag and WORKS
preg_match_all($regex,$data,$posts, PREG_SET_ORDER);
print_r($posts);
echo '<br/>';
$cnt = count($posts);
echo $cnt;
for($i=0; $i < $cnt; $i++){
foreach ($posts[$i] as $post) {
if(strstr($post, 'text/javascript')){
echo "hi".$post."<br/>";
}else{
// do something with data
//echo "hoy".$post."<br/>";
}
}
}
The following example explains how to scrape a page with <p> tags.
Sample
Let’s analyze the code.The file_get_contents() function aquires the html code we want to scrape. The $regex variable picks the data between the <p></p> tags. Then, the preg_match_all() function creates the $posts array based on finding the <p> tags within the website url. After the array is built, the array called $posts is counted. The resulting array is a mutlidemsional array which can be shown with print_r($posts). The for loop is used to examine the two main arrays and the foreach loop is used to sort the arrays within the main arrays.
Within the foreach loop, we add str_replace() functions to remove blocks of text we do not want. If you open the page with a browser and view the source, you can see the output of each array and make custom str_replace() functions. In our example below, we used various str_replace() functions so that we ended up with the desired text.
Within the foreach loop arrays are created that we displayed outside the loop.
$data = file_get_contents('http://example.com');
$regex = '/<p(.*)<\/p>/'; //finds p tags and gets content between tags WORKS
preg_match_all($regex,$data,$posts, PREG_SET_ORDER);
//var_dump($posts);
print_r($posts);
echo '<br/><br/>';
$cnt = count($posts);
echo $cnt;
$loops = 0;
for($i=0; $i < $cnt; $i++){
foreach ($posts[$i] as $post) {
$loops = $loops + 1;
//echo "loops"."-".$loops."<br/>";
//view source code and customize
$post = str_replace('<p class="art-page-footer"><a href="/"></a>','',$post);
$post = str_replace('class="art-page-footer"><a href="/"></a>','',$post);
$post = str_replace('><a href="http://www.macromedia.com/go/getflashplayer">','',$post);
$post = str_replace('<a href="http://www.macromedia.com/go/getflashplayer">','',$post);
$post = str_replace('<p>','',$post);
$post = str_replace('</p>','',$post);
$post = str_replace('<p','',$post);
$post = str_replace('</a>','',$post);
$post = trim($post);
echo $post."<br/>";
//$post = trim($post);
$posts_array[] = $post;
}
}
$posts_final = array_unique($posts_array);
print_r($posts_final);
Scarping a web page with php is a procedure for which you get the html code of a foreign website and retrieve specific parts of data. Scraping a website could be a method for which to use data for analysis when no rss feeds exist. Another reason one may wish to scrape a website is to analyze page titles of highly ranked websites.
The codes below show two methods for which you can captures all text within h1 tags. Both examples use arrays to capture all blocks of desired text. With an array, anything is possible from adding the content to a database or to analyze text. Both examples use the function preg_match_all() to create arrays from a particular website.
The second example is a little longer and lengthier and uses the string_replace() function and trim() function within the foreach loop to create unique arrays.
Scraping can be a little controversial since you are capturing somebody else’s copyrighted material. Pickybacking off somebody else’s hard work may not be taken lightly. If the website used copyscape.com and finds such abuse; small or large complaints could exist. In extreme cases, Google could significantly ban your website for using black hat seo.
Sample #1
Let’s go through the code.The file_get_contents() function gets the html code we want to scrape. The $regex variable picks the data between the h1 tags. Then, the preg_match_all() function creates the $posts array. The foreach loop runs each value in the array and checks for ‘<h1’. If it exists, it outputs the value.
$data = file_get_contents('http://example.com');
$regex = '/<h1(.*)<\/h1>/'; //finds h1 tags and gets content between and WORKS
preg_match_all($regex,$data,$posts, PREG_SET_ORDER);
//print_r($posts);
echo '<br/>';
foreach ($posts[0] as $post) {
if(strstr($post, '<h1')){
echo $post."<br/>";
}else{
// do something with data
//echo "hoy".$post."<br/>";
}
}
Sample #2
Let’s analyze the code.The file_get_contents() function aquires the html code we want to scrape. The $regex variable picks the data between the h1 tags. Then, the preg_match_all() function creates the $posts array based on finding the h1 tags within the desired file. After that, all posts are counted. What we end up with is a mutlidemsional array. Therefore, the for loop is used to separate the two main arrays and the foreach loop is used to sort the arrays within each arrray.
With the foreach loop, web can add str_replace() functions to remove blocks of text we do not want. If you open the page with a browser and view the source, you can remove the codes you do not want want. In our example below, we used various str_replace() functions so that we ended up with just ‘pure text’.
Within the foreach loop arrays are created that we displayed outside the loop.
$data = file_get_contents('http://example.com');
$regex = '/<h1(.*)<\/h1>/'; //finds h1 tags and gets content between and WORKS
preg_match_all($regex,$data,$posts, PREG_SET_ORDER);
//print_r($posts);
echo '<br/><br/>';
$cnt = count($posts);
//echo $cnt;
$loops = 0;
for($i=0; $i < $cnt; $i++){
foreach ($posts[$i] as $post) {
//view source code and customize
$post = str_replace('<h1 style="margin-top: 0px; margin-bottom: 0px; padding-bottom: 0px; font-size: 22px; color: rgb(90, 89, 95); text-shadow: 0.07em 0.07em 0.07em rgb(251, 144, 40);">','',$post);
$post = str_replace('style="margin-top: 0px; margin-bottom: 0px; padding-bottom: 0px; font-size: 22px; color: rgb(90, 89, 95); text-shadow: 0.07em 0.07em 0.07em rgb(251, 144, 40);">','',$post);
$post = str_replace('</h1>','',$post);
$post = trim($post);
echo $post."<br/>";
//$post = trim($post);
$posts_array[] = $post;
}
}
echo "<br/>Array Details:<br/>";
$posts_final = array_unique($posts_array);
print_r($posts_final);
The php function dirname(__FILENAME__) is used to get the working directory for files and include files.
The code below can be used to see how the function works.
$dir = dirname(__FILENAME__); echo $dir;
The php function getcwd() is used to get the current working directory.
The code below can be used to see how the function works.
$dir = getcwd(); echo $dir;
The PHP unlink() function can be used to delete files within specified directories. One such use of this function could be to remove images for a dynamic image gallery.
The code below can be used to delete multiple images in a specific folder. The post variables for $_POST[‘filenames’] is an array of each file which was selected for deleting. The foreach loop takes each file that you want to delete and uses the unlink($newdir) function to delete the file.
if ($_POST['mysubmit2']) {
foreach ($_POST["filenames"] as $filename) {
echo $filename;
// $newdir = getcwd()."/images/gallery/".$filename; // for live hosting
$newdir = getcwd()."\images\gallery\\".$filename;
unlink($newdir);
}
}
THE FORM
//$dir = getcwd()."/images/gallery" ; //for live host
$dir = getcwd()."\images\gallery" ; //for WAMP
?>
<form name="mydelete" method="post" action="<?php echo $_SERVER['PHP_SELF'] ; ?>" >
<?php
//$dir = $directory;
$files1 = scandir($dir);
foreach($files1 as $file){
if(strlen($file) >=3){
//$foil = strstr($file, 'jpg'); // As of PHP 5.3.0
$foil = $file;
//$pos = strpos($file, 'css');
if ($foil==true){
echo '<input type="checkbox" name="filenames[]" value="'.$foil.'" />';
// echo "<img width='130' height='38' src='images/gallery/$file' /><br/>"; // for live host
echo "<img width='130' height='38' src='/ABOOK/SORTING/gallery-dynamic/images/gallery/$file' /><br/>";
}
}
}?>
<input type="submit" name="mysubmit2" value="Delete">
</form>
The glob() function can be used to get an array which lists files from a chosen directory. For example, the command below will return an array of the image names from the images/gallery folder.
$files = glob(“images/gallery/*.*”);
The code below shows how to use glob() function to get an array of filnames for images for which a for loop is used to create thumnails and images links for each image.
$files = glob("images/gallery/*.*");
for ($i=0; $i<count($files); $i++)
{
$num = $files[$i];
/*print "<a href='".$SERVER[PHP_SELF]."?myeditor=".$num."'>".$num."</a><br />";
echo '<img src="'.$num.'" alt="random image" />'."<br /><br />";*/
echo '<div class="image_align">
<div class="myimage"><a href="'.$num.'" rel="shadowbox"><img alt="placeholder" height="98" src="'.$num.'" width="130"> </a></div>
</div>';
}
After installing SMF forum, you may find that approved regular members may be able to create new posts that get published without moderation. Therefore, if you want to moderate posts prior to being published, you must adjust a few settings.
3) Deselect ‘Post Topics and Replies to board’ and select the check boxes for ‘Post Topics and Replies to board only after they have been approved’. Now, new posts can be moderated prior to being published.
The scandir() function can be used to generate a list of filenames from a chosen folder. The following code demonstrates how to generate such a list.
First of all, a directory is chosen by creating the $dir variable.
Secondly, the $files1 array is created by obtaining all images with the scandir($dir) function.
Finally, a foreach loop is created to output a check box and images for each file in the array.
$dir = getcwd()."/images/gallery" ;
$files1 = scandir($dir);
foreach($files1 as $file){
if(strlen($file) >=3){
//$foil = strstr($file, 'jpg'); // As of PHP 5.3.0
$foil = $file;
//$pos = strpos($file, 'css');
if ($foil==true){
echo '<input type="checkbox" name="filenames[]" value="'.$foil.'" />';
// echo "<img width='130' height='38' src='images/gallery/$file' /><br/>"; // for live host
echo "<img width='130' height='38' src='/ABOOK/SORTING/gallery-dynamic/images/gallery/$file' /><br/>";
}
}
This example shows how to create a simple image gallery with php. No database is required. The first file displays the galler while the second file is used to manage the php gallery images. You can view the example here, or download the entire php gallery script here.
Gallery Code
The first block of code can be used to show the php photo gallery to the viewer. This code uses the glob() function to select files in a particular folder, which in this this case is the gallery folder. The for loop displays all the files to the viewer. The for loops stop after all images are displayed.
$files = glob("images/gallery/*.*");
for ($i=0; $i<count($files); $i++)
{
$num = $files[$i];
/*print "<a href='".$SERVER[PHP_SELF]."?myeditor=".$num."'>".$num."</a><br />";
echo '<img src="'.$num.'" alt="random image" />'."<br /><br />";*/
echo '<div class="image_align">
<div class="myimage"><a href="'.$num.'" rel="shadowbox"><img alt="placeholder" height="98" src="'.$num.'" width="130"> </a></div>
</div>';
}
Upload Code
The following block of code can be used to upload and delete photos. If an image is uploaded, it goes into the adequate directory, which in this case is the gallery folder. The image uploaded is idential to that on the pc. There is a sufficient amout of commented text that can be used to create resized jpeg images; in case you want to add that feature.
if (ISSET($_POST['mysubmit'])) {
if (($_FILES["img_upload"]["type"] == "image/jpeg" || $_FILES["img_upload"]["type"] == "image/pjpeg" || $_FILES["img_upload"]["type"] == "image/jpg" || $_FILES["img_upload"]["type"] == "image/pjpg" || $_FILES["img_upload"]["type"] == "image/gif" || $_FILES["img_upload"]["type"] == "image/x-png") && ($_FILES["img_upload"]["size"] < 1000000))
{
$max_upload_width = 2592;
$max_upload_height = 1944;
if(isset($_REQUEST['max_img_width']) and $_REQUEST['max_img_width']!='' and $_REQUEST['max_img_width']<=$max_upload_width){
$max_upload_width = $_REQUEST['max_img_width'];
}
if(isset($_REQUEST['max_img_height']) and $_REQUEST['max_img_height']!='' and $_REQUEST['max_img_height']<=$max_upload_height){
$max_upload_height = $_REQUEST['max_img_height'];
}
if($_FILES["img_upload"]["type"] == "image/jpeg" || $_FILES["img_upload"]["type"] == "image/pjpeg" || $_FILES["img_upload"]["type"] == "image/jpg" || $_FILES["img_upload"]["type"] == "image/pjpg"){
$image_source = imagecreatefromjpeg($_FILES["img_upload"]["tmp_name"]);
}
if($_FILES["img_upload"]["type"] == "image/gif"){
$image_source = imagecreatefromgif($_FILES["img_upload"]["tmp_name"]);
}
if($_FILES["img_upload"]["type"] == "image/x-png"){
$image_source = imagecreatefrompng($_FILES["img_upload"]["tmp_name"]);
}
//CREATING NEW IMAGE
/*$remote_file = "images/gallery/SM-".$_FILES["img_upload"]["name"];
//echo $remote_file;
imagejpeg($image_source,$remote_file,100);
chmod($remote_file,0644);
list($image_width, $image_height) = getimagesize($remote_file);*/
//ADD A SECOND FILE ORIGINAL LENGTH AND WIDTH
$upload_original = move_uploaded_file($_FILES["img_upload"]['tmp_name'], "images/gallery/LG-".$_FILES["img_upload"]["name"]);
if ($upload_original)
{
echo "Upload Successful!<br/>";
}
//echo "hoy".$image_width;
/*if($image_width>$max_upload_width || $image_height >$max_upload_height){
$proportions = $image_width/$image_height;
if($image_width>$image_height){
$new_width = $max_upload_width;
$new_height = round($max_upload_width/$proportions);
}
else{
$new_height = $max_upload_height;
$new_width = round($max_upload_height*$proportions);
}
$new_image = imagecreatetruecolor($new_width , $new_height);
$image_source = imagecreatefromjpeg($remote_file);
imagecopyresampled($new_image, $image_source, 0, 0, 0, 0, $new_width, $new_height, $image_width, $image_height);
imagejpeg($new_image,$remote_file,100);
imagedestroy($new_image);
}*/
imagedestroy($image_source);
}
else{
}
}
/*echo "<b><a href=\"logout.php\">Logout!</a></b>"." |   "." <b><a href=\"login.php\"> Update Content</a></b> | <b><a href=\"edit.php\">  Edit Content</a></b><br/>";*/
?>
<form name="myform" method="post" action="<?php echo $_SERVER['PHP_SELF'] ; ?>" enctype="multipart/form-data">
<label>Maximum 1MB. Accepted Formats: jpg, gif and png:</label><br />
<input name="img_upload" type="file" id="img_upload" size="40" />
<input type="hidden" name="MAX_FILE_SIZE" value="1000000" />
<input style="display:none;" name="max_img_width" type="visible" value="" size="4">
<input style="display:none;" name="max_img_height" type="visible" value="" size="4">
<input name="tmp_name" type="hidden" value="myfile.jpg" >
<input type="submit" name="mysubmit" value="Submit">
</form>
<?php
$dir = dirname(__FILENAME__)."/images/gallery" ;
if ($_POST['mysubmit2']) {
foreach ($_POST["filenames"] as $filename) {
echo $filename;
// $newdir = getcwd()."/images/gallery/".$filename; // for live hosting
$newdir = getcwd()."\images\gallery\\".$filename;
unlink($newdir);
}
}
//$dir = getcwd()."/images/gallery" ; //for live host
$dir = getcwd()."\images\gallery" ; //for WAMP
?>
<form name="mydelete" method="post" action="<?php echo $_SERVER['PHP_SELF'] ; ?>" >
<?php
//$dir = $directory;
$files1 = scandir($dir);
foreach($files1 as $file){
if(strlen($file) >=3){
//$foil = strstr($file, 'jpg'); // As of PHP 5.3.0
$foil = $file;
//$pos = strpos($file, 'css');
if ($foil==true){
echo '<input type="checkbox" name="filenames[]" value="'.$foil.'" />';
// echo "<img width='130' height='38' src='images/gallery/$file' /><br/>"; // for live host
echo "<img width='130' height='38' src='/ABOOK/SORTING/gallery-dynamic/images/gallery/$file' /><br/>";
}
}
}?>
<input type="submit" name="mysubmit2" value="Delete">
</form>
<?php //} ?>
Redirecting with the php header() function is just one of the many uses of the function. However, to use it safely in your applications it is a good practice to use it before outputting any text or html. Otherwise, you may get the error ‘Headers Already Sent”. The code below shows its usage at the top of your file which analyzes posted data before outputting any html.
$member_id = $_POST['member_id'];
if($_POST['member_id']){
$command = "INSERT INTO tablename VALUES (NULL, '{$_SESSION['id']}', '$friend_id', '{$_POST['name']}',now()) ";
$resulta = mysqli_query($db, $command);
}else {
## redirect if $_POST['member_id'] variable exists
header("Location: filename.php");
exit();
include("html_header_file.inc");
}
}
The code below shows how data from two different tables can be merged into a single array.
$command = "select * from tablename where member_id = '{$_SESSION['member_id']}'";
$result = mysqli_query($db, $command);
while ($row = mysqli_fetch_assoc($result)) {
$my_array['id'] = $row['id'];
$my_array['title'] = $row['mytext'];
$my_array['title'] = date("ga", strtotime($row['date']))." ".substr($row['mytext'], 0, 10)."...";
$my_array['start'] = date("D, j M Y G:i:s T", strtotime($row['date']));
$my_array['color'] = '#000000';
$my_array['url'] = "filename.php?mydid=".$row['id'];
$big_array[] = $my_array;
}
$command_b = "select * tablename2 where member_id = '{$_SESSION['member_id']}' ";
$result_b = mysqli_query($db, $command_b);
while ($row = mysqli_fetch_assoc($result_b)) {
$my_array['id'] = $row['id'];
$my_array['title'] = $row['column'];
$my_array['title'] = "Note: ".substr($row['column'], 0, 10)."...";
$my_array['start'] = date("D, j M Y G:i:s T", strtotime($row['date']));
$my_array['color'] = '#dc4000';
$my_array['url'] = "filename.php?myid=".$row['id'];
$big_array[] = $my_array;
}
print_r($big_array);
?>
The trim() function with mySQL behaves like the trim() function with PHP. Both strip white space at the beginning and end of a string. The following example shows how the trim() function can be used with the mysqli_real_escape_string() function.
When functions like trim() and mysql_real_escape_string() are used within a query there is much less code to work with. However, you could apply the php trim() and mysqli_real_escape_string() functions to each post variable instead of adding it into the command.
Method A
$firstname = mysqli_real_escape_string($db, trim($_POST[firstname])); $lastname = mysqli_real_escape_string($db, trim($_POST[lastname])); $phone = mysqli_real_escape_string($db, trim($_POST['phone'])); $email = mysqli_real_escape_string($db, trim($_POST['email'])); $command = "INSERT INTO tablename VALUES (NULL, '$firstname', '$lastname', '$phone', '$email', now()) "; $result = mysqli_query($db, $command);
Method B
$firstname = mysqli_real_escape_string($db, $_POST[firstname]);
$lastname = mysqli_real_escape_string($db, $_POST[lastname]);
$phone = mysqli_real_escape_string($db, $_POST['phone']);
$email = mysqli_real_escape_string($db, $_POST['email']);
$command = "INSERT INTO tablename VALUES (NULL, TRIM('$firstname'), TRIM('$lastname'), TRIM('$phone'), TRIM('$email'), now()) ";
$result = mysqli_query($db, $command);
There could come a time when the database or website seems to lag and the pages take longer than normal to load. The problem could exist if there are relational database queries which do not use indexes, or queries are written in a manner for which poor performance occurs.
Web Host Manager
To see processes with Web Host Manager, 1) Select 'Home' >'SQL Services' >'Show MYSQL Processes'
Shell command
The command below will give you all mySQL running and sleeping process status then select the sleeping process id and kill it using SSH. Open SSH and show the process ids. Then, open mySQL and kill the id.
Show processes with Linux # mysqladmin pr Show processes with mySQL mysql> show processes; Kill Process mysql> kill process Id# ;

PHP Blogs are the common blogs on the Internet. In fact, rumor has it that WordPress accounts for 20% of all new websites.
WordPress is a very popular php blog for many reasons; it easy to learn, it ranks well with Google and other search engines, there are many good plugins and many web developers use it.
However, there are many other open source applications and php scripts which function as blogging platforms. For example, Joomla works okay as a blog, especially with the components Myblog or Jaggy Blog.
High Performance Blogging
Although the majority of web development leans towards the usage of assembly line open source products like WordPress, Joomla and Drupal for php blogging; there are many lightweight php / mySQL blogs which can be very effective.
Custom blogs can outperform the open source applications much like a custom chopper outperforms an assembly line product.
Here is where creating a very custom project gets easier than open source applications like WordPress since templating an exact html / css template can be done very quickly; and performance would be like night and day.
We could talk benchmarks all day; but the Bootstrap and PhpBlogifier Blog samples displays help to create a fast loading blog. You can check typical WordPress blogging benchmarks and you may find that that many results don’t even come close to the 1/100th of a second to execute all php code.
Come to PHP Blog and view more details about php blogs.
SOFTWARE
PHP / mySQL runs on the Apache server. You can configure the Apache server and update PHP in one shot using ‘Easy Apache’.
To upgrade Apache Server and PHP,
1) Select ‘Easy Apache’.
2) Select ‘Start customizing based on profile’ to upgrade from existing settings.
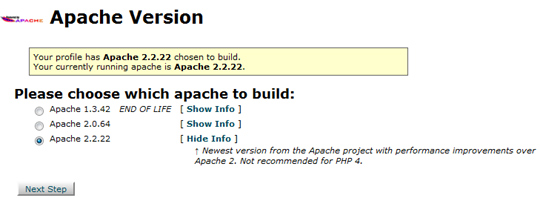
3) Select Apache version >Next.
4) Select a PHP Version.
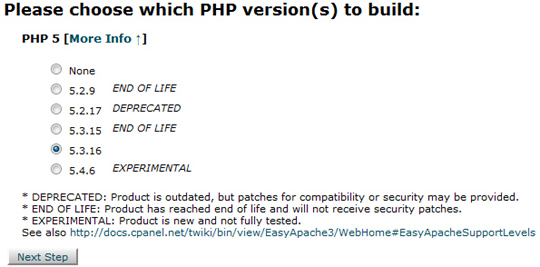
5) Select ‘Next Step’.
6) Select From ‘Short Options’ or scroll down and select ‘Exhaustive Options List’.

7) Customize Options. The options here can be checked if you want them. For example, checking ‘GD’ means you can use many image image functions within your programming. The GD library is very useful to create and resize images with PHP.
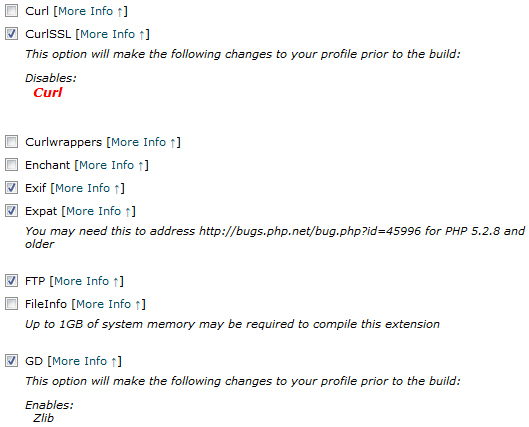
8) Select ‘Save and Build’. Now, you simply wait for the build to finish, then reboot Apache server and you are good to go.
SQL SERVICES
SQL Services has many useful features. Nevertheless, two standout features are ‘phpMyAdmin’ and ‘MYSQL Root Password’.
phpMyAdmin
When it comes to usage, ‘phpMyAdmin’ might be the feature which get the most clicks. The ‘phpMyAdmin’ option allows the root user to access all mySQL databases for the webmaster. If you have four cpanel accounts, you can access each and every mySQL database for all accounts.
MYSQL Root Password
By default, the mySQL root password is the same as the root password. The advantage is simplicity, the disadvantage is security. With Putty, you can login to your Linux hosting account with your root username and password.
To login to mySQL with Putty,
1) Login to Linux hosting as ‘root’.
2) Type: mysql
Wasn’t that easy? Well, you can add another layer of protection by updating the ‘Root mySQL’ password’.
To update the ‘Root mySQL Password’,
1) Select ‘mySQL Root Password’.
2) Add the password and password again.
3) Click ‘Change Password’.
DNS FUNCTIONS
DNS functions allow the web developer to control the DNS for a particular domain. When you register a domain name, you must point the DNS to yours. Often, the hosting company sets it to its own DNS by default, which means you cannot view the website hosted elsewhere. After pointing the DNS to your server, you may need to login to Web Host Manager and edit the DNS after you create a new account or addon domain.
Edit DNS
Off all the DNS functions, there is a good chance that ‘Edit DNS’ would be used the most, or exclusively from the others. When you create an an account or an addon domain, its DNS will have a default value. Thus, arriving at this setting to change any dns nameservers is an obvious option.
To create a website with proper dns,
1) Register domain name.
2) Create a new account for the domain name or create an addon domain.
3) Login to Web Host Manager and Edit DNS for the domain name; if necessary.
To edit the DNS so that it works with your hosting account,
1) Select ‘DNS Functions’.
2) Select ‘Edit DNS Zone’.
3) Select a domain.
4) Select ‘Edit’.
5) Set the DNS to your account. In this case, the main domain is example.com and the dns nameservers are ns1.example.com and ns2.example.com.
6) Select ‘Save’.
To change php.ini file in web host manager,
1) Open Web Host manager
2) Under ‘Service Configuration’ select PHP Configuration editor. The advanced view will allow the file the most possibility to edit various settings.
Some of the setting you can change here are error reporting, max_execution_time, log_errors_max_length, upload_max_filesize, post_max_size and memory_limit.
3) Select ‘Save’.

To edit an existing account,
1) Select ‘List accounts’ under the heading ‘Account Information’ or select Home >’Account Information’ >’List Accounts’.
2) Select the desired account.
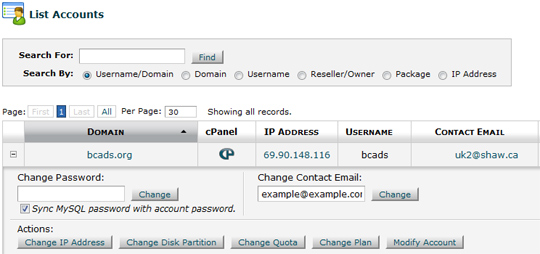
3) Select ‘Modify Account’.
4) Modify the fields.
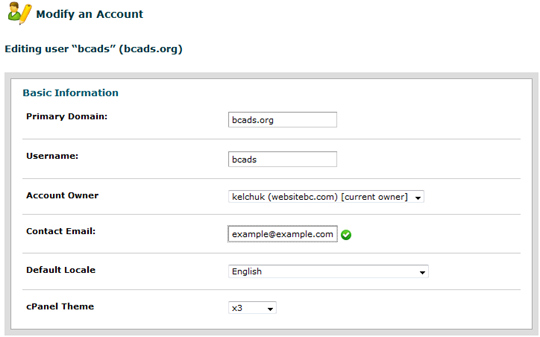
5) Select ‘Save’.
ACCOUNT INFORMATION
‘Account Information’ is where you create, edit and modify accounts. New accounts makes it easy to create new website(s) with a dedicated ip address. There are many reasons why you may want to do that. For instance, you may have a client who publishes controversial subject matter or sends mass amounts of spam email. Therefore, putting the client at his own address could be beneficial for other clients. One spammer can ruin it for others.
To create a new account,
1) Select ‘Account Functions’ or select ‘Home’ >’Account Functions’.

2) Create ‘New Account’.
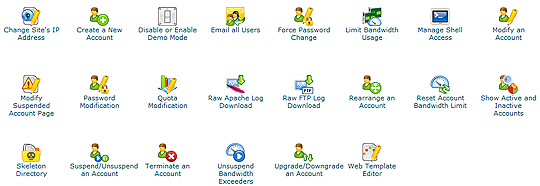
3) Fill out web site details.
4) Select Create.
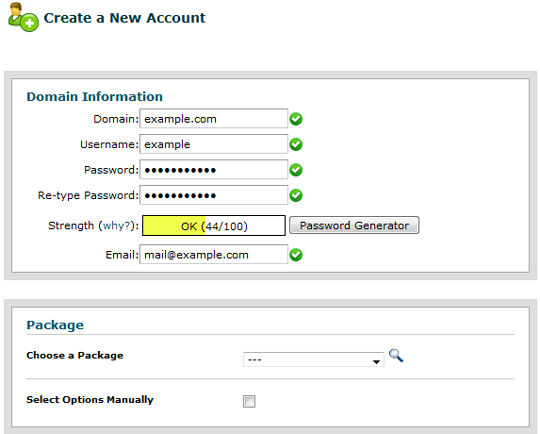
SYSTEM REBOOT
One of the first features the administrator of a VPS or dedicated server needs to be familiar with is ‘System Reboot’. You can reboot a server if the memory becomes depleted or you notice the site is down for some unknown reason. Furthermore, you will reboot the server if you alter system files like php.ini, my.cnf or, you rebuild the Apache server.
To reboot a VPS or dedicated server,
1) Login to WHM.
2) Select `System Reboot` from the home menu, or scroll down on the left menu until you see `System Reboot`.
3) Select `Graceful Server reboot`or ‘Forceful Server Reboot’. ‘Graceful Server Reboot’ will finish executing unfinished processes and reboot while a ‘Forceful Server Reboot’ will not wait until processes finish. Often, the wait for a ‘Graceful Server Reboot’ is very short.

Web Host Manager is a server admin control panel which allows an administrator to control Cpanel accounts. With WHM(Web Host manager), you have access and control to each and every reseller account through its unique interface. But, there is many built-in features. You can control the php settings with the php.ini file, reboot the Apache server, customize DNS and email MX settings. The chapter will not discuss each detail about Web Host Manager, but, you will have the necessary tips and tools needed to keep a healthy server up and running.
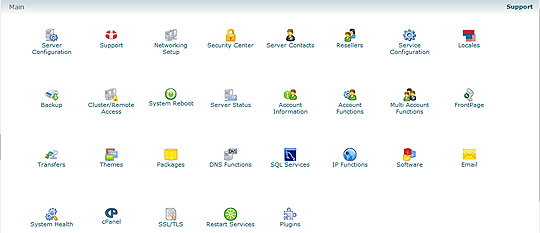
Web Host Manager is a very good and popular admin tool that is offered by giant hosting comapnies like Hostgator, Peer1 while cpanel is used by many too. Using a hosting service with Web Host Manager is a common practice for people who have outgrown a simple shared hosting account. There are many reasons why there is a need to upgrade such as; your websites get sufficinet traffic and / or you use too many shared resources. With shared hosting, you share memory and PHP server resources with others who use the same server. Eventually, as websites grow, the web host may ban or suspend your account based on your over-usage of resources. The best way to solve this problem, is to remove the sharing part. From experience, you often get what you pay more. The more you pay, the better the reources, the better the website performance.
Normally, when you upgrade from a basic shared hosting account, your options are a reseller account, VPS hosting and Dedicated server. A reseller account has access to Web Host Manager. However, the sharing part still exists. This really can be a potential bottleneck; especially is someone runs cron jobs on scripts that hog resources. The only advantage of reseller plans over VPS are ease of use. With a reseller plan, you don’t have the responsibility of keeping the server up and running.
With VPS and dedicated servers, you have access to all root files and can control, modify and configure your server as you want. But, when you must know how to manage your resources like memory, know if hardware failed, and reboot the server if it goes down. Most companies have monthly fees for this service, but, with some practice and patience using a VPS or dedicated server can become second nature. This chapter covers the requirements for keeping a VPS or dedicated server live and well.
To remove a cron job,

Cpanel Advanced Settings
The ‘Advanced’ settings can be of use to particular individual. However, one such feature which may catch your attention is ‘Cron Jobs’. Cron jobs allow you to schedule events to happen at a certain time. An example of a cron job is to execute a php file which copies and resets a database each day. An cron could be compared to a browser automatically opening a php file each day and executing the code.
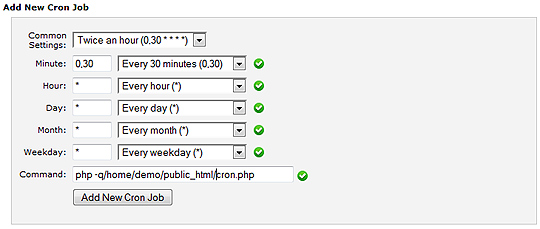
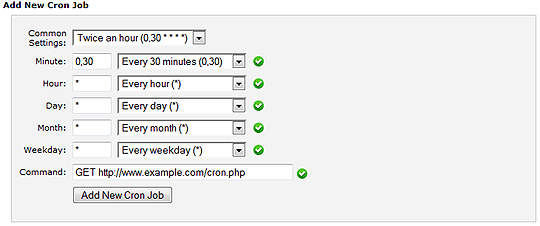
SOFTWARE / SERVICES

The Software / Services features come with programmer perks like Pear Packages. But, the gold may lie with ‘Optimize Website’. The optimize website feature can be used to compress all websites. This can make websites load faster in a browser. When you test with a tool like Yahoo YSlow, it often recommends gzip compression for websites.
Optimize Website
To optimize website,
1) Select ‘Optimize Website’.
2) Select ‘Compress All Content’.
3) Select ‘Update Settings’.

To remove a redirect with Cpanel,
1) Select ‘Redirects’.
2) Find the redirects near the bottom of the page.
3) Select ‘Remove’.

Redirects do the obvious. You take the traffic that arrives at a specific domain and send it elsewhere.
To set a redirect,
1) Select ‘Redirects’.
2) Select an address to redirect from.
3) Select an address to redirect to.
4) Select ‘Add’.
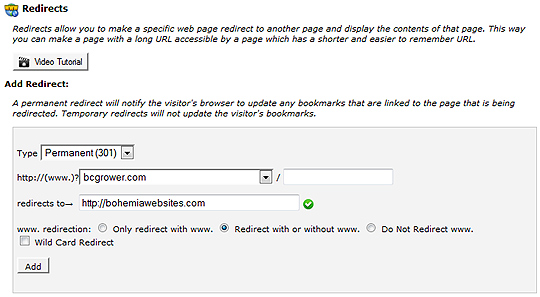
Domains helps you manage subdomains, addon domains and redirects. Although there are more features, addon domains and redirects are popular selections.
The addon domain button allows you to create an addon domain for the account. For example, if you have a main account with the domain example.com, you can reside the domain example2.com here as well. For shared hosting, it can be a pretty good bang for the buck.
Redirects allow you to redirect domains to other web addresses. For example, you may want all traffic that goes to example.com to redirect to example2.com.
To create an addon domain,
1) Select ‘Addon Domains’.
2) Type in domain name, username and password.
3) Select ‘Add Domain’.
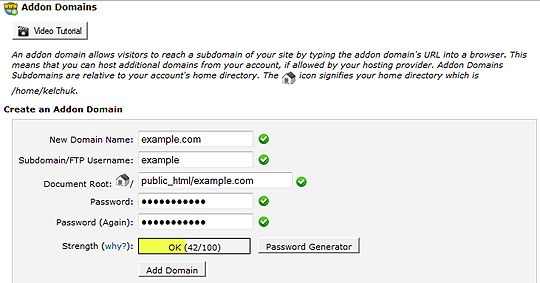
To unblock an ip address with Cpanel,
1) Select ‘IP Deny Manager’.
2) Delete the ip you are denying.

To deny an ip with Cpanel,
1) Select ‘IP Deny Manager’.
2) Add the ip address you want to deny.
3) Select ‘Add’.
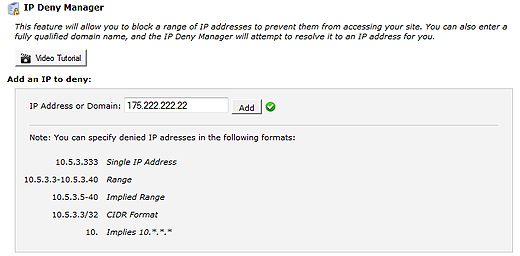
Cpanel has a few security features which can be implemented quickly. Two features which could see some usage from time to time are ‘Protect Password Directories’ and ‘IP Deny Manager’.
To password protect a directory,
1) Select ‘Password Protect Directories’.
2) Select a domain.
3) Select ‘Go’.
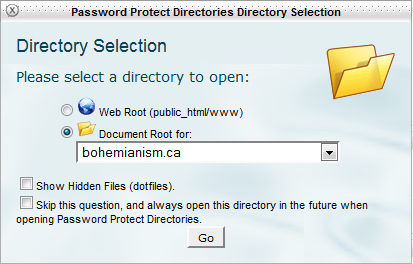
4) Select a folder.
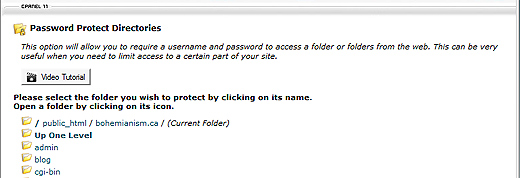
5) Select the checkbox >add a name >Save.
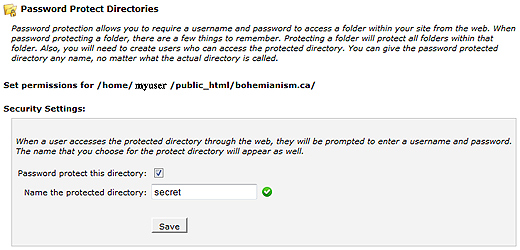
Spam Assassin
Spam Assassin cannbe used to filter the good email from the bad. If you ever have spread your email addrerss around, you may have noticed how junk mail starts flowing in. But, spam assassin can be used to blacklist and whitelist ip addresses.
To get Spam Assassin working,
1) Select ‘Spam Assassin’.
2) Select ‘Configure Spam Assassin’.
3) Add ip addresses to filter. As you fill up the spaces, Spam Assassin automatically adds new fields.
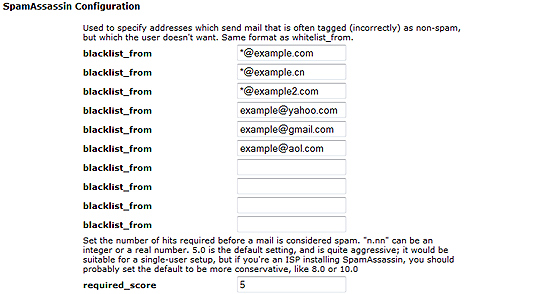
4) Select ‘Save’.
To access webmail with Cpanel,
1) Select ‘Webmail’ > ‘Go to Secure Webmail Login’
2) Select an email option; such as ‘Horde’.
3) Select an email address from the list. At this point, using one of the email services is much like using a service such as hotmail or gmail.
As far a your clients are concered, they may want to access their webmail with their domain. It looks a little cleaner. One such trick is to add their domain into the url. For example, http://example.com:2095/ could be used to access webmail for any account at example.com; cuch as info@example.com.
To manage an email account,
1) Select an option from the desired email account.

To configure an email client,
1) Select ‘More’.
2) Select ‘Configure Email Client’.
3) Use the settings displayed to configure your email client such as Outlook or Eudora.
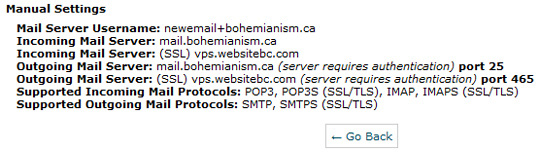
Handling email is one of the features that comes with Cpanel. You may be wondering, what does email have to do with PHP / mySQL? Well, it doesn’t. But, any web developer who builds PHP / mySQL websites will use these tools to administer email accounts for clients and others.
The email options appear under the heading ‘Mail’.
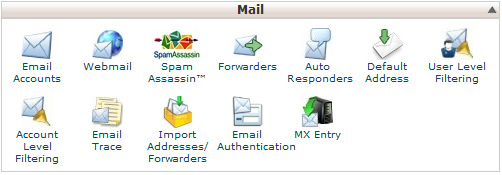
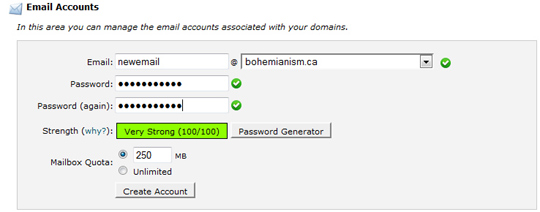
FIREBUG
Firebug is an addon for Firefox or Google Chrome. It is so valuable, that it is hard to imagine a day, when it does not get used by any working web developer. Although Firebug is oftent used to troubleshoot html, css and Javascript
Get Firebug
You can simply Google ‘Firebug’ and you will have instant access to download Firebug.
Using Firebug
To open Firebug,
1) Select the Firebug icon that resembles a beetle.
Firebug opens in the bottom of the browser window.
To troubleshoot code,
1) Select the pointer next to the Firebug.
2) Mouse over the page to see the code.
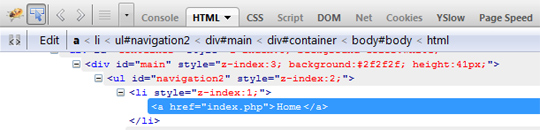
At this point, you have a few simple choices to test and troubleshoot code.
3) Option A: Add css to the small window on the right hand side.
Option B: Add text to the main window.
Option C: Select a div tag or block of text >Right click the mouse >Edit HTML >Edit the html and test your new code. The changes will look as though they are live.
These two files demonstrate how inheritance works with constructors and the parent constructor. The first file shows how properties are declared within the constructor, while the second file uses the parent constructor(parent::__construct()) to inherit properties. Both files are available for previewing.
Accessing Properties Without Parent Constructor
class Blogger extends Bohemia
{
protected $_email;
public function __construct($category, $first_name, $email)
{
$this->first_name = $first_name.” and his friend Eugene can be contacted at”;
$this->category = $category;
$this->email = $email;
}
public function get_email()
{
return $this->email;
}
}
$blogger = new Blogger(‘PHP’, ‘Johnny’, ‘nerdos@example.com’);
echo $blogger->get_first_name().’ the email address “‘.$blogger->get_email().'”. They love ‘.$blogger->get_category().’.’;
?>
Accessing Properties With Parent Constructor
class Blogger extends Bohemia
{
protected $_email;
public function __construct($category, $first_name, $email)
{
parent::__construct($category, $first_name);
$this->email = $email;
}
public function get_email()
{
return $this->email;
}
}
$blogger = new Blogger(‘PHP’, ‘Johnny’, ‘nerdos@example.com’);
echo $blogger->get_first_name().’ the email address “‘.$blogger->get_email().'”. They love ‘.$blogger->get_category().’.’;
?>
Using ‘Null’ for a database column(field) will give any row a value of ‘NULL’. That part should be obvious. But, why not just leave it blank? Why should I use ‘NULL’ and not juts use an empty string? Well, there are a few differences. First of all, Null means “a missing unknown value” while an empty string is actually a value. Therefore, when you have 0 or an empty string in a column it is NOT NULL. Only a value of ‘NULL’ is null. If you use an empty string, you can always write a clause like WHERE tablename1.columnname = tablename2.columnname. But, if one of the columns is NULL you cannot join on a NULL value. You would need the query to read WHERE tablename1.columnname IS NULL AND tablename2.columnname IS NULL.
With MySQL, a NULL value cannot be compared to anything else. To see if a column is ‘NULL’ you use ‘IS NULL’ in a query, while ‘IS NOT NULL’ can be used for NOT NULL values. The query cannot use a clause like columnname=NULL. Alternatively, columnname<=>NULL can be used to find ‘NULL’ values.
IS NOT NULL:
$command = “SELECT * FROM table where columnname IS NOT NULL”;
You can add indexes on InnoDB or MyISAM tables that contain NULL values. Since indexes enhance performance, this a good feature. When you use a clause like ORDER BY or GROUP BY, all; NULL values are equal; just like ordering by lastname asc where three people have the same name ‘Anderson’. When NULL values exist in a column, they will show up first if the data is output by ascending order.
Using a PHP calendar Script can be a convenient method for which to keep track of upcoming events. The script could be integrated for use with Google Calendar or as a stand alone application. One free php calendar script can be found here. The php calendar script demo can be seen here.
Calendar scripts are very popular additions to websites. Hair salons, bed and breakfasts, and event promoters can benefit from online bookings.
Calendar scripts can be built for various access levels. The entire could be private, or only the calendar is available to the public. On the other hand, the script could allow the public to post events on the calendar with or without administrator approval.
The code example below shows how you can take a url array with PHP and use it as a string within Javascript. The urls array could include a file and links to a public Google Calendar.
$command = “SELECT * FROM calendar_urls “;
$result = mysqli_query($db, $command);
while ($row = mysqli_fetch_assoc($result)) {
$url = $row[‘calendar_array’];
$urls[] = $url;
}
When it comes to altering data from the database, PHP usually has an answer. In this particular situation, we are outputting weight from the database. The rows from the database output with lbs. For example, the weight for John Sims may be 175 lbs. Now, we want to remove the lbs because the plan is to use the 175 for comparison with Google Chart Tools.
How to we remove the lbs from each row that outputs? We use the preg_replace() function to select only digits.
The header() function has various uses. It can output headers for an xml file, force downloads and redirect pages to a new url. If it is used to redirect a url, there must not be any html or text of any sort.
Redirect With Header() Function
PHP Force Downloading
CREATING XML File
echo ‘<urlset xmlns:xsi=”http://www.w3.org/2001/XMLSchema-instance” xsi:schemaLocation=”http://www.sitemaps.org/schemas/sitemap/0.9 http://www.sitemaps.org/schemas/sitemap/0.9/sitemap.xsd” xmlns=”http://www.sitemaps.org/schemas/sitemap/0.9″>’;
The example below takes the names, height and age from a database table and outputs it into a simple chart. The original chart was a yearly chart which displayed year, sales and expenses. The key to this example, is to get the desired code into the Javascript.
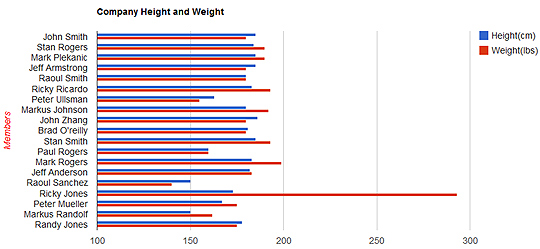
Here is what we want to change:
var data = google.visualization.arrayToDataTable([
[‘Year’, ‘Sales’, ‘Expenses’], [‘2004’, 1000, 400], [‘2005’, 1170, 460], [‘2006’, 660, 1120], [‘2007’, 1030, 540] ]);
Here is what we want to change it to:
var data = google.visualization.arrayToDataTable([
[‘Name’, ‘Height’, ‘Weight’],
<?php echo implode(“,”, $myurl); ?>
]);
<?php
session_start();
include(‘connect.inc’);
$db=public_db_connect();
//get columnname id
$command = “SELECT firstname, lastname, height, weight FROM table_sort WHERE height<>’’ AND weight<>’’ “;
$result = mysqli_query($db, $command);
while ($row = mysqli_fetch_assoc($result)) {
$firstname = trim(addslashes($row[‘firstname’]));
$lastname = trim(addslashes($row[‘lastname’]));
$height = $row[‘height’];
$height = preg_replace(‘/\D/’, ‘’, $height);
$weight = $row[‘weight’];
$weight = preg_replace(‘/\D/’, ‘’, $weight);
$myurl[] = “[‘”.$firstname.” “.$lastname.”’, “.$height.”,”.$weight.”]”;
}
print_r($myurl);
echo implode(“,”, $myurl);
?>
<html>
<head>
<script type=”text/javascript” src=”https://www.google.com/jsapi”></script>
<script type=”text/javascript”>
google.load(“visualization”, “1”, {packages:[“corechart”]});
google.setOnLoadCallback(drawChart);
function drawChart() {
var data = google.visualization.arrayToDataTable([
[‘Name’, ‘Height’, ‘Weight’],
/* [‘2004’, 1000, 400],
[‘2005’, 1170, 460],
[‘2006’, 660, 1120],
[‘2007’, 1030, 540]*/
<?php echo implode(“,”, $myurl); ?>
]);
var options = {
title: ‘Company Height and Weight’,
vAxis: {title: ‘Members’, titleTextStyle: {color: ‘red’}}
};
var chart = new google.visualization.BarChart(document.getElementById(‘chart_div’));
chart.draw(data, options);
}
</script>
</head>
<body>
<div id=”chart_div” style=”width: 900px; height: 500px;”></div>
</body>
</html>
The Google pie chart below is made from querying the mySQL database. Then, an array is made. The array must fit exactly the same way as it is presented in the javascript file. After the array is built, you add PHP code into the Javascript.
Add the code:
<?php echo implode(“,”, $myurl); ?>
This code turns the array into a string that replaces hard coded values.
//get columnname id
$command = “SELECT DISTINCT lastname FROM table_sort “;
$result = mysqli_query($db, $command);
while ($row = mysqli_fetch_assoc($result)) {
$lastname = trim(addslashes($row[‘lastname’]));
$lastnamearray[] = $lastname;
//get the count
$commandb = “SELECT count(*) as cnt FROM table_sort WHERE lastname =’$lastname’ “;
$resultb = mysqli_query($db, $commandb);
while($row = mysqli_fetch_assoc($resultb)) {
$cnt = $row[‘cnt’];
$myurl[] = “[‘”.$lastname.”’,”.$cnt.”]”;
}
}
?>
<style>
#chartArea{background:red;}
#chart_div{background-color:white;}</style>
<!–Load the AJAX API–>
<script type=”text/javascript” src=”https://www.google.com/jsapi”></script>
<script type=”text/javascript”>
// Load the Visualization API and the piechart package.
google.load(‘visualization’, ‘1.0’, {‘packages’:[‘corechart’]});
// Set a callback to run when the Google Visualization API is loaded.
google.setOnLoadCallback(drawChart);
// Callback that creates and populates a data table,
// instantiates the pie chart, passes in the data and
// draws it.
function drawChart() {
// Create the data table.
var data = new google.visualization.DataTable();
data.addColumn(‘string’, ‘Rep’);
data.addColumn(‘number’, ‘Assigned Leads’);
data.addRows([
/* [‘Mushrooms’, 3],
[‘Onions’, 1],
[‘Olives’, 1],
[‘Zucchini’, 1],
[‘Pepperoni’, 2]*/
<?php echo implode(“,”, $myurl); ?>
]);
// Set chart options
var options = {‘title’:’Display Last Names’,
‘width’:500,
‘height’:450};
// Instantiate and draw our chart, passing in some options.
var chart = new google.visualization.PieChart(document.getElementById(‘chart_div’));
chart.draw(data, options);
}
</script>
</head>
<body>
<!–Div that will hold the pie chart–>
<div id=”chart_div”></div>
</body>
</html>
Google has many free tools and javascripts for which a developer can download and use. A very good set of tools for a PHP programmer are the chart tools. Basically, the chart tools are javascripts provided by Google. But, php developers can use them with PHP / mySQL queries to put the data into the charts. They keyo to most charts is the usage of php tags within the Javascript. Since most charts use an array of data; PHP allows you to print a string within the Javascript so that you can input desired data from the database. This section will demonstrate how to effectively use the charts with php tags within Javascript code.
Many Google Codes can be found at the ‘Code Playground’.
The Google Playground can be found at http://code.google.com/apis/ajax/playground/?type=visualization
For example, pie charts can be found at the playground.
To get a desired chart at the ‘Google Playground’,
1) Select an option under ‘Pick Api’.
2) Select ‘View Docs’.
Google Pie Charts
If you want to add a Google pie chart to your website, you can find them at https://developers.google.com/chart/interactive/docs/quick_start or https://developers.google.com/chart/interactive/docs/gallery/piechart
To locate mysql errors, you can use the code below after you run a query. Then, load the page in the browser and locate the error.
print (“Query: “.$command.” Error Message: “.mysqli_error($db));
$command = “SELECT firstname, lastname, height, weight FROM table_sort WHERE height<>” AND weight<>” “;
$result = mysqli_query($db, $command);
print (“Query: “.$command.” Error Message: “.mysqli_error($db));
This tutorial explains how to fix Wamp server when it does not work properly. After many reliable uses, Wamp could suddenly not work as expected.
To deal with a failed boot,
1) Check for other programs(particularly Skype) using port 80. If Skype is on, quite Skype and run Wamp first. The conflict disables Wamp but Wamp won’t disable Skype.
If the above fails,
1) Click wamp icon >Apache >Service >Remove Service
2) Click wamp icon >mysql >Service >Remove Service
3) Click wamp icon >Apache >Service >Install Service
4) Click wamp icon >mysql >Service >Install Service
5) Click wamp icon >Restart All Services
Using a PHP Download Script can be a convenient method for which to keep track of uploads and downloads on a website. The script could be used in a method for which the administrator can login to the backend and set files for downloading. The files could be any extension from jpeg to mp3 to txt. One free php downkoad script can be found here. The php file download script demo can be seen here.
File upload and download scripts can be extremely useful for people who surf the web and want to store jquery plugins, javascripts and other code formats like css. File management will make code reusability much simpler and faster.
The heart of PHP upload and download scripts can be easy to make. The upload script will need a form an input box designed for file uploads while the download script will need to force downloads for various file types.
<form enctype=”multipart/form-data” action=”<? echo $_SERVER[‘PHP_SELF’]; ?>” method=”post”>
<input type=”hidden” name=”MAX_FILE_SIZE” value=”1000000″>
<input type=”hidden” name=”myhid” value =”hi”>
<style type=”text/css”>
$myfilename=$_GET[‘filename’];
The Cpanel layout can be customized by dragging and positioning the various headings such as; Preferences, Mail, Files, Logs, Security, Logs, Domains, databases, Software / Services and Advanced. The simple order change occurs with a lef click next to the heading followed by dragging the section up or down to the desired location.
Cpanel makes it easy to back up some or all of your account. If you back up the entire account, you can easily move all email accounts, databases and files to a new server.
When you login to cpanel, you can access your files with File Manager. Look for the ‘Files’ heading which contains the various icons like Backups, Backup Wizard and File Manager. Using File manager is a decent option when you cannot access FTP. Many prefer using a text editor like Notepad++ and using FTP versus using File Manager.
Cpanel comes with various built-in applications which can be used to track visitors and bots that come to the website(s). From the list of options, manhy people like awstats. The first thing to remember about tracking web traffic is that no two sources ever give the same results. These los can be used in conjunction with Google Analytics to view information about traffic sources.
To open a log,
1) Select an icon within the ‘Logs’.
The various data sources are easy to use. For this example, Awstats will be demonstrated.
2) Select a website.
3) Read Stats
The stats will explain various pices of data such as unique visitors, pages, pages where visitor entered, pages where visitor exited, countries and page views, ip addresses, links, search keyphrases, viewer browser usage and origin of visitor. The origin of visitor attempts to explain which users came from a search engine and those who came from a direct address, bookmark and email link.
If you use open source software like Joomla, you will often read about security warnings, updates and hacks. People who work at hosting companies can be prime suspects since they have access to so many passwords on shared accounts. And, turnover in some comapnies can be very high. However, the web is rife with individuals who spend their time invading other’s space. In the web world, the best you can do is the best you can to defend yourself, then more. Often, there is a solution to your problem. With Joomla 1.5, there are many things you can do to protect yourself. Below, are a few such preparations.
2. Disable administrator reset password. Disabling the reset password takes away from anybody who can reset the password with your email address.
a) Open file: components\com_user\models\reset.php
b) Look for:
// Build a query to find the user
$query = ‘SELECT id FROM #__users’
. ‘ WHERE email = ‘.$db->Quote($email)
. ‘ AND block = 0’
c) Add line:
. ‘ AND usertype NOT LIKE \’%Administrator%\”;
3. Alter files components\com_content\views\article\view.html.php and components\com_content\views\frontpage\view.html.php
The idea here is to not allow document revisons. The user could login, but he would not be able to make changes.
Change:
$access->canEdit = $user->authorize(‘com_content’, ‘edit’, ‘content’, ‘all’);
$access->canEditOwn = $user->authorize(‘com_content’, ‘edit’, ‘content’, ‘own’);
Change To:
$access->canEdit = $user->authorize(‘com_content’, ‘edit’, ‘content’, ‘none’);
$access->canEditOwn = $user->authorize(‘com_content’, ‘edit’, ‘content’, ‘none’);
Change:
$access->canPublish = $user->authorize(‘com_content’, ‘publish’, ‘content’, ‘all’);
Change To:
/*$access->canPublish = $user->authorize(‘com_content’, ‘publish’, ‘content’, ‘all’);*/
4. Download component IP Filter
a) Set login access for the specific user from a specific ip
The admin would only have access from specific computers. If you need to change this in an emergency, use phpmyadmin to adjust ips or delete entry.
5. Install a plugin to redirect backend access. For example, example.com/administrator would create a 404 page error because the admin needs to add code like example.com/administrator/#my_special_code to view a username and password field.
6. Install Joomla Hackguard plugin. The plugin filters $_POST, $_GET and $_COOKIE variables, sanitizes data and more. The plugin is available for Joomla 1.5-2.5. The plugin was designer by the hosting company Siteground.
7. Try to have the latest version and install patches as needed.
Summary:
We have disabled anyone from having the ability to edit content from the front end. We have allowed private entry to the backend. Onle the admin can login to the frontend to edit forums and other components from a specific ip. We have also limited chances for successful sql injections and have filtered tainted code.
The following example for php and ajax will show how to make an input box with a specific name when a button is clicked. When a button is clicked, the id for the particular person is passed into a url. The id of the person is then used to output his first name in an input box.
Three files are used. One file is the page you see in the browser, another file connects to the database and the third file outputs the new input box.
File#1
</script>
</head>
<form method=”post” action=”<?php echo $_SERVER[‘PHP_SELF’].”?”.$_SERVER[‘QUERY_STRING’]; ?>”> <?php
$command= “SELECT id, firstname, lastname FROM table_sort WHERE id=3 “;
$result = mysqli_query($db, $command);
if ($result && mysqli_num_rows($result) > 0) {
while ($row = mysqli_fetch_assoc($result)) {
$id=$row[‘id’];
$firstname=$row[‘firstname’];
echo ‘<div id=”my_text”><input type=”button” value=”‘.$firstname.'” name=”‘.$id.'” onclick=”listMembers(this.name)” /></div>’;
}
}?>
</form>
</html>
File #2
$command3=”SELECT firstname, lastname FROM table_sort WHERE id =’$myid’ “;
$result3 = mysqli_query($db, $command3);
while($row = mysqli_fetch_assoc($result3)){
$first_name=$row[‘firstname’];
echo “Output for: “.$first_name.”<br/>”;
echo ‘<input type=”text” value=”‘.$first_name.'” name=”members” />’;
}
mysqli_close($db);
?>
The following tutorial for php and ajax will show how a drop down menu can be created with php and ajax.The example uses 2 files. The first file, creates a menu that changes when a user selects a value. The second file takes in the id of the person with the email address and makes a new drop down menu based on the id. In this case, the new options are those names with an id greater than the $_GET[‘mystring’] and less than that value + 4.
File#1
function listMembers(str)
{
if (str==””)
{
document.getElementById(“my_text”).innerHTML=””;
return;
}
if (window.XMLHttpRequest)
{// code for IE7+, Firefox, Chrome, Opera, Safari
xmlhttp=new XMLHttpRequest();
}
else
{// code for IE6, IE5
xmlhttp=new ActiveXObject(“Microsoft.XMLHTTP”);
}
xmlhttp.onreadystatechange=function()
{
if (xmlhttp.readyState==4 && xmlhttp.status==200)
{
document.getElementById(“my_text”).innerHTML=xmlhttp.responseText;
}
}
xmlhttp.open(“GET”,”ajax-get.php?mystring=”+str,true);
xmlhttp.send();
//alert(str);
}
</script>
</head>
<?php
function tablesort_menu() {
global $db;
echo ‘<select id=”my_text” name=”members” onchange=”listMembers(this.value)”>’;
$command= “SELECT DISTINCT id, email FROM table_sort “;
$result = mysqli_query($db, $command);
if ($result && mysqli_num_rows($result) > 0) {
while ($row = mysqli_fetch_assoc($result)) {
$id=$row[‘id’];
$name=$row[’email’];
echo “<option value=\”$id\” >$name</option>\n”;
}
}
echo ‘</select>’;
}
?>
<form method=”post” action=”<?php echo $_SERVER[‘PHP_SELF’].”?”.$_SERVER[‘QUERY_STRING’]; ?>”> <?php
tablesort_menu(); ?>
</form>
</html>
File #2
$command2=”SELECT firstname, lastname FROM table_sort WHERE id>’$myid’ AND id<‘$myid2’ ORDER BY firstname ASC”;
$result2 = mysqli_query($db, $command2);
echo ‘<select name=”name_list”>’;
while($row = mysqli_fetch_assoc($result2)){
$first_name=$row[‘firstname’];
$last_name=$row[‘lastname’];
echo “<option value=\”$first_name\” >$first_name</option>\n”;
}
echo ‘</select>’;
mysqli_close($db);
?>
When you pick a CMS, it can’t hurt to do a little homework. You’ve heard of the big players; like Joomla, Drupal and WordPress. Although these CMS’ have great features and expandability, they may not offer the typical website owner the styling flexibility and performance of a Lightweight PHP CMS. From a web developer’s point of view, you get very well acquainted with how long page load times takes with some platfroms; since you saving and testing can run into the hundreds of thousands. When you do this, you can see and feel a huge difference between 1/10 of a second and 2 seconds. Throw in a slow web cafe and 2 turns to four.
After years using Joomla and WordPress for content management, we made the switch to a custom php cms since it delivered better performance, exact styling and faster completion.
As a case study, remember an example with someone who spent countless hours to build a website with WordPress. Then, I copied his source code and dumped it into Sitemakin CMS. Then, I opened up the editor and made some changes. All of this took place in less than 2 minutes. Then, a quick eyeball even showed how much faster of a load time the new site had over the original.
Also, if you go custom coded sites you can also php code around any other templates that come with the package. Many template companies now provide so much good code at a very affordable price. Code that is much more workable on a customizable level.
PHP / mySQL is used by programmers to store and output data. Well, there is a lot more to it. PHP can use a lot of built in Internet information like rss feeds, display dates and times from a server, and print html / css…just to name a few things.The 4 commands below can be implemented to select, add, update and delete data.
The select statement is the basic command which grabs data from the database. The select statement can be very basic or more advanced. A basic select statement would grab all data from one database table and output it in a list or table.
Normally, the programmer grabs the desired data then lets html, css and javascript to apply special styling to the data.
The basic SELECT statement can only take place when you connect and select a database. Once you have done that, you can select data.
$command = “SELECT * FROM table_sort ” ;
$result= mysqli_query($db, $command);
$row = mysqli_fetch_assoc($result);
$first= $row[‘firstname’];
$last = $row[’email’];
echo “”.$first.” “.$email;
The connection to the mySQL database is the basics to php / mySQL. If this fails, all fails. Once you can connect to a database, you can select and alter data. It is like learning to walk.
Whether you plant to create a simple or elaborate PHP / mySQL application, you must connect to a mySQL database. There are many ways to write the code for which to do so, but,two functions will be present for you to do so. The two functions are mysqli_connect() and mysqli_select_db. The function mysqli_connect will appear first for obvious reasons. Doesn’t it make sense to first connect to a database then select it?
Normally, there are two methods for which the connection takes place. One technique is to use a function and the other is to just add the code into a page. Using a function is more secure and it saves on code repetition. This might not look like much now, but, an 8,000 word php/mysql application with separate database connection files used on a new server could be a hassle to fix up more than once.
The code below $db = public_db_connect(); calls the function and returns the $db variable. That variable can be passed into select, update, delete, and insert into queries.
$host = “localhost”;
$user = “user”;
$pw = “password”;
$database = “database_name”;
$db = mysqli_connect($host, $user, $pw, $database) or die(“Cannot connect to mySQL.”);
return $db;
}
$db = public_db_connect();
$command = “SELECT * FROM table_sort where id >0”;
$result = mysqli_query($db, $command);
if($result){
echo “There are entries”;
}
The code below will connect to a database. The $db variable is used in the mysqli_query() function. The output is the same as the example above.
$db = mysqli_connect($host, $user, $pw, $database)
or die(“Cannot connect to mySQL.”);
mysqli_select_db($db, $database)
or die(“Cannot connect to database.”);
$command = “SELECT * FROM table_sort where id >0”;
$result = mysqli_query($db, $command);
if($result){
echo “There are entries”;
}
Add on domains are a great asset to any web developer. When you have a hosting account you often have the option to have many or unlimited addon domains on one account.In most aspects, it is a great value for your buck. However, there are some differences that must be noted about addon domains. An addon domain gets made as a subdomain. You may see that the new site example.com shows up in the browser just like the main domain, and an added subdomain shows as subdomain.example.com. But, a page on the addon domain can be viewed as example.mainsite.com/mypage.html. Although this looks innocent, it can cause some of the urls of the addon domain to rank higher on Google than the actual subdomain. To solve the issue of urls shoing up as a potential subdomain or actual url, the codes below can be added to the htaccess file so your site cannot be access through the subdomain.
RewriteCond %{HTTP_HOST} mainsite\.com$
RewriteRule ^(.*)$ “http\:\/\/www.addondomain\.com\/” [R=301,L]
</IfModule>
RewriteCond %{HTTP_HOST} mainsite\.com$
RewriteRule ^(.*)$ “http\:\/\/www.addondomain\.com\/” [R=301,L]
RewriteBase /
RewriteCond %{REQUEST_FILENAME} !-f
RewriteCond %{REQUEST_FILENAME} !-d
RewriteRule . /index.php [L]
</IfModule>
RewriteCond %{REQUEST_FILENAME} !-f
RewriteCond %{REQUEST_FILENAME} !-d
RewriteCond %{REQUEST_URI} !^/index.php
RewriteCond %{REQUEST_URI} (/|\.php|\.html|\.htm|\.feed|\.pdf|\.raw|/[^.]*)$ [NC]
RewriteRule (.*) index.php
RewriteCond %{HTTP_HOST} websitebc\.com$
RewriteRule ^(.*)$ “http\:\/\/www.example\.com\/” [R=301,L]
RewriteRule .* – [E=HTTP_AUTHORIZATION:%{HTTP:Authorization},L]
#
#
########## End – Joomla! core SEF Section
Calendar Application With Database and Google Integration
You decide to make a custom calendar integrated with Google calendar. In other words, the calendar will grab data from a database and Google Calendar. You explore and discuss the options, and it comes down to a custom script, modified script or purchased script. After browsing the various options, the decision came down to a custom calendar script that will integrate with Google. You surf the web and find this JQuery Plugin called full calendar. The plugin comes with good documentation and it leaves room to do what you want. But, it needs plenty of work and adjustments to make it function exactly as desired.
Initially, the first step is to download the files and test them in wamp or Firefox. After looking into the files, you
attempt to set it up to work seamlessly with Google Calendar. But, it is not outputting as desired. After a short investigation, adding ‘<script type=’text/javascript’ src=’fullcalendar/gcal.js’></script>’ into the head of the file made things work properly. Then, changing the extension(.html) to index.php helped make things flow perfectly. After all, this is a php/mySQL script and we will need to work with a mySQL database. Then, the files were reordered so that the files of interest were in the root folder and css and js files were in the next level of folders. In the end, we created 4 files; index.php, edit_calendar.php, events.php and connect.inc and used the remaining cs and js files which came with Fullcalendar.
Seeing out it output with Google Calendar laid down a lot of groundwork for database preparation. But, some users will not use Google calendar. Therefore, the script must be made to work with a database as well.
In the end, we set up two database tables for the sources and one for the entries. The sources tables had two entries; one for the the Google calendar xml feed and one for a local file which made an array of the various entries for the calendar.
Then, you customize the a few pages so that entries output and you can add, edit, update and delete entries. With a little intensive date coding session; you end up with a robust system to make and adjust appointments with exact dates and times.
Then, you test to confirm the desired results. After creating, updating, editing and deleting a few entries; you have a solid calendar.
Now that the scripts works, you find change the file order around so that the index.php
Coding Summary:
File: connect.inc
The file connect.inc was added in order to connect to the ABOOK database.
File: index.php
The file json.html became index.php
The script ‘<script type=’text/javascript’ src=’fullcalendar/gcal.js’>’ was added to the head tag
A query was written to make an array of the urls for which to get calendar events. At nearly the same time, the database table was made to hold entries which display on the calendar.
Near line 43 we loaded the url sources for events we want to publish by adding eventSources: [<?php echo implode(“,”, $urls); ?> ]
A form was created to allow for adding events into the database.
File: File: events.php
The file json-events.php became events.php
The static array and commented it out and made the entries come out dynamically with the events array.
File: edit_calendar.php
This file was used to edit and delete entries.
Using the mySQL console is a typical step to learning PHP / mySQL. The mySQL console can be accessed after you start the Apache server in your Windows, Linus or Apple environment. Typically, WAMP or XAMPP is the application which is installed on your pc which contains the mySQL console. The procedure to access the mySQL console is shown below.
1) Start Wampserver

2) Select the WAMPSERVER icon

3) Select MYSQL >MYSQL Console
The advantage os using a mySQL console is that you can run all database queries, connect remotely with Putty on any computer, and run other mySQL commands such as query_cache and view details about available cache memory, etc.
The advantages of using phpMyAdmin is that it has a user interface and you can run queries within the SQL. Another advantage is that you can paste queries into the SQL to test data output; fom a simple ‘Select * FROM tablename’ to more advanced relational queries using various tables. The copying and pasting of queries is not available with the mySQL console. If you make a typo with the mySQL console, you must start again.
In today’s modern web world, publishing content legally on a website has all sorts ramifications. In general, you have the copyright over your material as soon and the words hit the page. However, some individuals or companies will steal content from others to use on their own web site. If you want to keep tabs of your content, you can go copyscape and search your pages. It will list sites who have similar or exact content.
Now that you found some of the culprits, you can compare the details with Way Back Machine at http://wayback.archive.org. Wayback.org will display a website throughout the years. In addition, it never hurts to keep backups of files and databases to show when you published your content. When you find a source of infringement, you can start the process of asking them to remove the content. The page http://www.copyscape.com/respond.php also explains some details about dealing with plagarism.
select password(‘password’);
The password in this case is the string ‘*2470C0C06DEE42FD1618BB99005ADCA2EC9D1E19’
To update a password,
1) Open SQL with phpMyAdmin.
2) UPDATE tablename set password=password(`pass123`) WHERE username =’myname’
However, you can always use the password() function in a query with PHP.
For example,
$string= ‘password123’;
$command = “INSERT into tablename VALUES (NULL, ‘”.addslashes($_POST[email]).”‘, password($string));
However, if you are stuck with trailing whitespace in a VARCHAR column, you can remove it through a two step process:
1) alter column type to char
2) alter column type back to varchar.
Another method is to use trim() or ltrim() function with mySQL or phpMyAdmin.
Here is a query which trism whitespace for all entries in a column for which the id >0.
UPDATE tablename set columnname = rtrim(columnname) WHERE id >0;
Yet, another method is to trim whuitespace with PHP. You can add the trim() function to post variables that are inserted into a database so that whitespace is removed.
Example query:
$var = trim($_POST[‘name’]);
$command = “INSERT into tablename VALUES(NULL, ‘$var’)”;
The code below can be used to get the distinct values in a column. For example, if there was 4 entries which had dog, cat, cat and monkey…the result would be 3.
The mySQL replace() function is a fantastic function for which you can select and change data from a database table. For example, let’s assume one column in a table has lbs or cm next to it; but you want to make mathematical comparisons without the letters. Well, replace() allows you to remove the lbs or cm from the values. The replace() function can be used to replace all sorts of data from a string; such as whitespace, numbers and letters.
include(‘connect.inc’);
$db = public_db_connect();
$command = “SELECT DISTINCT LOWER(firstname) as first, LOWER(lastname) as last, LOWER(Email) as email, replace(replace(height,’ ‘,”),’cm’,”) as height, replace(replace(weight,’ ‘,”),’lbs’,”) as weight, date FROM table_sort WHERE id >0 ORDER BY last ASC” ;
$result = mysqli_query($db, $command);
while($row = mysqli_fetch_assoc($result)){
$firstname = $row[‘first’];
$lastname = $row[‘last’];
$email = $row[’email’];
$height = $row[‘height’];
$weight = $row[‘weight’];
echo $firstname.”-“.$lastname.”-“.$email.”-“.$height.”-“.$weight.”<br/>”;
}
The strtolower() and strtoupper() php functions can be used to change the case of a variable. The example below shows how that is done.
$command = “SELECT DISTINCT firstname, lastname, email FROM table_sort WHERE id >0 ORDER BY lastname ASC” ;
$result = mysqli_query($db, $command);
while($row = mysqli_fetch_assoc($result)){
$firstname = strtolower($row[‘firstname’]);
$lastname = strtoupper($row[‘lastname’]);
$email = $row[’email’];
echo $firstname.”-“.$lastname.”-“.$email.”<br/>”;
}
include(‘connect.inc’);
$db = public_db_connect();
//MYSQL LOWER() and UPPER() Functions
$command = “SELECT DISTINCT LOWER(firstname) as first, UPPER(lastname) as last, LOWER(Email) as email FROM table_sort WHERE id >0 ORDER BY last ASC” ;
$result = mysqli_query($db, $command);
while($row = mysqli_fetch_assoc($result)){
$firstname = $row[‘first’];
$lastname = $row[‘last’];
$email = $row[’email’];
echo $firstname.”-“.$lastname.”-“.$email.”<br/>”;
}
To export a relational database query or custom set of tuples,
1) Select Query results operations >Export >Choose CSV (for compatibility)
2) The csv file can be opened in Excel for viewing purposes.
Note:
If you export a sql file it will give entire table even though your query created custom columns with custom values. But, if you export a csv file and make a new table with same column count you can import the csv file into a new table.
To import the csv file into a new database table,
1) Create a database table with the same number of columns.
2) Import the file into the new table.
3) Add a new column with autoincrement field if desired. The column will populate automatically.
Warning: Invalid argument supplied for foreach() in C:\wamp\www\ABOOK\SORTING\TABLES\filename.php on line 162
To get to the through the root of the problem you can backtrack and make sure your array and its values are properly represented. Using print_r() always help in showing your array. If the array is good, the next step would be to analyze the items within the array.
This simple contact form can be used to validate and send email. It checks for a few basic requirements like a properly written email address, a name and a message.
if (count($_POST) >0) {
if (!filter_var($email, FILTER_VALIDATE_EMAIL) || ($name == “Your Name” || $email == “Your Email” || $message == “Message”)) {
header(‘Location: https://fullstackwebstudio.com/locations/coding-blog’);
exit();
} else {
$body = “”;
$body .= “name: “;
$body .= $name;
$body .= “\n”;
$body .= “message: “;
$body .= $message;
$body .= “\n”;
// send email
$mail_send = mail($email_send_to, $subject, $body, “From: <$email>”);
echo “Mail was successfully sent!”;
}
}
?>
<div>
<form method=”post” action=”contact_form.php”>
<p><input name=”name” type=”text” onfocus=”if(this.value==’Your Name’) this.value=”” value=”Your Name” /></p>
<p><input name=”email” type=”text” onfocus=”if(this.value==’Your Email’) this.value=”” value=”Your Email” /></p>
<p><textarea style=”width:400px;” name=”message” onfocus=”if(this.value==’Message’) this.value=””>Message</textarea></p>
<p><input name=”submit” type=”submit” value=”Send Message”/></p>
</form>
</div>
The code below can be used to set an image in the background that will stretch and fit the width of various computer monitor sizes.
Larger images like 2100 x 500 help insure the centered look look good in all monitors.
The code below is used to display the various css files with a directory.
if($_POST[‘dir’]){
$dir = $_POST[‘dir’];
}
else {
$dir = getcwd();
//echo $directory;
}
The code below scans the files in tye directory. The files are in an array. Then, the array is sorted with a foreach loop. If the file name is longer than 3 characters and contains ‘.css’, the file list is output.
$files1 = scandir($dir);
foreach($files1 as $file){
if(strlen($file) >=3){
$foil = strstr($file, ‘css’); // As of PHP 5.3.0
//$pos = strpos($file, ‘css’);
if ($foil==true){
echo $file.”<br/>”;
}
}
}
Joomla components are built to use within the Joomla frontend and backend. One folder within the administrator folder is used to display the component when logged into the administrator backend while another folder is located inside the components folder. Bot folders contain the name of the component; such as as com_componentname. However, the frontend files can include files from the administrator folder. The excerpt below shows the basic structure of a component.
DEFINE TOOLBARS
administrator/components/com_componentname/toolbar.componentname.html.php
DECIDE WHICH TOOLBAR TO DISPLAY
administrator/components/com_componentname/toolbar.componentname.php
BACKEND DISPLAY
administrator/components/com_componentname/controller.php
Contains component functions like public, show entries, edit, publish, save and delete
BACKEND DISPLAY
administrator/components/com_componentname/admin.componentname.php
-puts the files together
-includes files like the html file (admin.componentname.html), adds tables, instantiates the controller object and displays
default task
BACKEND DISPLAY
administrator/components/com_componentname/admin.componentname.html.php
-contains HTML_componentname class and html code for functions like editReview, showReviews, etc
FRONTEND
START
components/componentname/componentname.php
-loads tables, includes controller and instantiates the controller object, dislays default task like view all
components/componentname/controller.php
-uses display() function
-displays requested view and corresponding model
-Normally, one var is all entries and the other is a single entry with one id. Code is below to display desired view.
Jrequest::getVar(‘view’, ‘all’);
router.php
-used to give adequate views and ids
VIEWS FOLDER
-contains folders for views; such as all or a single view. The folder must not use the name view or an error will trigger.
– view files within subfolders are named view.html
All Entries
class ComponentnameViewSubfoldername extends JView {
Single Entries
class ComponentnameViewSubfoldername extends JView {
MODELS FOLDER
-contains models for a single revue or all the revues
-class name is class ModelComponentnameFilename extends JModel
-Model and and view will have matching names
To alter the Joomla 1.5 activation message,
1) Open file: components\com_user\controller.php
Note: The activation() function is where you can add custom text. Alternatively, you can look for the JTEXT constants; such as JText::_( ‘REG_ACTIVATE_COMPLETE_TITLE’ ) and alter the file language/en-GB/en-GB.com_user.ini.
Below, a sample is shown which adds custom text inside the validate() function.
$message->title = JText::_( ‘REG_ACTIVATE_COMPLETE_TITLE’ );
$message->text = JText::_( ‘REG_ACTIVATE_COMPLETE’ );
echo “You can now <a href=\”http://bellecar.com\”>LOGIN HERE!</a>”;
or put at bottom of activation() function
$message->title = JText::_( ‘REG_ACTIVATE_COMPLETE_TITLE’ );
$message->text = JText::_( ‘REG_ACTIVATE_COMPLETE’ );
echo “You can now <a href=\”http://bellecar.com\”>LOGIN HERE!</a>”;
or put at bottom of activation() function
Sample:
else
{
// Page Title
$document->setTitle( JText::_( ‘REG_ACTIVATE_NOT_FOUND_TITLE’ ) );
// Breadcrumb
$pathway->addItem( JText::_( ‘REG_ACTIVATE_NOT_FOUND_TITLE’ ));
$message->title = JText::_( ‘REG_ACTIVATE_NOT_FOUND_TITLE’ );
$message->text = JText::_( ‘REG_ACTIVATE_NOT_FOUND’ );
}
echo ‘<br/><br/>’;
$view->assign(‘message’, $message);
$view->display(‘message’);
echo “<br/>Registered members can <a href=\”http://bellecar.com\”>LOGIN HERE!</a>”;
//end validate()function }
The PHP sort() function is a simple way to sort an array.The sort() function removes old keys and makes new ones. Although the results can be unpredictable in some instances, it can be useful in sorting arryas alphabetically or by date.
With the array_diff() function, you can compare 2 arrays and get the difference between the two of them. The code below takes ids from one table and compares it to the ids of another table.
## Get second array
$command2 = “SELECT * FROM table2 “;
$result2 = mysqli_query($db, $command2);
$rows_count = mysqli_num_rows($result2);
if($rows_count >0) {
while($row = mysqli_fetch_assoc($result2)) {
$id = $row[‘id’];
## Make an array of all ids
$id2[] = $id;
}
}
else{
$id2[]=0;
}
## CCompare teh difference of the ids in the 2 tables
$result_diff = array_diff($1id, $id2);
Using while loops, you can extract rows of data for which you and create variables with the results. Afterwards, you can use the variables to sort through more data. When sorting through databases, you can write single queries to obtain rows from one or more tables.
From time to time, you may find you need a large query to obtain the data you want. In this case, using joins is the way to go. But, the next two examples show has one query is used to capture ids from the first table. Then, the ids are used to select a url if the member_id exists in the second table. Again, this is spotting issues rather than recommending as a procedure.
<?php require_once(‘dbconnect.inc’);
$db=dbconnect();
$start = microtime(true);
$command= ‘SELECT id FROM table_sort ‘;
$result = mysqli_query($db, $command);
while($row = mysqli_fetch_assoc($result)) {
$id = $row[‘id’];
$command2= “SELECT url FROM members_urls WHERE member_id=’$id’ “;
$result2 = mysqli_query($db, $command2);
while($row = mysqli_fetch_assoc($result2)) {
$url = $row[‘url’];
echo $url.'<br/>’;
}
}
Example #2
This example shows how an array can be made with the second while loop. Then, the array is pulled outside the loop and individual values are printed.
<?php require_once(‘dbconnect.inc’);
$db= dbconnect();
$start = microtime(true);
$command= ‘SELECT id FROM table_sort ‘;
$result = mysqli_query($db, $command);
while($row = mysqli_fetch_assoc($result)) {
$id = $row[‘id’];
$command2= “SELECT url FROM members_urls WHERE member_id=’$id’ “;
$result2 = mysqli_query($db, $command2);
while($row = mysqli_fetch_assoc($result2)) {
$url = $row[‘url’];
$url_array[] = $url;
}
}
$url_array = array_unique($url_array);
//print_r($url_array);
foreach($url_array as $item) {
echo $item.'<br/>’;
}
When an entry is added to a database, you could insert ‘NULL’ by default if wish to do so. One such example could be that you have a form and the user can insert their email address or leave it blank. If it is left blank, the default ‘NULL’ value can be inserted instead.
With PHP, you may want to see if text exists in a string. For example, you may have database output from an api and you want to search the rows for particular string. Or, you may want to make conditional statements based on the database output. For example, you may to sort the same ‘John’ from all other names in a loop. The code below shows two methods for doing so using the preg_match() function and the strpos() function.
$string_entire = “SF Giants in World Series”;
$string_to_find = ‘SF Giants’;
if(preg_match(“/$string_to_find/”, $string_entire)==true) {
echo “<br/>Found it!”;
}
else {
echo “<br/>Not in the string”; }
?>
PHP is quite good at helping you fix errors. At times, you may make the od mistake by closing a bracket with a square bracket when it should be a curly brace. The code below is an example for which you should go to line 22 and fix the error.
PHP programmers will see error codes during development. One such error is ‘unexpected T_STRING’. This error usually means a semi-colon is missing. The error code will give a line number and it is best to start from there. Then, correct the error and try again. below is an example of the error as it would be displayed in a browser.
JQuery makes it very simple to alter css properties for an element, id, or class. The code below shows how an input value can become orange in case the number is greater than 10.
Initially, the change() function is activated when an input field changes. It is similar to Javascript’s onchange attribute. Then, the value is stored as an object with $(this).val() and the class is stored as an object $(this).attr(‘class’). Now, conditional statements are used to change the css text color if the value of a given input box becomes greater than 10. If it becomes greater than 10 the text becomes orange. If the text is 10 or less it becomes black. The full code is given below.
$(document).ready(function(){
$(“input”).change(function() {
var myvalue = $(this).val();
var myattributenclass = $(this).attr(‘class’);
if(myvalue > 10 && myattributenclass == “class1”){
$(this).css(“color”, “#dc4000”);
}
else {
$(this).css(“color”, “#000000”);
}
if(myvalue > 10 && myattributenclass == “class2”){
$(this).css(“color”, “#dc4000“);
}
else {
$(this).css(“color”, “#000000”);
}
if(myvalue > 10 && myattributenclass == “class3”){
$(this).css(“color”, “#dc4000“);
}
else {
$(this).css(“color”, “#000000”);
}
if(myvalue > 10 && myattributenclass == “class4”){
$(this).css(“color”, “#dc4000”);
}
else {
$(this).css(“color”, “#000000”);
}
if(value > 10 && myattributenclass == “class5”){
$(this).css(“color”, “#dc4000“);
}
else {
$(this).css(“color”, “#000000”);
}
});
});
First of all, not all loops are created equal. When coding in PHP or any other language for that matter, it never hurts to write code that is highly optimized. With PHP, there are so many ways to do things that you will see code written in all sorts of ways. And loops are particularly vulnerable to such unorthodox ways for which they can be written.
Since loops are often written within loops, a multitude of options are available. For example, you may query a database and obtain an array of ids in a while loop. Then, you may want to run another while loop within the while loop to check another table for data where the ids match.
Here are 2 examples for which the output is exactly the same. The first sample uses a single loop to print out data while the second example will make an array of the ids in the first loop, then use that array to find other data in a second loop. As you can see with a timing function called microtime(), example one not only outperforms example 2; it blows it away.
The small time might seem unnoticeable to the eye, but with larger websites, larger traffic and more loops added into the equations; writing optimized code can sure pay dividends. The overall performance will be better since less resources will be consumed. If you want to go big, you will want your queries as optimized as possible.
$db=db_connect();
$start = microtime(true);
//$ids_all = array();
$id=array();
$command= ‘SELECT id, firstname, age FROM table_sort’;
$result = mysqli_query($db, $command);
while($row = mysqli_fetch_assoc($result)) {
$id = $row[‘id’];
$user_age = $row[‘age’];
$user_firstname= $row[‘firstname’];
echo “<h2>Hi id #”.$id.”</h2>”;
echo “Firstname: “.$user_firstname.” | Age: “.$user_age.”<br/>”;
}
$end = microtime(true);
$elapsed_time = number_format($end – $start,4);
echo “Time took $elapsed_time seconds\n”;
$db=db_connect();
$start = microtime(true);
//$ids_all = array();
$id=array();
$command= ‘SELECT id FROM table_sort’;
$result = mysqli_query($db, $command);
while($row = mysqli_fetch_assoc($result)) {
$id = $row[‘id’];
$ids_all[] = $id;
}
$ids_all = array_unique($ids_all);
foreach($ids_all as $id_user){
echo “<h2>Hi id #”.$id_user.”</h2>”;
$command = “SELECT age, firstname FROM table_sort where id=’$id_user’ “;
$result = mysqli_query($db, $command);
while($row = mysqli_fetch_assoc($result)) {
$user_age = $row[‘age’];
$user_firstname= $row[‘firstname’];
echo “Firstname: “.$user_firstname.” | Age: “.$user_age.”<br/>”;
}
}
$end = microtime(true);
$elapsed_time = number_format($end – $start,4);
echo “Time took $elapsed_time seconds\n”;
You probably have noticed that you had seen a website load that did not start at the top. Instead, it started somewhere in the middle. When you link to a page, or post a form with PHP, you can always specify where you want the top of the page. The link or code to start a page at a specific spot looks like http://excample.com/#article_id. The code below shows a couple of samples of how the codes will look as a link and a form post field in PHP.
PHP Form
<html><body>
<div style=””><form method=”post” action=”<?php echo $_SERVER[‘PHP_SELF’].”#article_id”;?>” name=”myform” >
<div style=”float:left; “><textarea style=”height:2000px; width:600px;” name=”article”>
Add text here.
</textarea></div>
<input type=”hidden” name=”hidden_name” value=”” />
<div style=”float:left; margin-top:20px; margin-left:10px;”>
<input name=”submit” style=”display:visible; width=”150″ type=”submit” value=”Add Post” height=”25″ border=”0″ alt=”Submit Form” /></div>
</form></div>
<div style=”clear:both;”></div>
<div id=”article_id”>Here is the text at the top.<br/>Here is the text at the top.<br/>Here is the text at the top.<br/>Here is the text at the top.<br/>Here is the text at the top.<br/>Here is the text at the top.<br/>Here is the text at the top.<br/></div>
</body></html>
Here is a little snippet which allows you to print a page. When the print button is selected, you will be able to select a print, adjust settings(if desired) and print the page.
<div>
<form class=’do_no_print’><input type=”button” value=”Print Page”
onclick=”window.print();return false;” /></form> </div>
<div>Print the content of the page.</div>
Here are two methods for which you can use DOM(Document Object Model) to use values within html forms.
<html><body>
<script>
function get_price(value){
var price1 = document.getElementById(“myid”).value;
//return true;
alert(“Price is: $”+ price1 + “.00”);
window.location.reload();
return true;
}
</script>
<div>Hats
<form>
<input type=”text” id=”myid” name=”myid” value=”25″/>
<input type=”button” id=”thebutton” name=”thebutton” onclick=”get_price(this.form.myid.value)”/>
</form></div><div style=”clear:both;”></div>
</body></html>
<html><body>
<script>
function get_price(){
var price1 = document.getElementById(“myid”).value;
alert(“Price is: $”+ price1 + “.00”);
window.location.reload();
return true;
}
</script>
<div>Hats
<form>
<input type=”text” id=”myid” name=”myid” value=”25″/>
<input type=”button” id=”thebutton” name=”thebutton” onclick=”get_price()”/>
</form></div><div style=”clear:both;”></div>
</body></html>
Update is one of the main features for CRUD (Create, Read, Update and Delete). Normally, updating a database is performed on single entries or rows; such as users changing a profile or updating an address. However, using the for loop, you can update multiple records at once.
For example, you could have a list of players on a football team and you need to adjust their weights for a particular reason. The script below shows how all entries of a table can be output with editable input fields for each player. Upon submit, any adjustments to any row happens almost instantly.
$i=0;
$count = count($id);
#The loop below takes in account of all the rows in the table. Then an update is applied to each row; whether it is changed or not. If the row is unchanged, it updates based on the original values.
for ($i=0; $i < $count; $i++) {
$id_from_loop = mysqli_real_escape_string($db, $id[$i]);
$lastname_from_loop = mysqli_real_escape_string($db, $lastname[$i]);
$firstname_from_loop = mysqli_real_escape_string($db, $firstname[$i]);
$email_from_loop = mysqli_real_escape_string($db, $email[$i]);
$height_from_loop = mysqli_real_escape_string($db, $height[$i]);
$age_from_loop = mysqli_real_escape_string($db, $age[$i]);
$weight_from_loop = mysqli_real_escape_string($db, $weight[$i]);
$command = “SELECT * FROM table_sort WHERE id=’$id_from_loop’ “;
$result = mysqli_query($db, $command);
if (mysqli_num_rows($result) > 0) {
$command = “UPDATE table_sort SET firstname=’$firstname_from_loop’, lastname=’$lastname_from_loop’, email=’$email_from_loop’, height=’$height_from_loop’, age=’$age_from_loop’, weight=’$weight_from_loop’ WHERE id=’$id_from_loop’ “;
$result = mysqli_query($db, $command) or die(mysqli_error($db));
} else {
echo “There are no records!”;
}
}
?>
<div>Directory has been updated!</div>
<?php
}
?>
<form method=”post” action=”<?php echo $_SERVER[‘PHP_SELF’]; ?>” name=”directory”>
<div><p><input type=”submit” name=”submit” value=”Update” /></p></div>
<div style=”clear:both;”></div>
<?php
?>
<div>
<table style=”width:100%;”>
<tr>
<th>id</th><th>Last Name</th><th>First Name</th><th>Email</th><th>Height</th><th>Age</th><th>Weight</th><th>Date</th>
</tr>
<?php
################ Here we create the list of all entries from the database table and the form names use [] to create arrays of post variables for each entry.
$command = “SELECT * FROM table_sort ORDER BY id ASC “;
$result = mysqli_query($db, $command);
while ($row = mysqli_fetch_assoc($result)) {
//Remove a person if you want
//if($row[‘lastname’] == ‘Zhang’) { continue; }
$myid = $row[‘id’];
$first = $row[‘firstname’];
$last = $row[‘lastname’];
$email_address = $row[’email’];
$height = $row[‘height’];
$age = $row[‘age’];
$weight = $row[‘weight’];
$mydate = $row[‘date’];
echo ‘<tr>’;
echo ‘<input type=”hidden” name=”id[]” value=”‘.$myid.'” />’;
echo ‘<td>’.$myid.'</td>’;
echo ‘<td><input type=”text” name=”lastname[]” style=”width: 95%; padding: 3px; margin: 3px;” value=”‘.$last.'”/></td>’;
echo ‘<td><input type=”text” name=”firstname[]” style=”width: 95%; padding: 3px; margin: 3px;” value=”‘.$first.'”/></td>’;
echo ‘<td><input type=”text” name=”email[]” style=”width: 95%; padding: 3px; margin: 3px;” value=”‘.$email_address.'”/></td>’;
echo ‘<td><input type=”text” name=”height[]” style=”width: 95%; padding: 3px; margin: 3px;” value=”‘.$height.'”/></td>’;
echo ‘<td><input type=”text” name=”age[]” style=”width: 95%; padding: 3px; margin: 3px;” value=”‘.$age.'”/></td>’;
echo ‘<td><input type=”text” name=”weight[]” style=”width: 95%; padding: 3px; margin: 3px;” value=”‘.$weight.'”/></td>’;
echo ‘<td><input type=”text” name=”date[]” style=”width: 95%; padding: 3px; margin: 3px;” value=”‘.$mydate.'”/></td>’;
echo ‘</tr>’;
}
?>
</table>
</div>
<p><input type=”submit” name=”submit” value=”Update” /></p>
</form>
You can make a background color transparent withthe following css properties.
Joomla is often used as a portal for which users can sign up and login. Once they login, they can use the site as you desire. Meanwhile, when a new user does register, they often receive a registration confirmation message via email. The message is rather standard. However, you can always change and customize many Joomla user messages within a file called en-GB.com_user.ini. The file is located in the path language/en-GB/en-GB.com_user.ini. Below is an example of how messages can be changed.
Note:
You could add a url and a link for them to login. Below shows how the code was modified:
SEND_MSG=Hello %s,\n\nThank you for registering at %s.\n\nYou may now log in to http://www.example/mysubdirectory/filename using the username and password you registered with.
PHP continue is a ‘control structure’ that belongs to a group with other control structures such as if, else, while, foreach and more. Its main use is to skip something. A popular place you may encounter ‘continue’ is within a loop. When it is used within a loops, it is used to ‘skip something’. The code belowe shows how it can be used to skip an item in an array.
Output is:
Pete
John
How To Make A Custom Joomla Template Making a Joomla template is very similar to hand-coding a typical html/css template. However, there are slight changes in the coding and concepts. The main file which is responsible for the output of a Joomla template is index.php. Index.php can be coded between the body tags with plain old div tags. But, you can make it modular by adding tags which can be used to add custom modules. The page which holds the details for module positions is templateDetails.xml. If the name is in templateDetails.xml, you can assign a module the position with Joomla’s module manager in the administrator backend.
<?php
defined(‘_JEXEC’) or die(‘Restricted access’);
?>
<!DOCTYPE html PUBLIC “-//W3C//DTD XHTML 1.0 Transitional//EN” “http://www.w3.org/TR/xhtml1/DTD/xhtml1-transitional.dtd”>
<html xmlns=”http://www.w3.org/1999/xhtml” xml:lang=”<?php echo $this->language; ?>” lang=”<?php echo $this->language; ?>”>
<head>
<jdoc:include type=”head” />
<link rel=”stylesheet” href=”<?php echo $this->baseurl; ?>/templates/<?php echo $this->template; ?>/css/template.css” type=”text/css” />
<!–[if IE 6]>
<link rel=”stylesheet” href=”<?php echo $this->baseurl; ?>/templates/<?php echo $this->template; ?>/css/ie6.css” type=”text/css” />
<![endif]–>
<script type=”text/javascript”>
function showstuff(){
document.getElementById(“submenu”).style.visibility=”visible”;
}
function hidestuff(){
document.getElementById(“submenu”).style.visibility=”hidden”;
}
</script>
</head>
<body>
<div id=”container_1″>
<div id=”container_2″>
<div id=”container_3″>
<div id=”header” style=”margin-top:80px; height:auto;width:970px;”>
<!– CUSTOM MENU GOES HERE–>
<div style=”inline-block; color:white;”>
<ul style=”display:block; background-color:#000000; padding:0px;”>
<a style=”padding:5px 0px 5px 0px;” onmouseout=”hidestuff()” onmouseover=”showstuff()”
href=”../services”><li style=”display:inline-block; margin-left:0px; padding:5px;”>List 1</a>
<ul id=”submenu” style=”visibility: hidden; display:block;margin-top:5px; padding-left:0px;
margin-left:0px; position:absolute;visibility: hidden;”>
<a onmouseout=”hidestuff()” onmouseover=”showstuff()” href=”http://example.com/test”>
<li style=”background-color:blue; margin-top:0px; padding:10px;list-style-type:none;”>Drop down
1</li></a>
<a onmouseout=”hidestuff()” onmouseover=”showstuff()” href=”http://example.com”>
<li style=”background-color:blue; margin-top:0px; padding:10px;list-style-type:none;”>Drop down
2</li></a>
</ul>
</li>
<li style=”display:inline-block;padding:5px;”>List 2</li></ul></div>
</div>
<div style=”clear:both;”></div>
<div id=”content” style=”margin-top:300px;”>
<jdoc:include type=”component” />
</div>
</div>
<div style=”clear:both;”> </div>
</div>
</div>
<div id=”bottom”>
<div id=”footer”>
<jdoc:include type=”modules” name=”footer” style=”xhtml” />
</div>
</div>
<div id=”debug” style=”display:none;”><br/><br/>
<jdoc:include type=”modules” name=”debug” style=”xhtml” />
</div>
</body>
</html>
The code to add a module looks like this:
<jdoc:include type=”modules” name=”user3″ style=”xhtml” />
and
<jdoc:include type=”modules” name=”footer” style=”xhtml” />
Note:
To only use a module if it is enabled on a page, you can use the following code:
<?php if($this->countModules(‘right’)) : ?>
<!– Add code such as divs here –>
<?php endif; ?>
Here is a list of module positions and how they should be presented within templateDetails.xml
<positions>
<position>left</position>
<position>right</position>
<position>top</position>
<position>top1</position>
<position>user1</position>
<position>user2</position>
<position>footer</position>
<position>debug</position>
</positions>
Below is the code which grabs file names to download and passes those names into the url.
<?php if($_POST[‘file1’]){
$filename=$_POST[‘file1’];
echo ‘<a href=”mydownload_multi.php?filename=’.$filename.'”><b>Download file!</b></a>’;
}
else if($_POST[‘file2’]){
$filename=$_POST[‘file2’];
echo ‘<a href=”mydownload_multi.php?filename=’.$filename.'”><b>Download file!</b></a>’;
}
?>
The code below is the actual file which makes it possible to download the selected download.
With PHP, you can easily make a file accessible to download. PHP goes through a series of steps to make the downloading possible. The code below shows how PHP can find a file, make an application for it to download, name the new downloadable file, open the file, output the file data and close the data.
$filepath = $_SERVER[‘DOCUMENT_ROOT’].”/downloads/my_downloadable_file.pdf”;
if (file_exists($filepath)) {
//download application
header(“Content-Type: application/force-download”);
//the filename will be given below
header(“Content-Disposition:filename=\”my_downloadable_file.pdf\””);
//open file in binary mode
$my_file = fopen($filepath, ‘rb’);
//output data
fpassthru($my_file);
//close file
fclose($my_file);
}
With mysql, you can use the MAX() function to get the highest value in a column. The column could have data like ages, auto incrementing ids or weights. If you want just the highest value, the max() function will output that value.
If you want a list of values starting with the highest number, you use the ‘ORDER BY’ condition in a mysql query to output the data based on what you want; such as highest value or most recent date. The example below explains how such data is sorted.
When you access data from a mysql table and use loops to output all rows of data, you can add forms inside each loop which can trap the row values for which they can be tranferred into form hidden fields? Sounds confusing? The code below will show how easy it is to do that.
if (ISSET($_POST[‘submit’])){
$my_id = $_POST[‘myid’];
$myname = $_POST[‘myname’];
echo “My id is “.$my_id.” and my name is “.$myname;
echo “<br/><br/><strong>What just happened?</strong><br/><br/>
We selected the entire rows from the database where the id is less than 3; which are ids 1 and 2. Since there are 2 ids 1 and 2, the loop create 2 results and hence 2 forms. Each result will show a submit button; since other input fields are hidden. Now, when submit is clicked, we could make any query do what we want since we could use the myname and myid post variables. <br/><br/>”;
}
require_once(‘connect.inc’);
$db=public_db_connect();
$command = “SELECT * FROM table_sort where id<3 “;
$result = mysqli_query($db, $command);
while ($row = mysqli_fetch_assoc($result)){
$myid = $row[‘id’];
$name = $row[‘firstname’];
?>
<form method=”post” action=”<?php echo $_SERVER[‘PHP_SELF’]; ?>”>
<input type=”hidden” name=”myid” value=”<?php echo $myid;?>” />
<input type=”hidden” name=”myname” value=”<?php echo $name; ?>” />
<input type=”submit” name=”submit” value=”Submit Form” />
</form>
<?php
}
?>
If you have decided to use WordPress for your website or blog, it is a fine tool that will work right out of the box. Furthermore, shall you decide to create custom applications with WordPress, you can code freely code as you want. In order to create a custom application, you can create a custom php page based on page.php that is located in your default template folder. With a custom application, you can use WordPress function like get_header(), get_sidebar() and get_footer(). With the template file, you can add an inlude file to connect to a different database than the one used in the WordPress installation. Then, you can code freely with ‘pure php’.
To create a custom WordPress application,
1) Create a New Page with WordPress.
2) Choose a custom template for the new page. The template would be based on page.php.
3) Add a little text within the page; such as the text for the top of the page.
4) Choose the new template from the drop down menu.
5) Open you template file in Notepad++ or your desired editor.
6) Code the template file and add any include files.
Notes:
To access any images for the template, you can add the following code:
<img src=”<?php bloginfo(“template_url”); ?>/images/foldername/myfile.jpg” />
To include files, you can add the following code:
include (TEMPLATEPATH . ‘/foldername/myfile.php’);
When you submit forms with PHP, the URL may or may not contain query strings. URLS with query strings look like http://example.com/page.php?id=22&name=Betty. URLS with query strings can pose problems when you submit a form to itself. Below, shows typical code that is used to submit a form to itself and code which can be used with query strings in the url.
Here is typical code to submit a form to itself:
<form method=”post” action=”<?php echo $_SERVER[‘PHP_SELF’];?>”>
Here are 2 code samples which can be used to submit a form to itself where the url the query string shown above:
<form method=”post” action=”<?php echo $_SERVER[‘PHP_SELF’].”?”.$_SERVER[‘QUERY_STRING’];?>”>
<form method=”post” action=”<?php echo $_SERVER[‘PHP_SELF’].”?id=”.$id ;?>”>
When you use EXPLAIN before a mysql query, you can gather details ablout a database table such as possible keys and rows. The data can be useful to determine how a table can be optimized. On the other hand, you can use PHPMYADMIN and analyze the structure and indexes. When you select a table and click structure, the indexes and table information is simple to analyze. The data can be crucial in the adjustment of the tables in order to make optimized queries.
When you run a VPS or dedicated server, chances are memory usage is your biggest concern. Luckily, you can always login to your server with SSH and see the details to calculate free memory that is available.
Web Host Manager can be used to create, delete and manage accounts.
Back in the day, you could validate email with javascript, Jquery, and php using regex. Regex will check the input and make sure it is what the web developer wants to accept. Back in the day is still valid today. Regex is still a good option to validate input.
But,today in the day, a web developer can keep on top of new and recent other built-in PHP functions which do the same thing. One such function is one which validates email addresses.
The function will check the email row from the database and make sure it comes out like blahbalh@example.com. It will not output garbage like aaaaa.com or anything not resembling a real email address. It does not go all the way and check if the address exists, but the output still looks good on the screen.
below is an example of the PHP built-in function to validate email addresses.
Getting queries to work with mysql will help you gain confidence that you can select and output the data you had wanted. But, as time goes on and the demands to pull data with relational databases or the need to build applications with the need for speed is a factor, it will become obvious that output is only one factor while query optimization is another.
Fortunately, there are a few simple rules that can be followed to ensure you write better, optimized mysql queries. Three very important rules to use are; select only what you need, use indexes to match columns in various tables and matching columns should have the same structure.
Select What You Need
Selecting what you need should be fairly obvious. For example, select * takes rows from all columns and selecting unused columns adds time to a query. If you just need to select and id from a column in a table that has id, firstname, lastname, email and so forth, you are better off to just select that id in the first place.
Using Indexes
Using indexes on columns which are used in relational queries can create results in a fraction of time, especially if there are hundreds or thousands of rows of data. If you do not use indexes when writing relational queries with 2-4 tables, you could wait, wait and wait for the page to load. We could be taking up to a minute in serious cases while same data using indexes loads in less than a few seconds. So, the next time you are using where statements to match colums on various tables, those matching columns should be indexed. You can add an index with mysql or phpmyadmin.
1) Select the database table
2) Select Structure
3)Next to the desired column and under action, select ‘More’ next to the column
4) Click Add Index
5) You will see the list of indexes under the subheading indexes and it will include the newly made index on the column for which you made an index.
To add an index with the command line,
1) alter table `tablename` add index index_name (columnname);
Matching Columns
Finally, to keep speed as a priority, your columns structures should match. For example, if you have an indexed column called members_id in one column and mymembers_id in another column that hold the same values to define a specific member, it is better to have them with proper structure and exact structure values; such as int(3). If you never plan to have more than 999 members, then int(3) would be about as good as it could get. If one column type was varchar(3) and the other type was int(3) the query would run slower; with all other things equal.
PHP has quite an array of built-in functions which can be used to create, delete and manipulate images. Many image functions which need the GD library, such as getimagesize(), imagecreate(), imagedestroy(), imagetypes(), imagecreatetruecolor(), imagejpg() and getimagesize() can be found here:
http://www.php.net/manual/en/ref.image.php
However, in order to use these functions without generating errors, you need the GD library installed. It is likely to be available on shared hosting accounts, but, you may need to install and enable the module with a VPS or dedicated server.
If you attempt to use a function that is not part of the core PHP(like GD library) nd you have not loaded the
module for it, you will get an error like:
Fatal error: Call to undefined function: imagecreate()
Web Host Manager is a very popular Linux application that runs on CENTOS servers. One simple method to have GD library up and running is to follow the instructions given below.
1) Login to WHM(Web Host Manager)
2) Select Software -> EasyApache
3) Near step 5, click Exhaustive Options List which shows many more options
4) Scroll down under PHP and check GD >Build with new features
When you use an .htaccess file within a root or other directory, you can set rules to write search engine friendly urls. For example, you may have a dynamic url like example.com/blog/id=100&title=mytitle. With a little work, you could make a rule so that an address in the browser such as example.com/blog/100-mytitle. When you make rewrite rules with htaccess, the original url and the new sef url will display the same content.
In order to make rules for htaccess usable, mod_rewrite must be installed and enabled on the server. It is often installed and enabled for shared hosting and can simply be enabled with a VPS or dedicated server.
<IfModule mod_rewrite.c>
Options +FollowSymLinks
RewriteEngine on
RewriteBase /
RewriteCond %{REQUEST_FILENAME} !-f
RewriteCond %{REQUEST_FILENAME} !-d
#RewriteRule ^blog/([^/]+)/([^/]+)$ blog/blog\.php?id=$1&title=$2 [NC]
#RewriteRule ^([^/]+)-([^/]+).html$ blog/blog\.php?id=$1&title=$2 [NC]
#RewriteRule ^(.+)-(.+).html$ blog/blog\.php?id=$1&title=$2 [NC]
RewriteRule ^(.*)-(.*).html$ blog/blog\.php?id=$1&title=$2 [NC]
</IfModule>
The above code gives you the option to take the url example.com/blog/id=100&title=mytitle and be able to use it as example.com/blog/100-mytitle.html
The key code is RewriteRule. All rules with the comment ‘#’ in front are inactive. The line that does the rewriting is:
RewriteRule ^(.*)-(.*).html$ blog/blog\.php?id=$1&title=$2 [NC]
Rewriting a url is one thing and is simple to use if we just link to the new sef url. However, if you have code that uses $_GET variables in the string you need to rewrite the php code so that it will point to the sef url. Here is an example of that.
Original code that will produce non-sef url like example.com/blog/id=100&title=mytitle
<div style=”font-size:18px; margin-left:5px; display:none;”><a href=”blog.php?id=<?php echo htmlentities(stripslashes($row[‘bookmark_id’])); ?>&title=<?php echo htmlentities(stripslashes($row[‘title’])); ?>”><?
echo htmlentities(stripslashes($row[‘title’])).'</a></div>’;?>
New Code to rewrite SEF URLS that will make sef url like example.com/blog/100-mytitle.html
<div style=”font-size:18px; margin-left:5px;”><a href=”<?php echo htmlentities(stripslashes($row[‘bookmark_id’])).”-“.htmlentities(stripslashes($row[‘title’])).”.html”; ?>”><?
echo htmlentities(stripslashes($row[‘title’])).'</a></div>’;?>
When using PHP, you will often need to troubleshoot scripts to find and fix errors. Two very popular methods for which to do so are to use echo statements and the die() function.
The echo statement will print out text so you can pinpoint what works and what does not. Echo statements can be used to troubleshoot an entire script or functions. Not only do echo statements help you find where problems exists, they can be very valuable to print out arrays and variables made from relational database queries. This can help find many sysntax problems and saves lots of troubleshooting time.
The die() statement can be used with text. The die statement will stop the script and output the text inside its parenthesees.
Example:
die(“If you are a non-member the script stops here!”);
print_r($myarray);
echo $row[‘name’];
echo “hello does this print?”;
When you build applications, you may want to disallow some files from being opened. Such files you may want to hide are those with .inc and .sql extensions. You may want to hide those files since you do not them to be able to be read in a browser.
Although directories with index.php or index.html files will not allow someone to search for a directory list of files, someone could see the sensitive information if they tyled a url like http://example.com/databseconnect.inc. If databaseconnect.php was used, the data would not be visible.
The simple method to hide files using .htaccess is shown below.
Hide files with inc or sql extension:
<Files ~ \”\\.(inc|sql|…other_name_extensions…)$\”>
order allow,deny
deny from all
</Files>
PHPLIST is an open source php script which allows you to send mass email and organize newsletters. Here are some quick tips to set it up and use it.
To create a list,
1) Select ‘Lists’ >Add a List >Add a List Name >Select ‘Check this box to make this list active (listed)’ >Add description if desired >Save
2) Go to Subscribe pages >Edit >Alter text areas, checkboxes and radio buttons as desired >Save Changes
Note:
When you add a second list and alter subscribe pages, you have the option to offer various mailing lists when the user decides to subscribe to a list.
With phplist you can custom placeholders into the message. This can help turn a generic message like Dear Sir into a personal message like ‘Dear Tom’. They placeholders can be found at http://docs.phplist.com/Placeholders
To add an attribute(such as first name),
1) Manage User >User attributes >Add a name >Save Changes
Note: The attributes will be saved in the table called phplist_user_attribute
Note: When you make an attribute like First Name in the name column of the phplist_user_attribute table, you can use a tag placeholder [FIRST NAME] in the email body to make the users name appear where you want.
Advanced Note: Whe you create a new attribute, it will up show when they sign up. The value for the attribute(ie. First name) goes into the table phplist_user_user_attribute. The userid in this table and id from the phplist_user_user table are matching keys. Whenever a new attribute is made, new people signing up will have the values and existing people on the list will have ‘NULL”. You can update the value if desired.
To enable an attribute at any time,
1) Select Subscribe Pages >Edit >Check the box in the attribute that says ‘Check this box to use this attribute in the page’.
To delete an attribute(such as first name),
1) Manage User >User attributes >Delete
To customize sign up page,
1) Select Subscribe Pages >Edit >Alter text areas, checkboxes and radio buttons as desired >Save Changes
What Happens when a user(with attributes) signs up for the newsletter?
1) The client receives a confirmation email.
2) The user`s id and email goes into the user table.
3) The name goes into the user_attribute table and matches the id from the user table.
Note: These 2 tables can be used to dump a large list. However, the user_attribute table does not have autoincrement for the userid. Therefore, careful dumping must take place for which the userids will match in both tables.
To dump an email list with a first name,
1) Change user_attribute table and make userid a primary key and autoincrement
2) The csv file should have the id from the attribute table in the first column (they will a be the same number), then a blank second column, then the value(i.e.first name) in the 3rd column.
It looks something like this for the entire list.
| 1 | | Joe |
| 1 | | Jan |
3) Dump complete list into the table. The table will now have attributeid, userid and value. Now, put the structure back to how it was by removing the autoincrement userid and the primary key.
4) Now go back the original csv file and import the users into the user table. The id will be autoincrement and should matck exactly as the userid from the dump into the user_attribute table. You must set the Excel spreadsheet to match the 16 columns. The first column will be blank since it is for autoincrement id, the second will be email address, the 3rd can be 0 or 1 for the confirmed column…etc.
After the import, check the last records to see that they got updated properly.
If you have a query cache set up, you can restart the cache to start caching queries again.
Cron Jobs in Cpanel can be used to automate tasks that could otherwise need manual updating. One example for which to use a cron job could be to execute a php file in order to make database updates or send automated email.
The code belows how arrays can be fetched from a database with Joomla and pure php / mysql. The main differences in syntax are the databse connection variable and the naming of the database table. The two examples below clearly show the differences.
$db =& JFactory::getDBO();
$query = “SELECT name from #__mytable WHERE enabled=1 “;
$db->setQuery($query);
$rows = $db->loadAssocList();
//print_r($rows);
foreach ($rows as $row) {
echo “<br/><br/>My loadAssocList() method for the associative array loop count is <b>” .$row[‘name’].”</b> records which are enabled.<br/>”;
}
PHP / MYSQL
$query = “SELECT name from mytable WHERE enabled=1 “;
$result = mysqli_query($db, $query);
while ($row=mysqli_fetch_assoc($result)) {
$myname=$row[‘name’];
echo $myname;
}
The code belows how objects can be fetched from a database with Joomla and pure php / mysql. The main differences in syntax are the database connection variable and the naming of the database table. The two examples below clearly show the differences.
$db =& JFactory::getDBO();
$query = “SELECT name from #__mytable WHERE enabled=1 “;
$db->setQuery($query);
$rows = $db->loadObjectList();
foreach ($rows as $row) {
echo “<b>”.$row->name.”</b> records which are enabled.<br/><hr>”;
}
PHP / MYSQL
$query = “SELECT name from mytable WHERE enabled=1 “;
$result = mysqli_query($db, $query);
while ($row=mysqli_fetch_object($result)) {
$myname=$row->name;
echo $myname;
}
With decent mysql database skills, solid PHP programming skills and knowledge of the Joomla framework, you can develope Joomla modules rather quickly. The key is to build a template which can create queries and relational database queries for the tables in the Joomla framework. Once you have that, you can query and retrieve any results you want; just as though you were using php/mySQL with the exception of some slightly different methods to access the databse, objects, arrays and loops.
Once you have developed the starting module, you can test it with your desired Joomla installation. It is recommended to use various versions such as Joomla 1.5 and Joomla 2.5. Once all the versions work properly, all you really need to do is tweak the module’s default.php or modulename.php. To keep it simple, the default.php or modulename.php file will be identical for each Joomla version.
If you are using mysql_query_cache and you want to defragment the memory from time to time, you can flush the query cache.
Abstact classes use the abstract keyword. It would start as shown below.
abstract class Myabstract{
You cannot instantiate an abstract class. Thus ‘$myclass = new Myabstract;’ does not work. Abstract classes use abstract methods.
Abstract classes are used when you want to make sure that each new child class uses its own method; even though the method exists in the parent class.
Abstract Method
An abstract method would be written like any other method except it contains ‘abstract’ at the beginning. When an abstract method is declared in the parent class, the child classes must their own function under the same name as declared in the parent class.
Example:
abstract function get_var();
}
class childa extends Myabstract{
function get_var() {
echo “Hello World”;
}
}
$mychilda = new childa;
$mychilda->get_var();
You can access PHPMYADMIN from your web hosting account using WAMP that is installed on your home PC.
Procedure:
/* Servers configuration */
$i = 0;
/* Server: localhost [1] */
$i++;
$cfg[‘Servers’][$i][‘verbose’] = ‘localhost’;
$cfg[‘Servers’][$i][‘host’] = ‘localhost’;
$cfg[‘Servers’][$i][‘port’] = ”;
$cfg[‘Servers’][$i][‘socket’] = ”;
$cfg[‘Servers’][$i][‘connect_type’] = ‘tcp’;
$cfg[‘Servers’][$i][‘extension’] = ‘mysqli’;
$cfg[‘Servers’][$i][‘auth_type’] = ‘config’;
$cfg[‘Servers’][$i][‘user’] = ‘root’;
$cfg[‘Servers’][$i][‘password’] = ”;
$cfg[‘Servers’][$i][‘AllowNoPassword’] = true;
/* End of servers configuration */
$cfg[‘DefaultLang’] = ‘en-utf-8’;
$cfg[‘ServerDefault’] = 1;
$cfg[‘UploadDir’] = ”;
$cfg[‘SaveDir’] = ”;
/* rajk – for blobstreaming */
$cfg[‘Servers’][$i][‘bs_garbage_threshold’] = 50;
$cfg[‘Servers’][$i][‘bs_repository_threshold’] = ’32M’;
$cfg[‘Servers’][$i][‘bs_temp_blob_timeout’] = 600;
$cfg[‘Servers’][$i][‘bs_temp_log_threshold’] = ’32M’;
4) Change these lines:
$cfg[‘Servers’][$i][‘host’] = ‘localhost’;
$cfg[‘Servers’][$i][‘user’] = ‘root’;
$cfg[‘Servers’][$i][‘password’] = ”;
The new code will look like:
/* Servers configuration */
$i = 0;
/* Server: localhost [1] */
$i++;
$cfg[‘Servers’][$i][‘verbose’] = ‘localhost’;
$cfg[‘Servers’][$i][‘host’] = ‘127.0.0.0’; // change to actual ip address
$cfg[‘Servers’][$i][‘port’] = ”;
$cfg[‘Servers’][$i][‘socket’] = ”;
$cfg[‘Servers’][$i][‘connect_type’] = ‘tcp’;
$cfg[‘Servers’][$i][‘extension’] = ‘mysql’;
$cfg[‘Servers’][$i][‘auth_type’] = ‘config’;
$cfg[‘Servers’][$i][‘user’] = ‘myaccount_myuser’; //change this to the user
$cfg[‘Servers’][$i][‘password’] = ‘password_here’; // change this to the password
//$cfg[‘Servers’][$i][‘AllowNoPassword’] = true;
/* End of servers configuration */
$cfg[‘DefaultLang’] = ‘en-utf-8’;
$cfg[‘ServerDefault’] = 1;
$cfg[‘UploadDir’] = ”;
$cfg[‘SaveDir’] = ”;
There could come a time when you want to align a DIV tag in the center of another div or the webpage. The code align=center can be added to the opening DIV tag to accomplish this.
Below is a class that can be used on a list elemen.
a:link.alex_link
{
color:orange;
text-align:left;
text-decoration:none;
font-family: Helvetica,Arial,sans-serif;
font-size:15px;
}
The code below would execute on a visited link with the class name alex_link.
a:visited.alex_link
{
color:orange;
text-align:left;
text-decoration:none;
font-family: Helvetica,Arial,sans-serif;
font-size:15px;
}
With PHP, you can return a variable or an array from a function. The example below demonstrates how to return a simple array.
//The function will make variable called $mytotal which can be returned from the function
$total = people();
echo “<br/><br/>”;
//$total is setting the variable equal to the function
//The value $mytotal is returned and is printed below
echo “The array are the people $total[0], $total[1], $total[2] and $total[3].”;
?>
Returning variables from PHP OOP is slightly different from that of returning variables with procedural PHP.
With procedural PHP, the function can return a single variable, but it is accessed by setting a function equal to a variable.
With OOP PHP, you can call a method and return your desired variable. The variable returned from an OOP PHP function is output immediately.
An easy way to remember this is that returned variables with procedural need to come from a variable that is equal to a function and OOP PHP just returns it without any questions asked.
Database tables can load up quickly with data. As data becomes obsolete you may want to remove all entries from a table. The command below explains how to remove all entries within a mysql table.
With PHP, you can return one variable or an array from a function. The example below explains how to retun a single variable.
$num1 = “1”;
$num2 = “2”;
//The function will make variable called $mytotal which can be returned from the function
$total = add_numbers($num1,$num2);
echo “<br/><br/>”;
//$total is setting the variable equal to the function
//The value $mytotal is returned and is printed below
echo “The total $total is returned from the function which can only return a single variable or array. In this case, the function returns a variable.”;
Global variables are variables which are defined outside of a function, but are redecalred inside the function with a global keyword. The code below shows how $var1 uses the global keyword. When you use the global keyword, the variable takes on its original value. In this case, using global $var1 inside a function makes $var1 equal to the string “Hello”.
function myglobal_vars() {
global $var1; //$var1 has global scope
$var3 = “Hi this is var3 inside the function.”;
echo $var1.” “.$var2.” from inside the function”; //$var2 has no global scope and will not output
echo “<br/><br/>”;
echo $var3;
echo “<br/><br/><hr>”;
}
myglobal_vars();
echo “Only variable “.$var1.” can be used inside and outside the function.”;
echo “<br/><br/>”.$var3; //different output than inside the function
PHPLIST is an open source mass mailer built with php / mySQL. Here are some quick start setup tips to get the software running as desired.
PHP OOP properties can be named inside or outside the class. When you create an object, it gets the property name from within the class. Howvere, when you rename an object ouside the class, it will override the previous name for that property.
The code below shows 2 new instantiated objects;
$statement1 = new myclass;
$statement2 = new myclass;
Note how the text for the property name from each object is different from each other when the get_my_method() method is triggered?
function my_method(){
echo “My property name is “.$this->my_prop.” and my function is my_method()<br/><br/>”;
}
function get_my_method() {
return $this->my_method();
}
}
$statement1 = new myclass;
$statement1->get_my_method();
$statement2 = new myclass;
$statement2->my_prop = “Roger”;
$statement2->get_my_method();
function mymethod(){
echo “My property is “.$this->myproperty.” and my function is mymethod()<br/><br/>”;
}
function get_mymethod() {
return $this->mymethod();
}
}
$my_statement = new this;
$my_statement->get_mymethod();
$my_second_statement = new this;
$my_second_statement->myproperty = “Roger”;
$my_second_statement->get_mymethod();
?>
More Advanced Note:
Generally, $this-> is always used to reference methods within a class. You cannot name an oblect $this without getting an error.
Error Example:
You make a new object with the name $this = new myobject;
$this = new myobject;
$this->get_mymethod();
$this->myproperty = ”Bill”;
Output:
Fatal error: Cannot re-assign $this in C:\wamp\www\ABOOK\OOP\MY_OOP\this.php on line 17
if($time >= 00 AND $time <= 12){
//am
$my_style = ‘style.css’;
}
else if($time > 12 AND $time <= 24){
//pm
$my_style = ‘style_night.css’;
}
?>
<link rel=”stylesheet” type=”text/css” href=”<?php echo $my_style; ?>” />
Code for a custom image submit button:
<input id=”my_search” type=”image” SRC=”images/my_image.jpg” height=”25″ width=”75″ border=”0″ alt=”Submit Here”>
Adding a Variable Inside Array
With an array, you can use a variable to represent the value. The example below demonstrates a situation where a variable is used to display the days in the month.
$values=array(
”Jan” => $thirty_one,
”Feb” => 28,
”Mar” => $thirty_one,
”Apr” => $thirty,
”May” => $thirty_one,
”Jun” => $thirty,
”Jul” => $thirty_one,
”Aug” => $thirty_one,
”Sep” => $thirty,
”Oct” => $thirty_one,
”Nov” => $thirty,
”Dec” => $thirty_one
);
1) Performance can be slower than desired. In general, coding applications in php / mySQL is faster. Load times can be longer than wanted.
2) Creating custom extensions requires learning the Joomla framework. Editing some extensions can require knowledge of the Joomla framework.
3) Custom templating can be a lengthy process; especially making a design from a psd file.
4) From a web developer’s point of view, it can be difficult to alter when you need precise functionality or change its core functionality (like hack registration system).
5) It can be overkill for a small website that does not need too much functionality. It can significantly slow the load time vs a pure php / mySQL cms or plain old html / css.
1) Easy To learn
2) Can build an application without knowing how to code or can start with the cms and learn to code later.
3) Can extend it at anytime to add new functionality like blogs.
4) Installs in less than a couple of minutes.
5) Lots of free and commercial templates to choose from.
6) Many web developers to choose from if you need custom code.
7) Joomla community is friendly.
8) Can deploy websites quite quickly.
9) Many users and that provides plenty of documentation in Joomla Forums, other forums and books.
10) You can extend with stand-alone php / mySQL applications if desired since a good database schema is already in place.
Life as a php programmer will raise all sorts of eyebrows as you sift through other people’s code. The ‘@” simple can be one of those small quirks. For example, you may find a function like @mysqli_query() when you expect mysqli_query. The @ sign can be used in front of a functions (and expressions) to suppress errors. The errors will be ignored.
Multidemensional arrays are arrays of arrays. Multidemensional arrays will be indexed, but the arrays they index can be indexed or associative arrays. The example below consists of two associative arrays. You access the first array with the 0 index; such as $my_array[0]. To access an associative array value you need to choose the key. For example, $my_array[0][Email] selects the email value of the first array.
//print_r($my_array);
echo $my_array[0][Firstname].” “.$my_array[0][Lastname];
echo “<br/><br/>”;
echo $my_array[1][Firstname].” “.$my_array[1][Lastname];
Associative arrays have a key and a value. For example, the array below consists of the keys firstname, alstname and email while the values are Joe, Rogers and jo@example.com.
echo $my_array[‘firstname’].” “.$my_array[‘lastname’];
Indexed arrays are ordered by a numerical index. For example, the first value in the array is 0 and the second number is 1.
echo $my_array[0].” “.$my_array[1];
echo “<br/><br/>”;
WHAT IS CRUD?
CRUD stands for create, read, update and delete. Each term is very self-explanatory.
Create
The word create inserts fresh data into a database; hence the word create.
Read
The term read refers to reading data from a database. No data in the database is altered in any way. However, you can output the data any way you see fit.
Note: when you work with filrs from other programmers you may find code is written, you may find variables, arrays and other programming methodologies varied from your own. Often, the code looks more confusing but it does the same thing.
Below is an example of extracting data from the database. The data shown represents all first names in the chosen database table.
echo $var1[$row[‘first’]];
}
}
echo “<br/><br/>Simple:<br/><br/>”;
//Simple
$command = “select * from table_sort ORDER BY date DESC”;
$result = mysqli_query($db, $command);
if(mysqli_num_rows($result) > 0){
while($row = mysqli_fetch_assoc($result)){
$var1 = $row[‘firstname’];
$var2 = $row[‘lastname’];
echo $var1;
}
}
Update
Update takes place when you alter data which already exists. For example, you may change a blog entry and thus it gets updated.
Delete
The delete term represents the removal of specific row(s) of data from a database. For example, you may want to delete an old blog entry.
Examples using the foreach loop with PHP.
Loop Syntax #1
Loop Syntax #2
Examples using the for loop with PHP.
Loop Syntax #1
Loop Syntax #2
Examples using the while loop with PHP.
Loop Syntax #1
Loop Syntax #2
Using Constants in php can cut down a programmer’s time and keep organized code handy since one word can be used to represent an integer or string. The define() function is used to name a constant and and create a value for the constant.
The code below whows how to create two constants and output the constants’ values in an echo statement.
define(‘MY_SECOND_CONSTANT’, ‘ double or single quotes.’);
echo MYCONSTANT.MY_SECOND_CONSTANT;
There could come a time when you want to allow people to login and test an application. Then, you may want the application to go back to an original state. One such method to accomplish this is to drop the database tables which change. Then, create and copy backup tables into the changeable tables. Now, each new user gets a fresh look at the website upon login.
The if statement below checks to see if the session exists. If it does, the tables are dropped and are recreated with new content.
$command = “DROP table tablename_footer” ;
$result = mysqli_query($db, $command);
$command = “CREATE TABLE tablename_footer SELECT * FROM tablename_footer_backup “;
$result = mysqli_query($db, $command);
$command = “DROP table tablename_header” ;
$result = mysqli_query($db, $command);
$command = “CREATE TABLE tablename_header SELECT * FROM tablename_header_backup “;
$result = mysqli_query($db, $command);
}
Overview
Since PHP is the most popular server side programming language on the Internet, many people desire to learn it. When PHP emerged, it allowed programmers to create php files for which you could combine various languages(PHP, HTML, CSS, Javascript) into one file. This was very convenient for a web designer or developer. Since PHP is mainly used to output HTML / CSS, it is recommended to have a decent knowledge of these languages since you will actually work with various codes in one swoop. With editors like Notepad++ which highlight various languages like HTML and PHP, it easy to see detect what code is what. People with web design skills but little PHP knowledge should be able to see the difference. If not, they should be able to determine the difference in 2 minutes. When a PHP programmer works with HTML, HTML can be located inside or outside the PHP tags. Code outside of tags is just plain old HTML while code inside quotations gets parsed by PHP on the server. If single quotes are used, the HTML will look just as it would in plain old HTML. But, if the programmer uses double quotes, the double quotes in the HTML use backslashes.
Since PHP is mainly used to output HTML, the whole skillset is a bonus. Often, a team has members which have varied strengths. But, none should be totally lost when looking at the code. A designer should know where to edit his html and the web developer should have a grip on everything he sees.
First Steps
PHP code exists between a starting and ending tag. The staring tag is <?php and the ending tag is ?>. Create a file called first.php and write the code below into the file. Then, save it and open it in a browser.
echo ‘<br/>’;
echo ‘Isn’t it?’;
?>
//Yields:
PHP is fun!
Isn’t it?
The codes below show how to create a link.
Single Quotes
<?php
echo ‘<a href =”myfile.php”>Click Here</a>’;
?>
//Yields :
Click Here
Double Quotes
<?php
echo “<a href =\”myfile.php”>Click Here</a>\”;
?>
//Yields: Click Here
Custom Programming vs Open Source CMS
When you use need to create an application you can be faced with a decision to use an open source cms like Joomla, WordPress or Drupal, or build it from scratch. The answer is not very cut and dry. It depends upon your objectives. If you are very familiar with a cms, you may hear a client’s needs then know an open source cms could make the application in a heartbeat. Since your read on the client was little or no changes, it could be the obvious choice. In addition to the scratch or open source cms argument, you could always look for custom php/mysql scripts to do the job. Generally, the pure language coding is much better performance than an open source cms, and possibly easier to edit and update. A quick trial and a quick look at the code could let you know what you are in for. If you know procedural php/mySQL and can understand PHP OOP you will not have surprises.
However, if quality is a concern and specialization could be ongoing, a custom script could be the best bet. Using a language like PHP / mySQL in its pure form is always more flexible to use and build than creating a custom open source extension. For example, when I look at all the files assembled to make a custom form with a Joomla extension, it blows me away how distorted the system is when it could have been done in a couple of hours using a single file. If you can custom program and build CRUD applications by memory just by reading database tables and writing code, you are no faced with a no-brainer decision.
Beware: Look Good and Grow With Open Source CMS
When you use an open source cms for a development, you can often bridge the gap between your actual skill level and how you look on the web. It can allow a non-programmer to sell developments but not understand what the coding does. Although assembling can be easier, editing the code is another story. If you really want to follow the CMS into a new level, you will need to become familiar with its own libraries and file structures. Alternatively, you can always make custom applications using the cms database tables but not use the actual cms files. Here is where you can have the best of both worlds.
The problem in using an open source cms is that the coding is not as flexible as building an application in the PHP / mySQL language. For example, if you have strong php / mySQL skills, a solid login system, know how to handle data from the database, can create forms quickly and understand sessions inside and out, you can make data and imagery do whatever you want with much faster and leaner code. In other words, if you really want to change the code around to accommodate a client, changing an open source cms extension could be long drawn out nightmare opposed to using 1 lean file which could be edited before you even know which files you need to edit.
In the past, I took interest in Joomla web development. It led to the addition and modification of free and paid extensions. Eventually, with more practice, I took interest in the creation of Joomla extensions; both free and commercial. When you add extensions to the Joomla directory, you are required to provide links to the downloads and a link to the forum. Over the course of 3 years, more than 44,000 views existed in my most popular extension. The extension had a free and commercial extension.
In a nutshell, the numbers went like this:
44,000 views for an extension in the directory.
That led to about 12,000 downloads for all versions of that extension, which was about 25%. Overall sales was less than 10.
I had built 2 other commercial extensions and the numbers were all under a 1% conversion. In this case, a conversion was a sale. Since I had bought many extensions and knew they were worth the few dollars by comparison of others, I took it as a positive experience for web development skills, but a negative to keep on the track for commercial extension development.
After seeing and reading several reports from other developers who received almost nothing is donations vs number of downloads, I leant towards Joomla extension development as a bad idea for trying to make an extra buck.
After analyzing my forum and reading many other developer forums, I reached a personal conclusion for which most people trying to build applications with the Joomla CMS were trying to do it freely using code they knew nothing or very little about. Asides from gathering data and enjoying helping others, the forum positives were outweighed by the negative users who had no problem asking for help and thought a free extension came with unlimited free advice.
Another personal contradiction to allowing free extensions for downloads is the fact that you can allow non-programmers to compete with you since they may sell web development by using extensions for which the customer thinks they are brilliant, but, they are just adding free code which took no programming knowledge.
This does not conclude that creating Joomla extensions is valuable for nothing. I am sure some very elaborate extensions are profitable. Also, creating extensions could have some positive spin-off like getting the attention of the employer when applying for a web development position.
Here is an OOP PHP sample which inputs the age of each entry and returns a custom string based on the age of each person.
class age_level {
public $score;
public $course;
public function __construct($age_input) {
$this->score = $age_input;
}
public function convert_age(){
//set property values equal to strings based on age
if ($this->score>=’1′ && $this->score<=’12’) {
$this->course = “Kid”;
return $this->course;
}
elseif ($this->score>=’13’ && $this->score<=’19’) {
$this->course = “Teen”;
return $this->course;
}
else if ($this->score>=’20’ && $this->score<=’29’){
$this->course = “Twenties”;
return $this->course;
}
else if ($this->score>=’30’ && $this->score<=’39’){
$this->course = “Thirties”;
return $this->course;
}
else if ($this->score>=’40’ && $this->score<=’49’){
$this->course = “Forties”;
return $this->course;
}
else if ($this->score>=’50’ && $this->score<=’59’){
$this->course = “Fifties”;
return $this->course;
}
else if ($this->score>=’60’ && $this->score<=’69’){
$this->course = “Sixties”;
return $this->course;
}
else if ($this->score>=’70’ && $this->score<=’79’){
$this->course = “Seventies”;
return $this->course;
}
else if ($this->score>=’80’ && $this->score<=’100′){
$this->course = “Senior”;
return $this->course;
}
}
}
?>
<!DOCTYPE html PUBLIC “-//W3C//DTD XHTML 1.0 Transitional//EN” “http://www.w3.org/TR/xhtml1/DTD/xhtml1-transitional.dtd”>
<html class=”gecko win” lang=”en-gb” xml:lang=”en-gb” xmlns=”http://www.w3.org/1999/xhtml”>
<head>
</head>
<body>
<div id=”scores”>
<?php
echo “<b>Users</b><br/><br/>”;
?>
<ul style=”margin:0px; padding:0px;”>
<?php
//include (‘class_program_level.php’);
$command = “select * from table_sort ORDER BY date DESC”;
$result = mysqli_query($db, $command);
if ($result && mysqli_num_rows($result) > 0) {
while ($row = mysqli_fetch_assoc($result)) {
$age_input=$row[‘age’];
$myage = new age_level($age_input);
$bg =($bg==’#A7C6BA’ ? ‘#f9f9f9’ : ‘#A7C6BA’);
echo “<li style=\”padding:0px 10px 10px 10px;background: $bg;\”><span style=\”font-size:18px;display:none;\”><b>”.$row[“firstname”].”</b></span><br/><b>First Name:</b> “.$row[“firstname”].”<br/><b>Last Name:</b> “.$row[“lastname”].”<br/><b>Email:</b> “.$row[“email”].”<br/><b>Height:</b> “.$row[“height”].”<br/><b>Age:</b> “.$row[“age”].”<br/><b>Weight:</b> “.$row[“weight”].”<br/><b>Age Category:</b> “.$myage->convert_age(). “</li>”;
}
}
?>
</ul></div>
<div style=”clear:both;”></div>
</body>
</html>
Child classes belong to the parent class but can be customized. Child classes can have separate properties and methods and inherit those from the parent class. The example below shows how to write a parent class and a child class in a single file.
PHP OOP uses classes. The classes store the properties (similar to variables in procedural PHP) and methods similar to functions in procedural PHP). When you use classes, it does matter where you put them (from a functional point of view).
For example, you can create a class and insert it into your PHP for which you want to access the class. In fact, you could stack as many classes as you want in a file. But, many other applications that use PHP OOP tend to separate the classes in files with file names which are easy to identify.
For example, the class myclass could be used in a fiule called myclass.php. If classes are kept in individual files, it is easier to find and use them later in other pages for which you want to reuse the class.
Often, if you use various third party PHP scripts you may find some programmers have disorder, some keep all classes in separate files and some keep all parent and descendant classes in a single file.
With PHP OOP, you can declare properties and methods to be public, private and protected. Depending on the circumstances, you will have the option to choose the ideal method for which to control properties and functions. All methods and properties can be defined within their class.
Public
Public properties or methods can be accessed anywhere in various classes
Public variables:
public $variable;
public $variable2;
Public function:
public function myfunction(){
}
Private
Private Private properties and methods can be accessed only in the class where it is declared. They cannot be accessed by parent or children classes.
Private variables:
private $variable;
private $variable2;
Protected
Protected properties and methods can be accessed in the class where it is declared and child classes.
Protected variables:
protected $variable;
protected $variable2;
When you output data from a mysql database, the text could be html code with various tags such as <p>, <div> and span. Therefore, if you just selected the text for output you could end up with undesired output.
Now, let’s assume that you want to convert the html into plain text just as though it was interpreted from a browser. What you need to do is remove the whitespace and html tags and display the words you want to see. With PHP you can use the clever strip_tags() function to remove the html tags and use the trim() function to remove whitespace. The code below shows how to remove all html tags from a database entry.
echo ‘<p>’.$row[text].'<br /><br/>
</p>’;
}
The code below shows how to remove all html tags from a database entry except the <p> tag.
$command = “select text from mytable “;
$result = mysqli_query($db, $command);
while ($row = mysqli_fetch_assoc) {
$myhtml = $row[‘text’];
$myhtml = trim(strip_tags($myhtml, ‘<p>’)); //Leaves the <p> tag but removes all other html tags
$myhtml= substr($myhtml, 0, 80); //takes only the first 80 characters of the string
echo ‘<p>’.$row[text].'<br /><br/>
</p>’;
}
Depending on one’s background and learning methods, a PHP programmer is often lead to examine Procedural PHP vs OOP in PHP.
For the serious individual who want to program in PHP, learning both methods opens much more doors. Even if you never code in OOP, knowing how to read it will allow you to see what is going on in other people’s code. Chances are if you use large open source OOP in PHP you will want to edit or redo blocks of code. If you don’t know OOP and you open an application written in OOP, you will be lost. But, with a little practice and education, you can familiarize yourself with some OOP concepts like inheritance, polymorphism, instantiating objects, classes, methods, properties, constructors, objects, magic methods and encapsulation. If you don`t want to use OOP, it is recommended to avoid software which uses it. nevertheless, OOP can be found in CMS` like Joomla and PHP Frameworks like Zend and Codeigniter.
OOP uses properties, classes and methods. Properties are like variables and methods are like functions. which are variables and functions in whereas PHP functions can pass absolute parameters(like defined variables and strings), methods(functions in OOP) can take in parameters which can confuse a procedural PHP programmer. In a nutshell, classes have their own ways of doing things.
Execute a mysql query
mysqli_query()
Connect To MYSQL Database
mysqli_connect()
Fetch arrays from Database Using a Select
mysqli_fetch_assoc()
mysqli_fetch_array()
Fetch Object from Database Using a Select Query
mysqli_fetch_object()
Get the number of rows from a query
mysqli_num_rows()
The two functions add slashes to special characters when inserting data into a database. “Never trust the data being inserted’.
addslashes()
mysqli_real_escape_string()
PHP has many built-in language constructs and functions. Language constructs can be used with or without parentheses while functions always have parentheses. Here is an example using a language construct. With brackets: require_once(‘filename.php’) Without Brackets: require_once ‘filename.php’
Printing strings and variables
echo()
print()
Unsetting a session variable
unset()
Check is a variable is set
isset()
Check if post variable is empty
empty()
Check if post variable is not empty
!empty
Include files:
include()
include_once()
require()
require_once()
End the php script
die() or die
1) Open PHPMYADMIN
2) Select database >database table >Structure >(Select from option a or b below)
3) Look for Indexes Table which is below the main table.
4) Change or remove the unique index
Alter a table to create unique columns. This will ensure there is no duplicate values in a column that is unique.
Create a Table where only there is no duplicate firstname / lastname combinations
Create a Table where only there is no duplicate firstname / lastname combinations
The code below creates a new column called username to the table called mytable. The username must be unique. In other words, if you use an insert statement and a username already exists, the data will no be duplicated.
$command= “SELECT count(distinct username) as allusername from tablename “;
$result = mysqli_query($db, $command);
if ($result && mysqli_num_rows($result) > 0) {
while ($row = mysqli_fetch_assoc($result)) {
$myusername = $row[‘allusername’];
}
}
echo “The distinct count of usernames is “.$myusername.”<br/>”;
$command= “SELECT distinct username from tablename ORDER BY date asc “;
$result = mysqli_query($db, $command);
if ($result && mysqli_num_rows($result) > 0) {
$myusernames= mysqli_num_rows($result);
echo “The distinct count of usernames is “.$myusernames.”<br/>”;
}
Counting Rows with mysqli_num_rows function can provide useful pieces of data. The following example demonstrates how to gather gather distinct first names in a table sorted by date.
$names2 = “select DISTINCT firstname from table_sort WHERE date>=’2012-01-01′ “;
$result= mysqli_query($db, $names2);
$name_count2 = mysqli_num_rows($result);
echo “There are “.$name_count2.” rows.<br/><br/>”;
$myvalues=array(“After_2011” => $name_count, “Before_2011” => $name_count2);
echo “There are “.count($myvalues).” values in the array.<br/><br/>
There are “.($name_count+$name_count2).” rows in total.”;
Objective: Select all rows in a table for which there are blank values. You may want to see the values before you delete all the entries with a specified blank column.
Using mysql password function
update tablename set password=password(‘mypass’) where id=9;
Update MD5 Passwords
update tablename set password=md5(‘mypass’) where id=9;
Update sha1 Passwords
update tablename set password=sha1(‘mypass’) where id=9;
Otherwise, for subfolders please follow the next set of instructions!
6) Open file page_template_no_header_no_footer.php
Near line 21:
change lines 21 and 22
i.e)
CHANGE FROM:
$domain = strstr($url, ‘example’);
$cms_page_url= str_replace(‘example.ca/’, ”, $domain);
CHANGE TO:
$domain = strstr($url, ‘example’);
$cms_page_url= str_replace(‘example.ca/test/’, ”, $domain);
7) Open file page_template_ckc.php
Near line 21:
change lines 21 and 22
i.e)
CHANGE FROM:
$domain = strstr($url, ‘example’);
$cms_page_url= str_replace(‘example.ca/’, ”, $domain);
CHANGE TO:
$domain = strstr($url, ‘example’);
$cms_page_url= str_replace(‘example.ca/test/’, ”, $domain);
7) Open file page_template.php
Near line 21:
change lines 21 and 22
i.e)
CHANGE FROM:
$domain = strstr($url, ‘example’);
$cms_page_url= str_replace(‘example.ca/’, ”, $domain);
CHANGE TO:
$domain = strstr($url, ‘example’);
$cms_page_url= str_replace(‘example.ca/test/’, ”, $domain);
If there are two exact names in the names column, the query will output the second name. Who cares, right? But what of the query wanted distinct name and email like the query below:
“SELECT DISTINCT name, email from tablename;”
The result will retrieve rows with distinct name and email combinations which can be output in a table or list.
Note:
If the data in the list was submitted from a form, and some users had submitted the same email and name more than once, you will not see all entries for a distinct user. You will only see the earliest entry of a specific name / email combination.
$string = “I like to eat.”;
echo $string; //
Output is:
I like to eat
$string = str_replace(“eat”,”drink juice”, $string);
echo $string;
New output is:
I like to drink juice.
Using MYSQL Console
1) Open MYSQL Console (mysql>)
2) Type command:
delete FROM `test’ where id >’0′;
1) Open PHPMYADMIN
2) Select ‘SQL’ tab.
3) Type Command:
SELECT count(*) FROM information_schema.`COLUMNS` C
WHERE table_name = ‘mytable’;
1) Open PHPMYADMIN
2) Select ‘SQL’ tab.
3) Type Command:
SELECT COUNT(*) FROM tablename;
Here is the basics you need to know about Excel spreadsheets in order to make, edit or move the data into a mysql database.
make csv from excel comma delimited format
To add a column with Excel,
1) Right click on a letter >Select Insert
Note:It will insert before selected column
To delete a column in Excel,
1) Right click on a letter >Select Delete
To copy text with Excel,
Right Click on cell >Copy >Paste in phpmyadmin or wherever you want
Dumping Excel CSV File Into PHP MYADMIN with autoincrement fields.
1) With php myadmin, remove id auto increment field.
2) Load data from csv.
3) Add new auto_increment field after the new rows are updated.
Intention: To populate a mysql database table very quickly by copying existing rows and adding them to the existing rows.
With the following form we are trying to filter the results from an exact day. Since the date in the database uses the typical date format 2012-01-13, we can grab the date, month and day post variable and get results for that day.
This example uses a table to output data.
<form method=”post” action=”<?php echo $_SERVER[‘PHP_SELF’]; ?>”>
<select name=”date”>
<option value=”2012″>2012</option>
<option value=”2011″>2011</option>
<option value=”2010″>2010</option>
</select>
<select name=”month”>
<option value=”01″>January</option>
<option value=”02″>February</option>
<option value=”03″>March</option>
<option value=”04″>April</option>
<option value=”05″>May</option>
<option value=”06″>June</option>
<option value=”07″>July</option>
<option value=”08″>August</option>
<option value=”09″>September</option>
<option value=”10″>October</option>
<option value=”11″>November</option>
<option value=”12″>December</option>
</select>
<select name=”day”>
<option value=”01″>1</option>
<option value=”02″>2</option>
<option value=”03″>3</option>
<option value=”04″>4</option>
<option value=”05″>5</option>
<option value=”06″>6</option>
<option value=”07″>7</option>
<option value=”08″>8</option>
<option value=”09″>9</option>
<option value=”10″>10</option>
<option value=”11″>11</option>
<option value=”12″>12</option>
<option value=”13″>13</option>
<option value=”14″>14</option>
<option value=”15″>15</option>
<option value=”16″>16</option>
<option value=”17″>17</option>
<option value=”18″>18</option>
<option value=”19″>19</option>
<option value=”20″>20</option>
<option value=”21″>21</option>
<option value=”22″>22</option>
<option value=”23″>23</option>
<option value=”24″>24</option>
<option value=”25″>25</option>
<option value=”26″>26</option>
<option value=”27″>27</option>
<option value=”28″>28</option>
<option value=”29″>29</option>
<option value=”30″>30</option>
<option value=”31″>31</option>
</select>
<input type=”submit” name=”submit” value=”submit” /></form>
<div>
<?php
echo ‘<table align=”center” cellspacing=”0″ cellpadding=”5″>
<tr>
<td align=”left”><b># Entries</b></td>
<td align=”left”><b>Name</b></td>
<td align=”left”><b>Username</b></td>
<td align=”left”><b>Email</b></td>
<td align=”left”><b>Phone Number</b></td>
<td align=”left”><b>Date</b></td>
</tr>’;
$command= “SELECT member_id, name, username, email_address, phone_number, date FROM tablename WHERE date=’$my_date’ ORDER BY date desc”;
$result = mysqli_query($db, $command);
if ($result && mysqli_num_rows($result) > 0) {
$number = 0;
while ($row = mysqli_fetch_assoc($result)) {
$number = $number + 1;
$bg =($bg==’#DCEDE5′ ? ‘#f9f9f9’ : ‘#DCEDE5’);
echo ‘<tr bgcolor=”‘ . $bg . ‘”>
<td align=”left”>’ .$number. ‘</td>
<td align=”left”>’ .$row[“name”]. ‘</td>
<td align=”left”>’ .$row[“username”]. ‘</td>
<td align=”left”>’ .$row[“email_address”]. ‘</td>
<td align=”left”>’ .$row[“phone_number”]. ‘</td>
<td align=”left”>’ .$row[“date”]. ‘</td>
</tr>’;
}
echo ‘</table>’;
}
?></div>
With the following form we are trying to filter the results from a period of 1 month. Since the date in the database uses the typical date format 2012-01-13, we can grab the date and month post variable and append the first date of the month and last date of the month. The last date 31 would work for any month because the last 2 digits of the date never exceed 31.
This example uses a table to output data.
if (count($_POST) > 0) {
$start_date=$_POST[‘date’].’-‘.$_POST[‘month’].’-00′;
$end_date=$_POST[‘date’].’-‘.$_POST[‘month’].’-31′;
} ?>
<form method=”post” action=”<?php echo $_SERVER[‘PHP_SELF’]; ?>”>
<select name=”date”>
<option value=”2012″>2012</option>
<option value=”2011″>2011</option>
<option value=”2010″>2010</option>
<option value=”2009″>2009</option>
<option value=”2008″>2008</option>
<option value=”2007″>2007</option>
</select>
<select name=”month”>
<option value=”01″>January</option>
<option value=”02″>February</option>
<option value=”03″>March</option>
<option value=”04″>April</option>
<option value=”05″>May</option>
<option value=”06″>June</option>
<option value=”07″>July</option>
<option value=”08″>August</option>
<option value=”09″>September</option>
<option value=”10″>October</option>
<option value=”11″>November</option>
<option value=”12″>December</option>
</select>
<input type=”submit” name=”submit” value=”submit” /></form>
<div>
<?php
echo ‘<table align=”center” cellspacing=”0″ cellpadding=”5″>
<tr>
<td align=”left”><b># Entries</b></td>
<td align=”left”><b>Name</b></td>
<td align=”left”><b>Username</b></td>
<td align=”left”><b>Email</b></td>
<td align=”left”><b>Phone Number</b></td>
<td align=”left”><b>Date</b></td>
</tr>’;
$command= “SELECT member_id, name, username, email_address, phone_number, date FROM tablename WHERE date>=’$start_date’ AND date<=’$end_date’ ORDER BY date desc”;
$result = mysqli_query($db, $command);
if ($result && mysqli_num_rows($result) > 0) {
$number = 0;
while ($row = mysqli_fetch_assoc($result)) {
$number = $number + 1;
$bg =($bg==’#DCEDE5′ ? ‘#f9f9f9’ : ‘#DCEDE5’);
echo ‘<tr bgcolor=”‘ . $bg . ‘”>
<td align=”left”>’ .$number. ‘</td>
<td align=”left”>’ .$row[“name”]. ‘</td>
<td align=”left”>’ .$row[“username”]. ‘</td>
<td align=”left”>’ .$row[“email_address”]. ‘</td>
<td align=”left”>’ .$row[“phone_number”]. ‘</td>
<td align=”left”>’ .$row[“date”]. ‘</td>
</tr>’;
}
echo ‘</table>’;
}
?></div>
Here is a query for which you can use the mysqli_real_escape_string function within a query.It is identical in usage to the addslashes function, except the word addslashes is replaced with mysqli_real_escape_string.
In PHP, concatination is the joining of strings. The easiest way to explain this process is through the following examples.With concatinatiion, two variables can be joined with a period inserted between them.
Example 1
echo $var1.$var2;
#Ouput is My name isJohn.
Example 2
echo $var1.$var2;
#Ouput is My name is John.
Example 3
echo $var1.” “.$var2;
#Ouput is My name is John.
Notes:
With php, all text between quotes can be ended with a period. In example 3, a space was created after $var1. We simply used quotes to make a space.
Below, is the same as example 3 with the exception of using single quotes.
echo $var1.’ ‘.$var2;
#Ouput is: My name is John.
With PHP functions, you can pass variables and strings into a function. Then, the function uses the variables within the function.
Passing variables Into PHP Functions
}
$variable1=”Hello”;
$variable2=”World”;
$variable3=”Hello There!”;
my_function($variable1, $variable2, $variable3);
#Output Is: HelloWorldHelloThere.
Passing Values Into PHP Functions
}
my_function(“Hello”, “World”, “Hello There”);
#Output Is: HelloWorldHelloThere
Passing Values and Variables Into PHP Functions
}
$variable1=”Hello”;
$variable2=”World”;
my_function($variable1, $variable2, “Hello There”);
#Output Is: HelloWorldHelloThere
Passing Optional Values Into PHP Functions
}
$variable1=”Hello”;
$variable2=”World”;
$variable3= $_GET[‘myvalue’];
my_function($variable1, $variable2, $variable3);
#Output Is: HelloWorldHelloThere.
The most basic Facebook application is one for which Facebook allows you to create an Iframe for which you page will run inside of Facebook. This is very similar to using an iframe in HTML. The applications will be listed in the apps section of your profile.
1) Create New App >Fill in :
App Display Name >App Namespace >App Domain
2) App on Facebook >Canvas URL ie) mysite.com >Secure canvas url(ie) https://apps.facebook.com/my_app/
Note:
Wait for canvas url to appear underneath the secure canvas url
3) Website >Site URL
4) Edit App >Settings >Advanced >Add Privacy Policy URL >Save Changes
5) Settings >Auth Dialog >Add a Headline and privacy policy url >Save Changes
6) Open Graph >Dashboard >Set Rules for people using your app
Note: At the very least you need an object type for iframe. Type ‘website’.
7) Select Apps >Desired App
It should display:
Actions Objects Aggregations
Use Website Most recent use(global)
Note: You may have to add your first or other apps to your facebook account.
After Canvas Page propagates,
Type Canvas Page in browser (ie.) http://apps.facebook.com/my_app >Click Install
Now, you should be able to see the app when you login to Facebook. You may need to make a few adjustments so that the public, friends and you can view the app.
But, you can do a few more tweaks so that it can be publicly displayed and installed. Then, other Facebook users can use it.
To make app publicly available,
1) Settings >Auth Dialog >Default Activity Privacy >Public
To find errors in application development,
1) Select Apps >Choose App >Use Graph API Explorer >Get Access Token and copy the token string >Apps >Edit Settings >Use Debug Tool >Insert Token >Debug >Scopes could read publish_actions or be blank
2) Select Apps >Select App >Insights >Diagnostics
Imagine you just made a huge mysql dump and you want to create encryted passwords for a login script. First, you need to encrypt some data so passwords can be stored and retrieved in an encrypted format. Below is an example showing how to encrypt all entries in one of 2 database columns.
$success = true;
//start transaction
$command = “SET AUTOCOMMIT=0”;
$result = mysqli_query($db, $command);
$command = “BEGIN”;
$result = mysqli_query($db, $command);
$command = “SELECT tablename.id, tablename.username from tablename “;
$result = mysqli_query($db, $command);
if ($result && mysqli_num_rows($result) > 0){
while($row = mysqli_fetch_assoc($result)) {
echo “<br/><br/>Result 1 is:”.$result.”<br/><br/>”;
$myids = $row[‘id’];
$user_name = $row[‘username’];
$user_name= md5($user_name);
echo “hello”.$user_name;
$command2 = “UPDATE tablename SET username=’$user_name’ WHERE id=’$myids’ ORDER BY id DESC”;
$result2 = mysqli_query($db, $command2);
echo “<br/><br/>Result 2 is”.$result2.” and id is “.$myids.” and encrypted username is “.$user_name.””;
if (($result == false) ||
(mysqli_affected_rows() == 0)) {
$success = false;
}
}
}
$command = “COMMIT”;
$result = mysqli_query($db, $command);
#set session variable
$command = “SET AUTOCOMMIT=1”; //return to autocommit
$result = mysqli_query($db, $command);
?>
}
}
This tutorial shows the backbone for which you can create a dynamic dropdown menu from any database column. You will pull only the distinct values for an entry and autoselect the option for which the user has chosen. This is a procedure for updating entries.
$command= “SELECT DISTINCT size from table”;
$result = mysqli_query($db, $command);
if ($result && mysqli_num_rows($result) > 0) {
while ($row = mysqli_fetch_assoc($result)) {
/*creates an array from the distinct names in the column. The process actually makes 3 separate arrays. You can see with print_r() function. The arrays are Array ( [0] => Small ) Array ( [0] => Small [1] => Medium ) Array ( [0] => Small [1] => Medium [2] => Large ) */
$sizes[] = $row[‘size’];
print_r($sizes);
}
}
echo ‘<select name=”sizes”>’;
$command2= “SELECT size from table where id =’$my_id’;”;
$result2 = mysqli_query($db, $command2);
if ($result2 && mysqli_num_rows($result2) > 0) {
while ($row = mysqli_fetch_assoc($result2)) {
$myname=$row[‘size’];
foreach ($sizes as $key => $value) {
if($myname==$value) {
$selected=”selected=’selected'”;
}
else {
//make other months not selected
$selected=””;
}
//output the current month as selected
echo “<option value=\”$value\” $selected>$value</option>\n”;
}
}
echo ‘</select>’;
}
}
$sizes = array (‘Small’, ‘Medium’, ‘Large’);
echo ‘<select name=”sizes”>’;
$command2= “SELECT size from table where id =’$my_id’;”;
$result2 = mysqli_query($db, $command2);
if ($result2 && mysqli_num_rows($result2) > 0) {
while ($row = mysqli_fetch_assoc($result2)) {
$myname=$row[‘size’];
foreach ($sizes as $key => $value) {
if($myname==$value) {
$selected=”selected=’selected'”;
}
else {
//make other months not selected
$selected=””;
}
//output the current month as selected
echo “<option value=\”$value\” $selected>$value</option>\n”;
}
}
echo ‘</select>’;
}
}
You should sanitize data before inserting or updating data from forms into a mysql database. Two common methods are to use the functions mysqli_real_escape_string() or addslashes(). Sanitizing with mysqli_real_escape_string() is the best option, but, for demo purposes, I will show another method(which I would personally never use in production).
Note:
If you plan to update the data in the future, using the stripslashes function applied to the selected data will remove the slashes. Otherwise, you could end up with a string like John\’s shoes.
$result = mysqli_query($db, $command);
Here is how a query would look to display data for which slashes had been added:
Note:
$command = “SELECT name, email FROM table where id='”.addslashes($id).”‘;”;
$result = mysqli_query($db, $command);
while ($data = mysqli_fetch_object($result)) {
echo stripslashes($data->name).” “.stripslashes($data->email);
or
$command = “SELECT name, email FROM table where id=1”;
$result = mysqli_query($db, $command);
while ($data = mysqli_fetch_object($result)) {
echo stripslashes($data->name).” “.stripslashes($data->email);
or
$command = “SELECT name, email FROM table where id=1″;
$result = mysqli_query($db, $command);
while ($row = mysqli_fetch_assoc($result)) {
$name=$row[‘name’];
echo stripslashes($name).” “.stripslashes($row[“email”]);
echo stripslashes($row[’email’]);
You should sanitize data before inserting or updating data from forms into a mysql database. Two common methods are to use the functions mysql_real_escape_string() or addslashes().
Note:
If you plan to update the data in the future, using the stripslashes function applied to the selected data will remove the slashes. Otherwise, you could end up with a string like John\’s shoes.
A)
//Use the function with a post variable.
$var = mysqli_real_escape_string($db, $_POST[‘name’]);
B)
//Set a variable that is the form post data. Then, make a new variable equal to the post data.
$var = mysqli_real_escape_string($db, $name);
Here is how a query would look with a sanitized variable:
$command= “INSERT INTO table values (NULL, ‘$var’, now());”;
$result = mysqli_query($db, $command);
You can set email rule, such as blacklist and whitelist email addressess and domains with Spam Assassin.
*@website.com
This will block this entire domain.
With mysql, 4 typical methods to import data into a database are to iport the data, loading text data and dumping a csv file from Excel, or importing data from a xml file. This tutorial discusses loading the data from a text file.
The file below is contents of a text(.txt) file. Note that line 1 just tells us what the two database table columns could be.
The text below would add the file(my_file.txt) shown above into a database table called canadian_cities.
Decyphering the command:
The file myfile.txt gets loaded into the table canadian_cities which is in the database called world_cities.
The fields are terminated by ‘\t’ which means there is a tab space between the two columns; in this case between country name CAN and a city like Toronto.
Lines terminated by ‘\r\n’ means that each new line is a new row in the table.
IGNORE 1 LINES means the first line with the junk text ‘Country City’ is not inserted into the database. In order to load the data, we had already set the table and columns up. You could omit this condition if you deleted the first line ‘Country City’.
Often, and especially in the past, PHPMYADMIN in WAMP is not designed to handle the importing of larger sql file.
Here are a couple of quick tips to increase the ability for phpmyadmin to handle large files.
Note:
You may get the following error uploading a large file:
Set timeout
Fatal error: Maximum execution time of 300 seconds exceeded in C:\wamp\apps\phpmyadmin2.11.6\libraries\import\sql.php on line 118
4) Open C:\wamp\apps\phpmyadmin\config.inc.php
a) Near line 128 you can change the time for which phpmyadmin will execute
b) Change the number.
Before:
$cfg[‘ExecTimeLimit’] = 300; // maximum execution time in seconds (0 for no limit)
After:
$cfg[‘ExecTimeLimit’] = 10000; // maximum execution time in seconds (0 for no limit)
5) Restart All Services
More Options:
6) a) Open:
my.ini located in C:\wamp\bin\mysql\mysql5.0.51b\my.ini
b) Add the code:
max_allowed_packet = 200M
7) Open:
C:\wamp\apps\phpmyadmin3.4.5\config.inc.php
Look for:
$cfg[‘UploadDir’] = ”;
Change to:
$cfg[‘UploadDir’] = ‘upload’;
8) Create a directory called ‘upload’ in:
C:\wamp\apps\phpmyadmin3.X.X
Copy and Paste sql file to:
C:\wamp\apps\phpmyadmin3.X.X\upload\
9) Restart All Services
CKEditor can be used to add a editor into a custom cms, or any othered desired application where you want control to edit text, images, video or source code. The editor is similar to what you would see in WordPress, Drupal and Joomla. Personally, I think it is better than default cms editors since it has more bells and whistles.
The procedure to download and use the editor is quick and simple.
Note: If you want use html, head and body tags within the editor code
a) Open config.js
b) Add the text:
config.fullPage=true;
$user = $_POST[‘username’];
$password = md5($_POST[‘password’]);
If ($user || $password) {
if (!($user)) {
$error_message = “Please enter your username. “;
}
else if (!($password)) {
$error_message = “Please enter your password. “;
}
else {
#Check the mysql database for username and password
$command = “SELECT id, username, usertype FROM users WHERE username=’$user’ AND password=’$password’ AND usertype=’Administrator’;”;
$result = mysqli_query($db, $command);
if ($data = mysqli_fetch_object($result)) {
#if username, set sessions and redirect.
$_SESSION[‘id’] = $data->id;
$_SESSION[‘username’] = $data->username;
//If desired, you can echo output to see/check values.
}
else {
$error_message = “Sorry, your username was incorrect!”;
echo $data->username;//Note: nothing outputs since no object
echo $data->id; //Note: nothing outputs since no object
}
}
}
if ($myuser) {
$command=”SELECT * from users WHERE username=’$myuser’;”;
$result = mysqli_query($db, $command);
if ($result && mysqli_num_rows($result) > 0){
while($row = mysqli_fetch_assoc($result)) {
if ($row[‘access_level’]==’1′) {
echo “Add stuff here!”;
}
else if ($row[‘access_level’]==0){
echo “Add specific stuff here!”;
}
}
}
} else {
echo “Add general stuff here for any non-member!”;
}
function dynamic_dropdown() {
echo ‘<select name=”myname”>’;
$command= “SELECT DISTINCT mt.city from mytable as mt where mt.user_id>1 “;
$rows = array();
$result = mysqli_query($db, $command);
if ($result && mysqli_num_rows($result) > 0) {
while ($row = mysqli_fetch_assoc($result)) {
//echo $row[‘city’];
$name=$row[‘city’];
echo “<option value=\”$name\” >$name</option>\n”;
}
}
echo ‘</select>’;
}
//call the function
dynamic_dropdown();
When you make a query with mysql you can use quotes or use no quotes. In most cases, making queries without quoting numbers is safer. For example, examine the 2 queries used in php below:
$command= “SELECT name, email from table where years_experience<10 “;
$command= “SELECT name, email from table where years_experience<’10’ “;
//You may get unexpected results if there are the integers with the value 0 in some of the years_experience rows. In this case, the //column years_experience stores integers.
Although the two queries above may look alike, you can output the data to see how it actually worked. Testing output with mysql commands with phpmyadmin(or mysql console) and using the php script will help ensure you get the results you expect. On various servers, you could get various results.
In a nutshell, values inside of quotes will be strings. If you want numbers…use no quotes. With PHP, anything inside quotes is a string wheras any number without quotes is an integer.
$integer=123;
$number_string=’123′;
When you output database table rows into a list or table, you have several ways to write the output.
Outputting Rows Within Double Quotes.
echo “$row[name]”;
Option a)
$command= “Select col1, col2 from tablename where id>’0′”;
Option b)
$command= “Select col1, col2 from tablename where id>’0′ “;
Option c)
$command= “Select col1, col2 from tablename where id>’0′;”;
At first glance you may think they all yield the same results, but, technically, they are all different. If you want to use the queries above, they will all give the same results, unless you add another clause to the query.
However, you may want to add more length to the query like adding a limit clause; such as the one below.
$command .= ‘limit ‘ .($page_number – 1) * $number_entries .’,’ .$number_entries;
If you want to add to the initial command, it is safe to use option b since the white space at the end of the query could be the method for which the query behaves as you want it to.
Option a could merge the two statements to something like where id>’0’limit………
You do not want the end of the query to merge next to the limit clause without a space. It could cause an error.
You want where id>’0′ limit…
Option c, which ends ;”; will stop the query at the first semi-colon. Using it is fine, just remember it can lock the statement.
The php function is called and the function will execute.
function my_function() {
echo “Hello World!”; //Outputs Hello World
}
The example below shows how to pass multiple variables into a function and how to output those variables.
//variables
$var=”Hello”;
$var2=”World”;
//calling function
my_function($var, $var2);
//function below
//Note that the variable $var is now $my_var and $var2 is now $my_var2
my_function($my_var, $my_var2){
echo $my_var.” “.$my_var2;//Outputs Hello World
}
When you pass a variable($myvar) into a PHP function, it can be used within the function. The example below shows how to pass a variable into a function and how to output that variable.
When working with dates in php, it is easy to convert date strings when it outputs like 2010-01-24. You can convert that to almost anything you want, like January 1, 2010 or Jan 1/10.
$year=”1983″;
$month=”02″;
$day=”14″;
$mydate = $year.”-“.$month.”-“.$day;
$mydate = date(“Y-m-d”, strtotime($mydate));
echo $mydate; //prints 1983-02-14
Form
Function
There are several ways to add css to a td cell with css. One simple way is to give the form or table row (tr) a specific id. Then, you can use that id with reference to a cell ‘td’.
1) Create a file such as connect.inc or connect.php.
2) Add the following code.
<?php
function public_db_connect() {
$host = “localhost”; //usually always localhost
$user = “root”; //user for wamp
$pw = “”; //no password for wamp
$database = “mydb”; //database name
//connect to mysql
$db = mysql_connect($host,$user,$pw)
or die(“Cannot connect to mySQL.”);
//connect to mysql database
mysql_select_db($database,$db)
or die(“Cannot connect to database.”);
return $db;
}
?>
3) In your file that need to connect to the database you must write the following code at the top of the page:
include(‘connect.inc’);
Alternatively, you could use the same code on any page for which you want tom connect to the database. However, keeping include files in a safe directory is more secure than just leaving the access codes on random pages.
Here is a method to populate input text fields from a database using PHP / mySQL.
Here is some php code which could be used to paginate rss feeds or database queries.
if (!(isset($page_number))) {
$page_number = 1;
}
//Need to get the page number
$page_number=$_GET[‘pagenumber’];
$command = “select table1.category_id, table1.seo_fname, table2.post_id, table2.6, table2.post_date, table2.2, table2.5, table2.8, table2.9, table2.15 from cats as table1, p_table as table2 WHERE table1.category_id=table2.6 AND (table2.2 LIKE ‘$keywords%’ OR table2.2 LIKE ‘%$keywords%’ OR table2.5 LIKE ‘%$keywords%’) ORDER by table2.post_date DESC”;
$result = mysqli_query($db, $command);
$rows = mysqli_num_rows($result);
//command below tells us how many entries there actually are
//echo $rows;
//how many entries we want
$number_entries = 3;
//echo $number_entries;
//This tells us the page number of our last page
$last_page = ceil($rows/$number_entries);
//this makes sure the page number isn’t below one, or more than our maximum pages
if ($page_number < 1) {
$page_number = 1;
}
elseif ($page_number > $last_page) {
$page_number = $last_page;
}
//This is the query. It could be any query
$command2 = “select table1.category_id, table1.seo_fname, table2.post_id, table2.6, table2.post_date, table2.2, table2.5, table2.8, table2.9, table2.15 from cats as table1, part_table as table2 WHERE table1.category_id=table2.6 AND (table2.2 LIKE ‘$string%’ OR table2.2 LIKE ‘%$string%’ OR table2.5 LIKE ‘%$string%’)”;
//This sets the range to display in our query
//$command2 .= ” LIMIT “.(($page_number – 1) * 4).”,4″;
$command2 .= ‘limit ‘ .($page_number – 1) * $number_entries .’,’ .$number_entries;
//This is where you display your query results
$result2 = mysqli_query($db, $command2);
while($row = mysqli_fetch_array($result2)) {
$even_odd = ( ‘odd’ != $even_odd ) ? ‘odd’ : ‘even’;
?>
<div style=”display:inline-block;”>
<li style=”min-height:80px; width:99%; height:100%;” class=”myRow <?php echo $even_odd; ?>”>
<h4><?php echo “<a href=/jobs/job/$row[post_id] title=’$row[2]’ >$row[2]</a>”; ?></h4>
<div style=”width:600px; display:inline-block; “><p class=”myDesc” ><?php echo substr($row[5], 0, 120).”…”; ?></p></div>
<div style=”display:inline-block;” class=”mySource” ><span><?php echo “Name”; ?></span></div>
<div style=”display:inline-block;” class=”myDate”><?php echo date(‘l, jS<br/> F Y’, strtotime($row[post_date]));?></div>
</li></div>
<div style=”clear:both;”></div>
<?php
}
//starting with the first page, make a loop for all pages and links to those pages
for($i = 0; $i<$last_page; $i++) {
$page_link = $i + 1;
//create an array of links
$links_pages[] = ” <a style=\”font-size:13px;\” href=’http://localhost/page.php?pagenumber=”.$page_link.”‘ >”.$page_link.”</a>”;
}
// First we check if we are on page one. If we are then we don’t need a link to the previous page or the first page so we do nothing. If we aren’t then we generate links to the first page, and to the previous page.
if ($page_number == 1) {
}
else if ($page_number > 1)
{
echo ” <a style=\”font-size:13px;\” href='{$_SERVER[‘PHP_SELF’]}?pagenumber=1′> <<-First</a> “;
echo ” “;
$previous_page = $page_number-1;
echo ” <a style=\”font-size:13px;\” href='{$_SERVER[‘PHP_SELF’]}?pagenumber=$previous_page’> <-Previous</a> “; ?>
<?php
}
if ($page_number == $last_page) {
}
else {
$next_page = $page_number+1;
echo “<a style=\”font-size:13px;\” href='{$_SERVER[‘PHP_SELF’]}?pagenumber=$next_page’>Next -></a> “;
echo ” “;
echo ” <a style=\”font-size:13px;\” href='{$_SERVER[‘PHP_SELF’]}?pagenumber=$last_page’>Last ->></a>”;
}
// This shows the user what page they are on, and the total number of pages
echo “<span style=\”font-size:13px;\”> Page $page_number of $last_page</span>”;
?>
<div class=”mypageclass”>
Page:
<?php
if (count($links_pages)) {
foreach($links_pages as $links){
echo $links;
}
}
else {
echo “1”;
}
?>
</div>
</ul></div>
Here is some code that shows 2 typical html radio buttons.
Here is some code that shows 2 radio buttons that receive the value from the database. The chosen radio radio selection from the database will be automatically selected. This is a method which could be implemented when updating a database entry. The key is to pull the original values from the databse that were inserted from the original form. With this update page, the new changes can be updated upon submit.
}}
else { echo ‘<input type=”radio” name=”member” value=”yes” /> Yes’;
}?>
<?php
$command= “SELECT col1 FROM counselling_report where id=’$report_id’ AND member=’no'”;
$result = mysqli_query($db, $command);
if ($result && mysqli_num_rows($result) ) {
while ($row = mysqli_fetch_assoc($result)>0) {
echo ‘<input type=”radio” name=”member” value=”no” checked=”checked” /> No’;
}}
else { echo ‘<input type=”radio” name=”member” value=”no” /> No’;
}?>
</p>
Custom Script to Use Joomla Framework without Using Joomla
You may want to use Joomla framework since all tables are nicely setup, or you want tom use parts of a Joomla installation and custom code other parts. Coding PHP / mySQL to add users to the Joomla users table is not much different than using a custom users table. The custom form should be used from the beginning to ensure passwords all use the same methods of encryption. If you use Joomla password system for a few users then switch, you could have login issues. The key is to only use the custom registration form to keep everything in sync.
However, if you plan to use Joomla CMS and an application running on its own at the same time, you must consider the 3 tables which holds the 3 records for each user. If you just create a user to the user table, the user can be used in a standalone application, but not the Joomla CMS.
Here is some sample code for which you can take a pure php / mySQL form and add a user which can be used with the Joomla CMS or with pure PHP / mySQL.
<?php //check to see form is filled out and session for Super admin exists. We need the name, username, email address and password. The rest we can just insert values…like a typical Joomla registration
if ($_SESSION[‘my_session_id’] && $_POST[‘name’] && $_POST[‘username’] && $_POST[’emailaddress’] && $_POST[‘pword’]) {
$name = $_POST[‘agent_name’];
$username = $_POST[‘username’];
$emailaddress = $_POST[’emailaddress’];
$password = md5($_POST[‘pword’]);
$usertype = $_POST[‘usertype’];
$gid = $_POST[‘gid’];
$params = “admin_language=
language=
editor=
helpsite=
timezone=0”;
$command = “INSERT INTO jos_users VALUES (”, ‘”.addslashes($_POST[name]).”‘, ‘”.addslashes($_POST[username]).”‘, ‘”.addslashes($_POST[emailaddress]).”‘, ‘$password’, ‘”.addslashes($_POST[usertype]).”‘, 0, 0, ‘”.addslashes($_POST[gid]).”‘, now(), now(), ”, ‘$params’)”;
$result = mysqli_query($db, $command);
$need_id1=mysqli_insert_id($db);
$command = “INSERT INTO jos_core_acl_aro VALUES (NULL, ‘users’, ‘$need_id1’, ‘0’, ‘”.addslashes($_POST[name]).”‘, 0)”;
$result = mysqli_query($db, $command);
$need_id2=mysqli_insert_id($db);
$command = “INSERT INTO jos_core_acl_groups_aro_map VALUES (’18’, ”, ‘$need_id2’)”;
$result = mysqli_query($db, $command);
}
?>
<?php //Here is the form ?>
<form method=POST action=”<?php echo $_SERVER[‘SELF’]; ?>”>
<table>
<tr>
<td align=right>
Name:
</td>
<td align=left>
<input type=text size=25 max=50 name=” name”>
</td>
</tr>
<tr>
<td align=right>
Username:
</td>
<td align=left>
<input type=text size=25 max=50 name=”username”>
</td>
</tr>
<tr>
<td align=right>
Agent Email:
</td>
<td align=left>
<input type=text size=25 max=50 name=”emailaddress”>
</td>
</tr>
<tr>
<td align=right>
Password:
</td>
<td align=left>
<input type=password size=12 max=12 name=”pword”>
</td>
</tr>
<tr>
<td align=right>
</td>
<td align=left>
<input type=”hidden” size=12 max=12 name=”usertype” value=”Registered”>
</td>
</tr>
<tr>
<td align=right>
</td>
<td align=left>
<input type=”hidden” size=12 max=12 name=”gid” value=”18″>
</td>
</tr>
<tr>
<td colspan=2 align=center>
<input type=submit value=”SUBMIT”>
</td>
</tr>
</TABLE><br>
</form>
To make ajax and php output your desired data from a mysql, you will need 3 files;
a) main php file with a form and javascript ajax function
b) functions file which has the dynamic drop down menu
c) second php file which handles the GET variable from the url.
How To
1) Have a php function that has select box with a unique name and onchange javascript function like. The drop down menu is dynamic.
function pulldowns() {
echo ‘<select name=”listings” onchange=”pulldownit(this.value)”>’;
$command= “SELECT col1, col2, col3 from country ORDER BY membername ASC”;
$rows = array();
$result = mysqli_query($db, $command);
if ($result && mysqli_num_rows($result) > 0) {
while ($row = mysqli_fetch_assoc($result)) {
//echo $row[‘col1’];
$name2=$row[‘col2’];
$name =$row[‘col3’];
echo “<option value=\”$name\” >$name2</option>\n”;
}
}
echo ‘</select>’;
2) When an option is selected the ajax call is made. The desired drop down option is the value which gets passed into the javascript function pulldownit(). STR is the value selected. Now ajax goes to work with the string value.
The ajax call opens the desired file with xmlhttp.open(“GET”,”getupdate.php?formname=”+str,true);
<script type=”text/javascript”>
function pulldownit(str)
{
if (str==””)
{
document.getElementById(“txtHint”).innerHTML=””;
return;
}
if (window.XMLHttpRequest)
{// code for IE7+, Firefox, Chrome, Opera, Safari
xmlhttp=new XMLHttpRequest();
}
else
{// code for IE6, IE5
xmlhttp=new ActiveXObject(“Microsoft.XMLHTTP”);
}
xmlhttp.onreadystatechange=function()
{
if (xmlhttp.readyState==4 && xmlhttp.status==200)
{
document.getElementById(“txtHint”).innerHTML=xmlhttp.responseText;
}
}
xmlhttp.open(“GET”,”getupdate.php?formname=”+str,true);
xmlhttp.send();
}
</script>
The getupdate.php file passes the value into the url. Then, queries run based on the value selected. Change the value and that changes the str value in the url. Voila…fast synchronous output.
3) Set a variable for the get value with the php file which is called
//The getupdate.php file sets avariable to $_GET'[‘formname’]
$formname=$_GET[“formname”];
4) Get any data from the database with that variable.
When using WAMP to make custom php / mysql applications, it would not be uncommon to find it not to behave like your web host. Such issues can occur with if statements that need else conditions, or php short tags not working. If you accidentally have a php short tag, the code may just be treated as if nothing was there. The short tag is <? while the safe notation for starting a block of php code is <?php. Using short tags can be risky if you plan to reuse the code since some servers may not enable the usage, thus, code may not execute as expected. Using <?php always works.
Alternatively,
1) Open php.ini
2) Look for short_open_tag = On
3) Update the line to:
short_open_tag = On
or
To move a table from one mysql database to another,
1) Open phpmyadmin >Select table in phpmyadmin >Export table
2) Open file with editor like Notepad++ >Select ‘SQL’ with phpmyadmin >Paste the entire query that begins with ‘Create Table in NOT Exists’.
Note: You should have 2 queries. One for the new table creation and one for inserting the table data.
2) Select the new database table >Click ‘SQL’ >Paste the query that begins with ‘INSERT INTO’ > Click Go
\
When you test a page for validity online at W3C validator, you will see success or a list of errors.
If you receive a list of errors, you can find out where it is.
The code below is 2 separate fluid blocks that will be used in a fluid layout. With the code, the left block will be 50% of the width and the right would be 48%. The other 2 % is just a little space in the middle which goes unnoticed. When a large desktop monitor views the fluid web page, the 2 blocks stretch to fit the screen. The images and text all fit in proportion.
<div style=”display:block; float:left; margin-left:0px; padding:0px 5px 0px 0px; width:30%;”>
<div style=” padding:0px 5px 0px 5px; width:auto; height:70px; margin-top:0px;” ><br /><b><span style=”font-size:16px;”>TITLE 1</span></b> <br />Lorem ipsum dolor sit amet, consectetur adipisicing elit</div>
<div><img style=”float:left; padding:0px 5px 0px 5px; margin-top:10px; width:100%; height:auto;” src=”images/image1.jpg” alt=”google voice”/></div>
</div>
<div style=”display:block; float:left; margin-left:0px;padding:0px 5px 0px 0px; width:30%;”>
<div style=” padding:0px 5px 0px 5px; width:auto; margin-top:0px; height:70px;” ><br /><b><span style=”font-size:16px;”>TITLE 2</span></b> <br />Lorem ipsum dolor sit amet, consectetur adipisicing elit</div>
<div><img style=” padding:0px 5px 0px 5px; margin-top:10px; height:auto;width:100%;” src=”images/image2.jpg” alt=”web”/></div>
</div>
<div style=”display:block;float:left; margin-left:0px; padding:0px 5px 0px 0px;width:30%;”>
<div style=”padding:0px 5px 0px 5px; width:auto; margin-top:0px; height:70px;”><br /><b><span style=”font-size:16px;”>TITLE 3</span></b> <br />Lorem ipsum dolor sit amet, consectetur adipisicing elit</div>
<div><img style=”padding:0px 5px 0px 5px; margin-top:10px; width: 100%;” src=”images/image3.jpg” alt=”web” /></div>
</div>
</div>
<div style=”display:block; width:48%; float:right;”>
<div style=”float:right; width:100%; padding:10px 10px 0px 10px; display:block;”><code style=” margin:2px 0px 2px 0px;”><span style=”color:#dc4000;”><b>HEADING 1</b></span><br/>Lorem ipsum dolor sit amet, consectetur adipisicing elit, sed do eiusmod tempor incididunt </code></div>
<div style=”float:right; width:100%; padding:10px 10px 0px 10px; display:block;”><code style=” margin:2px 0px 2px 0px;”><span style=”color:#dc4000;”><b>HEADING 2</b></span><br/>Lorem ipsum dolor sit amet, consectetur adipisicing elit, sed do eiusmod tempor incididunt </code></div>
<div style=”float:right; width:100%; padding:10px 10px 0px 10px; display:block;”><code style=” margin:2px 0px 2px 0px;”><span style=”color:#dc4000;”><b>HEADING 3</b></span><br/><b>Call 555.555.5555</b> Lorem ipsum dolor sit amet, consectetur adipisicing elit, sed do eiusmod tempor incididunt</code></div>
</div></div>
The image below will resize image and page layout expands or decreases since image width is a percentage.
<div><img style=”float:left; padding:1px; width:32%;” src=”images/image1.jpg” alt=”Alt Text”/></div>
The image below will not resize in a fluid layout since width is not a percentage. In this case, no width is defined so it takes on its actual size.
<div><img style=”float:left; padding:0px 10px 0px 10px;” src=”images/image2.gif” alt=”myAlt Text”/></div>
To remove icon in top right,
1) Login to forum with FTP
2) Edit image in top right corner.
a) Go to Themes >default >images>smflogo.png
b) Edit image and upload.
To edit background,
1) a) Go to Themes >default >images> theme >backdrop.png
b) Edit and upload new background image.
2) a) Go to Themes/default/images/theme/main_block.png
b) Edit and upload new background image.
To edit CSS,
1) Go to Themes >default >css >index.css >change body background to match backdrop.png.
To remove info center at the bottom of the page,
1) Open file Themes/default/BoardIndex.template.php
2) Comment out the function:
template_info_center();
change to
// template_info_center();
3) Change:
<div id=”posting_icons” class=”flow_hidden”>
Change to:
<div id=”posting_icons” class=”floatleft”>
Creating a Top Menu
To create a custom top menu,
1) Download Custom Top Menu Module (ie. ctm_1.4).
2) Upload Module
3) Install Mod
4) Install new to install in default theme.
To use the top menu module,
1) Go to Admin >Features and Options >Administration Center >Configuration Modification Settings >Top Menu.
2) Add tabs and urls
3) Click Save
New Forum Categories and Boards
To add a category,
1) Go to Admin >Features and Options >Forum >Borads >Create new Category
2) Name category
3) Select Category order.
4) Select Add Category.
5) Add a Board for that category.
To add a board,
1) Go to Forum >Boards >Modify Boards >Select Add Board for the desired category.
2) Add full name and other details such as description.
3) Add Board.
To change category order,
1) Go to Forum >Boards >Modify Boards
3) Click Modify next to the category name.
4) Set the order.
5) Click Modify.
To delete a category,
1) Go to Forum >Boards >Modify Boards
3) Click Modify next to the category name.
4) Click Delete Category.
To change board order,
1) Go to Forum >Boards >Modify Boards
3) Click Modify for the board name.
4) Set the order.
5) Click Modify.
To delete a board,
1) Go to Forum >Boards >Modify Boards
3) Click Modify next to the board name.
4) Click Delete Board.
SEF URLS
To create SEF URLS,
1) Login as admin.
2) Select admin >features and options >Check Search Engine Friendly URLs >Save
To delete a member,
1) Login >Admin >Features and Options >Members >Members >View All Members >Checkbox member(s) you want to delete. >Delete Selected Members
Stop Spam
1) Download Stop Spammer module
2) Install module
3) Enable module
Furthermore, you can adjust built-in features.
1) Go to Admin > Configuration >Security and Moderation > Anti spam >Select Checkboxes >Save
Installing Modules
To install a module,
1) Download module
2) Admin >Package manager >Download Packages >Scroll to bottom >Upload downloaded package >Install Mod >Install Now
To see installed packages,
1) Go to Main >Package Manager >Installed packages
Uninstall Module
To uninstall a module,
1) Go to Installed Packages > Uninstall >Select ‘Remove all data associated with this modification’>Uninstall Now
Note:
If you uninstall a module, it will be accessible again when you select ‘Browse Packages’.
When using lists, it is very important to make sure that the bold and anchor tags reside inside the <li></li> tags so the lists will look proper in all browsers.
Proper order for links and bold text within a list element.
<li ><b><a class=”list” href=”mypage.html”</a></b></li>
Improper Order
The order below has white space before and after a list element which will cause undetectable spaces with Internet Explorer. The code would look fine with other browsers.
<b><li ><a class=”list” href=”mypage.html”</a></li></b>
Two methods to create colored text styling with lists that are links.
Styling text color in a list using css class.
<ol><li>
<a class=”list” href=”page.html>Link Text</a></li></ol>
METHOD B:
Styling override or styling a list element.
The specific anchor is styled where it is.
<ol><li><a style=”color:blue;” href=”page.html>Link Text</a></li></ol>
Ordered lists can be styled in the tag or in a stylesheet. Each method has pros and cons. The code below shows examples for creating styling to <li></li> tags.
Example:
<ol style=”list-style-type: lower-alpha;”> <!– makes list items with lower alpha characters –>
<li>Item A</li>
<li>Item B</li>
</ol>
Unordered lists can be styled in the tag or in a stylesheet. Each method has pros and cons. The code below shows examples for creating styling to <li></li> tags.
Example:
<ul style=”list-style-type: none;”> <!– makes list items with no characters or overrides stylesheet –>
<li>Item A</li>
<li>Item B</li>
</ul>
With PHP, you make not equal to command with !- .
With a mysql query, you use <> in a query to make a condition where not equal to.
<ul style=”list-style-type:none; padding: 0px 10px 0px 10px;”>
<?php
$command = “SELECT title, url FROM table where url=’index.php’ ;”;
$result = mysqli_query($db, $command);
while ($data = mysqli_fetch_assoc($result)) {
// echo stripslashes($data->sidebar);
//echo “<ul style=\”list-style-type:none;\”>”;
echo “<li style=\”margin-left:0px;\”><a href=\””.$data[‘url’].”\”>”.$data[‘title’].”</li></a>”;
//echo “</ul>”;
}
$command = “SELECT title, url FROM table WHERE url<>’index.php’ order by title asc;”;
$result = mysqli_query($db, $command);
while ($data = mysqli_fetch_assoc($result)) {
// echo stripslashes($data->sidebar);
//echo “<ul style=\”list-style-type:none;\”>”;
echo “<li style=\”margin-left:0px;\”><a href=\””.$data[‘url’].”\”>”.$data[‘title’].”</li></a>”;
//echo “</ul>”;
}
?>
</ul>
Notepad++ is quite a versatile html, css, Javascript and PHP editor. It does a fantastic job at separating and hightlighting the various codes such as Javascript, PHP and HTML. In fact, you could put several individuals into a page and the colors alone would determine whom edits what content.
Besides that,it is free and very lightweight. When you right click and edit a page with Notepad++, it opens almost instantly. I cannot think of any other PHP editors who come close to half that time.
Asides from the features above, Notepad++ allows you to click on a tag(ie div), or a curly bracket in php from an if, else or while statement and it will find the closing tag while highlighting it very nicely.
Notepad
Alternatively, you can always use Notepad which comes with all Windows systems. You simply save files as “filename.php”. You must have double quotes before and affter the end of the file.
The code will allow will add .php to each entry in the url column.
1) Open mysql> or phpmyadmin
2) Open sql in phpmyadmin or use mysql> prompt
3) Execute the command:
UPDATE tablename set url=concat(url,’.php’) where id>’0′;
Here is a block of code which shows 3 different user levels and how to output code blocks based on that output level.
<?php session_start();
//echo $_SESSION[‘session_name’];
//set a variable to the session name
$user = $_SESSION[‘session_name’];
if ($user) {
//select statement to find access level based on unique username
$command=”SELECT table.ID, table.Username, table.access_level from table WHERE table.Username=’$user’;”;
$result = mysqli_query($db, $command);
if ($result && mysqli_num_rows($result) > 0){
while($row = mysqli_fetch_assoc($result)) {
//echo $row[‘Username’];
//echo $row[‘access_level’];
if ($row[‘access_level’]==’1′) {
//add custom content here for this user access level?>
<?php }
else if ($row[‘access_level’]==0){
//add custom content here for this user access level
?>
<?php
}
}
}
} else {
//add custom content here for public access level
?>
<?php }?>
PHP error reporting is fine for determining hopw to fix and polish scripts. However, there could be times when you want to hide errors from appearing on a web page.
Although some versions of phpmyadmin allow you to easily copy mysql tables; you may find it faster to use a query or in a position where phpmyadmin does not have the feature.
user table.
//basic form validation
if (empty($old_password ) || empty($new_password) || empty($confirm_password) || ($confirm_password != $new_password) || ($old_password != $old_pass)){
echo “<b>PLEASE FILL IN ALL DATA.</b><br/><br/>”;
}
$name = $_POST[‘name’];
$username = $_POST[‘username’];
$email = $_POST[’email’];
$password = md5($_POST[‘password’]);
$usertype = $_POST[‘usertype’];
$gid = $_POST[‘gid’];
$params = “admin_language=
language=
editor=
helpsite=
timezone=0”;
$command = “INSERT INTO jos_users VALUES (NULL, ‘”.addslashes($_POST[name]).”‘, ‘”.addslashes($_POST[username]).”‘, ‘”.addslashes($_POST[email]).”‘, ‘$password’, ‘”.addslashes($_POST[usertype]).”‘, 0, 0, ‘”.addslashes($_POST[gid]).”‘, now(), now(), ”, ‘$params’)”;
$result = mysqli_query($db, $command);
Here is the form for which to add Registered Users into Joomla Users Table
</td>
<td align=left>
<input type=”hidden” size=12 max=12 name=”usertype” value=”Registered”>
</td>
</tr>
<tr>
<td align=right>
</td>
<td align=left>
<input type=”hidden” size=12 max=12 name=”gid” value=”18″>
</td>
</tr>
<tr>
<td colspan=2 align=center>
<input type=submit value=”SUBMIT”>
</td>
</tr>
</TABLE><br>
</form>
This form allows you to take session variables from a login form for which you can alter the Joomla user table.
//start session and connect to db
session_start();
$id=$_SESSION[‘id’];
$user=$_SESSION[‘username’];
require_once(‘connect.inc’);
$db=db_connect();
//basic form validation
if (empty($old_password ) || empty($new_password) || empty($confirm_password) || ($confirm_password != $new_password) || ($old_password != $old_pass)){
echo “<b>PLEASE FILL IN DATA.</b><br/><br/>”;
}
if (!($id)) {
$error_message = “Please enter the username you used to join. “;
header(‘Location: outer_space.php’);
}
if ($id) {
$name = $_POST[‘name’];
$username = $_POST[‘username’];
$email = $_POST[’email’];
$password = md5($_POST[‘password’]);
$usertype = $_POST[‘usertype’];
$gid = $_POST[‘gid’];
$params = “admin_language=
language=
editor=
helpsite=
timezone=0”;
$command = “INSERT INTO jos_users VALUES (NULL, ‘”.addslashes($_POST[name]).”‘, ‘”.addslashes($_POST[username]).”‘, ‘”.addslashes($_POST[email]).”‘, ‘$password’, ‘”.addslashes($_POST[usertype]).”‘, 0, 0, ‘”.addslashes($_POST[gid]).”‘, now(), now(), ”, ‘$params’)”;
$result = mysql_query($command, $db);
}
Here is the formto add Registered Users into Joomla Users Table
</td>
<td align=left>
<input type=”hidden” size=12 max=12 name=”usertype” value=”Registered”>
</td>
</tr>
<tr>
<td align=right>
</td>
<td align=left>
<input type=”hidden” size=12 max=12 name=”gid” value=”18″>
</td>
</tr>
<tr>
<td colspan=2 align=center>
<input type=submit value=”SUBMIT”>
</td>
</tr>
</TABLE><br>
</form>
The php strstr() is a great method to retrieve part of a string after a certain point.Here is an example to retrieve a url and get the page title for other purposes.
$page_URL = ‘http’;
if ($_SERVER[“HTTPS”] == “on”) {$page_URL .= “s”;}
$page_URL .= “://”;
if ($_SERVER[“SERVER_PORT”] != “80”) {
$page_URL .= $_SERVER[“SERVER_NAME”].”:”.$_SERVER[“SERVER_PORT”].$_SERVER[“REQUEST_URI”];
} else {
$page_URL .= $_SERVER[“SERVER_NAME”].$_SERVER[“REQUEST_URI”];
}
return $page_URL;
}
$var=my_page_URL();
//This shows the url
echo $var;
//strstr gets all string after a certain point
$domain = strstr($var, ‘mysitename’); //will output mysitename.com/mypage.php
echo $domain; // prints mysitename.com/mypage.php whether the url had http:, www., etc
//now get rid of mysitename.com
$cms_page_title= str_replace(‘mysitename.com/’, ”, $domain);
echo $cms_page_title; //now we get mypage.php
?>
Updated Feed to XML
$file = file_get_contents(‘http://api.indeed.com/ads/apisearch?publisher=0000000000000000&q=’.$keywords.’&l=’.$loc.’&sort=&radius=&st=&jt=&start=&limit=30&fromage=&filter=&latlong=1&co=ca&chnl=&userip=1.2.3.4&useragent=Mozilla/%2F4.0%28Firefox%29&v=2&.xml’, true);
// write all code here
$dom = new DOMDocument;
//$dom->load($url);
// use the above to load an xml file on server or below to load the api. Both run in less than 1/10 second
@$dom->loadHTML($file);
foreach ($dom->getElementsByTagname(‘result’) as $result) {
$date = $result->getElementsByTagname(‘date’);
$date_text_value = $date->item(0)->firstChild->nodeValue;
// indeed url
$myurl = $result->getElementsByTagname(‘url’);
$myurl_value = $myurl->item(0)->firstChild->nodeValue;
$myurl = $result->getElementsByTagname(‘jobkey’);
$myurl_value = $myurl->item(0)->firstChild->nodeValue;
$jobtitle = $result->getElementsByTagname(‘jobtitle’);
$jobtitle_value = $jobtitle->item(0)->firstChild->nodeValue;
$source = $result->getElementsByTagname(‘source’);
$source_value = $source->item(0)->firstChild->nodeValue;
$snippet = $result->getElementsByTagname(‘snippet’);
$snippet_value = $snippet->item(0)->firstChild->nodeValue;
print “$date_value.$source_value \n”;
//create an array from the values which can be combined with other feed sources
$myarray[] = array(“link” => “$myurl_value”, “title” => “$jobtitle_value”, “source” => “$source_value”, “description” => “$snippet_value”, “date” => “$dateString”);
}
Updated Feed to XML
$file = file_get_contents(‘http://api.indeed.com/ads/apisearch?publisher=0000000000000000&q=’.$keywords.’&l=’.$loc.’&sort=&radius=&st=&jt=&start=&limit=30&fromage=&filter=&latlong=1&co=ca&chnl=&userip=1.2.3.4&useragent=Mozilla/%2F4.0%28Firefox%29&v=2&.xml’, true);
$ext=”.xml”;
$feedurl=”myfeed”;
//This makes a name like mysite.com/myurl.php with unique time
$myfeed=$feedurl.time().$ext;
//opens or creates the file here with the desired name
$fh = fopen($myfeed, ‘w’);
//writes the file to the new file name
fwrite($fh, $file);
fclose($fh);
$url = “http://www.mysite.com/temp-xml/”.$myfeed;
// write all code here
$dom = new DOMDocument;
$dom->load($url);
// use the above to load an xml file on server or below to load the api. Both run in less than 1/10 second
//@$dom->loadHTML($file);
foreach ($dom->getElementsByTagname(‘result’) as $result) {
$date = $result->getElementsByTagname(‘date’);
$date_text_value = $date->item(0)->firstChild->nodeValue;
// indeed url
//$myurl = $result->getElementsByTagname(‘url’);
//$myurl_value = $myurl->item(0)->firstChild->nodeValue;
$myurl = $result->getElementsByTagname(‘jobkey’);
$myurl_value = $myurl->item(0)->firstChild->nodeValue;
$jobtitle = $result->getElementsByTagname(‘jobtitle’);
$jobtitle_value = $jobtitle->item(0)->firstChild->nodeValue;
$source = $result->getElementsByTagname(‘source’);
$source_value = $source->item(0)->firstChild->nodeValue;
$snippet = $result->getElementsByTagname(‘snippet’);
$snippet_value = $snippet->item(0)->firstChild->nodeValue;
//print “$date_value.$source_value \n”;
//create an array from the values which can be combined with other feed sources
$myarray[] = array(“link” => “$href”, “title” => “$jobtitle_text_value”, “source” => “$source_text_value”, “description” => “$snippet_text_value”, “date” => “$dateString”);
}
Online courses, and other forms may have the need to submit the information after a specific time period. For example, a student may have 30 minutes to complete a course. If the course is not completed on time, submitting the work automatically is much like a teacher grabbing the exam paper at the bell. Students may try clever things, but using the autocommit, sessions, ip tracking and cookies could ensure that the exam is rather cheat-proofed and submitted on time.
Here is the javascript code which can go above the form in the php file.
You can use the variable $page_title in the head of the header.<title><?php echo $page_title; ?> </title>
//get the route
$findme = ‘mysite.com/category/subcategory’;
//make sure the path is in the url
$pos = strpos($my_url, $findme);
//echo $pos;
if ($pos==true){
//echo $my_url;
//just grab the unique id of the article
$my_url_trimmed = str_replace(“http://www.mysite.com/category/subcategory/”, “”, $my_url);
//echo $my_url_trimmed;
//query the database and find the data you want for the page title
$command = “SELECT tb1.id, tb1.col1, tb1.col2 from tablename as tb1 WHERE tb1.id=’$my_url_trimmed’;”;
$result = mysqli_query($db, $command);
if ($result && mysqli_num_rows($result) > 0) {
while ($row = mysqli_fetch_assoc($result)) {
//make the new page title
$space=” “;
$gap=” | “;
$location=$row[“col1”];
$page_title= $row[“col2”].$space.$location.$gap;
}
}
}
Bulding a website requires a few simple simple steps:
2. hosting
3. website template
4. content
5. extras
6. web management
Domain Name:
Domain name is self explanatory. Buyiong a name like mysite.com is necessary to start. The price starts as low as $12.
Hosting
Hosting is where the website files and database server exist; such as godaddy or a cpanel provider.
Web Template
The template is the design. It can be custom, free, bought, or any combination of the 3.
Extras
Websites can use all sorts of addons, plugins, components and custom programming when necessary; such as mp3 players, video players, rss parsers, custom database applications. Some techniques are canned installations while others very custom; depending upon what is required or requested.
Content
Content is needed to build a the page. It will be the text and images for pages such as ‘About Us’.
Web Management
Keeping the site maintained with updates or adding extras as new needs are met.
Using php copy() and rename() functions are two such methods to copy and rename php files. However, fopen() and fwrite() functions can alos do the trick. The example below is a method regarding how to copy, move and rename a php file. In this case, the template file and the copied file with a new name exist in the root directory.
You’ve added images everywhere before in sites like facebook and MSN. The procedure is fairly straightforward to open an image, resize the image, rewite the image and save the new image. Below is a siomple tutorial with a form showing how to add a resized image into a form.
// if user chosed properly then scale down the image according to user preferences
if(isset($_REQUEST[‘max_img_width’]) and $_REQUEST[‘max_img_width’]!=” and $_REQUEST[‘max_img_width’]<=$max_image_width){
$max_image_width = $_REQUEST[‘max_img_width’];
}
if(isset($_REQUEST[‘max_img_height’]) and $_REQUEST[‘max_img_height’]!=” and $_REQUEST[‘max_img_height’]<=$max_image_height){
$max_image_height = $_REQUEST[‘max_img_height’];
}
// JPEGs
if($_FILES[“img_upload”][“type”] == “image/jpeg” || $_FILES[“img_upload”][“type”] == “image/pjpeg”){
$image_source = imagecreatefromjpeg($_FILES[“img_upload”][“tmp_name”]);
}
// GIFs
if($_FILES[“img_upload”][“type”] == “image/gif”){
$image_source = imagecreatefromgif($_FILES[“img_upload”][“tmp_name”]);
}
if($_FILES[“img_upload”][“type”] == “image/x-png”){
$image_source = imagecreatefrompng($_FILES[“img_upload”][“tmp_name”]);
}
$remote_file = “my_uploaded_images/”.$_FILES[“img_upload”][“name”];
imagejpeg($image_source,$remote_file,100);
chmod($remote_file,0644);
// get the dimensions in width and height of orig image
list($image_width, $image_height) = getimagesize($remote_file);
if($image_width>$max_image_width || $image_height >$max_image_height){
$proportions = $image_width/$image_height;
if($image_width>$image_height){
$new_width = $max_image_width;
$new_height = round($max_image_width/$proportions);
}
else{
$new_height = $max_image_height;
$new_width = round($max_image_height*$proportions);
}
$new_image = imagecreatetruecolor($new_width , $new_height);
$image_source = imagecreatefromjpeg($remote_file);
imagecopyresampled($new_image, $image_source, 0, 0, 0, 0, $new_width, $new_height, $image_width, $image_height);
imagejpeg($new_image,$remote_file,100);
imagedestroy($new_image);
}
imagedestroy($image_source);
}
else{
}
?>
HTML CODE HERE
<form name=”form1″ method=”post” action=”<?php echo $_SERVER[‘SELF’];?>” enctype=”multipart/form-data”>
Maximum 1MB. Accepted Formats: jpg, gif and png:<br />
<input name=”img_upload” type=”file” id=”img_upload” size=”40″ />
<br />
<br />
<br />
<input name=”max_img_width” type=”hidden” id=”max_img_width” value=”130″ size=”4″>
<input name=”max_img_height” type=”hidden” id=”max_img_height” value=”54″ size=”4″>
<tr>
<td >First Name</td>
<td><input name=”FirstName” value=”” type=”text” id=”FirstName”></td>
</tr>
<tr>
<td>Last Name </td>
<td ><input name=”LastName” value=”” type=”text” id=”LastName”></td>
</tr>
<p><input type=”submit” class=”form_submit_button” onclick=”display_alert()” name=”Submit” value=”Submit”>
</p>
</form>
You may want to add the image name to a database table for other purposes; such as a user’s profile picture. Below, shows how this can be done.
You can add this above the form!
If you use php long enough, you will want to concatenate php strings in echo and print statements, or as new strings.Here is a simple example showing how to combine simple strings into a new, larger string.
echo $my_new_third_variable;
output:
filename.php
The function to see the output of an array, print_r($my_array); is a php and mysql database programmers best friend. Normally, examining the array will help in determining how an error was made in programming a query.
For example, duplicate or unsuspected values could result if one of the values in the array is not clearly defined. Imagine an instance for which you select an id, but not a specific id. Therefore, the array could output everything you wanted, but made 3 duplicate rows since the exact user_id was not identified in a WHERE condition or it was not necessary to have in the array.
Such array issues could occure in situations where you make a join by selecting data from 2 or more databse tables. If you select a column which is not used and could contain various auto_incremented IDs, your output could be 3 identical table rows with 3 indexed arrays. Since the one ID from was not clearly defined in one of the tables.
Here is an example:
$username=”Mike”;
With this query above, we would get the results we wanted which was the username and email for Mike. But, if tb3.adminid had 3 entries, there would be 3 indexed arrays with identical arrays.
Since there was no use for tb3.adminid, it would be best to leave it out of the query.
Alternatively, the query could have been written:
“SELECT tb1.id, tb1.username, tb1.email, tb1.date, tb2.username, tb3.adminid from tb1 as tableone, tb2 as tabletwo, tb3 as table3 WHERE (tb1.username=tb2.username AND tb1.username=’$username’ AND tb3.adminid=’$username’) order by date DESC”;
In the second query, the foreign key tb3.admin matched with other keys; thus only record was returned.
When testing shopping carts prior to ‘going live’, it is recommended to to use the Paypal sandbox. The Paypal sandbox had been implemented for this purpose. When the time comes to making the cary live, changing the code is very minor. The following example shows how a form processed the order and sends the sum to a Paypal sandbox and a real Paypal account.
After:
<div style=”float:right;”> <form action=”https://www.paypal.com/cgi-bin/webscr” method=”post”>
<input type=”hidden” name=”cmd” value=”_xclick”>
<input type=”hidden” name=”business” value=”my_real_email_biz@gmail.com”>
<input type=”hidden” name=”item_name” value=”My Company Details”>
<input type=”hidden” name=”currency_code” value=”USD”>
<input type=”hidden” name=”amount” value=”<? echo number_format($total, 2);?>”>
<input type=”image” src=”http://www.paypal.com/en_US/i/btn/x-click-but01.gif” name=”submit” alt=”Make payments with PayPal – it’s fast, free and secure!”>
</form> </div>
Javascript and PHP share many similarities when writing functions; such as how the function is written:
function(){}.
However, there are a few fundamental differences. For one, Javascript functions can start be started by using html, while php functions tend to be called from PHP files.
Several methods to start Javascript files are to run when the page loads using <body onload'”myfunction()”> or to call them when a form is submitted <input type=”button” value=”Submit” onclick=”myfunction()” />, or to create an anchor link <a href=”javascript:myfunction()”>Text link</a>.
With Javascript, there are many event handlers for which to start a function. Many of the popular event handlers are:
onload , onclick, onmouseover, onmouseout, onfocus, onchange, onblur and onsubmit.
PHP tends to call a function within php such as:
myfunction(); or
$myfunc=myfunction();
Other differences exist within the functions. Javascript and PHP can use similar methods to create variables in strings:
(i.e.) $myvar=”Here is a string of text”;
However, Javascript can create and use strings without ‘$’ and do not need to close the line:
myvar= “Here is a string of text”
In PHP, variables wouls always need ‘$’ to define a string.
Web Host Manager is a server admin control panel which allows an administrator to control Cpanel accounts. Cpanel is a very popular control panel which runs on Linux CENTOS. It is a fantastic control panel for which to run and control websites. It comes bundled with all sorts of software such as phpmyadmin; which can make a web developer run and test mysql databases very efficiently.
Web Host Manager is often available with upgraded packages such as reseller accounts, VPS server accounts, and dedicated server accounts. With WHM(Web Host manager), you have access and control to each and every reseller account. But, there is more. You can control the php settings with the php.ini file, reboot the Apache server, customize DNS and email MX settings.
Cpanel is one of the most popular web hosting control panels, if not the most popular. Its main competition is Plesk. It allows anyone with 1 or more websites to manage email, ftp, stats, databases and more. It is available for as little as $5 / month with a single domain on a shared hosting package or it can be used with upgrade such as reseller accounts, VPS server packages and dedicated server packages. With upgraded packages such as reseller accounts, VPS server accounts, and dedicated server accounts; you will have access to another service called Web Host Manager; which allows the administrator to have access and control to each and every reseller account.
With Pinnacle Studio, sound issues could arise for various reasons. One such issue is that sound is lost after a file is opened in Pinnacle Studio. Loss of sound could arise for various reasos such as the source file framerate.
Here is an example how a file from Camstudio could be imported to Pinnacle Studio without loss of sound.
For no loss of sound,
1) Open avi-flv-mp4-wmv converter.
2) Take an avi file from Camstudio >convert to mpg format with avi-flv-mp4-wmv converter.
3) Open the converted mpg file(made with same framerate as Pinnacle settings).
4) Edit the movie or combined clips. All sound will be intact.
An alternative to the sequence above is to record a new voice over for the entire movie.
Paypal offers a sandbox to test shopping carts prior to ‘going live’.The following excert explains how to test buyers and sellers to see if the program works and payments would be processed in the real world.
To enter the account,
1) Select a radio button next to the account.
Note: Recommended to set Payment Review Disabled to Enabled.
2) Select Enter Sandbox Test Site.
To get Paypal Pro API or Seller API credientials,
1) Select API Credentials after seller account has been created.
You will have an API username, API signature and signature.
When making a buyer test purchase,
1) Get card info.
To get credit card info,
a) Login to sandbox account
b) Select View Details of the buyer account.
Too see all transactions is seller account,
1) Login to Sandbox,
2) Login to to the seller account
3) View Transactions
The setCookie() function below creates a cookie with a date at that instant; thus it is gone virtually the same time it is created.
setcookie(“firstnm”, $firstname, time() + 0, “/”, ‘.mysite.com’);
A problem that exists when setting cookies is accessing the cookies on various urls such as: mydomain.com, http://mydomain.com and http://www.mydomain.com
Unfortunately, if you want a cookie(s) to be accessible on all directories in the domain regardless of what is inserted into the browser, you need to set the cookie properly.
But, if you want to access the cookie no matter how the url is presented in the browser, you would use:
setcookie(“my_cookie_name”, $var, time()+ 14400, ‘/’, ‘.mysite.com’);
The latter code above sets a cookie called my_cookie_name that remains usable for 2 hours. If you wanted to pull the data from the cookie it would actually be the value $var.
Cookies are stored in the browser. They have many uses since they can timeout at certain intervals and contain identifiable names. Programmers may use them to store variable data for usage elsewhere, or for page access.
When a cookie is written to the browser, name, content and the path can be set.
The code below takes a variable($email_address) and uses it as the cookie ‘Content’.
setcookie(“email”, $email_address, time()+ 7200, “/”);
If you echo the cookie in the future like:
value=”<?php echo $_COOKIE[’email’]; ?>” ///the output will be the data_output with a real email address.
To retrieve the values from a Joomla component you can use JRequest::getVar() to grab the variable and use a cookie to set the variable’s value. Cookies can be made in all content management systems like Joomla, Worpdress and Drupal for which they can be retrieved elsewhere. Importing sessions is another story.
Below is an example to retrieve form variables like first name, last name and email address and then make cookies for all values.
To use the variables in scripts outside of Joomla you only need to echo the value.
The code below is an example to autofill a form within another PHP script using a cookie made in Joomla. Importing a cookie uses the straight PHP code function setCookie() within Joomla.
Use microtime() to calculate how long it takes to run code:
// write all code here
$function1= myfunction();
$class = newClass;
$timer_end = microtime(true);
$elapsed_time = $timer_end – $timer_start;
echo “This ran for $elapsed_time seconds”;
mysql_close();
“select tbnm1.question, tbnm1.answer, tbnm1.firstname, tbnm1.email, tbnm1.lastname, tbnm1.representative, tbnm1.time, tbnm2.score, tbnm2.firstnm, tbnm3.helpText, tbnm2.DateReceived, TIMESTAMPDIFF(MINUTE,tbnm1.time,tbnm2.DateReceived) AS minutes, from prefix_tbnm3quiz_written as tbnm1, prefix_tbnm3quiz_1 as tbnm2, prefix_tbnm3quiz as tbnm3 WHERE tbnm3.question=tbnm1.question AND (TIMESTAMPDIFF(MINUTE,tbnm1.time,tbnm2.DateReceived)>-120 OR TIMESTAMPDIFF(MINUTE,tbnm1.time,tbnm2.DateReceived)<120) AND (tbnm1.email=tbnm2.emailaddress OR (tbnm1.firstname=tbnm2.firstnm AND tbnm1.lastname=tbnm2.lastname)) ORDER BY time DESC”;
You may want to use the Joomla Framework in combination with standalone PHP applications. There can be many reasons for this; such as bypassing Joomla extensions and modules to use different software. Also, in many cases, it is much faster for a programmer to code pure php / mysql than it is to write pure php / mysql and convert it to a Joomla extension. If this is the case, you will probably want to tie into the Joomla Users table. If you do this, the simplest method is to create a login form that encrypts the password with md5. Joomla uses md5+salt by default; but shorter md5 strings work.
Now, your new tables with standalone php scripts can be joined and used with any Joomla tables.
Here is an example below for which the setInterval function will start the setCountDown() function after 2 minutes have elapsed.
setTimeout(‘setInterval(“setCountDown()”,1000);’,120000); // Start timer
To set a cookie for the entire web site and directories,
//This cookie will be stored as written and will last 60 seconds * 60 minutes = 3600 milleseconds
setcookie(“written”, “loaded”, time()+ 3600, “/”)
1) Make an ip variable.
$ip=$_SERVER[‘REMOTE_ADDR’];
echo “IP Address= $ip“;
2) Check to see the variable upon clicking submit
if (isset($_POST[‘submit’]){
echo $_POST[‘ip’];
}
3) Make a hidden post variable to post the ip
<input type=”hidden” name=”ip” value=”<? echo $ip;?>/>
4) Insert the $_POST[‘ip’] into the database when the form is submitted.
“INSERT INTO tablename id, ip VALUES (NULL, ‘$_POST[‘ip’])”;
1) Open the file /public_html/components/com_virtuemart/themes/default/templates/product_details/flypage.tpl.php
2) a) Comment echo $ask_seller to /* echo $ask_seller*/
or
b) Remove the table row code:
<tr>
<td colspan=”2″><?php echo $ask_seller ?></td>
</tr>
When you select an array from the database, you may want to output each row to list items or table rows. Either way, the data for each list item or table row will look identical unless you specify otherwise.
The examples below shows how to alter the color for each list item from the database.
or
$background= ‘#CFCFCF’;?>
<ul id=”ul” ><?
$command = “SELECT id,catid,question, question_type FROM table1 WHERE question_type=’3′ and table1.catid=3 ORDER BY RAND() LIMIT 3″;
$result = mysqli_query($db, $command);
if ($result && mysqli_num_rows($result) > 0) {
while ($row = mysqli_fetch_assoc($result)) {
$background =($background==’#CFCFCF’ ? ‘#ffffff’ : ‘#CFCFCF’);
?><li style=”padding:10px 10px 10px 10px;background:<?php echo $bg;?>”>
Inner joins will select data and return all entries which match
With LEFT JOIN, the first table of the statement is critical. If the first table in the statement has 5 entries, 6 entries would have been selected. But, if tbe first table selected had 6 categories it would show all six entries.
When using relational databases and SELECTING data from more than one table, using joins is the answer to make ideal queries.Two options are to use an inner join or LEFT JOIN. The inner join will select data and return results for all rows that match while an OUTER JOIN or LEFT JOIN will show all entries; even those which exist in 1 table, but not in the other. Depending on circumstances, one of the joins is the ideal usage. For example, let`s assume 2 tables share the same category id. One table has 6 categories that match six of seven categories of the second. An inner join will retrieve the 6 matching categories while the LEFT or OUTER JOIN will select 7 categories. However, in the case of the LEFT JOIN, the first table sets the stage. If the table with 6 entries was the first called in the statement only 6 entries would have been selected and matched but if the table with 7 categories was selected first it would show all seven entries.
There may be time when you want to add a number or letter to the beginning or end of every entry in a column. For example, a csv file from excel may have omitted the beginning digit 0.
The description and keywords for the Joomla home page can be set in the Global Configuration.
To access the global configuration,
1) Login to Joomla admin
2) Select >Site >Global Configuration
3) Change Description and keywords.
4) Save changes.
You may want to remove the Joomla generator tag from the head of the document and from appearing on each and every page of the website.
2) Near line 87 comment out a line with generator like:
$strHtml .= $tab.'<meta name=”generator” content=”‘.$document->getGenerator().'” />’.$lnEnd;
WordPress seo issues? Google not crawling?
2) Make robots.txt
User-agent: *
Disallow: /cgi-bin
Disallow: /wp-admin
Disallow: /wp-includes
Disallow: /wp-content/plugins
Disallow: /wp-content/cache
Disallow: /wp-content/themes
Disallow: /trackback
Disallow: /feed
Disallow: /comments
Disallow: /category/*/*
Disallow: */trackback
Disallow: */feed
Disallow: */comments
Disallow: /*?*
Disallow: /*?
Allow: /wp-content/uploads
# Google Image
User-agent: Googlebot-Image
Disallow:
Allow: /*
# Google AdSense
User-agent: Mediapartners-Google*
Disallow:
Allow: /*
# digg mirror
User-agent: duggmirror
Disallow: /
Sitemap: http://mysite.com/mysite.xml
3) Sign in to Google webmaster tools
4) Create or open the site
5) Site configuration >sitemap >submit sitemap or check its status. You want the checkmark.
6) Site configuration >Crawler access >test robots.txt file >You want to see Googlebot allowed on the bottom
7) Diagnostics >crawl errors >You may have issue like url restricted by robots.txt
8) Diagnostics >fetch as Googlebot >Fetch >You want success as fetch status >You can also immediately index the page as well.
Using ajax is a very fast method to retrieve data from a database with a php file.
2) Send a request to the server with open() and send() methods
xmlhttp.open(“GET”,”myfile.php?q=”+str,true);
xmlhttp.send();
3) response from server Use responseText for string from server or responseXML as xml data
//3A. SET / STORES A FUNCTION (or the name of a function) to be called automatically each time the readyState property changes
xmlhttp.onreadystatechange=function() {
if (xmlhttp.readyState==4 && xmlhttp.status==200)
{
//3B. RESPONSE FROM SERVER
document.getElementById(“txtHint”).innerHTML=xmlhttp.responseText;
}
}
Edit Store Information
Here is where the currency is set.
The home page text for a Virtuemart menu item can be changed in the bottom editor
———-
After the cart works, there may be styling issues. One such issue is the spacing between the Categories, shop info at the top and the categories below. The file shopIndex.tpl.php allows you to remove excess <br/> elements and even add new style to h4 category for margin.
You may want to change the cart image. The mod_virtuemart_cart module is image is located:
/components/com_virtuemart/shop_image/ps_image/menu_logo.gif
When using css classes and ids, using ids when possible always alllows direct styling to the desired elents. But, there may come a time when you want to substyle elements; such as color coding specific link. Although you can use ids, you may want to use classes. When using classes, all children will inherit the color and styling of parent classes, until specified otherwise. For example, you may want alkl the same styling except for font color.
For example, the parent would have been a class called .myart-block-body and the link would have been written like:
.myart-block-body a:link
{color:blue;
}
If you want to assign a subclass called sublevel to make a white link, the code would like:
.myart-block-body a.sublevel:link
{
color: #FFFFFF;
}
Camstudio can make very high quality video captures. It is open source and free.
To make a top quality Camstudio video,
1) Download and install Lossless codec or use an appropriate codec.
You can see the codecs at Options >Video Options >Select codec and set a high quality.
2) Options >Autopan Speed >Use a high number.
3) Use a mic. Setting are Options >Audio Options >Audio options for microphone. When the settings are ideal, the sound will be good.
4) When making a video capture, you set the size with Region >Fixed Region. Here is where you want the target video size.
When you make a movie with Camstudio, the recording area will be highlighted and moves as you move the mouse. If you stay within 1-inch from the edge, the region will not move. If you move closer to the edge, the region will move and the scrolling of the page may look a little stuttered.
If you make Camstudio videos within the fixed regions and add all video degments into video editing software, they will look very professional. If you need to scroll throughout the page and move the region, make sure to do it very slow and the results will be satisfactory.
When a video is made for the web, sizing is very important. The major is issue is the dominant player for which the video will be played. If the video will be played on a player 320px x 240px, then this size is fine to make the video; whether the source is a video capture or edited movie. But, if the video target is youtube, a size like 640 x 480 or 640 x 360 may be preferred.
If the video will be embedded on a smaller a size on the website and viewable on youtube, the smaller size will expand and look larger on youtube without sacrifice to quality, while it will also look in proportion on the website. However, a video that is too large for the small website player that will bescaled down will cause a difficult navigational experience for the even though it looks proper for youtube.
Meanwhile, when you login to the backend, there may be an error message with the following text:
<div id=”bogallery”>
<?php echo $slideshow_content; ?>
</div>
The !empty() function checks to see if a variable is empty or set. The !empty() function is commonly implemented with if and else conditional statements while using $_POST variables in a form. Its usage is very similar to the isset() function. For example, if the name field is !empty within a form a statement is executed, otherwise, an error is prompted.
The empty() function checks to see if a variable is empty or set. The empty() function is often used with if and else conditional statements for $_POST variables in a form. For example, if the name field is empty within a form, an error could be prompted.
The isset() function checks to see if a variable is set. The isset() function is often used with if and else conditional statements for $_POST variables in a form. For example, if the name field is missing in a form, an error could be prompted.
echo ‘<div style=”text-align:center; margin-left:15%;margin-right:15%;”><table border=”0″ width=”400px” cellspacing=”3″ cellpadding=”3″ align=”center” >
<tr>
<td align=”left” width=”20%”><b>Artist</b></td>
<td align=”left” width=”20%”><b>product Name</b></td>
<td align=”left” width=”20%”><b>Description</b></td>
<td align=”left” width=”30%”><b>Image Name</b></td>
<td align=”right” width=”10%”><b>Price</b></td>
</tr>’;
// Display all the URLs.
$result = mysqli_query ($db, $query);
while ($row = mysqli_fetch_assoc ($result)) {
// Display each record.
echo ” <tr>
<td align=\”left\”><a href=\”browse_products.php?aid={$row[‘artist_id’]}\”>{$row[‘last_name’]}, {$row[‘first_name’]} </a></td>
<td align=\”left\”><a href=\”view_product.php?pid={$row[‘product_id’]}\”>{$row[‘product_name’]}</td>
<td align=\”left\”>” . stripslashes($row[‘description’]) . “</td>”;?>
<td align=”left”><? echo “<a href=\”view_product.php?pid={$row[‘product_id’]}\”>”; ?> <img src=”admin/myuploads/<? echo stripslashes($row[‘image_name’]); ?> “/></a></td>
<? echo ” <td align=\”right\”>\${$row[‘price’]}</td>
</tr>\n”;
} // End the while loop.
echo ‘</table></div>’; // Closing the table.
//$sql = “SELECT * FROM table1”;
//$result = mysqli_query($db, $sql);
$command = “SELECT * FROM table1”;
$result = mysqli_query($db, $command);
//see the array of what is there
//print_r(mysqli_fetch_assoc($result));
if($row = mysqli_fetch_array($result)/*mysqli_fetch_assoc($result)*/) {
//SET UP VARIABLES
$id = $row[‘id’];
$column2 = $row[‘column2’];
$column3 = $row[‘column3’];
$column4 = $row[‘column4’];
$column5 = $row[‘column5’];
$column6 = $row[‘column6′];
echo “Column 2 is: “.$column2;
#check to see if entered
if($column6 == “”){
//column titles
if($column4 == “This Text”){
$column6 = “New Text”;
}
if($column4 == “This Different Text”){
$column6 = “Different New Text”;
}
//update table
$sql = “UPDATE table SET column6=’$column6’ WHERE id=’$id'”;
$result = mysqli_query($db, $sql) or die(mysqli_error($db));
}
}
When working on a WordPress site, you have the option to allow Google to crawl the website or to make it private.
To make it private,
1) Open wp-admin
2) Settings >Privacy
3) Select ‘I would like to block search engines, but allow normal visitors’.
To make WordPress searchable and crawlable,
1) Open wp-admin
2) Settings >Privacy
3) Select ‘‘.
To create custom meta tags,
1) Open wp-includes folder.
2) Open general-template.php.
3) Set custom follow meta tags if desired.
There are several methods for which to change access to the backend menu. One is to alter admin.installer.php which would trigger an error message when one clicks Extensions.
Another method, the better method, is to remove the menu item from the backend.
To remove the menu item,
1) Goto administrator >modules >mod_menu >helper.php
2) Look for:
near line 196
* Extensions SubMenu
*/
if ($installModules)
\$menu->addChild(new JMenuNode(JText::_(‘Extensions’)), true);
\$menu->addChild(new JMenuNode(JText::_(‘Install/Uninstall’), ‘index.php?option=com_installer’, ‘class:install’));
3) Comment out the line above.
The backend menu has various features which can be used by managers, administrator and super administrators. In general, a manager can access the backend and control website content for which he has permissions. Super administrators on the other end, can do much more. At times, issues can arise because manager priviledges are not enough while super administrators can allow a client to much control. If your hosting and permormance are issues, then so should be the makeup of the Joomla website. An example of a client having super administrator priviliges in a potential negative situation is one for which he can add extensions. Sure, in most cases this can be fine, while in other cases it could cause the installation of extensions which cause intense resource consumption. In a higher traffic situations, this site is a bad grape ruining performance for others.
To limit what can be done in the Joomla backend, such as installation of extensions and plugins, you need to hack core files to create a custom menu so that the user cannot add and change extensions. Read more here!
If you have files stored on a shared server, it is normal to transfer all files back in forth under your username. More than likely, your hosting provider only allows you access to your account. In this case, files are moved back and forth while you are logged in under your username, hence files are owned by you.
However, in a virtual private server(VPS) or dedicated server, you will be able to login with secure FTP to any account or with the root login. In any case, the user will have ownership of the files for each account. For example, if you login as root, and transfer files from your pc to an account while logged in as ‘root’, ‘root’ will be the owner of the files. Meanwhile if you logged in to a specific account with a username like ‘myUserName’ with myUserName’s password, myUsername would be the owner of files transfered from your pc.
It is important to know how files are transfered because it could be the reason you cannot transfer them.
If you want to stay organized, you can login to your VPS or dedicated server with SSH Putty, and use CHOWN to change folder and file ownership.
To CHOWN folder and all files within a directory,
1) Find directory path.
1) chown -R username /home/username/public_html/mysite.com
Note:
This Unix command above will chown all files within the mysite.com directory. Now, you could login to the account under the username and transfer files back and forth between your pc and server.
Note: If you used the command ‘chown -R root /home/username/public_html/mysite.com’ and logged in with secure FTP as username, you would not have permission to transfer files.
To uninstall a Joomla 1.6 / Joomla 1.7 plugin,
1) Login to Joomla backend.
2) Select Extensions >Extension Manager >Manage >Select Plugin >Uninstall.
Sometimes, the plugin may not install automatically. However, manual uninstallation is always an option.
To manually remove a plugin,
1) Goto Extensions >Extension Manager >Select Type:Plugin >Look for your plugin and what ‘Type’ it is.
2) Login to server with FTP or Cpanel
3) Look in Joomla root directory and open plugins folder.
4) Find plugin files and delete them.
5) Open up phpMyAdmin or mysql> and open the databse for your Joomla site.
6) Look in extensions table.
7) Remove plugin entry from the plugin table.
To uninstall a Joomla plugin,
1) Login to Joomla backend.
2) Select Extensions >Install/Uninstall >Plugins >Select the plugin you want to uninstall >Select Uninstall
Sometimes, the plugin may not install automatically.
To manually remove a plugin,
1) Goto Extensions >Plugin Manager >Look for your plugin and what ‘Type’ it is.
2) Login to server with FTP or Cpanel
3) Look in Joomla root directory and open plugins folder.
4) Find plugin files and delete them.
5) Open up phpMyAdmin or mysql> and open the databse for your Joomla site.
6) Look in plugins
7) Remove plugin entry from the plugin table.
Pear packages may add a distinct functionality to a website in a fraction of the time. If you decide to use a pear package, you can simply install the package with PEAR in Cpanel. Cpanel allows you to see many packages and install, uninstall packages. You simple click on `Pear Packages`and follow the simple instructions. Cpanel may tell you where the files are within the home directory for the particular user account. For the keen individual, you can find PEAR at the unix command prompt:
# pear config-get php_dir
Now, that PEAR is installled, you need to use those files in your php code. Depending on the user account, the files will be installed ina particular directory. For example, the new `Calendar`package may be installed in /home/johndoe/php/Calendar/ directory.
There are a couple of options for which to use these files; set an include path within php.ini or hard code the include path within the file.
To see the where php.ini is, type the following unix command:
# php –ini
Now, make a simple php file and set an include, or just remember where it is.
Now that you know where the include path is located, you can create a test php file. The test file will use the require_once function to get the pear package. What you can do is point the include path in the path of the installed pear files. Then, check to see how it worked. You may find that they should be in your include path like /usr/lib/php because many classes and includes will automatically point to the set include directory on the server. You can move all files into your include path or hard code the files of the package where they had been installed. If they go into the include directory, they are resusable. If the paths are hardcoded, it will be more time consuming to make the changes, but you could do it with a cpanel shared account.
In a nutshell, the simplest method is to find the installed PEAR package files and move them into the includes folder that is set in php.ini. Then, use the path in your require_once function.
During web development tasks, you may want one server for email and one for the actual hosting.
As soon as you update DNS nameservers, all email and website data should point to the same web host. Then, all email accounts and files can be managed from there.
But, if you want email on one server and files on another, you need to change the mx data on the server which hosts the actual website. The company that will be used for the email account will supply mx data. You take that data and update the mx data on the hosting website. Then, you go back to the email provider and update the MX data. Now, email service is taking place with one provider and web hosting with another.
During web development tasks, one such task for completing a job is to use one web server for the website while using another for the email. There are many reasons for this procedure; such as a person registered a domain name and setup and email account before the website was constructed, or, it makes it easier for a developer not to walk a client through a new email server and steps to setup receiving email with Outlook.
After a domain name is registered, the next step is to change the nameservers to where the site will be hosted. If you have a GoDaddy email account, these email servers will change when the new dns settings are updated. But, you can get them back.
Since most domain names are registered with GoDaddy, this tutorial guides through the process of showing how to change mx data to recive email with GoDaddy, but using a website hosted elsewhere.
After nameservers are set for web hosting, you can login to a VPS or dedicated WHM. If you use shared hosting, your isp must make the changes. After logging in to WHM (Web Host Manager), you can see the DNS for all websites.
To see the DNS settings,
1) Login to WHM >Edit DNS >Select website >Edit >Put in proper DNS settings(if necessary) >Save >Wait >Test
Now, you can login to GoDaddy and retrieve the MX data for their service. You should see that the mx data points to the location where the website is hosted. You will want to change these settings. GoDaddy will give you details for the MX data.
To see the MX Records,
1) Log into GoDaddy account.
2) Select ‘My Account’
2) Select ‘My Products’
3) Click Email.
4) Select ‘Manage Account’ for an email account.
5) Select ‘Domains’ tab >Server Addresses. Now, you can update the MX records in WHM of the hosting provider.
Login to WHM >Edit MX Entry >Select website >Edit >Put in proper MX settings >Save.
6) In GoDaddy email account, select ‘Update MX’
After a plugin is installed and activated to a WordPress site, you may find that the plugin shows up on each and every page(or post). However, you only want the plugin to show up on the home page, or a specific page. WordPress has built-in functions to allow you to add code to files such as index.php, page.php and category.php so that you can customize on which places should display the plugin.
The code below can be used within index.php or page.php to allow only the home page to display the plugin called with the function.
The code below can be used within index.php or page.php to allow only the front page to display the plugin called with the function.
The code below can be used within single.php to allow only the specified post to display the plugin called with the function.
When you make a WordPress 3 site, you may want it to behave more as a content management system rather than a blog. The simple method, is to avoid using posts since they will group in widget categories and can cause building the site a lengthier exercise. If only pages are used, then the site can be built in logical order.
To create the home page,
1) Click Settings >Reading >Front Page Displays: A static page >Select Static Page >Save Changes.
But, yes…but. But what if I want a blog on one page and the others as pages? Can that be done. Of course. To allow a blog (which uses posts), you make a menu link to a post category. The link on the menu could be something like http://localhost/mysite/archives/category/uncategorized This page will call this category, which in this case is uncategorized. Now, you can add a widget for the catgories. If only the category.php file uses the get_sidebar(); function, the category list will only show up on the blog page. Now, all categories can be clicked and the web surfer can use the blog as it had been intended to be used.
After a WordPress plugin has been approved and added to the SVN depository, you may want to modify the WordPress plugin. Modifying the plugin is quite simple. You simply edit the files for which are connected to the WordPress SVN. After modification, you change the information header to the new WordPress plugin version, change readme.txt version and recommit the files to the SVN. Then, you create the tagged version for which you send files into the tags folder with the new version.
The benefits of updating a WordPress plugins are plentiful. Not only is it improved, but, it will be placed higher on the list for its tags. For example, if the readme.txt file has various tags for your plugin; such as mp3 player, it would crawl back to the top for those tags since WordPress tags are ordered by date descending.
To install WordPress,
1) Download WordPress from http://wordpress.org/download/
2) Create a new folder on your desktop. It can have any name like WordPress.
3) Copy and paste the wordpress zip file (i.e. wordpress-3.2.1) into the directory
4) Extract the file with zip utility.
5) Rename the WordPress file for the website name (like mysite.com).
6) Copy and paste or transfer the files into the appropriate server directory.
7) Open the web address or local Wamp directory
8) Click ‘Crate a Configuration File’
9) Select ‘Let’s Go’
10) Create a database with phpMyAdmin or root mysql>
11) Enter the appropriate databasename, username, password and prefix. The prefix should be something different for security purposes.For Wamp, the username is root, password is ‘blank’ and prefix is what you want.
12) Advance to the next page when you have the appropriate database name, username, password and prefix.
13) Select ‘Run the Install’
14) Select a ‘Site Title’
15) Fill in a username or leave Username as admin, password, and email address.
16) Select ‘Install WordPress’.
17) Login to wp-ad at http://localhost/sitename/wp-admin or view page at http://localhost/sitename/
Dumping zip, txt, or csv files into PHPMYADMIN is a quick way to generate a database. However, a time could arise when you would like to dump a very large file. By default, phpAdMin allows files up to 50 mb; although php.ini may have other limits. You can alter file sizes in php.ini to allow for upload_max_size and post_max_size. If you alter the size, you may want to alter the timeout so it will not timeout.
If you have root access to yoor hosting account, you can create an upload directory and load from the server, rather than remotely. To do this, you need to access your phpMyAdmin config file called config.inc.php. The file path may be something like: /usr/local/cpanel/base/3rdparty/phpMyAdmin.
To check for its location,
1) Login with SSh and type:
root@server [~]# cd /usr/local/cpanel/base/3rdparty/phpMyAdmin
To change the config.inc.php file,
1) Transfer a copy to your hard drive.
2) Change:
$cfg[‘UploadDir’] = ”; to
$cfg[‘UploadDir’] = ‘upload’;
3) Upload CSV, txt or zip file to upload folder.
4) Login to phpMyAdmin and dump from server. You will see:
‘Select from the web server upload directory’.
Tortoise is SVC software which can be used to add your files and versions to the WordPress plugins directory.
INSTRUCTIONS:
1) Install Tortoise
2) Update readme.txt
3) Make a new trunk folder which will have all your plugin files and the read me file. This can be located anywhere such as on the desktop.
4) Right Click on trunk folder > SVN Checkout > Select the Trunk Folder as destination. Choose all files and folders > Click OK
To add files to the trunk folder,
1) Right Click on trunk folder > Select SVN Commit
To make new versions,
1) Right click on trunk folder.
2) Select SVN > Branch / Tag
3) Create a tag version folder like:
http://plugins.svn.wordpress.org/mypluginname/tags/0.8
4) Click OK. After this, you can edit any version or make new tags from any version or the trunk version.
To take a previous WordPress plugin version and make a new version,
1) Right click the version folder.
2) Select SVN > Branch / Tag
3) Create a tag version folder like:
http://plugins.svn.wordpress.org/mypluginname/tags/0.8
4) Click OK.
More Tortoise SVN Features
As you can see on your plugin page, the version in your tags is shown in the compatibility widget. This set of files is actually in the the tags/version# folder
To access your trunk or tags folders,
1) Open Tortoise > Repo(Repository) Browser > Open current version (The version in trunk and tags/version# folder > Select Folder > Delete >Click OK
To add a tag folder after deletion,
1) Go to plugin folder on your pc (It may have a large green check mark)
2) Right click > Tortoise SVN > Branch / Tag > Write the tag url like: http://plugins.svn.wordpress.org/myplugin/tags/0.3
3) Click OK
The Tortoise Repository Browser is similar to FTP. You can add files, copy to working working folder, and more.
Worpress will display comments at the bottom of an article. This looks very bloggy. You can edit any post or page and delete comments. However, comments closed can still appear on the page underneath the article.
To remove the comment data from under each article,
1) Find the css class or id that displays the comments data from below the article.
2) Go to style.css and add display:none to css class or id for the author tag.
3) Save file.
Worpress will display date information on top of the article. This looks very bloggy.
To remove the date tag and name,
1) Find the css that displays the date and author css class or id.
2) Go to style.css and add display:none to css class or id for the author tag.
3) Save file.
Worpress will display date and author information on top of the article. This looks very bloggy.
To remove the author tag and name,
1) Find the css that displays the author css class or id.
2) Go to style.css and add display:none to css class or id for the author tag.
3) Save file.
In a world where people in various countries can make contact in milliseconds and work rates can vary, you may wonder if outsourcing is something you should consider. Although there are pros and cons; cultural differences, ‘security trust’ and copyright issues are 3 big factors you must consider.
Cultural Differences
Can you work with people from the foreign land in a positive manner? Do you remmber what a ruckus it was bartering in a market only to find more frustration that you had intended to find? Can you make accurate reads on people that will benefit a solid working relationship?
Security Trust
If you hire web development elsewhere, can you trust the people behind the project will have solid integrity? Will your site receive small inside hacks and need repairs or other service charges? Will you be locked into a service that is not portable? Can you take the work you paid for, move it to a new server and say goodbye without issues?
Copyright Issues
These days many companies receive letters from large image corporations like Getty for using images illegally. They do not care that you had a foreign pirate make the site, they will go after the site owner. which is probably you.
There have been many instances for which we have outsourced software products or templates. In the case, it is recommended to keep accurate records regarding images, memberships, etc… for obvious reasons. Also, it recommended to be able to understand every line of code so that you know what you paid for.
Changing the Joomla database prefix is recommended for each and every Joomla installation.
HOW TO CHANGE JOOMLA DATABASE PREFIX
Installation
Upon installation, you have an option to change the database prefixfrom jos_ to what you want. This is all there is to that.
After Installation Joomla Database Prefix Change
After a Joomla site is up and running, changing the Joomla database prefix can be a little more complicated.
To change the database prefix after installation,
1) Login to phpmyadmin.
2) Export the database as text or have it displayed in phpmyadmin. Aftyer it is displayed in phpmyadmin, copy the entire text and paste it into Notepad or Wordpad.
3) Search all text for the prefix and replace all. This will change all desired database prefixes.
Note:
You should use the underscore in the search like jos_ because any other words with that string will change; and that could be anything from a menu item to a string in article. For all intensive purposes, a database named with a string that would not be used for any other purpose (i.e. mydbnewz_) would eliminate any naming issues.
4) If your templates have the same name as your database prefix, in part or in whole, you will need to make more changes to either your template names or the templates_menu database table. Renaming them in either situation will help to make the changeover occur.
5) If you use a sef component, you may find that the template routes are incorrect. You must change this, but changing templates names is an easier option. For example, if your template was called ZZZmysite and your database was originally called ZZZmysite (then changed to ZZZnewsite) you may want to change your templates to ZZZnewsite.
Virtuemart is a fantastic store component to sell downloadable files. It allows you to take orders from registered or non-registered users and show backend information about each order. When an order is confirmed, the user will receive an email for which he can download s specific number of file(s) for a specific length of time.
If any thing went sour along the way; such as the user not receiving a download is in an email, you can always track further email in the database using
To find download id and order information from phpmyadmin,
1) Goto vm_order_user_info get name order_id and user_id.
2) Go to vm_product_download.
3) Match obvious user and order_id.
4) The desired entry shows downloadable file, how many downloads are remaining, etc
Alternatively, you can wait until we complete our administrator module which will show all users and download information.
SELECT * FROM jos_vm_product_download WHERE jos_vm_product_download.user_id=jos_vm_product_download.user_id;
or
SELECT * FROM `jos_vm_product_download` WHERE jos_vm_product_download.user_id=jos_vm_product_download.user_id;
The code to retrieve the download information of one specific user with <mysql or phpmyadmin:
SELECT * FROM jos_vm_product_download WHERE jos_vm_product_download.user_id=usersnumbergoeshere;
Often, as a WordPress sites nears to completion, you have a few classes and functions that display text for which you want removed. For one, you may want to disable comments for one or more pages or posts. Opening a page or post is all that is required to disable comments if the checkbox is ‘not selected’.
Another area which may need editing is the article information. Here is a snippet of default text that will appear for a post.
To remove the information under a post, you must edit the php in functions.php and loop.php.
Editing loop.php will help remove any other undesired text and will allow for a clean article and title.
By examining the css ids, classes and html text, you can find where to disable the appropriate output in the php classes and functions.
Making a WordPress theme can be done with any html/css file or various computer generated software. Both have advantages and drawbacks.
Computer Generated Templates
The advantages of using software to make a computer generated WordPress template are to save time and to create a theme with no or limited coding skills. Most designs will look generic, but the template can look ‘clean and professional’. Some software to complete the jobs are from Sitegrinder and Artisteer.
Sitegrinder
Sitegrinder can be used to make html/css which can be converted into a WordPress theme, or it can make a WordPress template with the proper plugin. If the html/css is used, you will have to alter many div tags and css since most of the generated page will have exact heights and widths; not auto or measurements like 95%. Having used Sitegrinder which costs near $400, it makes a W3C valid site, but, it creates many, many div ids and layers. The code can be messy to convert and edit after a conversion. Quite frankly, it is best used to pump out a very small website with a handful of pages.
Nevertheless, there is one option for which the psd file can be made into a potential Worpdress theme. It is called the grow hint. When you use the grow hint, you can make a stretchable page that will increase or decrease as content size alters.
However, the grow hint does have a small setback and that is that the text area cannot contain other elements; but rather just a wide swoop of text. If that is okay, you can always go and add a new div element under the line after the html/css is output and add other nested div elements which can be resized.
Now, you can take or make any PSD file with Photoshop and make a sufficient WordPress theme. With 1 large grow hint, you can add other div elements afterwards. To help speed up development time using this method you may want to position all new style id and classes at the top or bottom of the css file in order to make these changes quick and simple; since the css could easily be more than 1100 lines of code. Minifying the css could bring it near half the size.
Although building a WordPress theme with this method is possible, looking at the html/css with its naming conventions and coding placement can be tiresome and editing will not be as fast as dealing with optimized, well written html/css. It may seem like a shortcut, and it is if non-coding is desired, but it just won’t measure up to hand-coding…during building and future revisions.
Quite frankly, the only real benefit I see for using Sitegrinder converting html/css for WordPress would be to build a funky menu (and maybe a few stylish static columns) that is a perfectly sized chunk of html/css for the header.php file. The new html/css would be inserted into my hand-coded header.php template file. Then, recreating any changes to the menu could take place in the future and the html/css could be swapped back into the header.php and style.css files.
Artisteer
Making a template with Artisteer can be done quickly. It runs near $150 which is nice, but it too makes very long code.
Hand Coding
This might sound techie and laborious, but hand-coding is very efficient and creates fast loading templates. A website only needs a background, 2 or 3 content containers and maybe a few more child containers to hold a page. It is very fast to take a psd mockup and slice files for a website, then position all text and images through hand-coding. You may find 100 lines of html and css does the same thing as 2500 lines of computer generated software.
Furthermore, reusing templates to build new sites can be speed up the completion time on new projects.
If you use a premade html/css template, you can always inspect the code to estimate the time it would take to convert the html/css into a WordPress template.
Making a WordPress template requires basic file editing; primarily php and css. WordPress is very ordered and simple to use if you have built PHP websites with typical header and footer includes.
For starters, a simple way to create a custom WordPress theme is to re-work a default template like twentyten or twentyeleven. Since both templates have different PHP functions, you can just pick one as a solid place to start.
With the template, you will edit various files. Here is a list of the various files which will be edited so that WordPress will function normally and can be used to show pages, posts, archives and error messages. Since WordPress displays content using various php files, the list is rather long. Below, is a list and descriptions for files that were edited from the twenyten template to create a custom template.
single.php
Single.php displays an individual post when it is selected from a menu item or category.
page.php
Page.php is used to display pages.
index.php
Index.php is used to display the site’s homepage
archive.php
Archive.php is used to display archives and recent posts
404.php
404.php is used to display errors
comments.php
Displays comments
To remove “comments are closed” look near line 72 and remove the following line:
-<p class=”nocomments”><?php _e( ‘Comments are closed.’, ‘lightningbolt’ ); ?></p>
wp_includes/category_template.php
This file is optional to edit the function get_the_category_list
If you remove $rel, the site can be html5 Valid from W3C
Custom Menu Items
For this template, make custom menu in header.php and make permalinks or use post urls for menu items; using <ul></ul> and <li></li> tags
style.css
Style.css is the bread and butter to styling a new theme and add specs if you want to submit a theme to the WordPress directory.
-add for author name, etc
/*
Theme Name: Put Name Here
Theme URI: http://www.mysite.com
Author: My Name
Author URI: http://www.mysite.com
Description: Custom theme (Twenty Ten)
Version: 1.0
*/
screenshot.png
Change screenshot.png for site image in wp-admin
Making the Theme:
Making the theme requires putting the menu and any desired html in the header.php file. IOt can include any other div tags you want for the website. The page templates like index.php, single.php, page.php and catagory.php can use the same or different html div tags. It is possible to take any html/css template with a css menu and move the div tags into the ideal sections like header.php, footer.php and any other pages that will hold content. When you look a page like index.php you can float a sidebar anywhere and you use the appropriate function to display content.
The code below shows a snippet of index.php. It shows the get_header(); class which gets header on the top, followed by custom div tags which hold content, a sidebar class which loads the sidebar or widget into a floated right position, followed by an almight loop which loads all typical WordPress content on the homepage. Finally, a class to load the footer at the bottom. These 3 classes are existent and look almost exactly the same in the files which will display content.
INDEX.PHP
<div id=”main2″ >
<div>
<div style=”float:right;”><?php get_sidebar(); ?></div>
<div>
<?php
/* Run the loop to output the posts.
* If you want to overload this in a child theme then include a file
* called loop-index.php and that will be used instead.
*/
get_template_part( ‘loop’, ‘index’ );
?></div>
</div></div>
<?php get_footer(); ?>
SINGLE.PHP
Here is single.php with added static content. As you can see, it has get_header();, <?php get_sidebar(); ?>, get_template_part( ‘loop’, ‘index’ ); and <?php get_footer(); ?> similar to index.php
/* Run the loop to output the posts.
* If you want to overload this in a child theme then include a file
* called loop-index.php and that will be used instead.
*/
get_template_part( ‘loop’, ‘index’ );
?></div>
</div></div>
<div style=”clear:both;”></div>
<div style=”float:left; width:47%; padding:0px 10px 0px 10px; “><code style=”background-color: #dedddd; border:2px solid #D0D0D0; min-height:110px;”><span style=”color:#dc4000;”><b>SERVICES</b></span><br/><br/>Lorem ipsum dolor sit amet, consectetur adipisicing elit, sed do eiusmod tempor incididunt ut labore et dolore magna aliqua. Ut enim ad minim veniam, quis nostrud exercitation ullamco laboris nisi ut aliquip ex ea commodo consequat. </code></div>
<div style=”float:right; width:47%;padding:0px 10px 0px 10px; “><code style=”background-color: #dedddd; border: 2px solid #D0D0D0; min-height:110px;”><span style=”color:#dc4000;”><b>ABOUT US</b></span><br/><br/>Lorem ipsum dolor sit amet, consectetur adipisicing elit, sed do eiusmod tempor incididunt ut labore et dolore magna aliqua. Ut enim ad minim veniam, quis nostrud exercitation ullamco laboris nisi ut aliquip ex ea commodo consequat. </code></div>
<div style=”clear:both;”></div>
<div style=”display:block; float:left; margin-left:0; “>
<div style=”display:block; float:left; margin-left:0px; “>
<div style=” padding:0px 5px 0px 5px; width:200px; height:auto; margin-top:0px;” ><br /><b><span style=”font-size:16px;”>MOBILE WEB DESIGN</span></b> <br />Lorem ipsum dolor sit amet, consectetur adipisicing elit, sed do eiusmod tempor incididunt ut labore et dolore magna aliqua. </div>
</div>
<div style=”display:block; float:left; margin-left:0px; “>
<div style=” padding:0px 5px 0px 5px; width:200px; margin-top:0px; height:auto;” ><br /><b><span style=”font-size:16px;”>WEB 2.0</span></b> <br /> Lorem ipsum dolor sit amet, consectetur adipisicing elit, sed do eiusmod tempor incididunt ut labore et dolore magna aliqua. </div>
</div>
<div style=”display:block;float:left; margin-left:0px; “>
<div style=”padding:0px 5px 0px 5px; width:200px; margin-top:0px; height:auto;”><br /><b><span style=”font-size:16px;”>SEO / PAY PER CLICK</span></b> <br />Lorem ipsum dolor sit amet, consectetur adipisicing elit, sed do eiusmod tempor incididunt ut labore et dolore magna aliqua. </div>
</div>
</div>
<div style=”float:right; width:30%; padding:10px 10px 0px 10px; display:block;”><code style=” margin:2px 0px 2px 0px;”><span style=”color:#dc4000;”><b>WEBSITE OPTIMIZATION</b></span><br/>Lorem ipsum dolor sit amet, consectetur adipisicing elit, sed do eiusmod tempor incididunt ut labore et dolore magna aliqua. </code></div>
<div style=”float:right; width:30%; padding:10px 10px 0px 10px; display:block;”><code style=” margin:2px 0px 2px 0px;”><span style=”color:#dc4000;”><b>ONGOING SUPPORT</b></span><br/>Lorem ipsum dolor sit amet, consectetur adipisicing elit, sed do eiusmod tempor incididunt ut labore et dolore magna aliqua. </code></div>
<div style=”float:right; width:30%; padding:10px 10px 0px 10px; display:block;”><code style=” margin:2px 0px 2px 0px;”><span style=”color:#dc4000;”><b>Call Today</b></span><br/>Lorem ipsum dolor sit amet, consectetur adipisicing elit, sed do eiusmod tempor incididunt ut labore et dolore magna aliqua. </code></div>
<div style=”clear:both;”></div>
<br/>
</div>
<!–End of style–>
<?php get_footer(); ?>
PAGE.PHP
Here is page.php with added content like single.php. It also has get_header();, <?php get_sidebar(); ?>, get_template_part( ‘loop’, ‘page’ ); and <?php get_footer(); ?> similar to index.php
<div id=”main2″ >
<div style=”float:right;”><?php get_sidebar(); ?></div>
<div> <?php
/* Run the loop to output the page.
* If you want to overload this in a child theme then include a file
* called loop-page.php and that will be used instead.
*/
get_template_part( ‘loop’, ‘page’ );
?></div><div style=”clear:both;”></div>
</div>
<div style=”clear:both;”></div>
<div style=”float:left; width:47%; padding:0px 10px 0px 10px; “><code style=”background-color: #dedddd; border:2px solid #D0D0D0; min-height:110px;”><span style=”color:#dc4000;”><b>SERVICES</b></span><br/><br/>Lorem ipsum dolor sit amet, consectetur adipisicing elit, sed do eiusmod tempor incididunt ut labore et dolore magna aliqua. Ut enim ad minim veniam, quis nostrud exercitation ullamco laboris nisi ut aliquip ex ea commodo consequat. </code></div>
<div style=”float:right; width:47%;padding:0px 10px 0px 10px; “><code style=”background-color: #dedddd; border: 2px solid #D0D0D0; min-height:110px;”><span style=”color:#dc4000;”><b>ABOUT US</b></span><br/><br/>Lorem ipsum dolor sit amet, consectetur adipisicing elit, sed do eiusmod tempor incididunt ut labore et dolore magna aliqua. Ut enim ad minim veniam, quis nostrud exercitation ullamco laboris nisi ut aliquip ex ea commodo consequat. </code></div>
<div style=”clear:both;”></div>
<div style=”display:block; float:left; margin-left:0; “>
<div style=”display:block; float:left; margin-left:0px; “>
<div style=” padding:0px 5px 0px 5px; width:200px; height:auto; margin-top:0px;” ><br /><b><span style=”font-size:16px;”>MOBILE WEB DESIGN</span></b> <br />Lorem ipsum dolor sit amet, consectetur adipisicing elit, sed do eiusmod tempor incididunt ut labore et dolore magna aliqua. </div>
</div>
<div style=”display:block; float:left; margin-left:0px; “>
<div style=” padding:0px 5px 0px 5px; width:200px; margin-top:0px; height:auto;” ><br /><b><span style=”font-size:16px;”>WEB 2.0</span></b> <br /> Lorem ipsum dolor sit amet, consectetur adipisicing elit, sed do eiusmod tempor incididunt ut labore et dolore magna aliqua. </div>
</div><div style=”display:block;float:left; margin-left:0px; “>
<div style=”padding:0px 5px 0px 5px; width:200px; margin-top:0px; height:auto;”><br /><b><span style=”font-size:16px;”>SEO / PAY PER CLICK</span></b> <br />Lorem ipsum dolor sit amet, consectetur adipisicing elit, sed do eiusmod tempor incididunt ut labore et dolore magna aliqua. </div>
</div>
</div>
<div style=”float:right; width:30%; padding:10px 10px 0px 10px; display:block;”><code style=” margin:2px 0px 2px 0px;”><span style=”color:#dc4000;”><b>WEBSITE OPTIMIZATION</b></span><br/>Lorem ipsum dolor sit amet, consectetur adipisicing elit, sed do eiusmod tempor incididunt ut labore et dolore magna aliqua. </code></div>
<div style=”float:right; width:30%; padding:10px 10px 0px 10px; display:block;”><code style=” margin:2px 0px 2px 0px;”><span style=”color:#dc4000;”><b>ONGOING SUPPORT</b></span><br/>Lorem ipsum dolor sit amet, consectetur adipisicing elit, sed do eiusmod tempor incididunt ut labore et dolore magna aliqua. </code></div>
<div style=”float:right; width:30%; padding:10px 10px 0px 10px; display:block;”><code style=” margin:2px 0px 2px 0px;”><span style=”color:#dc4000;”><b>Call Today</b></span><br/>Lorem ipsum dolor sit amet, consectetur adipisicing elit, sed do eiusmod tempor incididunt ut labore et dolore magna aliqua. </code></div>
<div style=”clear:both;”></div>
<br/><br/>
</div>
<?php get_footer(); ?>
HEADER.PHP
Header.php will look unique. You can go down to the ul and li menu tags and make custom pages.Then, just add any div tags for custom content.
* Print the <title> tag based on what is being viewed.
*/
global $page, $paged;
wp_title( ‘|’, true, ‘right’ );
// Add the blog name.
bloginfo( ‘name’ );
// Add the blog description for the home/front page.
$site_description = get_bloginfo( ‘description’, ‘display’ );
if ( $site_description && ( is_home() || is_front_page() ) )
echo ” | $site_description”;
// Add a page number if necessary:
if ( $paged >= 2 || $page >= 2 )
echo ‘ | ‘ . sprintf( __( ‘Page %s’, ‘lightningbolt’ ), max( $paged, $page ) );
?></title>
<link rel=”profile” href=”http://gmpg.org/xfn/11″ />
<link rel=”stylesheet” type=”text/css” media=”all” href=”<?php bloginfo( ‘stylesheet_url’ ); ?>” />
<link rel=”pingback” href=”<?php bloginfo( ‘pingback_url’ ); ?>” />
<?php
/* We add some JavaScript to pages with the comment form
* to support sites with threaded comments (when in use).
*/
if ( is_singular() && get_option( ‘thread_comments’ ) )
wp_enqueue_script( ‘comment-reply’ );
/* Always have wp_head() just before the closing </head>
* tag of your theme, or you will break many plugins, which
* generally use this hook to add elements to <head> such
* as styles, scripts, and meta tags.
*/
//wp_head();
?>
</head>
<body id=”body”<?php /*body_class(); */?>>
<div id=”container_mymain”>
<div id=”main”>
<div id=”nav_bg”>
<ul id=”navigation” >
<li><a href=”index.php”>Home</a></li>
<li><a href=”sample-page”>Comment</a></li>
<li><a href=”new-page”>No Comment</a></li>
<li><a href=”new-page”>Page4</a></li>
<li><a href=”new-page”>Contact</a></li>
<li><span style=”font-size:40px; display:none;”><i>Welcome!</i></span></li>
</ul></div>
<? /////?>
<h1 style=”color:#2f2f2f; font-style:italic; padding:10px; “>MY BLOG, STORE AND COMMUNITY</h1>
<div><div><img style=”float:left; padding:0px 10px 0px 10px;” src=”<?php bloginfo(‘stylesheet_directory’); ?>/images/website-design-148.png” alt=”web-design”/></div>
<div style=”float:right;”><?php //get_sidebar(); ?></div></div>
<p></p>
<p style=”text-align:justify; “><span style=”font-size:16px; font-family:Arial, Helvetica, sans-serif;”>Welcome to the site!</span><br/><br/><span style=”font-size:18px;”><i>Your website is only limited to your imagination.</i></span></p>
<div style=”clear:both;”></div>
<br/>
<img style=”padding:0px 0px 0px 0px;” src=”<?php bloginfo(‘stylesheet_directory’); ?>/images/header-690.png” alt=”web-design”/></div>
</div>
<div>
<div style=”clear:both;”></div>
</div>
<div style=”clear:both;”></div>
<div id=”containertwo”>
ADD THEME:
Here is the web address to add a theme to the WordPress directory:
http://wordpress.org/extend/themes/upload/
Often, there comes a time when a password is lost, forgotten, or somehow altered.
However, changing a WordPress user password is an easy task and you have two options:
Option A: Click ‘Lost Password’ link and reset it.
Option B: Use phpmyadmin or mysql prompt to alter database password.
To alter the code in the database,
1) UPDATE `mywpprefix_users` SET `user_pass` = MD5( ‘newpassword’ ) WHERE `mywpprefix_users`.`user_login` = “ad_or_other_user” ;
Installing WordPress on Wamp
To install WordPress on Wamp,
1) Download wordpress from http://wordpress.org/download/
2) Move zip file to a new folder in www directory
3) Extract zip file
4) cOPY AND paste files from extracted folder into wordpress folder
5) In browser open http://localhost/phpmyadmin/
6) Create a new database
7) In address bar type: http://localhost/WORDPRESS/
8) Select Create a configuration file
9) Select Let’s Go
10) Add Database name, username, password and a new table prefix (if desired)
For wamp, this could be:
Database name: wordpress1
Database username: root
Database password:
Database host: localhost
Table prefix (if you want to run more than one WordPress in a single database): mywp_or wp_
11) Select Submit
12) Select Run the Install
13) Add a Site Title, Username and Password.
14) Select Install WordPress
To rename a WordPress installation,
1) Rename the folder.
2) Change .htaccess to correct address.
2) Open wp-admin
3) Select Settings > General > Change WordPress Address and Site Address
To move a WordPress installation,
1) Move the folder.
2) Change .htaccess to correct address.
2) Open wp-admin
3) Select Settings > General > Change WordPress Address and Site Address.
To Copy a WordPress installation and not use the previous installation,
1) FTP files to a new folder like mywebsite.com/new_wordpress
2) Alter .htaccess to point to new url
3) Go to phpmyadmin
4) Select wp_options
5) Edit siteurl > under option_name column change home option_value to new address >change recently_edited old url to new one
** Basically, change old urls to new ones
To Copy a WordPress installation and keep using the existing installation,
1) FTP files to a new folder like mywebsite.com/new_wordpress
2) Create a new database and dump data
3) change wp-config.php to new database details; database name, username and password.
4) Alter .htaccess to point to new url
5) Go to phpmyadmin
6) Select wp_options
7) Edit siteurl > under option_name column change home option_value to new address >change recently_edited old url to new one
** Basically, change old urls to new ones
8) Goto Settings > General > Add the proper WordPress address (URL) and Site address (URL).
Google Adsense can be a widget in a sidebar, or embeded in WordPress posts.
WordPress Widgets and Adsense
There are several WordPress plugins that can be installed to allow Google ads to be positioned in a typical ‘sidebar’ location.
However, they are not necessary.
1) Get the code from the ‘Ad Unit’ in WordPress.
The code looks like the following below, but with script tags:
google_ad_client = “ca-pub-idstring”;
/* Med Rectangle */
google_ad_slot = “slot_number”;
google_ad_width = 300;
google_ad_height = 250;
//–>
src=”http://pagead2.googlesyndication.com/pagead/show_ads.js”>
2) Select Appearance > Widgets.
3) Add a text Widget ‘Arbitary Text or HTML’
4) Paste the code.
5) Make a title, if desired.
6) Select Position.
7) Save widget.
Joomla articles can be added to any menu. It is a very convenient method for which content can be added to any menu item.
To select an article in a menu,
1) Select Article > Layout
2) Select an Article
3) Save
To change a menu item to an article,
1) Select the link of the item in a menu.
2) Select Change Type.
3) Select Article > Layout
4) Select an Article
3) Save
Alternatively, you can always make the menu type an external url for an article.
For example, the url:
index.php?option=com_content&view=article&id=14
could be an external link for a menu item with the following url:
http://mysite.com/index.php?option=com_content&view=article&id=14
Installing Joomla 1.6 in wamp is very fast and simple.
1) Download Joomla
2) Make a new folder in www directory > add zip file for Joomla 1.6 installation > Extract Zip file.
3) Open phpmyadmin
4) Create a new database
5) Open localhost in web browser
6) Select language and select Next until you get to database configuration.
7) For database configuration:
a) Type: mysql
b) username:root
c) password: none
d) database name: same as you made with phpmyadmin
e) Change prefix if you want or leave it ‘as is’.
f) Select next
8) Create the administrator username and password and select ‘Next’ until installation is complete.
9) Rename or reemove installion folder when finished
Although surfing the web with a mobile device is like trying to surf small, mushy waves with a gun (or surfing large, hollow tubes with an egg), the fact that it is getting so popular should raise a few eyebrows to web surfers, web designers and web developers.
Setting up for all devices is matter of creating redirects based on what device is being used by the web surfer.
Since the mobile web can take full advantage of displaying code written with html, css and Javascript, adopting a plan to create various templates based on these credentials is an obvious starting point.
For database driven websites, you can utilize php / mySQL since the browser output will interpret the code to html, css and Javascript.
The codes to create redirecting based on screen size is:
Since some users (a tiny minority) may disable Javascript, you can always add a meta tag within a noscript tag to redirect the user if they do not have Javascript enabled. Here is the code:
<meta http-equiv=”refresh” content=”2; URL=http://www.mysite_for_no_javascript.com”>
</noscript>
At this point, you have 3 options:
1) Create a single mobile version that is the perfect size in a device like the iphone, but needs scrolling in other devices.
2) Create one small version that is viewable in all deveices with a screen less tghan 300px.
3) Create various sizes for various devices.
With a default WordPress installation, you can automatically add links to a sidebar. Alternatively, you can always add a ‘Links’ widget to add links if you lost or deleted it somewhere along the way. When new links are added, they are shown in an order where the most recent posts are listed on top. If that works for you, you are good to go. But, you may want to add or rearrange posts at some point in time.
My Link Order
To have control over the link order,
1) Download the ‘My Link Order Plugin’ and install it.
2) Add a ‘My Link Order’ Widget’.
3) Select Links > My Link Order
4) Arrange categories and posts as desired.
To arrange posts in one category,
1) Open Links > My Link Order.
2) Under ‘Order Links’ select a category.
3) Drag and Drop the desired order for the posts.
5)Select ‘ Click to order’.
To arrange categories,
1) Open Links > My Link Order.
2) Drag and Drop the desired order for the categories.
5)Select ‘ Click to order’.
With so many content management systems available, you may wonder why spending many hours to build a custom cms is a worthy option. Firstly, the reusability of a CUSTOM CMS can speed up web development in many cases.
A custom CMS is built with server side languages such as php/mySQL. The backbone behind a CMS is CRUD, which stands for create, read update and delete. For a very small cms with limited pages, deleting may not be necessary. On a very simple level, administrators can login and make any changes to the website while web surfers will see selected data from the database. For all web usage, there will be a connection to the database for which the administrator has create, read, update and delete privileges while web surfers can only select data.
When making a custom cms, you can have a login file which rediirects or links the administrator to the file(s) which creates, updates or deletes data for one or various pages. All in all, making a cms can be a handful of files which should be lightning fast. The job is really for an individual with adequate php/mySQL knowledge since database design and creating the cms can take many hours of decent coding and testing. But, the result is the ability to make a website with your own editor. Furthermore, it is a starting point to add many pre-xisiting php scripts or more custom scripts like shopping carts, etc. Using a lightweight cms will significantly cut down on server resources.
Using a Custom CMS vs a Open Source CMS
When would I use an open source cms like Joomla or WordPress vs my own?
If the development time is faster, using an open source cms could be the solution. However, if you do not find an appropriate solution like an updatable cms for all mobile devices and want to include a fast, simple Paypal shopping cart for all devices, creating a custom cms with a lightning fast shopping cart could be the best option. Although many open source cms may have an answer to browsing the web on a pc, mobilizing the site is another issue; especially when it comes to using extensions.
A custom cms could also be diversified and used with PHP Frameworks too. The Framework could be dumped into the website and use the same template and / or database. The options to building and using a custom cms are endless.
Upgrading Joomla 1.5 is a standard procedure to apply patches and security fixes.
To ugrade to the most recent version,
1) Backup the original fiules and database.
2) Download the appropriate upgrade version from joomlacode.org.
For example, if you use Joomla 1.5.10 you would download:
Joomla_1.5.10_to_1.5.23-Stable-Patch_Package.zip
3) Unzip the package on your pc.
4) Use FTP or Cpanel ‘File Manager’ to transfer the updated files to the server. Make sure you do not remove any components or installed extensions. To keep this from happening, always overwrite files but do not delete files.
5) Login to the administrator backend and you will see the new version.
By default, Joomla will send an email to a registered user to activate an account. For obvious reasons, this feature has many benefits. However, you have an option to remove this feature.
HOW TO NOT SEND A REGISTERED USER IN BACKEND/FRONTEND AN EMAIL:
To add users to backend without sending them an email,
1) Open the following file:
/administrator/components/com_users/controller.php
Near line 189, comment out the following line:
// JUtility::sendMail( $adminEmail, $adminName, $user->get(’email’), $subject, $message );
In the Joomla administrator backend,
1) Click Site > Global Configuration > Click System Tab > New User Account Activation > Select ‘No’.
If you view the source code after a Joomla installation, you will see:
<meta name=”generator” content=”Joomla! 1.5 – Open Source Content Management” />
If you want to remove this code, there are a couple of ways to do so.
Here is one simple method to remove the generator tag
1) Open the file:
/libraries/joomla/document/html/renderer/head.php
2) Comment the following line:
$strHtml .= $tab.'<meta name=”generator” content=”‘.$document->getGenerator().'” />’.$lnEnd;
The new line is:
//$strHtml .= $tab.'<meta name=”generator” content=”‘.$document->getGenerator().'” />’.$lnEnd;
3) Save the file.
Using PHP for MYSQL Queries
There may come a when you want to write a custom PHP script to access one or more database tables. Even with content management systems like WordPress or Joomla, you can write custom search scripts.
If you add an .htaccess file within a folder that contains the PHP script, you can limit access to a single Internet IP addess. Alternatively, you can password protect the directory with the .htaccess file.
PHPMYADMIN allows you to use, alter, add, modify, create, delete and dump databases just as though you could with the mysql command prompt.
If you use phpmyadmin, you may often use it to access data. You may access data for content management systems such as Joomla, or stand-alone PHP scripts. Using phpmyadmin is fast. When accessing data with phpmyadmin, you can sort queries by order descending (most recent first) or order ascending (oldest first). Otherwise, you can always run a search query with SQL; such SELECT * from posts where username=username;
Although driving traffic to your website is a collection of crafting good text, good page titles and good linking, much consideration should also go to positioning location per traffic of keyword. For example, assume you write a powerful article that will show up in Google’s search results for specific keywords. Now, ask yourself the question: What are the odds of someone reading or scanning through 20 titles to find me? Then, ask yourself, “Would I get more desired traffic designing a search scheme for less searched keywording; like Italian Restaurant in Vancouver vs Restaurant in Vancouver?”.
Since different keywords will create different user responses, you must understand your user and learn how to write for that user. This process will take trial, error and changing text. As time goes on, adding specific keywords and fresh, grammatically correct written articles can seem to create a rather predictable outcome.
But, if you want the user to return you better be a company for which he wants to do business or maintain a website that is a worthwhile bookmark.
To add a column to a database table with mySQL,
1) Open phpmyadmin or mysql prompt.
2) Open desired database.
3) Type: ALTER TABLE contacts ADD email VARCHAR(60) AFTER name;
Note: This will add a column after the column named name.
or
Type: ALTER TABLE contacts ADD email VARCHAR(60) FIRST;
Note:This will add the column email to the beginning of the table. This is not recommended if the table has an auto_incremented id column.
or
Type: ALTER TABLE contacts ADD email VARCHAR(60);
Note: This will add the column email to the end of the table. All new columns will automatically be inserted to the end of the table unless specified otherwise.
Directories can be a fantastic format for search engine optimization. Directories can be custom pages with / without Google mapping, or pre-made scripts integrated into a website. Directories allow you to add listings that will dynamically generate page titles and custom text; just like a simple web page. If the directory is a unique fit into your website; such as construction ‘Do It Yourself’ web site with contractor listings, the relevant entries could be a reason for web surfers to bookmark your site. As a general rule; a bigger, better informative site receives better, more targeted traffic.
There are many, many directories available for a fee, or for free. Some are stand-alone scripts while others are extensions, modules or plugins for content management systems. Thje scripts come in various server-side languages using a database like php/mysql or apsx.net / msSQL.
If an administrator is not too concerned about style, finding the appropriate directory software that would suffice with limited editing makes the integration much simpler. However, even the best directory solution for a website could take some time, if not up to a hundred hours of editing to make it look and function as desired. Some of the editing could be simple backend ‘Click and Save’ techniques, while other editing could be changing php, css and Javascript coding. In many cases, forums could help solve issues, but at other times you are on your own.
Many directories have a backend that will keep track of web hits. On the other hand, the database may have a column in a table which tracks web hits. Analyzing traffic from a time to time will demonstrate how your directory traffic is functioning.
To change database table prefixes with WordPress using mysql prompt,
1) Open mysql command line.
2) Enter: Show databases.
3) Enter: Use desired database.
4) Enter the command:
Rename table wp_comments to newprefix_comments;
4) With mysql prompt, renaming each table will need to be typed each time one query is finished. Altering the database prefix is much faster with phpmyadmin. The following explains how to change database table prefixes with phpmyadmin.
5) Alter wp-config and change the wp_ prefix to the desired prefix.
To change database table prefixes with WordPress using phpmyadmin,
1) Open php myadmin.
2) Open sql window.
3) Enter the command:
Rename table wp_comments to newprefix_comments;
4) Every time you paste one line into the SQL window, click on GO and see the table name change on your left. Keep changing the table names until all your WordPress tables have the new prefix.
5) Alter wp-config and change the wp_ prefix to the desired prefix.
Resetting a username or password with Joomla 1.6 is easy.
To reset the Joomla 1.6 username or password for any user,
1) Login to the Joomla administrator.
2) Select ‘User Manager’ icon.
3) Select a User
4) Change Login Name, if desired.
5) Change password and confirm password, if desired.
5) Select ‘Save’ or ‘Save and Close’.
With Joomla 1.5, resetting a username or password is a no-brainer.
To reset the username or password for any user with Joomla 1.5,
1) Login to the Joomla administrator.
2) Select ‘Site’ from the main menu.
3) Select a User
4) Change or modify username and / or password.
5) Save the changes.
If you use Joomla extensively, there will probably come a time when you lose an administrator’s password for a Joomla installation. Resetting the Joomla administrator password is a simple procedure.
How to Reset Joomla Administrator Password
To reset the Joomla administrator password with mySQL,
1) Open Putty
2) Enter root user and password.
3) Type mysql
4) Write: ‘Show Databases’.
5) Type: ‘Use The_Desired_Database_Name’ where the desired databse name is the name of the database.
6) Type: UPDATE `jos_users` SET `password` = MD5( ‘my_updated_password’ ) WHERE `jos_users`.`username` = “admin”;
Note:
If the table has a different prefix (which is recommended for security) or a different username, just substitute the values.
To reset the Joomla administrator password with phpmyadmin,
1) Open PHPmyadmin
2) Select the desired database.
3) Select query
4) 6) Type: UPDATE `jos_users` SET `password` = MD5( ‘my_updated_password’ ) WHERE `jos_users`.`username` = “admin”;
Note:
If the table has a different prefix (which is recommended for security) or a different username, just substitute the values.
By default, the WordPress backend uses the url mysite.com/wp-admin to access the dashboard. So, any username and password scanners can make allow the access to at least make an attempt. Changing the username from admin can help too.
To make the wp-admin only accessible from your pc you can add the following code into the .htaccess file within the wp-admin directory,
1) Add the following code to .htaccess,
AuthName “Admin Only”
AuthType Basic
<Limit GET POST>
order deny,allow
deny from all
allow from xxx.xxx.xxx.xxx
</Limit>
To make the wp-admin only accessible from more than one ip address, add the following into the .htaccess file within the wp-admin directory,
AuthName “Admin Only”
AuthType Basic
<Limit GET POST>
order deny,allow
deny from all
allow from xxx.xxx.xxx.xxx
allow from xxx.xxx.xxx.xxx
</Limit>
Now, if someone tries to access the wp-admin login they will get a page that displays the horrible message ‘Internal Server Error’.
If you have ever used a content management system you obviously know there are default methods for accessing the backend. If you look at server stats, you will see many requests to your website trying to access the administrator backend. Obviously, you may wonder why people are snooping around in an area which has nothing to do with web content. You can’t stop this, but, by taking away the default urls to access the backend, or creating other methods to make backend access difficult, you will deter most cases from hackers looking for easy pickings.
To create a second level of security, you can password protect the wp-admin folder with a second, very secure username and password.
If the directory is in a subfolder, you may not be able to password-protect the directory with Cpanel. But, there is another simple method to password protect any directory.
To password-protect a directory,
1) Create a file in the wp-admin folder called .htaccess and add the following code:
AuthName “Password Protected Directory”
AuthType Basic
AuthUserFile /home/username/.htpasswds/public_html/mysite.com/myblog/.htpasswd/myblog/.htpasswd
<Limit GET POST PUT>
Require valid-user
</Limit>
Note:
The AuthUserFile will be the location of a new password file and could be the path for your WordPress Installation. You could locate the file outside the WordPress installation for extra security.
2) Create a file called .htpasswd and save the file in the desired directory. The file is stored in the path displayed in the .htaccess file.
/home/username/.htpasswds/public_html/mysite.com/myblog/.htpasswd/myblog/.htpasswd
3) Go to http://www.htaccesstools.com/htpasswd-generator/ or another website to generate a htpasswd.
4) Copy and the password into the .htpasswd file.
The password looks like:
johndoe:$apr1$IsfHg/..$VU1q23fkHf0XKUjXlO3q10
That is all there is to it to password protect the directory.
While creating or upgrading a php script, there is often a time when you want to find the last inserted id with mysql. The purpose is to get that id from the database and make it a variable for another database query.
The code to acquire the last inserted id of an auto_incremented id in a database table is to call the function:
$get_my_last_id = mysql_insert_id($dbc);
Finding out what version your browser is with php is required if you want to make custom conditions for a specific browser or various browser versions.
Joomla has a wide variety of wysiwyg editors. They can help speed up many aspects of coding; such as text color, linking, etc. However, the real power lies in the source code option for which you can troubleshoot and customize the html with div tags, ids, classes, span tags, and even spell checking. Typically, the editors in wysiwyg mode do not spell check.
If you do any substantial editing in Joomla, using the best of both worlds (source code and non-source code) will allow very detailed, quick styling.
The WordPress sidebar can be setup to display links, categories, images, archives, etc.
Although you can display categories and many default WordPress sidebar items, using the ‘widget’ in the administrator zone will allow for greater control of what you want to appear.
Displaying Widgets
To use widgets,
1) Login to admin
2) Under ‘Appearance’ select ‘Widgets’.
3) Add what you want to see in the sidebar.
4) You can select the position where you want the widget placed.
When you set up a main menu with WordPress, the order for the pages on the main menu will be exactly in the order for which they are created. The menu will work fine for a site with a simple menu. But what if you want to change the menu order or menu names?
Changing Menu Names
Changing menu names is very simple. You just go to the dashboard and select pages. Then, select a page, change the name, and click update.
Changing Menu Order
Changing menu order is a little more difficult to do.
To change the order,
1) Login to WordPress admin
2) Select Pages
3) Put a number in the order. For example, your home page could be number 0 or number 1. If it was number 1, the next page would be number 2, and so on.
If new pages are added, yo just do another order shuffle.
All submenu pages for the parent pages will remain intact.
There may come a time when you want to move Joomla articles into a WordPress blog or vice-versa. Alternatively, content can easily be moved between the big 3; Joomla, WordPress and Drupal.
The procedure is very simple to move a single page or few pages.
To move the content,
1) Open up the editor in HTML or source mode
2) Select all
3) Copy
4) Paste into HTML or Source code into the editor of choice.
Large Sites
Option A: Plugin
Find a WordPress plugin that will do this for you; such as FG Joomla to WordPress.
Option B:
Build a Custom PHP / mySQL Script
If you have many pages that need to be moved, you can export any pages, categories and sections that you want with phpMyAdmin. Then, create a new table with phpmyadmin and dump the desired files into an sql file. Now, you just need to match the tables up with your WordPress Installation; while leaving the autoincrement field blank. Once the tables are the same, you can export it and import it into WordPress.
Alternatively, you can create a custom php / mySQL script which will select the data you want from your Joomla database and insert it into your WordPress database. When you run the insert command, you can use the Joomla content and page name for the WordPress post_title, and post_name. The guid can be inserted using the the last_inserted_id() function for which you append the id onto the appropriate guid string. Then, you add what is appropriate into the other fields; such as dates, post_author and post_parent.
If you install or use WordPress, you may eventually hit a minor wall regarding the theme style. One major issue is the sidebar on the left(or right). By default, WordPress will have ‘Bookmarks’, ‘Archives’ and a ‘Search’ box in the vertical menu.
If you use or alter a default template, you can always select Appearance>Widgets in the administrator zone and remove them from showing up. With other templates, hand-made or computer generated, you can open up the editor and delete code. You can open up the sidebar PHP file; such as sidebar1.php located: Appearance>Editor.
The code below is represents the search widget. By cutting the following code and saving the new file, the search box and title will disappear. It is always a good idea to keep a backup file while editing a new file; especially if you have limited PHP knowledge.
There are several SEF components for Joomla; such as ACESEF, sh404SEF and SEF Advance. Using SEF components will rewrite URLs and provide a nice, clean look in the browser bar. Using Joomla’s built-in SEF urls with .htaccess works fine in many scenarios too.
Many extensions work well, especially if they are up to date. Some come with nice features like flood protection and url naming for specific extensions. They are excellent products. However, issues could arise when some extensions and components (no matter which ones) are mixed with each other. For example, it could make great urls in a forum one day, then using an upgrade fropm the same forum could make SEF urls uglier than the built-in Joomla SEF. Upgrading is where things can go haywire. Issues can arise if PHP is upgraded on the server and the extension was created prior to the upgrade. Furthermore, as some companies evolve, so does the pricing. Some may want a yearly license, etc.
The extensions can do do an excellent job and offer excellent control for which to name the URLs. But, well written articles, appropriate content and good link management should still have priority over how a string is displayed in the address bar.
Using SEF urls with Joomla does make a more professional look. Using the built-in SEF is free and can be set in the global configuration. Renaming the htaccess.txt to .htaccess will allow you to make custom urls. Personally, sef urls are something I would always have on a Joomla website. Since a good home page, link structure, page titles and excellent related content does more for SEO and nobody really cares about what they read in the address bar, using sef is the icing on the cake…. completing a professional look rather than some weird looking string.
Searching for specific strings of text with PHPMYADMIN or the MYSQL command prompt is a very fast way to find rows in tables for which you want to find specific pieces of data. For example, let’s assume you have a very long database table and you want to find all users that share one particular IP address or all names in a table for which a user is called John.
To search PHPMYADMIN for strings of text,
1) Open up the specific database with php myadmin.
2) Select Search
3) Add the word to search from the desired column.
4) Select Browse
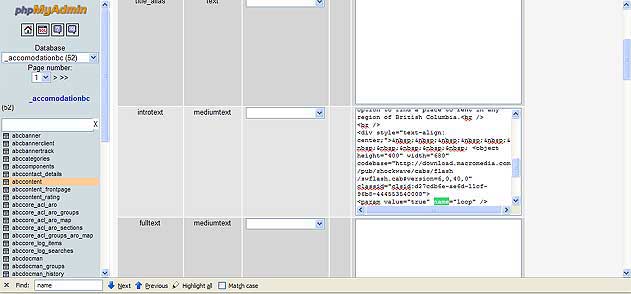
At this point, you can open up Firefox and find the exact location.
To find the desired text with a query,
1) Use mysql command prompt or select sql with PHPMYADMIN.
2) Add the following code.
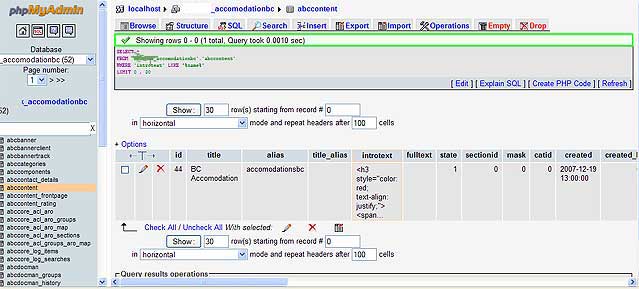
Joomla, as a content management system offers unlimited ways to create an organized website. One of the various tools to use with Joomla is to implement a blog.
Built-in Blog
To create a blog with the default Joomla CMS,
1) Add a new item to a menu.
2) Select articles > category blog layout or section blog layout.
3) Add appropriate figures for leading, intro, columns, links.
You can experiment with these numbers until you have the desired amount of leading articles, columns and links. With a blog layout, you have all articles from a section or category accessible of the first page. This is a decent looking layout and each page is very customizable with the content editor.
Blogging Component
Another option for adding a blogging component is to download a blogging component, install it, configure the backend parameters and edit php/css files to customize it (if necessary).
There are many blogging components such as myBlog, jaggyBlog, EasyBlog, WordPress Blog for Joomla, RSBlog and Smart Blog. Some are even free.
Personally, I have taken a liking to myBlog and JaggyBlog. MyBlog is a little more expensive, but integrates well with JomSocial and JomComment. JaggyBlog is a steal for the price, and you can set menu items to only show entries for a specific category, or all posts.
A downside to blogging components is that you may not have the control you like over sidebar categories. A way around this is to use custom menus with custom article links. This way, you can make custom article groupings; even to those which exist in different sections or categories.
Adding WordPress to Joomla
One option to add a blogging platform is to install or FTP WordPress into a subfolder within the root Joomla directory. With this option, you can use the existing database or create a new database. If you use the existing database, WordPress will use a different database prefix. Using a separate database will help lighten the load from the Joomla database. This method of using WordPress works fine if you don’t need the blog to be integrated into the Joomla CMS; such as with a member site; or with various blog users. Alternatively, if only bloggers are hired, using the separate installation keeps them only where you want them.
To access the WordPress pages, you simply use an external link in the Joomla site to a page in the WordPress installation.
When a separate WordPress installation is used within Joomla, the WordPress plugin ‘page-links-to’ allows you to create the exact menu you had in Joomla; even pointing the home page back to the Joomla home page. However, the templates are different. If computer generated software like Artisteer was used to make the Joomla and WordPress templates, templating could be rather fast; especially if they were not edited afterwards. If they are edited, both should be changed accordingly to make the match.
Now, you can blog in WordPress and link to this blog from Joomla for SEO purposes. All pages in the main menu will link to Joomla pages and all posts in the WordPress installation can be assigned to new categories.
If you have familiarity with WordPress, adding it to a Joomla installation could be rather painless. But, if you are new to WordPress, you must be prepared to learn a few things in order to manage the blog effectively.
The same approach to using a WordPress blog can be applied to other blogging platforms too; such as a Codeigniter blog application, or php/mySQL blogging software.
All sorts of problems can occur when trying to record sound. At times, the problems can be isolated with some software, yet, at other times, they occur across the board. Nevertheless, a good place to test microphone recording problems with Windows is through viewing what options are available in the ‘Sounds and Devices’ located in the Control Panel. You can check to see the volume levels and what recording/playback options are selected. For example, selecting ‘Mic in Volume’ and setting the volume slider to the appropriate position could get the sound working again.
To edit and use the new module,
1) Select Extensions
2) Select Module Manager
3) Click on the module of choice
4) Select position
5) Select Publish
5) Select Pages
6) Select Save
See tutorial for using a Joomla 1.6 module.
Installing a module into Joomla 1.6 is a very simple procedure.
How To Install the Module
1) Login to the administrator (http://mysite.com/administrator)
2) Select extensions > Extension Manager
3) Browse and Select File from hard drive. It will be a zip or rar file
4) Select Upload and Install
See video tutorial for Installing a Joomla 1.6 Module.
Typically, Joomla 1.6 is installed using Fantastico or from a zip file downloaded from joomla.org. Fantastico is included in many shared, VPS, or dedicated server hosting plans.
Fantastico
If Fantastico is used for a Joomla 1.6 installtion, you must have a hosting plan which includes Cpanel. Cpanel is very popular with Linux hosting. The upside to a Fantasico installation is simplicity and quickness. Just a couple mouse clicks and it is done. The downside to Fantastico is that is uses the default Joomla database prefix (_jos). For security, it is recommended to change the prefix since hackers can target the prefix.
To use Fantastico,
1) Go to Cpanel and Login
2) Click Fantastico
4) Install Joomla 1.6
Manual Installation with Zip File
The manual installation of Joomla 1.6 is very simple.
To manually install Joomla 1.6,
1) Dowload the zip file from joomla.org
2) Extract the file into the appropriate directory…such as public_html or mysite.com
3) Type the address of the new installation; such as mysite.com
4) Setup the appropriate database name, user and password
5) Remove or rename installation folder.
Manual Installation Video Tutorial
Here is avideo tutorial for installing Joomla 1.6. See tutorial.
There may come a time when you have an assortment of avi files for which you want to combine into a single movie. The files could come from various sources recorded at various frame rates.
You can combine all avi files and render the movie. However, it may be much faster to make a new avi file with Pinnacle Studio for each avi file. By doing this, you will have new avi files that are all with the same frame rate. In many cases, the sound will vanish from the original avi files. The solution to this problem will be to make a new voice over after all the new avi files are added to the storyboard or timeline. However, voice over has its drawbacks because adding new frames into a movie with a voice over will not be in synch with the voice over unless the frames are added before or at the end of the video timeline. Alternatively, for no loss of sound, using an avi-flv-mp4-wmv converter and take an avi file from camstudio and convert it to mpg. Then, the mpeg can be opened in Pinnacle with the sound intact. If sound is transfered to a timeline without the addition of voice over, clips are much easier to maintain.
After all the recorded avi files are converted to new avi files with Pinnacle Studio, you can combine them into a single movie and saved in the studio format. After the clips are edited and the voice-over is added, you can output a final avi file. The avi file can be played on the server or Windows Media Player, or uploaded to youtube. The file will be very large. One alternative is to save the file in a format like wmv, or mpeg2. Pinnacle, new and old versions support these formats and can make quick uploads to Youtube. Another alternative route is to convert the final avi with a conversion tool like avi-flv-mp4-wmv Converter. With this software, a 1 gb avi file can become a 10 mb mp4 file that youtube could upload in seconds.
More About Youtube File Formats
Anyways, Youtube accepts many file formats. If you don’t want to wait all night to upload an avi file, you can get the file into a small file prior to making the upload. As previously discussed, a few faster methods for uploading videos had been discussed. But, you may have tools to create other video formats for Youtube. Some of the accepted file formats for Youtube are:
1) .MPEG4
2) .MOV
3) .AVI
4) .MPEG (MPEG2)
5) .WMV
6) .FLV
Cam Studio is free software which can be used for capturing screen tutorials. You can move a colored cursor and add sound. Some commercial products with more bells and whistles are Adobe Captivate and Camstasia Studio.
Although Cam Studio can make an adequate screen tutorial, there are times when you need to add and edit various clips made from Cam Studio, a video recorder, or downloaded files.
Using Joomla can be a smooth experience. However, there can be times when components or modules exhibit PHP errors. There are many reasons why such problems can occur. In order to find the source of such a problem, you may want to track recent file or server changes.
One problem which could pose problems is upgrading the Apache server. For example, you may want to add a php module like xmlrpc. However, the default upgrade settings in web host manager or Linux CentOS could upgrade the PHP from the current version to a much more recent version. After the upgrade is completed, some extensions and modules which were created in an older PHP version may not work properly with the new version since some functions and features could be deprecated. To solve the issue, you may want to create a new Apache upgrade with the previous version of PHP for which everything worked properly, or upgrade Joomla core, components and modules, if necessary. Unfortunately, some older plugins, modules and components will be more difficult to upgrade than others.
To access the php.ini file in web host manager,
1) Open WHM
2) Under ‘Server Configuartion’ select PHP Configuration editor. The advanced view will allow the file the most possibility to edit various settings.
To add new PHP features,
1) ‘Easyapache’ must be opened.
2) Install a PHP feature and build ‘Apache’
Sometimes, using a content management system like Joomla, Drupal, or WordPress can present an eye-raising duplicate url issue.
This can happen when url strings and sef urls are indexed. Another such possibility is when a category or section is appended to the page; Thus, this is 2 separate urls. In many cases, Google will pick one.
Here is a good page regarding duplicate urls with Joomla:
Joomla and SEO
We have entered an era for which calls can be made with false identities. Companies such as Spoof Card sell such services to allow people to disguise themselves as cowardly wimps; thus allowing so much room for societal changes. Without rambling on, it is obvious why such services can be dangerous. For one, I hope new small claims courts and case laws pop up to allow cowardly terrorizers to be dealt with. As a web developer, I receive such annonying calls since some webmasters are often hip to the latest technology and use it in matters to be advantageous. I advise anybody to track back all services in order to be sure you are not being sucked in from a foreigner with a local phone number and local accent; while it was really a guy from an Eastern country who spoke little English.
I believe one of the crimes thus mentioned is false impersonation.
Some people disable Javascript so that they can become malicious users.
However, A noscript tag can be added into the head of the html or php to redirect users without Javascript.
Users who disable Javascript for the sake of malicious activity can be tracked down. Like a criminal coming back to the scene of the crime, they often come back with repeated patterns and finding them is not that difficult, even those who think using a proxy server is anonymity.
You can track ip from Unix timestamps, the ip addresses and proxy servers used to browse a website. Every surfing activity leaves a mark.
See link.
To deal with individuals that like to browse your website for no other reason than being an annoyance, you can create a route for them to follow for which you can record all their surfing stats. You use the noscript tag and redirect to pages for which the malicious user will leave you an ip address and Unix timestamp that gets deposited into a database.
Javascript is great stuff. But, it does have a few drawbacks. This article is about redirecting a web page or module if Javascript is not enabled. According to w3 Schools, 95% of all web browsers had Javascript turned on and this number had generally shown an upward trend in usage since 2000. These days, after installation, Javascript is turned on by default with most browsers.
If you really want to cater to everyone, you could make one website with Javascript while you could redirect the others to a non-javascript site (or page).
A noscript tag can be added into html, the main index.php file, or any other page for which you want to redirect a user if no Javascript is enabled. Here is the code to redirect users:
As a web developer, we have experienced users who disable Javascript, but often for the sake of malicious activity. They had done so to cause a harassment issue by trying to go around the Javascript validation. The current ip tracking from Unix timestamps, ip addresses and proxy servers is under investigation. Here is a link which explains how users trying to hide their identity can be identified:
See link.
To deal with individuals that like to browse your website for no other reason than being an annoyance, you can run the noscript tag and redirect to page for which the ip address and Unix timestamp will be inserted into a database. You can then track the ip’s browsing behavior for each and every visited page. The Unix timestamp will pinpoint exact time to the second, and ultimately, the location for which such behavior occurred.
Joomla comes with a few editors. The default editor is TinyMCE. TinyMCE is a good editor, but, FCK and JCK may be more desirable since they are a little more user friendly with inserting images and linking. As far as hand-coding goes, they are all fairly equal.
Hand Coding In Joomla Editor
When working with a Joomla editor, it is not like working with pure html/css or pure php for that matter. The editors may throw in some tags, but, that is marginal. The key is to understand the editor’s strengths. The editor’s strengths are div, br, td, tr, and span tags. When editing images and text in the source code, these tags stay where they should and work properly. You can style, float images, use tables and work css as you want. Most problems with working with an editor are when you try to edit outside of the source code. In this case, deleting rows and editing text may not do exactly as you expect.
When you use a content management system like Joomla and WordPress you can use components, modules, extensions, php frameworks and pure php/mysql.
Adding Pure PHP / MYSQL
The content management systems have many available templates and extensions, but, there may be times when you have a stand-alone php/mysql application that you want to add, but not recode into an extension. You just want to add it quick.
To add a pure php / mysql application you simply copy and paste the application inside the root directory. The index.php file could be accessed like mysite.com/socialbookmarks/index.php. The url could be added to the main menu of the content management system. The urls for each file of the new application could use absolute or relative urls; like join.php or http://mysite.com/bookmarks/join.php.
To finalize the application, you can dump the database schema into the existing database for the CMS, or use a different database. The application can use the same stylesheet too if an absolute url is used to link the stylesheet.
To keep it simple and use a php / mysql cms you can try Sitemakin CMS.
When you use a PHP framework like Codeigniter to speed up web development, it is a good idea to beware of its strengths and weaknesses.
By default, Codeigniter is setup to run a single application. Since each controller can reference views located in organized, separate folders, an entire website could look like it uses multiple applications. For example, a controller called blog.php could access view files in the views/blog folder. With a single application that requires one database this could work just fine.
You see this article and you wonder what place it has to do with SEO and blogging. Well, not much and that is exactly what the article is trying to explain. When articles are written in blogs or anywhere else, the writer can choose various narrators; first person[I], second person[You] or third person[he, she,it] to describe an article. Furthermore, you can use the passive voice which is often used in the making of boring articles that are often found in repair manuals and some how-to books.
Passive Voice
The passive voice will sound like:
‘The next step is to disconnect the wire from the laptop’s bus.’
First Person
The first person will sound like:
‘I tried to install Joomla but it didn’t work.’
Second Person
The second person sounds like:
‘You install Joomla with the correct database name, password, db_prefix, db_username and sample data.’
Third Person
The third person goes like this:
‘He tried to install Joomla but, it would not install since he forgot the db_password.’
As it was explained previously, which method you choose to use is entirely up to you. Copywriters and other people with strong English skills may recommend you stay consistent, or you can hire them to make an edit. However, articles that vary in terms of writing ‘voices’ do not seem any better or worse off in search engines than others. Furthermore, combining various voices in an article which contains proper grammar and spelling does not seem worse for wear either. If you cannot write with adequate grammar and spelling, it recommended to use Word until you make the grade. If Word is used for computer articles, there can be issues when copying and pasting the text, especially into a CMS. To keep the code lean and clean, it is recommended to copy and paste the text from Word to Notepad prior to inserting the text into an article.
You may find that using the first person or second person is easy-reading while the passive voice can be harder to comprehend. Therfore, if you use the passive voice, you could lose a person’s interest in the website.
We are all different. But writing in the first person or second person is probably easier than creating prose with the passive voice.
This article is intended to clear up a few details regarding SEO. The plan of SEO attack can be different for small and big websites. For example, for small websites with limited pages, the influencing factors are a good domain name, good page titles, proper keywording and content, proper text tagging(like h1, h2) good link structure(incoming and outgoing) and sitemap. For large websites, many of the same rules apply, but a plan is must also be implemented starting at the home page. Then, the development process must be considered; such as blogs, forums and custom pages. There is much more to consider, but this is a place to start.
Small Websites
As mentioned above, the plan of attack is outlined. The results will be be limited since the site does not expand.
Large Websites
Large websites really hold much more power than small websites. With more pages, much more internal linking can take place and many more keywords can link together. For example, this website(less than 1 year old) has only one dominant author and its overall Internet traffic ranking is often much better than many other web development / seo companies with a team. Why? Because one technical writer can outdo a team.
Why? Well, here is some history. Before the web had blossomed, our blogger had began as a writer using a desktop computer running DOS. With intentions and determination to being a published writer, practice was the key ingredient. To make a long story short, it took about 3, 40,000 word books with text, images and perfect grammar before writing perfect copyedited material was possible. Until that time, organizing paragraphs, cutting and pasting sentences into the appropriate spot and making sure the text flowed was quite time consuming.
Alternatively, I believe a good creative writer from University is the closest thing to someone who is qualified as a blogger. Although they may lack some tricks about tags and writing text, they have a better chance to do what really counts…producing thousands of good words per day.
By comparison, if I wrote this article when I was starting to write(after 3 years of University and passing English ECT) it would have taken the better part of a frustrating day. This approximate 500-word article took about 15 minutes to write, edit typos and publish. It is not perfect, but Google will index it very quickly(without a sitemap) and search engines will find new, copyrighted material. At 500-words in 15 minutes, 1500 words an hour is possible with bathroom and coffee breaks. In three hours that could be the equivalent of a 5000 word term paper for a 4th year final.
Does this help reinforce some more truths about SEO? I am just trying to help explain the truth since it could be hard to see the bigger picture, especially if many SEO companies are annoying spammers who seem to focus on ‘Trix’ rather than truth.
In today’s era, so much focus regarding SEO is about magical techniques, Google algorithms, etc. But, such little focus is about getting the words to the page.
All in all, I believe a skilled writer is sitting in a much better position to create SEO content than a staff with inadequate writers that knows SEO. You can look around and it seems obvious that many people entering web design, web development and SEO are not skilled writers, but, rather more focussed on assembling a website.
As a person who has experience in web design, web development, SEO, blogging, technical writing, I can honestly say that being a decent web content writer is no easier than being a good web developer. Being a good web designer is the easiest of the three. Take that comparison lightly since I am just speaking from experience.
With Joomla, there are many custom Joomla specific extensions that work fine upon installation and / or modification. In some cases, there are extensions which are bridges. The bridges allow a user to integrate a separate PHP/mySQL script(from another installation) to be used inside Joomla as a component. The bridge is a quick fix, but some need database updates, etc. An example of a bridge would be to use a current phpBB forum installation with Joomla and synchronize the members.
In other cases, php scripts can run inside Joomla by placing them individually or within folders inside the parent Joomla installation directory. If a folder is used, the index.php will show up if the url is mywebsite.com/myfolder. If the databases do not need synchronization, this is the simple approach to adding scripts inside a Joomla installation. The next issue will be css styling. An example of this would be to use a WordPress blog inside a Joomla installation. If the blog was only used by the system administrator, it could use its own database or its database tables dumped into Joomla`s. It would not be a real issue, but the two installation would use different templates. The administrator would need to make them, match. Unlike WordPress, a php framework like Codeigniter could easily modified top use the existing template from Joomla(or any cms for that matter).
Other alternatives are to use a PHP framework inside Joomla, although practically any php/mysql script could be dumped inside the root folder and accessed with an external link from the main menu.
The procedure to use the PHP framework would be similar to using another php script. Frameworks offer so many advantages; such as simple integration, although some scripts in pure php/mysql would integrate faster and easier than converting them to Codeigniter.
A php framework can be used with or without a database. The php framework could simply run off the existing database, thus allowing for unlimited possibilities.
With Joomla, you can practically recode any php / mySQL script to be used as a Joomla extension. To do this, you must know how to create and package a Joomla extension as a module, component or plugin using Joomla classes. A rebellious way to say this is `To make a Joomla extension, you must do things with our code!`. Joomla has a system and it is fine to follow its rules for those previous specified extensions.
But, what if I want another alternative to add a php/mySQL script without so much rigidity? For example, I may want to use it for WordPress or Expression Engine and I don`t want to recode for the CMS each time? Then, moving the php/mySQL script into a php framework like Codeigniter or using a stand-alone php/mysql application is a valid solution; unless you want to make extensions available to others or for profit. By using this method, the application could be applied simply to other content management systems. Another positive aspect is speed and raw language coding. Converting a php/mySQL script to Codeigniter application can be done very quickly. The php/mySQL files will use MVC, but the database connectivity can be used within the view files. Basically, one or more controllers could be used to call the view files which will be slightly modified versions of the original php / mysql files.
Codeigniter comes with all sorts of classes to make a custom blog. Once a blog is built with appropriate styling, there could come a time when the view file needs altering in order to display the blog title in the page title(for order and SEO). (more…)
The blogger is the freelance-style writer who writes about a topic of interest or a topic for which he receives a paycheck. Writing the blog is like writing a magazine article. The article could be short or long. This type of writing is often satisfying since a writer(especially on his own terms) can just write what he wants.
Normally, there is some sort of intention for blogging articles; such as taking notes and making articles that a targeted audience will find. Desired traffic to a website is always a good thing. Since blogs can be organized into categories, they have the potential to be anything like a collection of short stories to a full online book.
Blogging is a lucky talent for some people since they can write Google-keyword-targeted content without much hesitation, while most people despise writing, well before the days of a 5,000 word university history paper.
With a little savvy, bloggers can add text, embedded video, sound and commenting into each blog post. The positives are plenty. It can be fun in the beginning, but as website gets over 100,000 words, assembling a linking strategy, artful SEO and the power of search indexing increases dramatically.
A technical writer creates technical documentation for online and print media. The output would depend on a company’s needs. For example, manuals for boilers could accompany the item during sale and the online documentation could be revised and updated as required.
Two popular software applications for writing such documentation are Microsoft Word or Adobe Framemaker. They have been around for quite some time. At other times, some companies prefer web savvy developers to create online documentation with Content Management Systems which can easily be edited. A content management system allows for specific users to be able to access and edit specific content; while a head administrator can over-look and have access to any content.
Regardless of what software and applications are used to create documentation, most companies always want someone who have some knowledge about the topics; such as chemical engineering company seeking a technical writer with an engineering degree.
You see tabs everywhere, especially large websites like MSN and Yahoo Sports. Normally upon clicking, tabs allow websites to display content within a particular module. The benefit of tabs is that the page can hold much more content than a page without tabs.
To achieve the tab effect, Javascript may be used within a module to swap the view of the area upon a click. With some tabs, the text may load into the document and into the space when the page loads. With other tabs, the content may only display when the tab is clicked. The tab with the loading content would be the beneficial tab for SEO.
Many modules and tabs can display any dynamic content; from text to video. Many such open source scripts are available for static html/css sites to content management systems. If the code is available to use and modify, the site admin should look at it to make sure it is optimized and minified so that performance optimization is given a high priority.
Blogging is about the simplest and fastest way to create new pages for a never-ending Search Engine Optimization(SEO) program. The hard part is being a good writer or blogger for which propper grammer is used with words that flow continuously.
With blogs and blogging platforms, new pages can automatically create new pages with the desired titles. Since Google has standards, and learning those standards is not rocket science, starting an seo program today for tomorrow’s future is always a good idea and satisfying as you watch a website blossom.
With blogging, you can create new articles with titles, keywords, descriptions and various tags (h1, h2, b).
MORE IS BETTER APPROACH
The more is better approach is a method for which you do your best to write relevant content for a specific audience. It is a very simple procedure to get people to your website. For those who shun writing, you can always have someone else write it for you.
1) You do your best to write perfect editorial copy with appropriate tags and title the first time. You want it perfect, but the odd typo won’t be the end of the world. But, too many typos will look amateur. Then, you can add the content to a sitemap, but often, Google will pick it up soon enough without revising the sitemap.
2) Instead of focussing on the past, you go forward. This means you keep writing new articles. Google likes sites that update with new content on a regular basis. Also, you may find writing 2 pages on a similar topic attracts more traffic than 1 revised article. You can attempt to see how popular keywords are using various tools, but at times it can seem like a lottery to see how well pages rank. Being on the first page or near the top is always satisfying. In some cases, there is not a pure recognizable formula. But experience shows that writing more articles that are similar to others in content and linked together, will pull each other up as will an anchor link from a website using the same text as an article title.
Patience is always a key too. A website that gets stronger and stronger with good internal linking and plenty of updated content can show newly indexed pages within days. It seems harder to build from the beginning rather than building with a solid foundation. For example, a new site with the same content may not rank as high as a 3 year old site using the same content.
3) Read the stats. It is not uncommon for a 150-450 word article to attract 6-25 unique visitors a months. This translates into 72-300 unique vistors for one article per year. With an article a day which is like writing a small book, the numbers could be near 25,000-131,000 unique visitors. These numbers are very rough, but it gives the idea regarding expansion.
What all this means is that the web is still owned by those who can write. Although the technical aspects of SEO are always changing and play a significant role, text has always been the key ingredient to organic Google search queries. Without text nothing shows up in the organic search. Although the web has many people mesmorized, hypnotized, or whatever, writing is still something that hinders SEO since it is a completely different creative activity than web design, web development and software development.
The first assessment to finding a web designer in Vancouver (or anywhere for that matter) is to know what you need. If you need a website with 4-5 pages that will display text and images without future changes, a web designer should be able to complete the task. But, if you need more, such as content management system, you must determine how much more you need because the skill levels vary.
Determining their Skillset
It is a good idea to ask what technologies would be used to build your website. If you need a content management system, it will use a database and server side language like PHP/mySQL. You will want to know what you need because people who use content management systems can be anything from users editing text and images to software developers creating elaborate custom programs. Since the html/css hand-coder is competing with the kid next door, knowing how your website is built will give some indication to the designer’s experience. However, a good portfolio will show the type of work that they do. Web designers who this sort of work are plentiful and prices vary dramatically. Often, it is very affordable to have it done with HTML/CSS and doing it yourself would be a waste of time. The web is cluttered with amateur-looking websites done by those who decided it was within their grasp. If you want to have changes made in the future, you may want someone trained from a decent institution, since they will use hand-coding techniques and can update websites much faster by manipulating code rather than manipulating text and images with pointing and clicking. The code is much better too since it would not contain bloat generated by a computer.
HTML/CSS Conversion
Another option is to create the website yourself in Photoshop and have it sent out for conversion to html/css. A site like this can look identical to the original Photoshop PSD file. This can be okay, or not. Photoshop is often the source for CSS, WordPress and Joomla templates. The code should be modified after conversion. For html converted pages, pages could end up with separate stylesheets and that would mean a lot of editing later for a very small change. Imagine having to pay $100 for changes when you could have logged in and made them yourself, or with your web developer in less than 10 minutes.
Downside to HTML/CSS Websites
The downside to a basic website built with html/css is that it does not easily allow for expansion of new content. If SEO is important, then a system for which you can expand the website into hundreds of pages and thousands of words. If you need more than the basics, the next stage of progression would be to use a content management system or blog.
Content Management Systems
Some of the major players here are Joomla, WordPress, Drupal, Plone and Expression Engine. Any one of these CMS can allow for a strong SEO plan and allow quite a lot of flexibility in terms of making changes to any part of the website. Here is a zone where web design and web development merge. A web designer with design skills may be able to style with images and text, but may not be comfortable in other programming languages like php and mySQL. In addition to that, a skilled programmer could add and alter custom components and templates. Here is a real division and you should highlight this part.
Determining their CMS skillset
Having someone build your cms can result in low to high pricing. Here are some details that shows what questions will help you determine a web developer in Vancouver who can deliver what you need.
1) I need a CMS. Can you create the cms. If so, do you use the default database prefix, or make a different one? This is a security issue, and most hackers take advantage of the default prefix for sql injections since they already know the database prefix.
2) Do you hand-craft templates, use software, buy them, or any combination. If they hand-craft them or hand-craft with other methods that is a good sign. If all you care about is a website with style and changeability a good template maker may be the only extra skill you need.
3) Can you customize or create extensions for the CMS. If the answer is no and you need a specific feature on your website like video lists, this could be an issue. Here is where an area where skill levels vary dramatically and it can be very difficult to know if the web developer is qualified.
Some people may search forums and spend time trying to copy and paste answers with little or no programming knowledge. It is like it sounds, a person without a clue of the language is taking online advice and trying it out! In some cases it could work, in others it could turn into a big issue between web designer/developer and the client, sooner or later. In some cases, a skilled programmer could do the job in 1-2 hours where as someone not qualified could spend 20 hours looking for a solution. In the end, the solution may not work and they would look elsewhere to find a programmer to fix the issue(and you may never know about it).
If you want the bells and whistles like blogs, forums, custom directory application, custom CRUD applications you are much better off with a qualified web developer who has a list of samples to show. The learning curve between a simple web designer using html/css and maybe some Javascript and a well-rounded dynamic web programmer using a language like PHP, perl, mysql is huge. Not only is it a huge gap, but the skill variance within the language is huge. With WordPress, Joomla, Drupal and many other content management systems exhibiting a huge influence on the web, many web designers without adequate php/mySQL skills are trying to use the PHP/mySQL technologies to the best of their ability without knowing the code.
Caveat Emptor!
Beware of any website designer in Vancouver that does not hand-code, but just uses simple methods like installing the CMS, adding a commercial or computer generated template, installing components for which they do not know how to recode or check for security. A hand-coder is always more efficient and there are a glut of people who build websites on a whim without knowing how to optimize the server, website files, templating, database and coding. They know how to assemble, but that could lead to a slow, unsatisfactory website.
The requirement above covers most jobs. But, for more custom applications you would need to seek a web developer to deliver your custom needs. Here is some more info to find a web developer.
Now that I got a few details out of the way, I hope I made your ability to select an appropriate web designer or web developer a little easier.
For any database driven website, the database is a backbone that must remain secure. That now leaves the question whether or not to use one database or multiple databases? The school that invented the first Apache server, first website and is still amongst the top computer programming schools in the United States had me convinced that more databases is a better option since it made for better overall security of data; especially if backed up elsewhere. Personally, I like one website to have at least one database. One is often more than enough. But, if you decided to use 2 frameworks for 1 website, 2 could be the better option. Multiple databases is one area where Drupal excels. Some people like using 1 database for their various installations. One downside to this could be that someone with access to the database could alter it in such a way that it ruins things for everyone. Imagine every client not being able to login. If a clever hacker had you make his website with Drupal and he requested a backup upon payment, you might want to think about him having his own database since the connection username, password and database name may be the same, especially with shared hosting.
Anyways, like a good boy, I believed that all files, 1 database with specific passwords per site and backed up sql files and a good log file is quite good to ensure the sites can stay up and running. Keeping all the files in the public_html folder for each website with the databases can allow for quick recovery. And, always expect the worst so that you can fix the mess if you must.
Codeigniter applications can be integrated into various content management systems; such as WordPress, Joomla and Expression Engine. (more…)
There may come a day when you would want to use an Artisteer template.css file for other applications, or to know how the styling works. By default, Artisteer sets the main menu to the user3 position. Although you can change the main menu position name, let’s assume it is in user3. You can find some details about the main menu in the mytemplate/html/mod_mainmenu/default.php file; although it is not that important to do so.
With this example, it is assumed that you want to use the Joomla template with a Codeigniter component. Since the component uses Codeigniter classes and some raw php, we just wanted to plop it into Joomla without having to rewrite classes (such as connecting to the database, selecting from the database, making new controllers, views and models) which would take significantly longer than using something that has already been thoroughly tested and works as desired.
In the Codeigniter view file, you would simply paste in a menu in the desired position within the view file.
Note:
In order for the Codeigniter component to use the Joomla template, it must load the appropriate files within the head tags which are located in the view file.
In this particular case, the menu lies just above the content. The template for the Codeigniter component will look identical to that of the rest of the Joomla website which contains Joomla components. The code could resemble something like the code shown below:
<div class=”art-nav” >
<div class=”l” ></div>
<div class=”r” ></div>
<ul class=”art-menu” >
<li class=”item1″><a href=”http://localhost/mysandbox”><span class=”l”></span>
<span class=”r”></span><span class=”t”>Page 1</span></a></li>
<li> <span class=”art-menu-separator”></span></li>
<li class=”item2″><a href=”http://localhost/mysandbox”><span class=”l”></span>
<span class=”r”></span><span class=”t”>Page 2</span></a></li>
<li> <span class=”art-menu-separator”></span></li>
<li class=”item2″><a href=”http://localhost/mysandbox/codeigniter/index.php/ciexample_test”><span class=”l”></span>
<span class=”r”></span><span class=”t”>Page 3</span></a></li>
<li> <span class=”art-menu-separator”></span></li></ul>
</div>
<div class=”art-contentLayout”>
For most languages that do not use special characters, the default mysql settings will work fine creating and using mysql database tables. However, they can be created and modified to accept other characters like
Joomla 1.6 is now the future for Joomla. From now on, most developers will develope extensions for the new version of the Joomla CMS. This article is not to reinvent the wheel, but, rather point to a solid page with the required information required to perfom such an upgrade.
Upgrading Joomla 1.5 Modules to Joomla 1.6
To upgrade a Joomla 1.5 module,
1) Open the module xml file.
2) Change the description tag by adding underscores
i.e. <description>PLEASE_GO_TO_MY_MODULE_FOR_DESCRIPTION</description>
3) If you are using a lanuguage file, the underscores must be changed there too in addition to added quotations and # changed to ;
; BWS
; Copyright (C) 2011 BWS
; License GNU/GPL
; Note : All ini files need to be saved as UTF-8
PLEASE_GO_TO_MY_MODULE_FOR_DESCRIPTION=”<div id=”holdthem”><h1>MY Module for Joomla 1.6x</h1>”
4) Convert the Parameters
a) change “<param ” with “<field “
b) change “</param>” with </field>”
c) change “<params> with “<config><fields name=”params”><fieldset name=”basic”>”
d) change “</params>” with “</fieldset></fields></config>”
e) change “<install” with “<extension “
f) change “</install>” with “</extension>”
5) The method to retrieve parameters is the same as Joomla 1.5
i.e. color:<?= $params->get(‘modtextcolor’); ?>;
Alternative Module Templates for Joomla 1.6
f you have various templates in the tmpl folder, you need to modify the main php file. For example, if your extension is mod_myextension you would edit mod_myextension.php.
The code you add to the file is shown below.
Change
Change to:
require JModuleHelper::getLayoutPath(‘mod_mymodule’,
$params->get(‘layout’, ‘default’).’_items’);
The files need names like my_second_templatefile_items.php
The code needed to add the template files in the xml file is:
More details regarding how to upgrade Joomla 1.5 extensions to Joomla 1.6 extensions can be found here.
WordPress users dominate 8.5% of the web. This stat was made made public by CMSWIRE.com in article on September 2010. My prediction is that this number will continue to climb since WordPress is a top 20 website, which hangs around other elite company like Google, Yahoo, Facebook and MySpace. Now that WordPress has partnered with Microsoft, users can now publish posts from Windows Live. WordPress also has apps for Android and other devices so users can create and publish content.
However, the numbers can be misleading because WordPress hosts free blogs and many people jump on the free bandwagon, then get hesitant to pay for a real website and hosting.
Although I like WordPress and its simplicity, I still think Joomla and a paid blog is a better option since it has great seo, styling, and comment controls. All in all, a seasoned WordPress programmer and a seasoned WordPress expert could spice a blog quite nicely with specific user rights and comment controls.
According to the website ostatic.com, Drupal powers 1% of the web. Not only does it power 1%, but it powers many significant websites built by large corporations and publications.
According to a published heading on February 10, 2010 from the website joomla.org, Joomla powers 2.6% of the entire web. This is not such a surprising stat since it is a CMS and is quite flexible. With the new Joomla 1.6, it will be interesting to see how much committment carries on to extensions to Joomla 1.6. Here is a page that explains how to upgrade extensions:
Upgrading Joomla Extensions
Explorer stylesheets of any version can be simply added to most index.php files with:
Using PHP to redirect pages based on browser can make life simpler in some circumstances. The following samples below show various redirects for various browers.
Moving Zen Cart to a local server or remote server is an easy process. All that is necessary is to move the files and database over to the new server. If the passwords and database have the same names, the setup will go seamlessly. However, 2 configure files need to be updated. The files are /admin/includes/configure.php and includes/configure.php. Both files look the same. The main lines of code to change are:
Since the includes/configure.php operates properly with permissions 444, it is recommended to change them to 644 during editing, then back to 444, or an error message will persist.
Another method is to do a clean Zen Cart installation and update the template and database.
Joomla does a pretty good job at presenting web pages at a decent speed. I find it unfair when I read articles about why to use this CMS rather than Joomla, or other such negative commentaries regarding the speed of Joomla. To keep the arguement very short, Joomla can run quite fast when the proper environment is used regarding its operation. Personally, I have found 3 variables to be the key factors in determining Joomla loading speed.
Hosting
As a normal part of the learning curve, shared hosting may be the plan for which a web site is hosted. In this case, shared resources can really affect performance. VPS or dedicated servers will allow you to have control and to monitor which processes eat up the CPU. Operating a VPS or dedicated server is more responsibility and requires knowledge regarding how to maintaining a Linux server, but well worth it if there comes a time when optimizing your server for performance is a top priority.
Template
Templates can be hand-crafted, purchased, or made with software. Hand-crafted templates will give the best performance….period. For example, I built a template with Artisteer, then, made the same hand-crafted design and the YSlow rating was 76% for Artisteer and 95% for the hand-crafted version. Hand-crafted templates can have many less lines of css and less images. When a custom template is used, the web developer needs to know where and how all modules, text, components and images will be positioned during template construction.
Components/Modules
Component and module usage will affect performance. In extreme cases, like Joomla statistics, large database queries can really slow a site down.
Conclusion
Joomla sites can rank quite high in terms of speed if the web developer makes adequate files and uses an adequate server.
This is a simple way to change an addon domain user password in cpanel.
To change the password,
This should change your addon domain user password.
When it comes to building websites with various forms of content, the road often leads to 3 choices;
 Although each method would have its own strengths and weaknesses, the PHP framework is a great place to build, build and build. Since each controller will actually be the name of each web page, it makes it nice and convenient to build reusable pages which are easy to find and edit. For example, you build a contact form with specific validation. Then, you reuse it later but the client wants different validation and fields. The changes would be very simple to change update and even transfer to another Codeigniter installation.
Furthermore, it uses the MVC approach to display web pages.
How does MVC work? The (C) is the controller and is the workhorse.
If a database is used, the controller does a short call to the model.
To get the code from the model into the controller,
$this->load->model(‘My_model’);
Then, the controller sends data to the view. Now, the view returns data back to the controller that sends the desired data to the browser.
If a framework like Codeigniter is used, the model can be bypassed and the database can be accessed from the controller. However, using models just to access a database or xml file, controllers to load and organize the page to the brower and the view for HTML/CSS makes it simple to separate php, database access and style.
To access the database,
$query = $this->db->query(‘SELECT, UPDATE query goes here’);
With a framework like Codeigniter, there is not too many limitationss since a controller can call a view file which accesses a database, makes a database queries and contains html source code. In this case, using a view is almost like using pure php; except the controller is the page name.
This is a simple way to change an addon domain user password in cpanel. 1) Login into cpanel 2) Click FTP Accounts or Find FTP accounts or FTP Manager 3) You will see a page with a list of your addon domains with that particular account. 4) You can change your user password from change password option there. 5) Make a new site with FTP 6) The website will be whatever.com 7) The username will be thedomainname@theaccountname.com/ca/org/etc
For example, a website called mysite.com hosted in the master account mymasteraccount.com would have a username mysite@mymasteraccount.com 8)Now, the client could login from any FTP software with those authoritative credentials.
Using the mysql query cache can enable the website to grab the queries from a cache rather than having to query the database over and over again. Grabbing the data can work for ‘SELECT’ statements. To enable the query cache, the administrator needs root access. Root access can be aquired with Putty or some other SSH tool.
To see what variables are present in the mysql query cache;
mysql> show variables like ‘query%’;
Look next to query_cache_size and see its value. The value 0 means it is not enabled. A value like 2,000,000 is 2 mb.
To set the query cache to 2 mb;
mysql> set global query_cache_size=20000000;
To see info about the query cache like the amount of free memory and number of queries
mysql> show status like ‘qc%’;
To dump the cache is as easy as setting the global query_cache_size to 0 then setting it to a new value.
Depending upon the default settings, the query cache may be enabled or disabled. To see if query_cache_type is enabled,
mysql> show variables like ‘query%’;
The 0 value is enabled. To enable it,
mysql> set global query_cache_type=1;
or
mysql> set global query_cache_type=2;
If the number does not change, it could be that you logged in with an updated administrator password, rather than the mysql password. To fix this, login to the server with SSH, then, type
$ mysql -u root
Whether you need to get through school or you need to modify a commerce application, adding columns into mySQL is something that must be done to custom tweak databases.
The following 3 commands can be used in at the mysql prompt or made with an sql query with phpmyadmin.
ALTER TABLE mytable add column newcolumn varchar (20);
ALTER TABLE mytable ADD newcolumn VARCHAR(25) AFTER secondcolumn;
ALTER TABLE mytable ADD newcolumn VARCHAR(25) FIRST;
Alternately, the column can be added with php my admin. Just add the custom field(s) and attributes and click Go.
Joomla has a wide variety of extensions available for tagging articles and having tag lists on any page. Joomla Tags is one such extension. The extension could need lots of extra configuring to get it working as desired. Personally, it has a consumed a couple hours on my end to get it functioning how I wanted it to work on a particular website. One issue that must be dealt with is that the tags seem to only work properly with all articles that belong to a category and section. Uncategorized articles do not tag; at least not very easily.
The Kunena plugin works quite well with jomsocial. However, there are a few items for which to take note in order to make the most of it; such as new posts and deleting entries from jomsocial recent activities. For one, a new entry will be published in recent activities on the original save. The only way that I can see to update the entry is to copy the finished entry from the Fireboard or Kunena table named fb_messages_text and move it into the appropriate entry within the communities_activities table which is part of jomsocial. If images are used, they should be transparent unless the forum and jomsocial activities have the same background.
Writing directly to the database via phpmyadmin or using the mysql prompt can also save quite a lot of time creating entries rather than using a clunky backend administrator zone.
Finally, if you happened to leave the forum open for public access, you will notice these entries will show up in the Activities in JomSocial as well. Chances are that if you allow public access, someone will do ‘greasy kidstuff’ like write bogus links and text. Or, some spammers from eastern europe could create a bunch of annoying links. Either way, if the spam gets out of hand, the fb_messages table will leave an ip address of the spammer so that it that can be added to a list of banned ips.
If there a con method to acquiring links, it can be done through blogs and forums. Just recently, I received a new registered user who had made some posts on my forum regarding problems with a module. This post, like other similar posts, had similiarities. Although the problems varied, they all had went out of their way to add links to their website. I helped them sort out their problems, but I was left wondering if this was all about trying to piggy back off my Page 6 Google Page Rank and help their own seo. I was not too concerned since they always help my seo process by contributing. But, I just don’t like scams…period. An artful way to deal with ‘The Artful Link Dodger’ (taken from the Artful Dodger in Dicken’s Oliver Twist) is to have all www change to ww. Now, the link dies and the scam can be minimized.
To access any email account in cpanel,
1) Go to the address below with proper configured port number.
http://www.websiteaddress.com:1002095/
or
https://www.websiteaddress.com:1002096/
2) Enter username and password
3) Enter email and password.
Here are the new usernames and passwords:
Email: name+websiteaddress.com or name@websiteaddress.com Password: poiu1290
For speed and performance, gzip is an obvious choice for compression with websites using cpanel. In some cases, like reseller packages, this may be enabled when you buy a hosting plan. In other cases, it may have to be enabled.
To enable GZIP,
There may come a time when you want to disallow horizontal scrolling in the browser. One reason may be that you use a fluid template. Another reason could be that it looks messy if someone scrolls to the right.
Simple, you can go to the CSS stylesheet and write the following in the body id or class.
overflow-x: hidden;
Now, you can reload the page and the horizontal scroll bar should be be gone.
SSL certificates come in all sorts of price ranges. For commerce sites and other websites where you want strong encryption when dealing with sensitive information, they are a must addition. However, there may come a time when you want encryption on your website just for administrator logging in to zones like the Drupal administrator, cpanel or Web Host Manager. In this case where you may feel a commercial SSL certificate could be overkill, there is always the option to setup a self-signed SSL certificate with Web Host Manager, SSH shell or SecureFTP / SSH.
With WHM, the procedure is as follows:
The new self-signed certificate can be used for incoming / outgoing email, logging into WHM and Cpanel. To make a self-signed certificate for a particular website, the website needs a dedicated IP address and it should have its own Cpanel account created in WHM. Then, the previous installation and setup steps can be used to have a SSL that will work on that site, Cpanel, and incoming / outgoing email servers.
The annoyance of a self-signed certificate is that you must follow steps to use it when typing https into the browser or sending email. You will have to accept it on each browser and perhaps on various occasions. One advantage to using self-signed SSL is that you can use a different port to access Cpanel and WHM rather than that from the unsecure url. One disadvantage of a self-signed SSL is that it may not work on each browser; such as Google Chrome. But, it should work each and every time with Firefox.
After the release of Joomla 1.6 RC1, I had come across a significant roadblock in developing a website…. extensions. With Joomla 1.5, there was always the ability to manually insert extensions into administrator and components folders or with the backend installer.
But, with Joomla 1.6, the installer will not install Joomla 1.5 extensions without recoding installers, nor can components be manually dumped into the proper folders and using the Discover setting. The discover setting will pick up the extensions, but the component will not install.
I could only hope these issues will iron out in time, but, in the meantime it looks like Joomla 1.6 has nothing on Joomla 1.5 that has an additional ACL component.
After waiting patiently for 1 year for Joomla 1.6 to be released; RC1 finally came about. Since I had a site that needed a strong user management like Drupal, I had decided to use this version. The alternative would have been to use a Joomla component from Core PHP for $79. However, the news ACL in Joomla 1.6 looks more simpler than community ACL. Although, it is recommended to use the new simplistic RC1 for a production site, in case some security holes are found, I had decided to anyway. Since I will not allow public access to login scripts and would use Linux to block users initially, nobody would have access to frontend or backend locations where most hackers tend to buzz inconveniently. Finally, I would stay on top of any new patches just to be sure.
After first glance using Joomla 1.6 RC1, I decided to test some old templates. Issues existed immediately due to my infamiliarity with Joomla 1.6. For one, if templates are moved into the template folder they will not show up unless you go to Extenions->Extension manager->Discover->Select the template->install. I really was thankful it offered an option to allowing me to use a template without packaging it perfectly. After using Discover setting, you can go back to the template manager and make that template the default site template. I installed an older Artisteer template and it installed, but had a php error. Since I was experimenting, I did not look into the issue. But, it looked fixable.
Another template issue I had noticed was that if I went to the template manager and had any text in the ‘Filter’ box, it would not allow me to select a template. Oh well, I remember that if it happens again. That is one benefit from blogging.
After trying adding a second template manually, I had problems deleting the file. I removed the folder and tried clicking delete in the template manager, but with no success. But, I could remove it manually with php/myadmin or mysql with the command DELETE from template_styles where template = ‘templatename’;. Upon refresh in the Joomla backend; dealing with the manual installation is done.
Next issue I had was that when I tried to manually or with the installer, the templates would not install properly. I found that strange considering both methods worked previously. But, I was able to move the template folders into the master template folder and manually add an entry into the database table template_styles. After adding new entries, they show up in the template list.
Finally, I have noticed a lot of issues with templates compatible with Joomla 1.0 and Joomla 1.5 or Joomla 1.5 moved into 1.6. The only one I did not find had issues was a custom template that was very simple with a single index.php, images, css and html folders. Those templates that had OOP classes derived from commercial software like Artisteer or from a commercial template salesman were not compatible on a first test. With Artisteer, editng the functions.php file will make it work without php error. The code I added was replacing $mainframe->getMessageQueue(); with JFactory::getApplication()->getMessageQueue();. However, the css will need editing to make the template look as desired.
Therefore, if you make a custom template or edit an existing working template, you will be on the right track to building the website.
HTACCESS is a file located in the root directory that allows webmasters to do more advanced features such as rewrite urls, deny ip adresses and add header expires(for faster loading). However, there is some order to follow since the deny ip addresses must be on the bottom. If not, they will write to that location when you deny an ip address in cpanel. If the deny ip addresses are not on the bottom, you may see the following error message.
Internal Server Error
The server encountered an internal error or misconfiguration and was unable to complete your request.
Please contact the server administrator, webmaster@website.address.com and inform them of the time the error occurred, and anything you might have done that may have caused the error.
More information about this error may be available in the server error log.
Additionally, a 500 Internal Server Error error was encountered while trying to use an ErrorDocument to handle the request.
Apache/2.2.17 (Unix) mod_ssl/2.2.17 OpenSSL/0.9.8e-fips-rhel5 mod_auth_passthrough/2.1 mod_bwlimited/1.4 FrontPage/5.0.2.2635 mod_perl/2.0.4 Perl/v5.8.8 Server at www.website.address.com Port 80
WordPress took 2nd place in 2009 for the CMS of the year which is hosted annually by PackT Publishing, a world leader in computer technology text books. As usual, Joomla and Drupal were battling it out, but WordPress had surprised some people.
But, when you look at the plugins that can be used with WordPress, it has the ability to be used as a simple blogging platform to ecommerce to a community website.
Taking an analysis a step further according to Alexa, wordpress.com is one of the Top 20 most visited websites in the world for July, August and September 2010 while joomla.org ranks at 258 and drupal.org at 469.
Some interesting stats according to Alexa is that Drupal viewers tend to have a large selection of users with a grad school education, male, and between the ages of 25-34 and are browsing from home. Joomla’s audience is similar to Drupal’s with the exception of a higher percentage of users between the ages of 35-44 and that most of the users view from work. Finally, WordPress does not tend to have an excessive amount of male or female viewers (more equal than Joomla and Drupal), a more younger crowd as the 18-35 crowd is over populated and most viewers browse from school.
A top 20 website is a force and if younger viewers are gravitating towards this system of choice, the writing could be on the wall to which cms could dominate for years to come. Looking at recent years, it looks like WordPress could become a very mainstream tool just like Facebook and Google; since they now all share a spot in the Top 20 websites.
Having worked extensively with open source cms technology, this is not surprising WordPress is the easiest CMS to use. Even if WordPress is used quite often as a blog, it would be a logical step for any one having used this blog platform to want to stretch out and expand a website into a CMS with familiarity.
The downside of using any open source cms for a quick solution is that knowledge of html, css, php and mySQL is necessary at some point along the web design and development process or the website will have no functionality beyond image and text changes. In some ways, the explosion of popularity of open source cms can help a lot of PHP/mySQL developers stay with work because modifying a simple site can help make it more important to have a larger skill set than html of the web 1.0 era. By seeing a potential trend of having static html/css websites obsolete, a company could have a lot of difficulty making it without PHP/mySQL skills.
If there is one business where there is a huge gap between client and company, web design / development could sure be located high on the list. As time goes on, technology and techniques change so frequently that even web designers and developers must continue learning and keeping up with the changes….or give up.
For the regular Joe wanting a small business website, he could call 5 companies to enquire about small business web design and end up with a head full of terms like, html5, html4, JQuery, PHP, WordPress, Joomla, mySQL, MSSQL…just to name a few. Unfortunately, this is really nonsense since what matters is determining if the company can do the desired job. What the small business owner must do is realize that it is probably useless to go the direct html/css route since this method is rather disposable while using a CMS is recyclable and reusable. Since change is inevitable, having a website that is simple to change is the way to go. If you can find a company that knows their way around 3 of the biggest and cheapest; Joomla, Drupal and WordPress you have now gotten 1 step further.
Now, another division can be made here since so many many web designers can point and click their way around building a website with a CMS. What separates the men from the boys here are companies who can add, create and modify custom extensions for these Content Management Systems or even add custom PHP/mySQL programming to the CMS. If your designer can do all that, you can build your website or make it have those features you want. If your designer cannot code php/mySQL, then, your site will be rather ‘canned looking’ or unable to do those custom requests.
In some cases, a company with a large budget or a very specific request just may need a custom PHP/mySQL website to do the task so that it is very lightweight and functional.
Although this article had a heavy emphasis for open source cms, a .net website would be sufficient for anybody wanting to go this route. With .net database driven websites, a programming language like C# or VB is used instead of PHP and the database is typically MSSQL rather than mySQL.
Joomla templates can made with commercial software, hand coded, downloaded for free, or purchased. Purchasing a template can save a lot of time if the template does not need much tweaking. Although software exists to make template rather quickly, the result is often quite bloated. If the template will not need much editing in the future, then this may be a way to go if you are prepared to spend the $200 for such software. However, if you want to change the template later, there could be thousands of lines of code in the css file which can make this a chore. In this case, knowing CSS is a must. See our free Joomla templates.
Joomla has a large forum for members to ask questions about the Joomla CMS. Since we are part of the Joomla community and have created several Joomla extensions, our members can partake ion our forum to ask questions regarding how to use our extensions. See our Joomla Extensions Forum.
Joomla 1.5 extensions are custom programs that can be installed into the Joomla CMS. The custom programs are written in PHP, HTML, CSS and perhaps Javascript. These programs can be anything from popups to automated shopping carts. We have several extensions that are available to download for free.
In some cases, some extensions work perfect right from the box, while others need to be modified significantly so that it looks and works like you want it to. Although this sounds convenient, web developer should look over the code and make sure it is very secure and protected from potential SQL injections, etc.
The simplest Joomla module contains 3 files.
1. XML manifest file 2. PHP file (main controller file) 3. 1 Dummy HTML file
XML File
The XML manifest file contains the parameters and installation instructions for the module. This file must have the same name as the folder which contains all module files; such as mod_popper.
HTML File
This file is just a line of code to make sure others cannot see files within this directory, but it does function with the module itself.
PHP File
The PHP file is the controller file like it was designated in the parameters in the XML file. This file could be something like a self-checking form or another program. Alternatively,
More instructions can be found here:
Build a Simple Module
Alternatively, all modules (except custom modules made in Administrator) show their files in the modules folder. If you had more than one template, a filelist could be made in the XML manifest file.
NEXT STEP
If the module is to have a list of templates or a template path, this code would be added to the php file:
require(JModuleHelper::getLayoutPath(‘mod_module_name’));
The folder would be called tmpl and would have the default.php file and images for the template. These file names would be added to the xml file.
Joomla has a decent contact that form that comes with the CMS. But, you may want to upgrade one day as you may find the odd piece of junk email gets sent for which the user effortlessly fills it out with a couple of letters in each text box and sends it. The built in form can be upgraded with a plugin and component like tinCaptcha. The captcha ensures that the person is real. However, unless you have some competency in editing source files, you will find it difficult and time consuming to add new form fields. Therefore, wouldn’t it be great if you could just add custom forms with normal HTML/CSS, Javascript and PHP syntax? Well, that solution is very feasible with a plugin like sourcerer. Sourcer allows you to write Javascript, HTML/CSS and PHP just the way you want it. WordPress and Drupal have similar plugins and modules for writing similar code. Back to Joomla and Sourcerer. To make a custom form, you can create a new article and use whatever code you want to use between the sourcerer tags [source][/source]. Then, the form will be validated using the POST method using a content article with a specific id. The content article will use sourcerer tags to contain the php code which is used to validate the form. The code call the php file which validate the code may look like:
form action=”index.php?option=com_content&view=article&id=206&<?php echo date(‘l jS \of F Y h:i:s A’);?>” method=”POST”
However, if you made the form in an article using Sourcerer tags, the page would be cached. Therefore, if you would use this if page caching is ‘off’ or something very low like 1 minute. If the cache was set to 1 minute, only the first email in the next 60 seconds will be received and the next email after 60 seconds would be received.
Now, although this works fine, there in another rather simple option to use. That option is to make a custom module (they are not cached unless specified to do so). You can make a Joomla module here.
Now, you know how to use forms within Joomla reusing code from your repository. If you want to add Javascript, you can also do so in the article, if the Sourcerer plugin is set to accept Javascript in Articles (normally, it is by default). You can make sure the user fills out the form properly with error checking like “Please make sure your email address uses @” or “Please make sure your phone number is exactly 10 digits with or without hyphens”. Validation like this will almost certainly stop all people who get a kick out of annoying people with useless requests. Even if the person goes through the trouble at this point to send a bogus email, your simple deletion is 1/10 the time it would take to fill out the form properly. If the thank you message contained the user’s IP address that could help deter future harrassment. Finally, the contact page could always contain a little php to deny the ip addresses you don’t want to receive mail from and redirect them elsewhere.
When someone goes looking for a website to be made, often one of 3 words comes to mind; web designer, web developer and webmaster. The term that probably has the most usage is ‘web designer’. So, what is the difference between the 3? Typically, the web designer is the person who makes the design using an HTML editor like Dreamweaver or software like Photoshop to convert a PSD file to XHTML/CSS. The web designer is the style behind the project. The web developer on the other hand, is the person who takes the original style and makes a functional website by applying custom coding. The website can be a simple one page HTML file with style tags, or it can be an elaborate CMS with a SSL shopping cart. Finally, the webmaster is the person who oversees the project from beginning to completion and works with everyone in the design and development process. For small companies, the web designer, web developer and webmaster can be the same person. Alternatively, the web designer can be one entity while the otehr person is the web developer / webmaster.
To make this unclear, most companies have their own specifications for web design and web developer positions. The web designer may be expected to hand-code and know CSS and PHP.
Since there are so many platforms for which one can use to build an elaborate website, the web developer could be anything from someone who hand codes in XHTML /CSS and PHP to someone who is flexible and can be efficient using PHP / MYSQL, Joomla, Drupal, Ruby On Rails, XOOPs, DotNetNuke and .NET.
Although there is a lot of hype and a lot of media about mobile devices used for web surfing, the stats don’t seem to promising for mobile devices for general web surfing. In a nutshell, the phone, IPhone or Blackberry are good tools for some web apps; like Google maps, but when it comes to getting the general web experience, it just does not cut it. According to Google analytics, many websites receive significantly less than 1% traffic from a mobile device.
Is that enough traffic to build another website just for mobile viewers?
Joomla has a number of various editors which can be used to create content for pages and modules. However, in most cases, they can arrange text, images and Flash to look precise. However, the editors are not the best choice for precise custom coding. For custom coding, an the extension Jumi can be used to create custom content in modules and articles.
With Jumi, custom content can be done with the various common coding scripts and languages; XHTML, CSS, PHP, CGIs and Javascript. With Jumi, you can take a page designed in a Photoshop PSD file and convert it to XHTML / CSS. Then, these files can be inserted into a directory. With the Joomla article manager, a new page can be made with Jumi for which will contain these files. When making the appropriate file with Photoshop, it should be sized properly to fit inside the page.
This matter about using custom coding is often discussed in many forums regarding Joomla vs Drupal. But, both can be used to add custom precise coding to any content page with proper coding and tagging. As far as ease goes, the timeframe to work with Jumi and custom tags from the login would be almost equal, and definitely within seconds. With Drupal you just add the php whereas with Jumi you upload a php file and write a tag so that it will run on the desired page.
A blog is an invaluable resource for any website that is concerned with SEO. A blog is like writing freelance articles that will become titled, keyworded and indexed with search engines; especially the most popular one ‘Google’. Unlike other menus and content management, a blog allows unrelated and related articles to be displayed in an order; such as the time they are made. For example, a blog for an autobody shop may have articles about car care, car maintenance, car painting, how to notice bad drivers, and have articles about trends in car painting.
Although the list may not have articles all about the same subject, it will not be noticeable when a Google search is performed. When someone searches on the search engine for a particular subject ‘like maintaining new car paint’, the page that shows up in the organic searches will only display the relevant page the person was seeking. Although the subject matter can be rather unrelated, it should fit in well with your website so that you land the surfer there and have a website that will keep his interest. If the topic was way out of whack like ‘Pubs in Vancouver’ on a website about horse grooming the reader may have a glance, see what the website is all about, then high tail it elsewhere.
Generally speaking, writing more words allows for more phrases to be picked up by the search engines. Often enough, these phrases can exist in the content without being listed in the title. However, keywords and phrases in the title will get better rankings than those that are nested in the content.
In a nutshell, more is not always better in the article itself, but more articles is always better. The simplest way to achieve this is to have a blog or a content management system with all sorts of categories, sections and content.
Even though small articles and blog posts can be very effective, quality will always count. People are not dumb. If they are smart enough or have been lucky enough to have the opportunity to read, they will normally know the difference between the good writing and the bad. Also, your writing on your website will be a maker or breaker for repeat visitors.
In recent years, the monitor size has grown and grown. Now, when you go to your local electronics shop you find monitors that look larger than big screen tvs.
Years ago, this would have been a nightmare to web designer / web developer. However, nowadays, browsers like Firefox 3.x and Internet Explorer 8 do a fantastic job at holding decent resolution when someone zooms in on the webpage. In Explorer, the commands are Page >Zoom >Pick a Setting and in Firefox View >Zoom >Pick a Setting.
Therefore, designing pages these days to look proper in various computers is quite a challenge. But, still, it normally is broken down into two parts. The severe minorities that use phones, Blackberrys, Iphones to surf the web and those that use a laptop and a desktop. The portable devices normally are less of a concern because browsing the net with those devices and typing is a real pain and an eyesore. I bought a top of the line phone for this reason and have downgraded its usage only for checking email and perhaps MSN messaging on the fly. Otherwise, it is totally the wrong tool for web surfing unless you are into the social media thing that caters to chatty this and chatty that. Anyone that is dedicated to surfing would use a laptop or desktop. The extra price is worth every penny.
Catering to the larger screens is still quite a mission. What size should that website be? Well, a safe size is to fit tight into 15″ monitor and fit into everything above. You could go narrower. As far as length goes, if the top half looks good in everything (like a well figured woman), the fact that the bottom lingers a little off the page and must be seen by scrolling is fine; at least in terms of style. A site could be made short in length if you want all the page to fit into any monitor. However, the short page will look a little tiny to the big spender with the large monitor. This is really a matter of choice at this point, but after looking at laptop sizes in the stores over the last two years, the sizes 15-17-inch still seems to be the most common sizes. A laptop larger than 17-inches is a little bulky to carry around. Consumers have been quite happy with the common sizes that have tendd to dominate the market in 2009.
Sound capturing is taking the sounds that are being played on your computer, and turing them into wav or mp3 files.
A simple and free method to capture sound and audio is to use the software Audacity. The downloads are free from Audacity’s website. The downloads are straightforward. But, setting it up could be short and sweet or it could take a few hours. It will need to be custom configured so that sound will sound perfect when it is captured. To make an example of these past statements, I installed Audacity on two partitions of the same computer; Windows Vista and Windows XP. It took 4 hours to install Audacity on my Windows Vista partition while it took 25 minutes to be recording perfectly in Windows XP. The differences were that I had to install and test various encoders and more. It was also quirky. But, with XP, I only had to install, try a couple test configurations, and it was good to go. Nevertheless, it is a fantastic product that allows you to record that song you want, especially your own rare tracks that may be on Youtube for which you lost your mp3 file, but not available freely on Limewire or other download services.
A Business card website is the fastest way to make your presence on the web. A typical business card website could consist of one splash page with a logo, text, images and contact information. In other words, it would look a basic homepage like many websites.
Normally,business card websites are very fast to build because they have such limited content and do not link to other pages. These sites can be made very easily in any html editor or built in Photoshop and converted from a PSD file to compliant HTML / CSS.
There are various methods to generate revenue on your website.
1) Sell a product or service
2) Affiliate Advertising
Google Adsense
A simple form of affiliate advertising is to use Google Adsense. With Google Adsense, you sign up with Google and allow spots on your web pages for Google ASdsense. Then, when someone clicks an adword, Google records the click and pays you a percentage. Affiliate ads are more profitable when the keywords are pricey. Pricey keywords come with competetive Google Adword bids, unlike inexpensive adwords like ’15th Century Volcano Explosions’ or ‘Jonestown was a peaceful place’.
Other Affiliate Ads
Other Affilate ads can be done with companies who allow you to place their banner on your website and track the clicks coming from your website. Then, if the click resulted in a sale, you receive a percentage of that sale.
The percentages can run low and as high as 30% or more. Basically, if your website can generate plenty of traffic, you can be a salesman without having to do anything more than opening the door to the company. The company makes the sale and handles all of the tech support.
An example of affiliate advertising would be having a travel website and using Expedia’s affilate program for flight booking.
The video below shows how to make a custom Drupal Template with Adobe Photoshop.
[youtube:http://www.youtube.com/watch?v=QXlZHsdMlNs 770 300]
Joomla, Drupal and WordPress have add-ons that can be used to create websites that will do specific functions; like add a directory, classified ads, and streaming audio. In Joomla, they are called components, modules and plugins. In Drupal, they are called modules. In WordPress, they are widgets.
Here are some features that can be installed in Joomla,Wordpress and Drupal to create a custom need:
* eCommerce Shops
* Directory systems
* Event calendars
* News system
* Document management systems
* Ads and Affiliates
* Statistics tools
* Polls
* Surveys
* Video streaming
* Youtube video sharing
* Flash banners
* Google maps
* Slideshows and galleries
* Subscription systems
* Online communities
* Blogs
* Forums
* Chat rooms
* Wikis
* Online surveys
* Custom forms
* Real estate listings
* Job listings/Job boards
* RSS readers
* Sitemaps
* SEO/SEF extensions
* FTP rooms
… and many many more!
After the component, module, plugin or widget is installed, it can be configured in the CMS backend to behave as desired. After that point (more often than not), the add-on must need further PHP and CSS editing so that it works as desired.
Every CMS has procedures for installing an add-on componenet. If installation problems arise it could be that an XML file is not provided or named properly, the zip file is too large or the zip file needs to be unzipped first before installing more zip files.
If the file is too large, it can be installed manually in some cases. For Joomla, you unzip the plugin, module, component or package of any combination and move it into a temporary directory. Then you install it from that directory.
The debate whether or not to use Joomla or Drupal goes on and on. However, popularity stats do speak for themselves. Here are a few examples of statistics from the world, Canada and the US.
World

Canada

United States

All images above are statistics from Google Trends
A picture can be worth a thousand words. But, the words can be all over the map. Since Drupal and Joomla do practically the same thing, it can be a matter of preference. Joomla should be more easier to use and update; unless all updates are through the front end for which both cms would easy to manage. Joomla 1.6 and Drupal both have good user management and Joomla has various 3rd party plugins available for earlier versions. Drupal gets the edge in performance, with all things equal. But, skilled optimization and an optimized web server take care of such issues. I’ve seen optimized Joomla websites with Jquery slideshows and video plugins rank 95% with Yslow. While the Joomla vs Drupal debate focusses on the basics, it often never gets to the nitty gritty for how to make the most of what you got. Codeigniter integrates very simply into Joomla and can be used for very fast performance; although slightly more work.
One negative drawback about Drupal for some ‘low balling’ web design projects is that it has a disadvantage in the module department. Joomla has so many and it can help a seasoned developer build a website very quickly. For larger websites where speed is an issue, Drupal could be a good choice. Often, many Drupal users like to condone Joomla with regards to speed, code, etc. But, Joomla does do a good job in the proper environment if the server, template and code is optimized for speed. Codeignter and pure php/mysql is faster than Drupal, but, not many Drupal folk discuss this.
In the end, both are great pieces of work.
Joomla and WordPress are two php scripts that compete almost neck and neck. Below, are some stats to compare the usage of Joomla and WordPress in the world, Canada and US.
World

Canada

United States

All images are from Google Trends
You can read blogs, documentation and stats about the competing frameworks to determine which technologies to use, or, you can see what others are actually using.
The following images compare ASP, ASP.net, PHP and Joomla. These three comparisons show that although there is a decrease in PHP (which is what Joomla and Drupal are written with) there is an overall upward trend with Joomla compared to others which look as though they are slowly decreasing. Although not shown, Drupal and WordPress also show an increase to their usage against asp.net. These results are as of July 26/09 from Google Trends. We have all learned to use and trust Google, so are these stats about as accurate as we can get?
Although it looks like PHP is on the decrease, the question would be why, when the big 3; Joomla, WordPress and Drupal are on the rise. Could that be an obsolescence in other PHP scripts that had once been popular?
ASP.NET vs JOOMLA

ASP vs PHP

PHP vs ASP.NET

All images are from Google trends
Our concern for people’s needs and a desire to help others has caused us to invest so much time providing information to anyone in the website design process. Our ebook, forum and do-it-yourself website services are direct results of these informative features.
This website will help anyone be able to start from the ground floor and work up from there. It covers the usage of word processing, digital photography, image editing, designing webpages, and much more.
For those who need help with word processors, we have explained how to quickly make the most of various versions of Microsoft Word.
How to edit and work with images with Adobe Photoshop is explained in detail.
Some companies charge more for 1 equivalent Drupal, Joomla, or WordPress template than we charge for a membership which provides a free ebook, a forum to ask questions for help and unlimited template downloads. With a memebership here, just post message for any section for which you want a reply.
Joomla 1.5 was released on January 2008 and it has been used to build millions of sites. Now, it is at version 1.512 and still going strong. Joomla can be downloaded at joomla.org and installed on the hosted domain or a local Wamp or Xamp server. Wamp is a good tool to use for testing Joomla sites offline before they go live.
Joomla can be seen as the Windows of Content Management Systems. Other CMS may have positives like better administration control over content, but, Joomla has so many components, modules and plugins that can be installed which can do practically anything a user wants. All plugins components and modules are written in PHP. In some cases they can be installed and used immediately. In other cases, proper parameters need top be setup. Yet in other cases, they will need complete makeovers in the CSS and PHP files. Furthermore, just how PHP is setup on the server can have an impact on how the site displays information. At some point, a web builder will need adequate knowledge of PHP and MYSQL in order to make forward progress with the majority of Joomla components, plugins and modules. Still, for the client he wins because the CMS can be setup and delivered rather affordably, and his ability to edit text and image content will cut all future costs and allow for a more up to date website at all times.
So many websites are built with Joomla 1.0 and Joomla 1.5 because the client can login and make changes on his computer. The changes can be text or graphics.
With the Global economy, so many Joomla extensions are being produced in countries the american dollar is very strong. This allows for an instant purchase for an affordable extension that can often be downloaded within minutes of purchase. And, as you read this, more and more competition is popping up and new versions and templates are being tweaked to keep web 2.0 very fresh indeed. It may be heartbreaking for some people to see such advanced coding being sold in Malaysia for $150 when it would take a hefty salary for an efficient PHP programmer with solid CSS skills to create the same software at home. This is just the way it is. Web development is becoming more plug and play. Joomla is a spelling change from the derived word ‘Jumla’ which means ‘all together’. The future, at this point, only looks easier for the plug and play web developer since the methods of plug and play are so cost effective and a quick solution to often complex problems.
Some of the more high end Joomla sites are outdoorphotographer.com and tnawrestling.com
For websites that just use text and graphics, familiarity will be the key. Drupal and WordPress load very fast with websites that display text and graphics.
Adding video into blogs and forums can be done through various means; such as embedding local videos or adding Youtube videos.
This sort of feature on a website can be used for so many uses; such as travel writers wanting to post tales and videos on the fly, a bounty hunter with new leads, a private eye tracking a cheater for divorce purposes, a writer with new blog entries with video readings, and any other use where video and text make a great union.
Adding Youtube videos is the simplest method for which to add videos.
To add Youtube videos into a blog,
1) Join Youtube which takes a minute.
2) Upload the video.
3) Wait for Youtube to convert it.
4) Take the Youtube ID and use that in the blog or forum entries. For this to happen, you may need to hire a web developer to set the blog up so that this is possible, just like the video inserted into one of these blog entries.
[youtube:http://in.youtube.com/watch?v=4gPr1jsvr6E&eurlueUOTImKp0k 375 283]
Content Management Systems are a fine way to make websites for people with lots of content, or with those that like to make lots of changes to their website.
The sky is the limit; video, podcasts, online examinations, blogs, forums, community sites (dating, facebook-like), memberships, advanced searching and more.
This blog uses a simple youtube video to show how simple it is to write any text with an accommpanying video. For artists, musicians, a blog and other forms of communication is a simple way to make a point. The artist below, who made his way on talent, is from the era before video killed the radio star. Nowadays, the Internet and savvy artists are finding a way to promote without having to fork over the weekend’s entertainment fund.
Your Flash site can stand alone or it can be used in conjunction with a Content Management System so that you may include an assortment of bells and whistles at any time.

Owner of Fullstack Web Studio

Quality Coding

Digital Marketing
When Performance and Flexibility Matters
Affordable web design,custom web development and mobile apps for individuals and businesses.


Let us analyze your data and competition to acquire more traffic! Professional SEO content writer
© 2018 ALL Rights Reserved | Sitemap
Vancouver | North Vancouver | Burnaby | Richmond | Coquitlam | Port Coquitlam | Surrey | Langley | Maple Ridge | Mission | Abbotsford | Kamloops | Kelowna | Victoria | Squamish | Whistler | Pemberton