


Monit is a linux package that can be used to monitor and restart processes automatically if they go down. This brief article will explain how to install and configure Monit.
Installing Monit
root# yum install monit
Now that you have installed Monit, the fun begins. The main files you will access and configure are the main configuation file located at /etc/monit.conf and its log file located at /var/log/monit. All editing will take place with configuration file while the log files will show you what it has been doing and can be used for troubleshooting.
Configuring Monit
The main configuration file is located at ‘/etc/monit.conf’. You can open it in your desired editor like Vi or Nano. A shortened configuration file is shown below. This file only checks for the Apache and mySQL services. More often than not, one of these two services would be the likely culprit that brings down your website(s). Take a look at the configuration file. After the file, there is a description about ‘how it works’. When you make any changes to the monit.conf file, you need to reload the configuration file with the ‘reload monit‘ command or restart it with the ‘/etc/init.d/monit restart‘ command.
root# vi /etc/monit.conf
# set daemon mode timeout to 1 minute
# set daemon 60
# Include all files from /etc/monit.d/
include /etc/monit.d/*
How It Works
Okay, the above code shows 2 blocks for Apache and one for mySQL. Too keep it simple, Monit looks for the adequate process ids for the Apache and mySQL services on your server every 2 minutes. If it does not find them, the service(s) are restarted.
When it comes to email, spam and your clients, you may want to take control of their email limits for many reasons; much of which are very obvious. For example, you want to limit the emails that can be done with a mass emailing script from a client. If you do not control the limits, your ip and domains could find their way into blacklists. Then, you have to send nice emails telling the spam cop to remove your ip or domain name from the blacklist.
Setting the Limit For All Domains
If you have a VPS or dedicated server, you can do this with Web Host Manager. By default, Web Host Manager’s email limit is unlimited.
To set the same email limits for all domains on the server,
Setting the Limit For Specific Domains
To set a limit for one domain particular domain on the server,
After days, months or years, you have finally come to the conclusion that you want to migrate your website to a new domain name. There are many reasons why you may want to do this such re-branding, recycling content, you need a name that reflects how the website has grown or you want to use a ‘new domain name’ that is easier to remember. Now that you have the plan, you must execute it. The move is rather quite simple and this procedure will work for any small or large php / mySQL website whether it was made with WordPress, Joomla, or a custom php / mySQL script. The process consists of five simple steps. The steps are to change the old domain name to the new one in all files, make the same name changes in the database, alter your database connection settings (if necessary), add a 301 redirect and resubmit new sitemaps.
1. File Name Changes
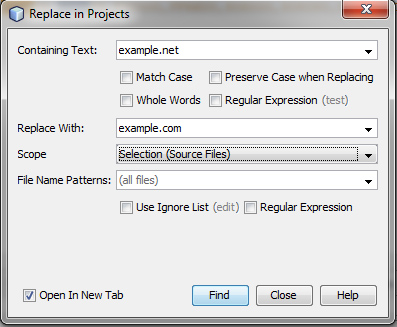
The first step is to do a ‘Find’ and ‘Replace’ for all occurrences of your old domain name in your files and replace it with the new domain name.
Method A
One way to do this is to ftp the files to your pc and use an editor that can search all files and folders for a specific string and replace it with the new one. For example, you search for example.com and replace it with example.net. In many cases, you can change everything at once. But, if you have large error_log files or lots of cache files it could take a while. You could remove all error_log files and cache files to save time, if necessary.
Method B
If you have Linux shell access, you can do a quick find and replace with the Linux command line. The example below will find and replace a string for all files within the directory. The example below will search for example.net and replace it with example.com. Be careful! If you screw up, you screw each occurrence up and need to fix it. However, this example shows hows effective command-lining can be.
2. Database Name Changes
Changing the occurrence of your old domain to the new one is simple. You download an uncompressed sql file and load it in an editor. Then, you do a simple find for the old domain name and replace it with the new one. After that, you can import that database into a new or existing database.
3. Alter Database Connection
If you setup up a new database on a new account or a new host, you will have a different. You must change the old username and password with the new one. If you try to view web pages with invalid credentials, your browser will show you connection errors.
4. Add a 301 in your .htaccess File
The one line below can be added to your .htaccess file so that all old urls will point to the new ones. In other words, example.net will redirect to example.com and pages like example.net/wordpress_post will redirect to example.com/wordpress_post.
5. Resubmit a New Sitemap to Google Webmaster Tools
Finally, login to your Google Webmaster Tools account and submit new sitemaps for the new domain.
Conclusion:
Out with the old, in with the new. All of your web pages that are indexed with Google (or any other search engine) will redirect to your new website. In time, your new content and old pages on the new website will be indexed. All in all, everything will go smoothly as though the move did not take place.
When you have root access to your Linux hosting account, you have so many extra features that are not available with shared hosting. One of the major features is SSH access with a tool like Putty. With SSH acccess you can literally connect fromm any computer on the Internet and do whatever you want to your website. You can create, edit and delete files, reboot the server, have acomplete access to all mysql databases, and much much more.
Knowing how to navigate at the Linux root can allow you to work on a website with no extra tools. Unlike a typical pc where you need FTP software and an editor, using SSH can be your final safety net if you need to use that. Imagine going on vacation in Cancun and you lose your laptop, or it fails. If you can access your Linux server wuth SSH, you can be back to work at the nearest Internet connection.
Logging In With SSH
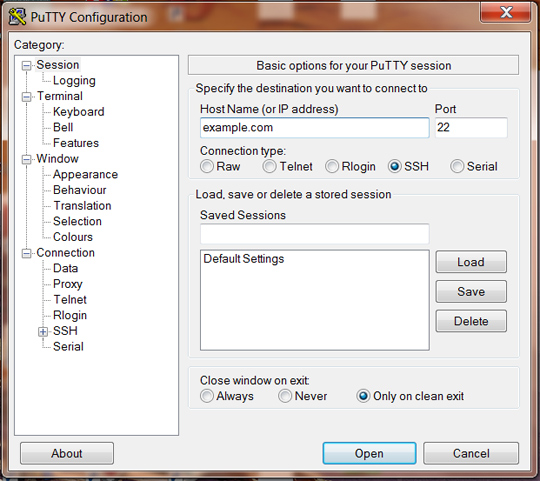
Putty is a simple tool which can be used to connect to the server with SSH. The tool is free to download.
To login with SSH,
1) Open Putty
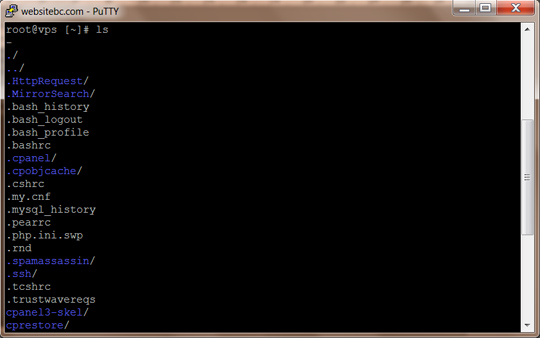
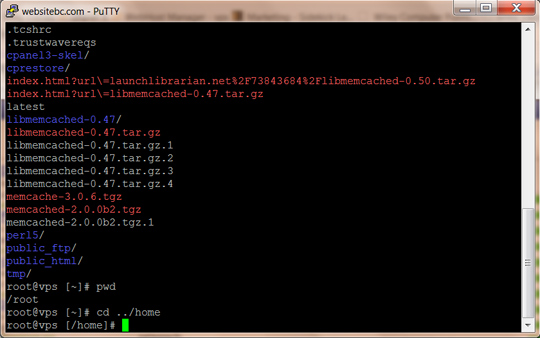
To view files in the folder
To view files within a folder,
1) Use the ls command.
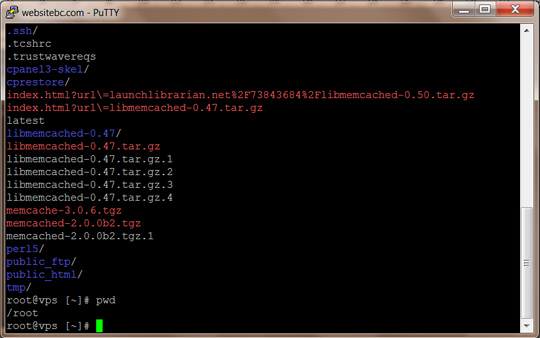
Current Directory
To view the current directory,
1) Use the pwd command.
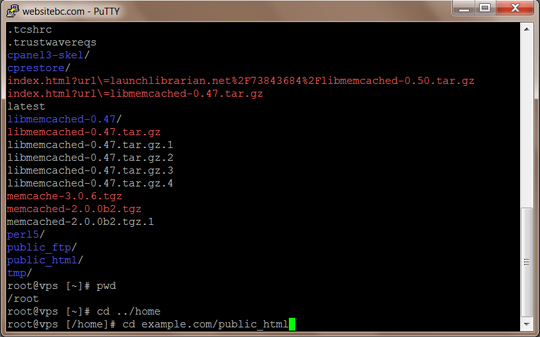
Changing Directories
To change directories,
1) Use the cd command.
Editing and Creating Files
To view a file(but not edit),
root@vpscat [/home/user]# cat filename.txt
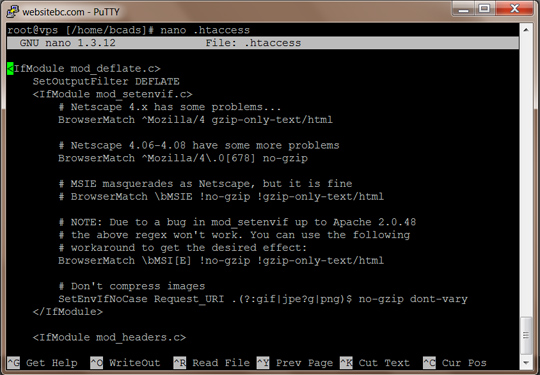
To view and edit a file,
1) Open nano or pico editor
2) root@vpscat [/home/user]# nano filename.txt
3) Use arrow keys to navigate.
Note: If you already have a file with Nano it opens up the file. Otherwise, the command nano filename.txt will open a blank screen and you can make the new file called filename.txt.
To save a file edited or created with Nano or Pico,
1) Click Ctrl + O on the keyboard
2) Click ‘Enter’ on keyboard
To exit Nano or Pico,
1) Click Ctrl + X on the keyboard
Removing Files
To remove files,
1) Use the rm command.
root@vpscat [/home/user]# rm filename.txt
2) You will be prompted ‘rm: remove regular file ‘filename.txt’ ?
3) Answer ‘yes’ or ‘no’
3) Hit Enter on the keyboard.
Exit SSH
To exit SSH,
1) Type: Exit
2) Hit ‘Enter’ on your keyboard.
When you want to add a SSL certificate to your website using Cpanel or web Host Manager(WHM), there are a few key points to remember. The two main points are the key and the actual SSL certificate. The two go hand in hand because the key on the web hosting account is used to create a matching SSL certificate. Then, the certifcate from the SSL company is added to your hosting account to finalize the match on the server.
In the end, the company where you buy the SSL certificate will ask for a key that was generated from your Cpanel or WHM. Then, they give you a certificate which can be used to update your key on yopour server. Now, both your SSL provider and your server have details for the key and SSL certificate. That is the main details which will deploy a usable SSL certificate.
With Web Host Manager or Cpanel, you can create SSL certificates.
Cpanel
To add an SSL certifcate to Cpanel,
1) Make sure the Cpanel account has its own dedicated ip address.
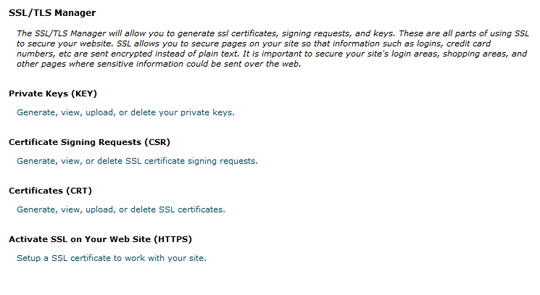
2) Select SSL TLS Manager
3) Select ‘Generate, view, or delete SSL certificate signing requests’. You will add your domain name and some other required fields like city, state and country.
4) At the bottom look for Generate.
5) Select Generate.
The CERTIFICATE SIGNING REQUEST(CSR) will have a block of code that the resembles the block of code shown belown.
Certificate Signing Request
-----BEGIN CERTIFICATE REQUEST----- MIICrDCCAZQCAQAwZzEhMB8GA1UECgwYQm9oZW1pYSBXZWJzaXRlIHNlcnZpY2Vz MQ8wDQYDVQQHDAZTYXZvbmExCzAJBgNVBAgMAkJDMQswCQYDVQQGEwJDQTEXMBUG A1UEAwwOYm9oZW1pYW5pc20uY2EwggEiMA0GCSqGSIb3DQEBAQUAA4IBDwAwggEK AoIBAQDXwOjuRrBTD7Vlc6xoeqyv0rgefUKJ+rR3RhVF4VmJgWLYvvP92Coh6V82 PDxiV6gDqG/oklloPiWxyyBPEI6UinXRHlq4UXTkLB6h011CNnCi0KtXdCSWo5xE meZI0qQmTDctYLBs3tNAuCR2k8j8v7p9poid+48BaJf0dVBIBvflLy7fYLlodM2Q 69IAhewSw4LG2XUVwmDNMjlIV+9U1oRGRsW+AXHy9Z58Jfm7V31qyhK6Xf4W9Ru3 s9bBjTKcwmpgTI2XVVWueGrByOAAFl27mFof8avwWUW5YCZHdnFp+1u5pwmrPHm2 AmPxhXpeWNjo2WrGm/JsV8eOYC63AgMBAAGgADANBgkqhkiG9w0BAQUFAAOCAQEA yM1aC3Ss3uAHo2YXWiyLSEFOArnwVZ+patyKG8iJX4shGDxYIPEDMIa6R6o5QM8+ 1goGpaxHbFKk91Z9SKbUmv3/pd4+7fd3v4r3ILveWSwFq7DQdj0pQCtrzRYChgcM fXNe5372cPQ6TYrv97eGPh/go7Gb0OTq3W9n4z8W3Kgc65wDGj8cHsFJsW5G+e+o UeE05uLPgt8loyAfRslp02O5sWPENfIf1pqJJQdGmEATd35lBantFWYR8BR+12VP 3ez6Vjw9mJyBnqNjB6V0ZGPVumFcPoNUi28kASiCseWV5yZJyWdIzAOKRVLpgVrg fRF9a/2E7pMjAIM/uWXbCw== -----END CERTIFICATE REQUEST-----
Note: The useful code begins with
—–BEGIN RSA PRIVATE KEY—–
and ends with
—–END RSA PRIVATE KEY—–
You will do nothing with the lower block of code that begins with: Private-Key: (2048 bit)
Generated Private Key
-----BEGIN RSA PRIVATE KEY----- MIIEpAIBAAKCAQEAvBO/ZbkpzfbZqq9G47OWNE/5vOgFmybqVvHOiF6olXnx+T2V YJK4eIsDjwbC5FM83Ul/06Fy/hekZOZhAYAx6X/Qb0TtbecO3BytKqERLdgIeHOR idRybVUg3dQkqrwtOKipBnw8MX52uwfC9//SGAPs1+pGZ5URkeo2dSbYZ12oC5Zy MGpfdsvHDHpSEKGEp/MOWdE9UKKbx6dJek4Icalo6YwkvwkYPwfDR/YvgbK36OAD 07VH5MyKVTyqqPfOd9UKP9kLN+IorRtYJvhKsNZ3Aj2d7l/NvlDpZ5fOzuNuSj8S C8Tziqxhi2AtEG9Wz3KxRD9JNKbOCk9UF6NJmwIDAQABAoIBAQCI2T2dALwAV6tN 3LeSGywh6EdpQtJBcHF2zf9fjrDQAqkkl8DHQjrjyxLN0Teh90cD6q8uB88Yv48o s9DFzMeEhTHepKK2IzfWxS7jI8tiNh0Dt+OgDGsuTpDZl/EOIlotLdu/EkqiIMi3 khA1b3kpbEG7YYXU/MyKBYeWeqtfma8aarI0KmmDYQu3N5fe9AiIp0o4h0mw4jTd DtZ60t35IIasWcxkDEtxX+T+I5B9hN5ysfH6KIZg2afdSZ+2I0wXA/RA9400g0Or xzZ4Z9rkJYN8jhce0LY2BTJoRIuMNiCzHQ0ugVNFNRzMh574IU17Muu9kxjJpBj2 Pzt2wN+xAoGBAPMcU7T0ouTHZ+/jzj9eoR6l/j1HqzDtg8zRTHWZN4p5BxjoTmBo bxtkNCrZw+LB/tKmP5VF/ROioqViCumOnId5mCr8FyYgnYfjxtcs002fuBHTSnUo cDQmu/g4XQxiBGlcR4no6ztF7ctU5LNi7JT+PphKDmwdFjBF8w2e17fHAoGBAMYM d1YBGUZShgVY/e+i6q4y6uQef6sLpbgQgDHOuHQ43sipVfFF5uYdpVbArKS4oWri JIu8ZqIL8S2cvllEg9RSQPpAl0+3/zwGlxI/3kHxsIxGrkBmdtukQSjmslZdcai0 IOkEgVh11OBlYP10AKC+riDQBcZFrNch6PklDmeNAoGAcJhRCIE5JH5aXBeFAYKB WuGEU7tqxRlsLqNNJzYULDULnXSSQEJ+GxCYvLPo7o/sxoEq96bXpI1xiOlUpoFf a7tcR6RD0GvQqgxLnoLrRotPxCm41XQqK205J6hrJ/4JjwanN29B60zi6oZh+dc6 PXNXaE78SQRbr3XmMQu9WycCgYEAndnTx9XKWlVuApcilryIRl3JABca9K6s4B8u vgQg2ml1kAP/vvVTCvh4DsQ1FnkeFv212TZJq0DPcuZqhOXqGPGSXqPatixWH3a1 NFN5h5/mcnfnbOb+NyQc10fAvrtt2uPvEyqHGYWZLV1AR+MMmRJB4V9MKvLfxvx9 Hw8dAwUCgYBCKVZrznuqzHQzJ66VM9Wrl6vgt0nMAUEfLK5r7Cuz3FQ5LF4GVATi 8zMOoWGExXvmZl1sQBIJeNb/zKt4Lhwy40DyZzjkvuoPiEk9+X+q/Cuc4OtcXR49 JXcA03RVcZI3XqUOgsMEYkYgWKpxV/77IEmSHPu/Lq9L745R08ZVcP== -----END RSA PRIVATE KEY----- Private Key Information Private-Key: (2048 bit) modulus: 00:bc:13:bf:65:b9:29:cd:f6:d9:aa:af:46:e3:b3: 96:34:4f:f9:bc:e8:05:9b:26:ea:56:f1:ce:88:5e: a8:95:79:f1:f9:3d:95:60:92:b8:78:8b:03:8f:06: c2:e4:53:3c:dc:f9:7f:d3:a1:32:fe:17:a4:64:e6: 61:01:80:31:e9:7f:d0:6f:44:ed:6d:e7:0e:dc:1c: ad:2a:a1:11:2d:d8:08:78:73:91:89:d4:72:6d:55: 20:dd:d4:24:aa:bc:2d:38:a8:a9:06:7c:3c:31:7e: 76:bb:07:c2:f7:ff:d2:18:03:ec:d7:ea:46:67:95: 11:91:ea:36:75:26:d8:67:5d:a8:0b:96:72:30:6a: 5f:76:cb:c7:0c:7a:52:10:a1:84:a7:f3:0e:59:d1: 3d:50:a2:9b:c7:a7:49:7a:4e:08:71:a9:68:e9:8c: 24:bf:09:18:3f:07:c3:47:f6:2f:81:b2:b7:e8:e0: 03:d3:b5:47:e4:cc:8a:55:3c:aa:a8:f7:ce:77:d5: 0a:3g:d9:0b:37:e2:28:ad:1b:58:26:f8:4a:b0:d6: 77:02:3d:9d:ee:5f:cd:be:50:e9:67:97:ce:ce:e3: 6e:4a:3f:12:0b:c4:f3:8a:ac:61:8b:60:2d:10:6f: 56:cf:72:b1:44:3f:49:34:a6:ce:0a:4f:54:17:a3: 49:9b publicExponent: 65537 (0x10001) privateExponent: 00:88:d9:3d:9d:00:bc:00:57:ab:4d:dc:b7:92:1b: 2c:21:e8:47:69:42:d2:41:70:71:76:cd:ff:5f:8e: b0:d0:02:a9:24:97:c0:c7:42:3a:e3:cb:12:cd:d1: 37:a1:f7:47:03:ea:af:2e:07:cf:18:bf:8f:28:b3: d0:c5:cc:c7:84:85:31:de:a4:a2:b6:23:37:d6:c5: 2e:e3:23:cb:62:36:1d:03:b7:e3:a0:0c:6b:2e:4e: 90:d9:97:f1:0e:22:5a:2d:2d:db:bf:12:4a:a2:20: c8:b7:92:10:35:6f:79:29:6c:41:bb:61:85:d4:fc: cc:8a:05:87:96:7a:ab:5f:99:af:1a:6a:b2:34:2a: 69:83:61:0b:b7:37:97:de:f4:08:88:a7:4a:38:87: 49:b0:e2:34:dd:0e:d6:7a:d2:dd:f9:20:86:ac:59: cc:64:0c:4b:71:5f:e4:fe:23:90:7d:84:de:72:b1: f1:fa:28:86:60:d9:a7:dd:49:9f:b6:23:4c:17:03: f4:40:f7:8d:34:83:43:ab:c7:36:78:67:da:e4:25: 83:7c:8e:17:1e:d0:b6:36:05:32:68:44:8b:8c:36: 20:b3:1d:0d:2e:81:53:45:35:1c:cc:87:9e:f8:21: 4d:7b:32:eb:bd:93:18:c9:a4:18:f6:3f:3b:76:c0: df:b1 prime1: 00:f3:1c:53:b4:f4:a2:e4:c7:67:ef:e3:ce:3f:5e: a1:1e:a5:fe:3d:47:ab:30:ed:83:cc:d1:4c:75:99: 37:8a:79:07:18:e8:4e:60:68:6f:1b:64:34:2a:d9: c3:e2:c1:fe:d2:a6:3f:95:45:fd:13:a2:a2:a5:62: 0a:e9:8e:9c:87:79:98:2a:fc:17:26:20:9d:87:e3: c6:d7:2c:d3:4d:9f:b8:11:d3:4a:75:28:70:34:26: bb:f8:38:5d:0c:62:04:69:5c:47:89:e8:eb:3b:45: ed:cb:54:e4:b3:62:ec:94:fe:3e:98:4a:0e:6c:1d: 16:30:45:f3:0d:9e:d7:b7:c7 prime2: 00:c6:0c:77:56:01:19:46:52:86:05:58:fd:ef:a2: ea:ae:32:ea:e4:1e:7f:ab:0b:a5:b8:10:80:31:ce: b8:74:38:de:c8:a9:55:f1:45:e6:e6:1d:a5:56:c0: ac:a4:b8:a1:6a:e2:24:8b:bc:66:a2:0b:f1:2d:9c: be:59:44:83:d4:52:40:fa:40:97:4f:b7:ff:3c:06: 97:12:3f:de:41:f1:b0:8c:46:ae:40:66:76:db:a4: 41:28:e6:b2:56:5d:71:a8:b4:20:e9:04:81:58:75: d4:e0:65:60:fd:74:00:a0:be:ae:20:d0:05:c6:45: ac:d7:21:e8:f9:25:0e:67:8d exponent1: 70:98:51:08:81:39:24:7e:5a:5c:17:85:01:82:81: 5a:e1:84:53:bb:6a:c5:19:6c:2e:a3:4d:27:36:14: 2c:35:0b:9d:74:92:40:42:7e:1b:10:98:bc:b3:e8: ee:8f:ec:c6:81:2a:f7:a6:d7:a4:8d:71:88:e9:54: a6:81:5f:6b:bb:5c:47:a4:43:d0:6b:d0:aa:0c:4b: 9e:82:eb:46:8b:4f:c4:29:b8:d5:74:2a:2b:6d:39: 27:a8:6b:27:fe:09:8f:06:a7:37:6f:41:eb:4c:e2: ea:86:61:f9:d7:3a:3d:73:57:68:4e:fc:49:04:5b: af:75:e6:31:0b:bd:5b:27 exponent2: 00:9d:d9:d3:c7:d5:ca:5a:55:6e:02:97:22:96:bc: 88:46:5d:c9:00:17:1a:f4:ae:ac:e0:1f:2e:be:04: 20:da:69:75:90:03:ff:be:f5:53:0a:f8:78:0e:c4: 35:16:79:1e:16:fd:b5:d9:36:49:ab:40:cf:72:e6: 6a:84:e5:ea:18:f1:92:5e:a3:da:b6:2c:56:1f:76: b5:34:53:79:87:9f:e6:72:77:e7:6c:e6:fe:37:24: 1c:d7:47:c0:be:bb:6d:da:e3:ef:13:2a:87:19:85: 99:2d:5d:40:47:e3:0c:99:12:41:e1:5f:4c:2a:f2: df:c6:fc:7d:1f:0f:1d:03:05 coefficient: 42:29:56:6b:ce:7b:aa:cc:74:33:27:ae:95:33:d5: ab:97:ab:e0:b7:49:cc:01:41:1f:2c:ae:6b:ec:2b: b3:dc:54:39:2c:5e:06:54:04:e2:f3:33:0e:a1:61: 84:c5:7b:e6:66:5d:6c:40:12:09:78:d6:ff:cc:6b: 78:2e:1c:32:e3:40:f2:67:38:e4:be:ea:0f:88:49: 3d:f9:7f:aa:fc:2b:9c:e0:eb:5c:5d:1e:3d:25:77: 00:d3:74:55:71:92:37:5e:a5:0e:82:c3:04:62:40: a0:58:aa:71:57:fe:fb:20:49:92:1c:fc:bf:2e:af: 4b:ef:8e:51:d3:c6:55:72
6) Go to your ssl provider.
7) Add your certifcate request. You will need to add your key or CSR that was generated from your web host. In this example, the key was shown above.
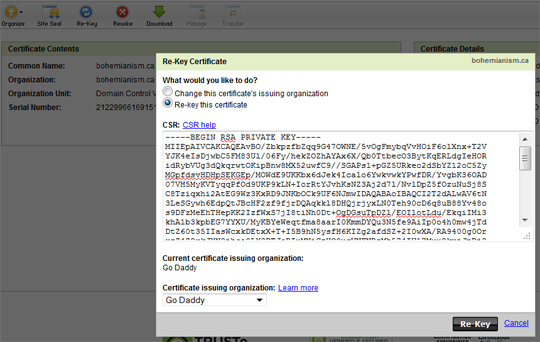
8) Follow instructions with the SSL provider. You may need to verify your website. The verification process will be different for each company. For example, Godaddy will give you the option to add a file to the root folder and verify that it exists while another company may send a verification email. Wait until they have made you an SSL certificate.
9) When you have an SSL certificate from the provider, it will be a ‘.crt’ file.
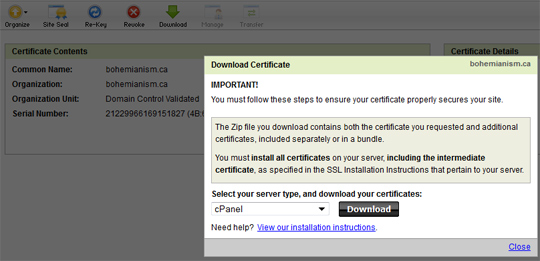
10) Go to Cpanel > SSL / TLS Manager >Certificates (CRT) > Click ‘Generate, view, upload, or delete SSL certificates’.
11) Paste the code into the box or upload the ‘.crt’ file.
12) Select ‘Generate’.
Details About SSL Activation
1) Go to Cpanel > SSL / TLS Manager >Activate SSL On Your WEbsite(HTTPS) >Setup a SSL certificate to work with your site. >Select Your Domain. >Make sure you have the proper key and certificate.
2) Select ‘Install Certifcate’, if necessary.
Web Host Manager
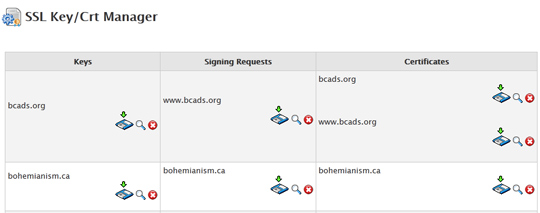
To view SSL certificates,
1) Look for SSL / TLS >Click SSL Key / Crt Manager. You can download all keys, signing requests and SSL certificates here.
Issues
When you set up an SSL certificate, you may have made a mismatch with the key or certificate. To fix this, you can always download or make a new key. Then, you can go to your SSL provider and update the key. they will give you a new block of certificate code. The code they give is the ‘.crt’ file. This file can be used to install the proper SSL certificate with Cpanel.
Web Page Errors
As a safeguard, you can reboot the server after making changes.
Desired Results
When all goes well, you open your website with https and see the following results.

By now, you may know that Web Host Manager is quite a fine tool to administrate accounts and your Linux Hosting account. Having the ability to create new accounts with new cpanels allows for all sorts of web management.
Although you may want to keep all database usage and files within specific accounts, you are not required to do so. You do have the option to use databases from different accounts. For example, if you have one account called mainaccount and another account called mysecondaccount, you could connect to databases from mainaccount. The simple trick is to just use the aaccount prefix which appends to all database usernames and databases.
The examples below show how you can connect to a database from another account. You simply add the specific connection variables into your file(s).
Database Connection to mainaccount:
$host = “localhost”;
$user = “mainaccount_name”;
$pw = “add_password_here”;
$database = “mainaccount_databasename”;
Database Connection to mysecondaccount:
$host = “localhost”;
$user = “mysecondaccount_name”;
$pw = “add_password_here”;
$database = “mysecondaccount_databasename”;
Web Host Manager is a fantastic tool to order accounts and databases. Generally speaking, Web Host Manager is used to create accounts where you want to keep accounts organized and separated.
Here are various reasons why you may want to create separate accounts with Web Host Manager:
1) Some clients may require their own cpanel. Therfore, you only want them to administrate their own websites, emails and databases.
2) You want to add an SSL certificate to a specific account.
3) You want to keep a large project in one place. Addon domains and multiple databases can get messy after a while.
4) if you need more resources., tIt makes it easy to move an entire account to a new server.
Web Host Manager allows webmasters to remove addon domains from one account and move it to a new account. In fact, that order must be done first. The tutorial below explains how to perform this procedure.
Note:
You may need to make a few adjustments during or after you create the new account; such as editing the package.
To edit a package,
1) Look for packages in left column.
2) Select ‘Edit package’ >Modify >Save as desired
Update DNS Zones
You may need to update the DNS zones.
To edit a DNS zone,
1) Select ‘DNS Functions’ >Edit DNS Zone
2) Modify and save, if necessary.
GET THE SITE RUNNING
To get the new site up and running,
1) Login to the new Cpanel account.
2) Add any databases that are needed.
3) FTP all files into the new account.
4) Change any database connection files so that the new prefix and login credentials for your new account. For example, if your site was previously in an account called myname, and the new account is called newname, you will need to change all database prefixes and database names to the newname.
5) Troubleshoot the website. At this point, you should be able to open up the website in your browser.
From time to time, a website can shut down for several reasons. One very common reason is that the server is running out of memory. Many websites consume many resources because they are built with Joomla, WordPress, Drupal and so on. With that in mind, you may want to know how log a website went down. Well, Cpanel offers an array of methods to find that out. You can use the ‘Logs’and the features.
Method #1: Bandwidth
To see bandwidth options during hours or days,
1) Login to Cpanel.
2) Go to logs > Select ‘Bandwidth’.
3) Look for downtime.
Method #2: Error Log
To see recent errors and track when site went down,
1) Login to Cpanel.
2) Go to logs > Select ‘Error Log’.
3) Look for downtime. You can track ip and where site went down; such as memory allocation. If the ip was suspicious, you can ban it.

Method #3: Latest Visitors
To see latest vistors,
1) Login to Cpanel.
2) Go to logs > Select ‘Latest Visitors’.
3) Select ‘View’ next to the desired website.
SOFTWARE
PHP / mySQL runs on the Apache server. You can configure the Apache server and update PHP in one shot using ‘Easy Apache’.
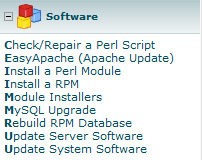
To upgrade Apache Server and PHP,
1) Select ‘Easy Apache’.
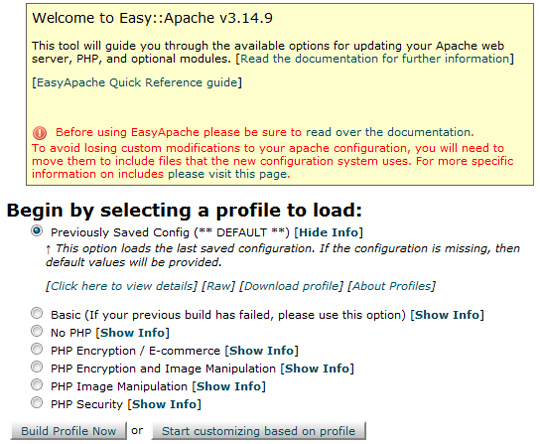
2) Select ‘Start customizing based on profile’ to upgrade from existing settings.
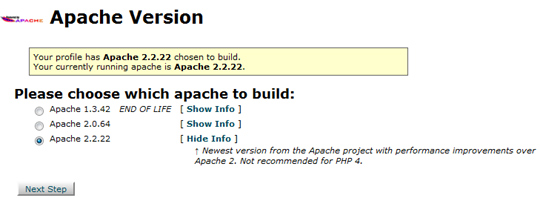
3) Select Apache version >Next.
4) Select a PHP Version.
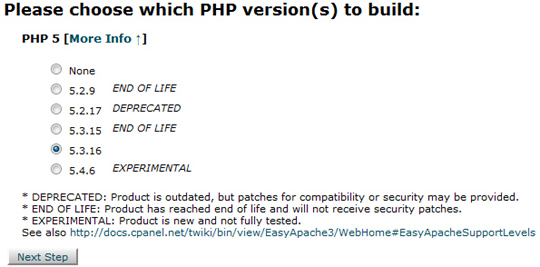
5) Select ‘Next Step’.
6) Select From ‘Short Options’ or scroll down and select ‘Exhaustive Options List’.

7) Customize Options. The options here can be checked if you want them. For example, checking ‘GD’ means you can use many image image functions within your programming. The GD library is very useful to create and resize images with PHP.
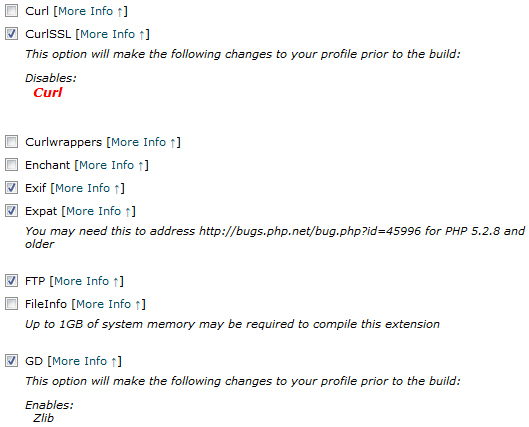
8) Select ‘Save and Build’. Now, you simply wait for the build to finish, then reboot Apache server and you are good to go.
SQL SERVICES
SQL Services has many useful features. Nevertheless, two standout features are ‘phpMyAdmin’ and ‘MYSQL Root Password’.
phpMyAdmin
When it comes to usage, ‘phpMyAdmin’ might be the feature which get the most clicks. The ‘phpMyAdmin’ option allows the root user to access all mySQL databases for the webmaster. If you have four cpanel accounts, you can access each and every mySQL database for all accounts.
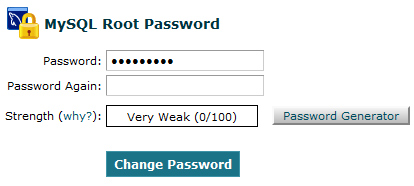
MYSQL Root Password
By default, the mySQL root password is the same as the root password. The advantage is simplicity, the disadvantage is security. With Putty, you can login to your Linux hosting account with your root username and password.
To login to mySQL with Putty,
1) Login to Linux hosting as ‘root’.
2) Type: mysql
Wasn’t that easy? Well, you can add another layer of protection by updating the ‘Root mySQL’ password’.
To update the ‘Root mySQL Password’,
1) Select ‘mySQL Root Password’.
2) Add the password and password again.
3) Click ‘Change Password’.
DNS FUNCTIONS
DNS functions allow the web developer to control the DNS for a particular domain. When you register a domain name, you must point the DNS to yours. Often, the hosting company sets it to its own DNS by default, which means you cannot view the website hosted elsewhere. After pointing the DNS to your server, you may need to login to Web Host Manager and edit the DNS after you create a new account or addon domain.
Edit DNS
Off all the DNS functions, there is a good chance that ‘Edit DNS’ would be used the most, or exclusively from the others. When you create an an account or an addon domain, its DNS will have a default value. Thus, arriving at this setting to change any dns nameservers is an obvious option.
To create a website with proper dns,
1) Register domain name.
2) Create a new account for the domain name or create an addon domain.
3) Login to Web Host Manager and Edit DNS for the domain name; if necessary.
To edit the DNS so that it works with your hosting account,
1) Select ‘DNS Functions’.
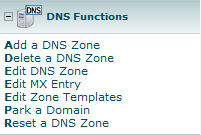
2) Select ‘Edit DNS Zone’.
3) Select a domain.
4) Select ‘Edit’.
5) Set the DNS to your account. In this case, the main domain is example.com and the dns nameservers are ns1.example.com and ns2.example.com.
6) Select ‘Save’.
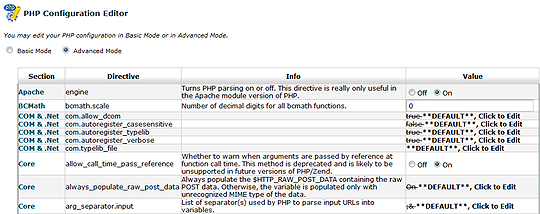
To change php.ini file in web host manager,
1) Open Web Host manager
2) Under ‘Service Configuration’ select PHP Configuration editor. The advanced view will allow the file the most possibility to edit various settings.
Some of the setting you can change here are error reporting, max_execution_time, log_errors_max_length, upload_max_filesize, post_max_size and memory_limit.
3) Select ‘Save’.

To edit an existing account,
1) Select ‘List accounts’ under the heading ‘Account Information’ or select Home >’Account Information’ >’List Accounts’.
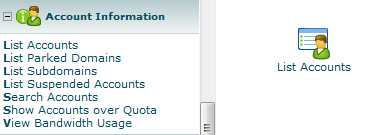
2) Select the desired account.
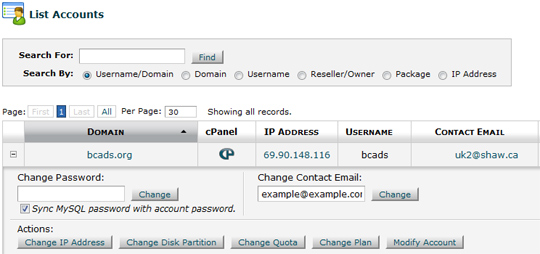
3) Select ‘Modify Account’.
4) Modify the fields.
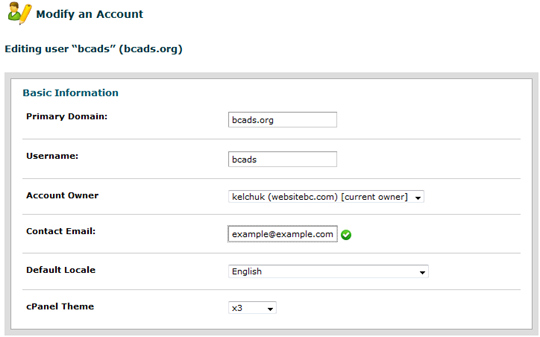
5) Select ‘Save’.
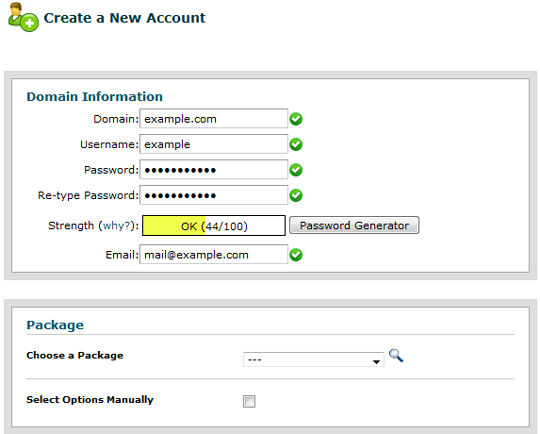
ACCOUNT INFORMATION
‘Account Information’ is where you create, edit and modify accounts. New accounts makes it easy to create new website(s) with a dedicated ip address. There are many reasons why you may want to do that. For instance, you may have a client who publishes controversial subject matter or sends mass amounts of spam email. Therefore, putting the client at his own address could be beneficial for other clients. One spammer can ruin it for others.
To create a new account,
1) Select ‘Account Functions’ or select ‘Home’ >’Account Functions’.
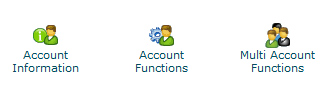
2) Create ‘New Account’.
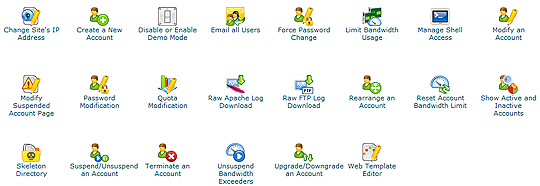
3) Fill out web site details.
4) Select Create.
SYSTEM REBOOT
One of the first features the administrator of a VPS or dedicated server needs to be familiar with is ‘System Reboot’. You can reboot a server if the memory becomes depleted or you notice the site is down for some unknown reason. Furthermore, you will reboot the server if you alter system files like php.ini, my.cnf or, you rebuild the Apache server.
To reboot a VPS or dedicated server,
1) Login to WHM.
2) Select `System Reboot` from the home menu, or scroll down on the left menu until you see `System Reboot`.
3) Select `Graceful Server reboot`or ‘Forceful Server Reboot’. ‘Graceful Server Reboot’ will finish executing unfinished processes and reboot while a ‘Forceful Server Reboot’ will not wait until processes finish. Often, the wait for a ‘Graceful Server Reboot’ is very short.

Web Host Manager is a server admin control panel which allows an administrator to control Cpanel accounts. With WHM(Web Host manager), you have access and control to each and every reseller account through its unique interface. But, there is many built-in features. You can control the php settings with the php.ini file, reboot the Apache server, customize DNS and email MX settings. The chapter will not discuss each detail about Web Host Manager, but, you will have the necessary tips and tools needed to keep a healthy server up and running.
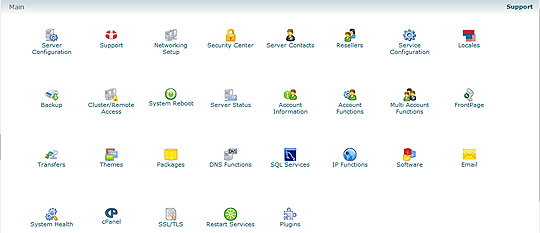
Web Host Manager is a very good and popular admin tool that is offered by giant hosting comapnies like Hostgator, Peer1 while cpanel is used by many too. Using a hosting service with Web Host Manager is a common practice for people who have outgrown a simple shared hosting account. There are many reasons why there is a need to upgrade such as; your websites get sufficinet traffic and / or you use too many shared resources. With shared hosting, you share memory and PHP server resources with others who use the same server. Eventually, as websites grow, the web host may ban or suspend your account based on your over-usage of resources. The best way to solve this problem, is to remove the sharing part. From experience, you often get what you pay more. The more you pay, the better the reources, the better the website performance.
Normally, when you upgrade from a basic shared hosting account, your options are a reseller account, VPS hosting and Dedicated server. A reseller account has access to Web Host Manager. However, the sharing part still exists. This really can be a potential bottleneck; especially is someone runs cron jobs on scripts that hog resources. The only advantage of reseller plans over VPS are ease of use. With a reseller plan, you don’t have the responsibility of keeping the server up and running.
With VPS and dedicated servers, you have access to all root files and can control, modify and configure your server as you want. But, when you must know how to manage your resources like memory, know if hardware failed, and reboot the server if it goes down. Most companies have monthly fees for this service, but, with some practice and patience using a VPS or dedicated server can become second nature. This chapter covers the requirements for keeping a VPS or dedicated server live and well.
To remove a cron job,

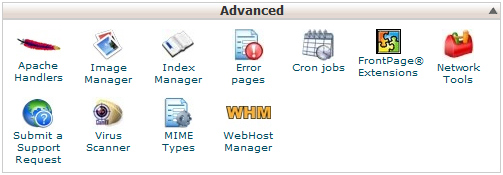
Cpanel Advanced Settings
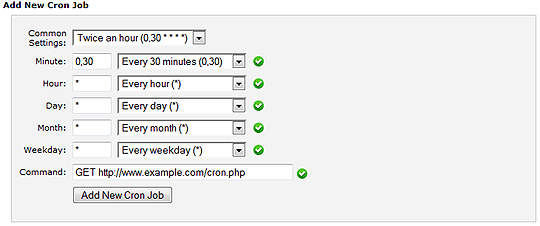
The ‘Advanced’ settings can be of use to particular individual. However, one such feature which may catch your attention is ‘Cron Jobs’. Cron jobs allow you to schedule events to happen at a certain time. An example of a cron job is to execute a php file which copies and resets a database each day. An cron could be compared to a browser automatically opening a php file each day and executing the code.
SOFTWARE / SERVICES

The Software / Services features come with programmer perks like Pear Packages. But, the gold may lie with ‘Optimize Website’. The optimize website feature can be used to compress all websites. This can make websites load faster in a browser. When you test with a tool like Yahoo YSlow, it often recommends gzip compression for websites.
Optimize Website
To optimize website,
1) Select ‘Optimize Website’.
2) Select ‘Compress All Content’.
3) Select ‘Update Settings’.

To remove a redirect with Cpanel,
1) Select ‘Redirects’.
2) Find the redirects near the bottom of the page.
3) Select ‘Remove’.

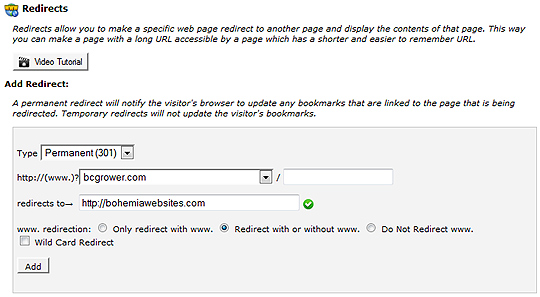
Redirects do the obvious. You take the traffic that arrives at a specific domain and send it elsewhere.
To set a redirect,
1) Select ‘Redirects’.
2) Select an address to redirect from.
3) Select an address to redirect to.
4) Select ‘Add’.
Domains helps you manage subdomains, addon domains and redirects. Although there are more features, addon domains and redirects are popular selections.
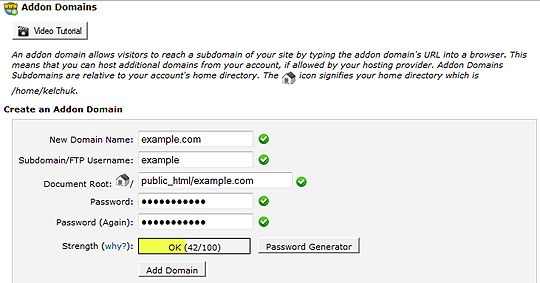
The addon domain button allows you to create an addon domain for the account. For example, if you have a main account with the domain example.com, you can reside the domain example2.com here as well. For shared hosting, it can be a pretty good bang for the buck.
Redirects allow you to redirect domains to other web addresses. For example, you may want all traffic that goes to example.com to redirect to example2.com.
To create an addon domain,
1) Select ‘Addon Domains’.
2) Type in domain name, username and password.
3) Select ‘Add Domain’.
To unblock an ip address with Cpanel,
1) Select ‘IP Deny Manager’.
2) Delete the ip you are denying.

To deny an ip with Cpanel,
1) Select ‘IP Deny Manager’.
2) Add the ip address you want to deny.
3) Select ‘Add’.
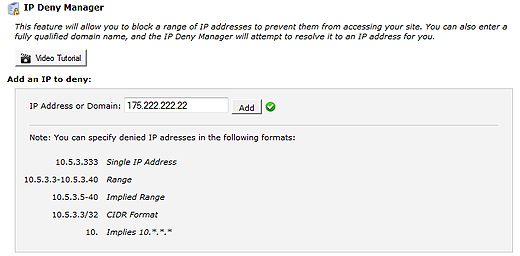
Cpanel has a few security features which can be implemented quickly. Two features which could see some usage from time to time are ‘Protect Password Directories’ and ‘IP Deny Manager’.
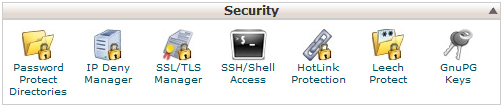
To password protect a directory,
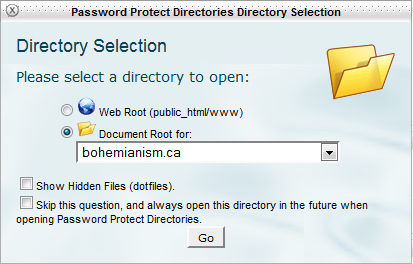
1) Select ‘Password Protect Directories’.
2) Select a domain.
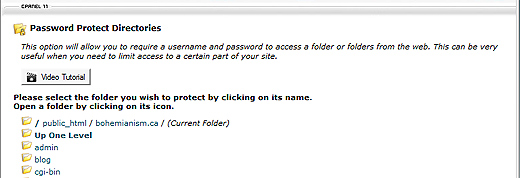
3) Select ‘Go’.
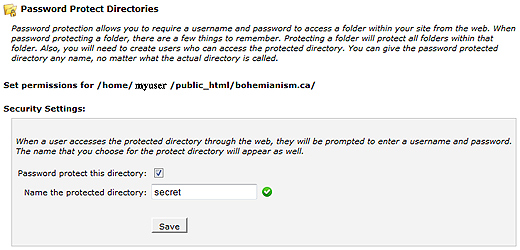
4) Select a folder.
5) Select the checkbox >add a name >Save.
Spam Assassin
Spam Assassin cannbe used to filter the good email from the bad. If you ever have spread your email addrerss around, you may have noticed how junk mail starts flowing in. But, spam assassin can be used to blacklist and whitelist ip addresses.
To get Spam Assassin working,
1) Select ‘Spam Assassin’.
2) Select ‘Configure Spam Assassin’.
3) Add ip addresses to filter. As you fill up the spaces, Spam Assassin automatically adds new fields.
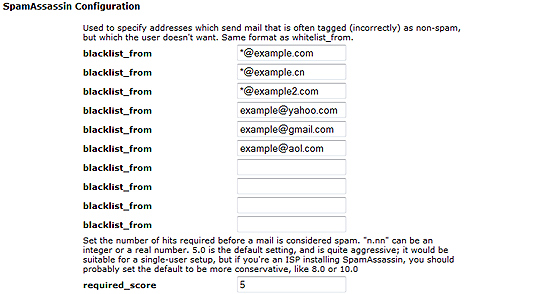
4) Select ‘Save’.
To access webmail with Cpanel,
1) Select ‘Webmail’ > ‘Go to Secure Webmail Login’
2) Select an email option; such as ‘Horde’.
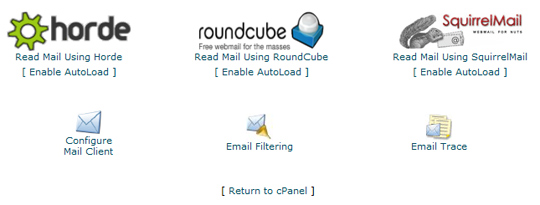
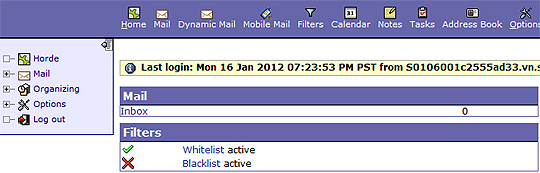
3) Select an email address from the list. At this point, using one of the email services is much like using a service such as hotmail or gmail.
As far a your clients are concered, they may want to access their webmail with their domain. It looks a little cleaner. One such trick is to add their domain into the url. For example, http://example.com:2095/ could be used to access webmail for any account at example.com; cuch as info@example.com.
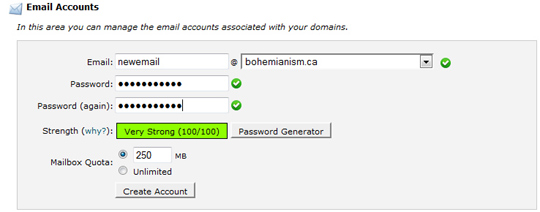
To manage an email account,
1) Select an option from the desired email account.

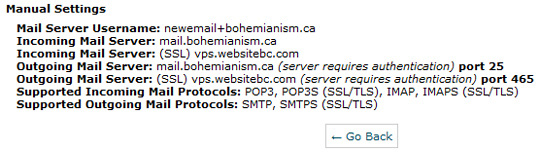
To configure an email client,
1) Select ‘More’.
2) Select ‘Configure Email Client’.
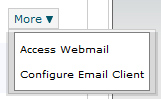
3) Use the settings displayed to configure your email client such as Outlook or Eudora.
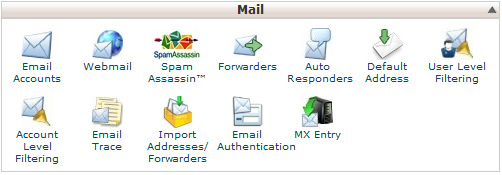
Handling email is one of the features that comes with Cpanel. You may be wondering, what does email have to do with PHP / mySQL? Well, it doesn’t. But, any web developer who builds PHP / mySQL websites will use these tools to administer email accounts for clients and others.
The email options appear under the heading ‘Mail’.
The Cpanel layout can be customized by dragging and positioning the various headings such as; Preferences, Mail, Files, Logs, Security, Logs, Domains, databases, Software / Services and Advanced. The simple order change occurs with a lef click next to the heading followed by dragging the section up or down to the desired location.
Cpanel makes it easy to back up some or all of your account. If you back up the entire account, you can easily move all email accounts, databases and files to a new server.
When you login to cpanel, you can access your files with File Manager. Look for the ‘Files’ heading which contains the various icons like Backups, Backup Wizard and File Manager. Using File manager is a decent option when you cannot access FTP. Many prefer using a text editor like Notepad++ and using FTP versus using File Manager.
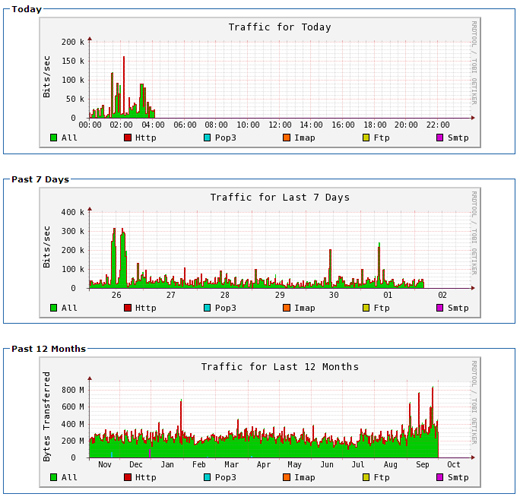
Cpanel comes with various built-in applications which can be used to track visitors and bots that come to the website(s). From the list of options, manhy people like awstats. The first thing to remember about tracking web traffic is that no two sources ever give the same results. These los can be used in conjunction with Google Analytics to view information about traffic sources.
To open a log,
1) Select an icon within the ‘Logs’.
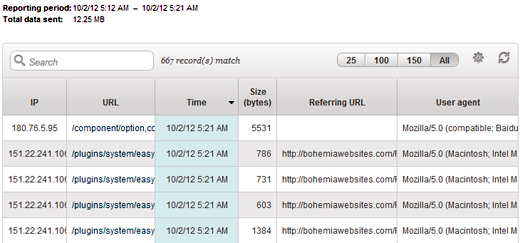
The various data sources are easy to use. For this example, Awstats will be demonstrated.
2) Select a website.
3) Read Stats
The stats will explain various pices of data such as unique visitors, pages, pages where visitor entered, pages where visitor exited, countries and page views, ip addresses, links, search keyphrases, viewer browser usage and origin of visitor. The origin of visitor attempts to explain which users came from a search engine and those who came from a direct address, bookmark and email link.
When you run a VPS or dedicated server, chances are memory usage is your biggest concern. Luckily, you can always login to your server with SSH and see the details to calculate free memory that is available.
Web Host Manager can be used to create, delete and manage accounts.
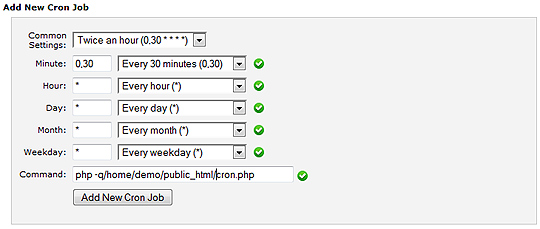
Cron Jobs in Cpanel can be used to automate tasks that could otherwise need manual updating. One example for which to use a cron job could be to execute a php file in order to make database updates or send automated email.
You can set email rule, such as blacklist and whitelist email addressess and domains with Spam Assassin.
*@website.com
This will block this entire domain.
Web Host Manager is a server admin control panel which allows an administrator to control Cpanel accounts. Cpanel is a very popular control panel which runs on Linux CENTOS. It is a fantastic control panel for which to run and control websites. It comes bundled with all sorts of software such as phpmyadmin; which can make a web developer run and test mysql databases very efficiently.
Web Host Manager is often available with upgraded packages such as reseller accounts, VPS server accounts, and dedicated server accounts. With WHM(Web Host manager), you have access and control to each and every reseller account. But, there is more. You can control the php settings with the php.ini file, reboot the Apache server, customize DNS and email MX settings.
Cpanel is one of the most popular web hosting control panels, if not the most popular. Its main competition is Plesk. It allows anyone with 1 or more websites to manage email, ftp, stats, databases and more. It is available for as little as $5 / month with a single domain on a shared hosting package or it can be used with upgrade such as reseller accounts, VPS server packages and dedicated server packages. With upgraded packages such as reseller accounts, VPS server accounts, and dedicated server accounts; you will have access to another service called Web Host Manager; which allows the administrator to have access and control to each and every reseller account.
If you have files stored on a shared server, it is normal to transfer all files back in forth under your username. More than likely, your hosting provider only allows you access to your account. In this case, files are moved back and forth while you are logged in under your username, hence files are owned by you.
However, in a virtual private server(VPS) or dedicated server, you will be able to login with secure FTP to any account or with the root login. In any case, the user will have ownership of the files for each account. For example, if you login as root, and transfer files from your pc to an account while logged in as ‘root’, ‘root’ will be the owner of the files. Meanwhile if you logged in to a specific account with a username like ‘myUserName’ with myUserName’s password, myUsername would be the owner of files transfered from your pc.
It is important to know how files are transfered because it could be the reason you cannot transfer them.
If you want to stay organized, you can login to your VPS or dedicated server with SSH Putty, and use CHOWN to change folder and file ownership.
To CHOWN folder and all files within a directory,
1) Find directory path.
1) chown -R username /home/username/public_html/mysite.com
Note:
This Unix command above will chown all files within the mysite.com directory. Now, you could login to the account under the username and transfer files back and forth between your pc and server.
Note: If you used the command ‘chown -R root /home/username/public_html/mysite.com’ and logged in with secure FTP as username, you would not have permission to transfer files.
Pear packages may add a distinct functionality to a website in a fraction of the time. If you decide to use a pear package, you can simply install the package with PEAR in Cpanel. Cpanel allows you to see many packages and install, uninstall packages. You simple click on `Pear Packages`and follow the simple instructions. Cpanel may tell you where the files are within the home directory for the particular user account. For the keen individual, you can find PEAR at the unix command prompt:
# pear config-get php_dir
Now, that PEAR is installled, you need to use those files in your php code. Depending on the user account, the files will be installed ina particular directory. For example, the new `Calendar`package may be installed in /home/johndoe/php/Calendar/ directory.
There are a couple of options for which to use these files; set an include path within php.ini or hard code the include path within the file.
To see the where php.ini is, type the following unix command:
# php –ini
Now, make a simple php file and set an include, or just remember where it is.
Now that you know where the include path is located, you can create a test php file. The test file will use the require_once function to get the pear package. What you can do is point the include path in the path of the installed pear files. Then, check to see how it worked. You may find that they should be in your include path like /usr/lib/php because many classes and includes will automatically point to the set include directory on the server. You can move all files into your include path or hard code the files of the package where they had been installed. If they go into the include directory, they are resusable. If the paths are hardcoded, it will be more time consuming to make the changes, but you could do it with a cpanel shared account.
In a nutshell, the simplest method is to find the installed PEAR package files and move them into the includes folder that is set in php.ini. Then, use the path in your require_once function.
During web development tasks, you may want one server for email and one for the actual hosting.
As soon as you update DNS nameservers, all email and website data should point to the same web host. Then, all email accounts and files can be managed from there.
But, if you want email on one server and files on another, you need to change the mx data on the server which hosts the actual website. The company that will be used for the email account will supply mx data. You take that data and update the mx data on the hosting website. Then, you go back to the email provider and update the MX data. Now, email service is taking place with one provider and web hosting with another.
During web development tasks, one such task for completing a job is to use one web server for the website while using another for the email. There are many reasons for this procedure; such as a person registered a domain name and setup and email account before the website was constructed, or, it makes it easier for a developer not to walk a client through a new email server and steps to setup receiving email with Outlook.
After a domain name is registered, the next step is to change the nameservers to where the site will be hosted. If you have a GoDaddy email account, these email servers will change when the new dns settings are updated. But, you can get them back.
Since most domain names are registered with GoDaddy, this tutorial guides through the process of showing how to change mx data to recive email with GoDaddy, but using a website hosted elsewhere.
After nameservers are set for web hosting, you can login to a VPS or dedicated WHM. If you use shared hosting, your isp must make the changes. After logging in to WHM (Web Host Manager), you can see the DNS for all websites.
To see the DNS settings,
1) Login to WHM >Edit DNS >Select website >Edit >Put in proper DNS settings(if necessary) >Save >Wait >Test
Now, you can login to GoDaddy and retrieve the MX data for their service. You should see that the mx data points to the location where the website is hosted. You will want to change these settings. GoDaddy will give you details for the MX data.
To see the MX Records,
1) Log into GoDaddy account.
2) Select ‘My Account’
2) Select ‘My Products’
3) Click Email.
4) Select ‘Manage Account’ for an email account.
5) Select ‘Domains’ tab >Server Addresses. Now, you can update the MX records in WHM of the hosting provider.
Login to WHM >Edit MX Entry >Select website >Edit >Put in proper MX settings >Save.
6) In GoDaddy email account, select ‘Update MX’
Dumping zip, txt, or csv files into PHPMYADMIN is a quick way to generate a database. However, a time could arise when you would like to dump a very large file. By default, phpAdMin allows files up to 50 mb; although php.ini may have other limits. You can alter file sizes in php.ini to allow for upload_max_size and post_max_size. If you alter the size, you may want to alter the timeout so it will not timeout.
If you have root access to yoor hosting account, you can create an upload directory and load from the server, rather than remotely. To do this, you need to access your phpMyAdmin config file called config.inc.php. The file path may be something like: /usr/local/cpanel/base/3rdparty/phpMyAdmin.
To check for its location,
1) Login with SSh and type:
root@server [~]# cd /usr/local/cpanel/base/3rdparty/phpMyAdmin
To change the config.inc.php file,
1) Transfer a copy to your hard drive.
2) Change:
$cfg[‘UploadDir’] = ”; to
$cfg[‘UploadDir’] = ‘upload’;
3) Upload CSV, txt or zip file to upload folder.
4) Login to phpMyAdmin and dump from server. You will see:
‘Select from the web server upload directory’.
To access the php.ini file in web host manager,
1) Open WHM
2) Under ‘Server Configuartion’ select PHP Configuration editor. The advanced view will allow the file the most possibility to edit various settings.
To add new PHP features,
1) ‘Easyapache’ must be opened.
2) Install a PHP feature and build ‘Apache’
This is a simple way to change an addon domain user password in cpanel.
To change the password,
This should change your addon domain user password.
SSL certificates come in all sorts of price ranges. For commerce sites and other websites where you want strong encryption when dealing with sensitive information, they are a must addition. However, there may come a time when you want encryption on your website just for administrator logging in to zones like the Drupal administrator, cpanel or Web Host Manager. In this case where you may feel a commercial SSL certificate could be overkill, there is always the option to setup a self-signed SSL certificate with Web Host Manager, SSH shell or SecureFTP / SSH.
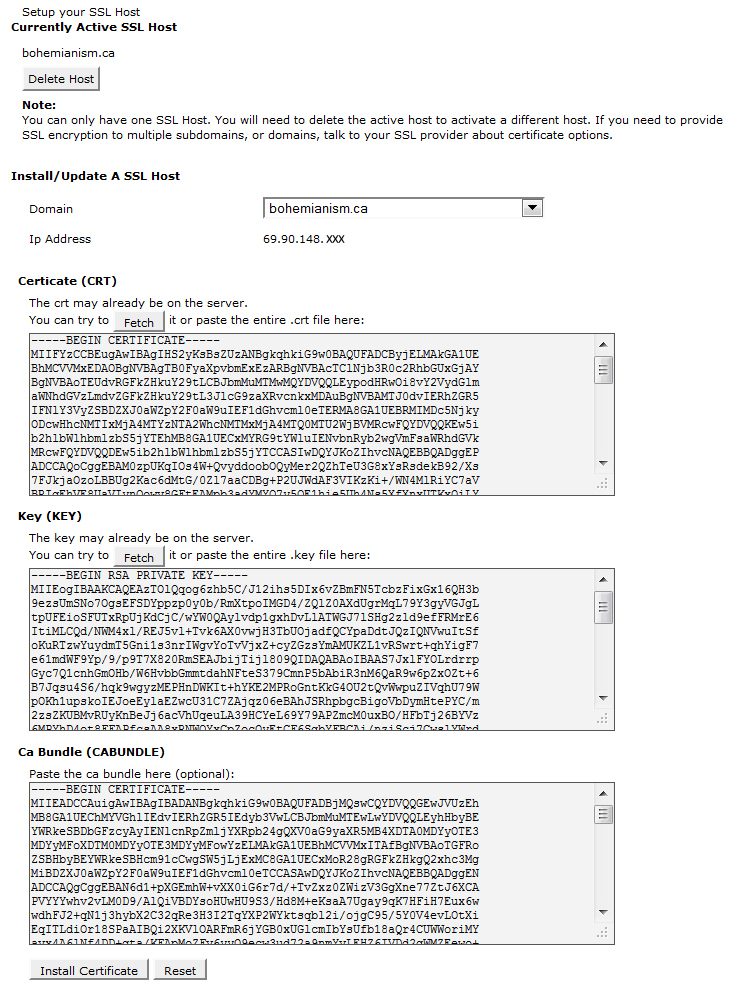
With WHM, the procedure is as follows:
The new self-signed certificate can be used for incoming / outgoing email, logging into WHM and Cpanel. To make a self-signed certificate for a particular website, the website needs a dedicated IP address and it should have its own Cpanel account created in WHM. Then, the previous installation and setup steps can be used to have a SSL that will work on that site, Cpanel, and incoming / outgoing email servers.
The annoyance of a self-signed certificate is that you must follow steps to use it when typing https into the browser or sending email. You will have to accept it on each browser and perhaps on various occasions. One advantage to using self-signed SSL is that you can use a different port to access Cpanel and WHM rather than that from the unsecure url. One disadvantage of a self-signed SSL is that it may not work on each browser; such as Google Chrome. But, it should work each and every time with Firefox.

Owner of Fullstack Web Studio

Quality Coding

Digital Marketing
When Performance and Flexibility Matters
Affordable web design,custom web development and mobile apps for individuals and businesses.


Let us analyze your data and competition to acquire more traffic! Professional SEO content writer
© 2018 ALL Rights Reserved | Sitemap
Vancouver | North Vancouver | Burnaby | Richmond | Coquitlam | Port Coquitlam | Surrey | Langley | Maple Ridge | Mission | Abbotsford | Kamloops | Kelowna | Victoria | Squamish | Whistler | Pemberton