


As a Linux enthusiast, particularly Ubuntu for home pcs, I had decided to write this article to explain why I have really taken to Ubuntu Mate. If I could sum it up in two words, it would be Ubuntu compatibility.
Several years ago, I had an old HP laptop that came with Windows Vista for which I wanted to install Ubuntu. After installing Ubuntu 12 and 14, the graphics did not not work properly out of the box. Even with some tinkering, there was issues. But, when I installed Linux Mint, it worked fine.
However, I had used Ubuntu extensively throughout the years and really liked the forums, always kept a copy of the book ‘Ubuntu Unleashed’ close to my workstation and was brand faithful. Thus, although I liked a lot about Linux Mint, especially the GUI, it always felt like I was substituting for my favorite Linux flavor.
Hence, if you have a Linux background, you may know what I am about to say next. When I first installed Ubuntu Mate 16 in the same old laptop, everything went perfect. In addition, I really liked the GUI and color scheme.
Since then, I bought several old laptops at auctions and have installed them without any issues as well.
Finally, my new Raspberry Pi3. I bought a new 16GB micro SD card and installed the Ubuntu Mate image designed for the Raspberry Pi. Again, I was very impressed how well it performed.
That’s it, my little story about Ubuntu Mate and why I have it in four of my pcs.
The idea here is to run a Linux cron job to reset a mySQL database at the desired interval. In the case of this tutorial, the interval is every two hours.
The code below clearly shows how this can be done in its entirety. It is a cron file for the user named myUser. Although it appears that it has 4 cron sections, note that to are commented out. Also, note that the top two lines of cron commands and bottom two are for 2 different databases.
The top two cron jobs have backticks with backslashes that are required for database names with hyphens, but the latter two lines use underscores where they are not required.
So, you may notice that the top line that is commented out is nice and easy. But, you may also find that it is only useful when you want to dump data into an empty database. Thus, the uncommented option, will run two mysql commands that drop and create a database for the desired user ‘myUser’, then dumps the data from a sql file into the database.
That is all there is to it.
SHELL=”/usr/local/cpanel/bin/jailshell”
#0 */2 * * * mysql -u myUser -pmyPassword myUser_my-DB < /home/myUser/cron/db.sql >/dev/null 2>&1
0 */2 * * * mysql -u myUser -pmyPassword -e “DROP DATABASE \`myUser_my-DB\`; CREATE DATABASE \`myUser_my-DB\`”; mysql -u myUser -pmyPassword myUser_my-DB < /home/myUser/cron/db.sql >/dev/null 2>&1
#0 */2 * * * mysql -u myUser -pmyPassword myUser_my_db < /home/myUser/cron/db.sql >/dev/null 2>&1
0 */2 * * * mysql -u myUser -pmyPassword -e “DROP DATABASE myUser_my_db; CREATE DATABASE myUser_my_db”; mysql -u myUser -pmyPassword myUser_my_db < /home/myUser/cron/db.sql >/dev/null 2>&1
Linux has all sorts or neat packages you can install. Luckily, you may want to use one of them from a PHP script. This brief tutorial will explain how to do this.
The code below takes a submittted form and gathers the url into variable called $url. Then, the httrack service is used to clone the desired website.
shell_exec('/usr/local/bin/httrack http://' . $url . '/ -O "/home/username/websites/ ' . $url . '" -%v -%e0 2>&1;');
Besides PHP, you need to make modifications to the /etc/sudoers file on Linux. The change is shown below.
username ALL=NOPASSWD: /usr/local/lib/httrack,/usr/local/bin/httrack
Now, when you open the folder /home/username/websites/ you will see the new clone.
Here is a simple may to open the new cloned folder with the Linux shell:
cd *example.com
With Pro FTP, you can quickly add conditions to an FTP account. There can very a variety of reasons why you would want to limit FTP to certain files types. For example, let’s say you hired a web designer from overseas to work on a project.
Without placing file restrictions, he could potentially transfer PHP, Perl or Python files which could snoop around your system or reveal sensitive data. Or, he could create an ‘.htaccess’ file and do all sorts of undesirable stuff like allow .txt files to be interpreted as php.
With shell access, you can easily restrict the files that can be transfered with ‘PathDenyFilter’. The example below will demonstrate its usage. First of all, the line starting with ”PathDenyFilter’ is added to the file /etc/proftpd.cond. After that, the ftp services is restarted. If you attempt to transfer a file like .htacccess, or one with an extension like ‘.pl’ or ‘.php’ you will fail.
<VirtualHost 70.90.148.999> ServerName ftp.example.com AuthUserFile /etc/proftpd/example MaxClients 3 "Sorry, this ftp server has reached its maximum user count (%m). Please try again later" DirFakeGroup On ftpgroup DirFakeUser On ftpuser DefaultRoot ~ PathDenyFilter "(\\.ftpaccess|\\.htaccess|\.(pl|php))$"
Using Acronis True Image is a great way to backup computers for web developers and programmers. Since these types of users often have multiple partitions, specific software for specific systems and perhaps many Virtual machines running on various operating systems, having a good cloning tool can make it easy to avoid the hassle of starting from scratch if s hard drive fails.
Thanks to Acronis True Image, it does have a nice feature to clone a complete disk using its clone tool. In order for this to happen, you need to have a PC with two hard drives; such as a laptop with two hard drive bays.
Although Acronis works very smoothly with Windows and will clone all partitions, including Linux, it can have its hickups when you clone systems other than Windows. But, it can be done. This tutorial will guide you through common problems and how to fix them.
After a cloning operation has completed successfully, Windows or Linux could have booting errors; especially if GRUB is fired up upon boot.
Recently, after cloning a hard drive with Linux and Windows, Linux failed to boot and Windows booted but had an annoying error.
To solve these problems, I had to match the proper UUIDs to each machine. With Linux, things are done a certain way and with Windows setting the UUID was different.
Essentially, with Windows, the UUID was updated by changing the UUID in GRUB, while Linux has a simpler commands which fixed the same problem.
This tutorial will explain how those fixes in detail.
LINUX
When I tried to boot into Linux, I received the error ALERT! /dev/disk/uuid/5467d38a-3517-4b79-9efa-8a4973852mom does not exist.
After that, I booted an Ubuntu Live USB and ran the blkid command to get all partition UUIDS.
From that list, Windows was the nfts while Linux was /dev/sda4.
With Ubuntu Live, mount the desired partition just to make sure the fields are the one you expect for the partition that is not booting.
Now that you are absolutely certain about the UUID and the partition, run the command
Now, if you run the command blkid a second time, you will see it us updated. Now reboot without the Live cd or USB and Linux should work as expected. If not, you can always update /boot/grub/grub.cfg file for the root partition, which in this case is Linux. So, if you mount the partition witrh errors and open the /boot/grub/grub.cfg file, you can change the UUIDs there. Just find the error UUID and replace it with the proper one from the blkid command.
WINDOWS
For Windows NFTS partitions, another story. You could get this error:
Although you can press a key right away and get the Windows Bootloader, it can seize after time and it is always a good idea to fix a problem anyways. If this is the case, you need to edit /boot/grub/grub.cfg Good idea to make a backup first. After that, use the blkid command again to get the ID of the Windows partition. Then, replace it with the erroneous one. Finally, run the command update-grub.
Now, all errors should be gone and you have can boot without any error messages.
With .htaccess, you can override the main configuration you set with Apache. However, you can be very specific with your needs. For example, you can set a domain to have no override options in the root folder, yet, specify which folders you want to have the ability to override the main settings.
The code block below will help simplify this explanation.To make this as simple as possible, there is the default file from an Apache installation on an Ubuntu installation on an Ubuntu server. The file is located in the path /etc/apache2/sites/available/default.
As you can see, there is no option to override anything in the root folder. But, the blog folder will be given the option to override. If you have mod_rewrite enabled, you would see that it will work for all files loaded from the blog folder since it has ‘AllowOverride All’.
So, there you are. Only the files the blog folder will have the abilty to use the .htaccess file.
<Directory />
                Options FollowSymLinks
                AllowOverride None
        </Directory>
        <Directory /var/www/>
                Options Indexes FollowSymLinks MultiViews
                AllowOverride None
                Order allow,deny
                allow from all
        </Directory>

        <Directory /var/www/blog>
                Options Indexes FollowSymLinks MultiViews
                AllowOverride All
                Order allow,deny
                allow from all
        </Directory>
About mod_rewrite
When you rent a server; shared, VPS or dedicated, it lis likely that mod_rewrite is enabled by default. But, when you build your own you will likely need to enable it. At the same time, you may want to enable mod headers too.
sudo a2enmod rewrite
sudo a2enmod headers
Using .htaccess code with Apache Stanza
For the real security type, you can always keep all rules in a safe place on the server and deny any overriding with .htaccess. The code below shows code within the file called /etc/apache2/sites/available/default.
<Directory /var/www/blog-test>
                Options Indexes FollowSymLinks MultiViews
                AllowOverride None
                Order allow,deny
                allow from all

DirectoryIndex static.php index.php index.html

#Expire Header
<FilesMatch "\.(ico|pdf|flv|jpg|jpeg|png|gif|js|css|swf)$">
#ExpiresDefault "access plus 2 hours"

#ExpiresActive On
#ExpiresByType image/gif "access plus 1 month"
#ExpiresByType image/png "access plus 1 month"
#ExpiresByType image/jpeg "access plus 1 month"
#ExpiresByType text/css "access plus 1 month"
#ExpiresByType text/javascript "access plus 1 month"
#ExpiresByType application/x-javascript "access plus 1 month"
#ExpiresByType application/x-shockwave-flash "access plus 1 month"

</FilesMatch>

<IfModule mod_rewrite.c>
Options +FollowSymLinks
RewriteEngine on
RewriteBase /

RewriteCond %{REQUEST_FILENAME} !-f
RewriteCond %{REQUEST_FILENAME} !-d
RewriteRule ^(.*)\.html$ blog/index\.php?title=$1 [NC]


#RewriteCond %{REQUEST_FILENAME} !-f
#RewriteCond %{REQUEST_FILENAME} !-d
#RewriteRule ^(.*)\.html$ index\.php?title=$1 [NC]
</IfModule>

<Files ~ ".inc">
Order allow,deny
Deny from all
</Files>

<Files ~ \"\\.(inc|sql|...other_extensions...)$\">
  order allow,deny
  deny from all
</Files>

<Files 403.shtml>
order allow,deny
allow from all
</Files>
        </Directory>
For whatever reason, the time could arrive when you would like to remove www from urls from your root website folder or a subdirectory. If you use the Apache server, mod_rewrite makes it easy for you to do this procedure.
The methods below show one example you could use in your root folder and another you could use in any subfolder which has its own .htaccess file. The examples will have the blocks for both http and https urls.
The first block of code below will be added to any .htaccess file where you want to make the custom rewrite conditions and rules.
The code between the <IfModule mod_rewrite.c> and </IfModule> tags is interpreted if the mod_rewrite module is enabled on the server. Usually, it is always enabled. Although the other blocks of code are outside of the mod_rewrite folder, they will be interpreted.
<IfModule mod_rewrite.c>
Options +FollowSymLinks
RewriteBase /
Options +FollowSymLinks
</IfModule>
Root Folder
HTTP
RewriteCond %{HTTP_HOST} ^www.example.com$ [NC]
RewriteRule ^(.*)$ http://example.com/$1 [R=301,L]
HTTPS
RewriteCond %{HTTP_HOST} ^www.example.com$ [NC]
RewriteCond %{HTTPS} =on
RewriteRule ^(.*)$ https://example.com/$1 [R=301,L]
Subfolder
HTTP
 # remove www
RewriteCond %{HTTP_HOST} ^www\.(.+)$ [NC]
RewriteRule ^ http://%1%{REQUEST_URI} [NE,R=301,L]
HTTPS
 # remove
www RewriteCond %{HTTP_HOST} ^www\.(.+)$ [NC]
RewriteCond %{HTTPS} =on
RewriteRule ^ http://%1%{REQUEST_URI} [NE,R=301,L]
For more information about mod_rewrite variables, you can see them at http://www.askapache.com/htaccess/mod_rewrite-variables-cheatsheet.html
More mod_rewrite Theory
Although you can move on and just add the code as it was described above, I will add a little theory into the mix.
The actual file mod_rewrite.c is C source code. You could find this file with command find / -name ‘mod_rewrite.c’ 2>/dev/null. If you wanted to check it out, you can view it with the cat command or load it into an editor. At this point, you may want to have a tuner on the language C, so that you will know more about pointers, global scope, and libraries. It is very different and more head spinning than a scripting language like PHP.
If you have a computer with a faulty Windows installation, or a pc that just runs too slow with Windows, you may want to give Linux a try. Two distributions which have a modern look feel and functionality are Ubuntu and Linux Mint. Generally speaking, you can download the iso and write the image to a USB stick or CD. Then, you allow your BIOS to boot from USB or CD and go through a typical installation.
Installing Linux does have many advantages beyond having a working system. For example, I have a desktop PC with dual hard drives. One hard drive has Windows Vista and the other Linux Mint. The performance is night and day. The Windows Vista is slower all the way around; from boot to general usage. Meanwhile, the performance of Linux Mint on that 1GB memory PC can be compared to my higher end Laptop when it runs Windows 7. The performance of Ubuntu partitions and Virtual machines on the same laptop is much faster too.
With those details in mind, you should have renewed hope with your older, malfunctioning computer. Alternatively, if you are a web developer and need a decent working machine you could skim some costs and turn somebody’s junk into your own treasure.
The key with installing Linux could be patience. In some cases, the drivers or graphics could limit your installation. For example, I recently installed Ubuntu on an old HP DV9000 and the graphics did not look desirable at first. After some tweaking, I could get my desired resolution, but the system had a few errors. Being impatient and finding this buggy, I immediately decided to install the latest Linux Mint.
This failed, even though the same version installed fine on my desktop PC. So, I decided to install the previous version of Linux Mint. Ten minutes later, all went well. So, if you don’t want to get down and dirty with command-lining, but just want a usable faster Internet surfing device, it should not take you long to be up and running.
Another area where you could have issues with Linux is networking. In some cases, your pc will work upon installation, while at other times the Internet connectivity could cause issues. If you want to be up and running with Ethernet or wireless, a no-brainer solution is to buy USB wireless or USB network adapters that are plug and play compatible with Linux. Then, you can just plugin them in and go.
Otherwise, you may need to find and install drivers. Personally, I find ordering a few of each on Ebay for around $5 each is worth the savings of hunting down and installing drivers. Another option, if you have at least 1 wireless network adapter, is to connect to the Internet and hopefully download your desired driver.
So there you go. The above lesson for converting the Windows machine to a Linux machine had been covered. I would like to remind you that the key points you should remember are to install a Linux installation that works perfectly upon installation. The only minor change you should have to make is to alter the screen resolution. If this is not possible or you have errors, move on and find one that does work better. In addition to that, having external wireless or ethernet adapters will make your Internet connections painless experience.
Moving updated files from one server to another server can be done with few Linux commands. To move or backup files to another server, you could create a tar or zip file on one server. Then, you can use SCP to move the tar or zip file to the foreign server. After it reaches its destination, you extract it.
From a backup point of view, it only makes sense to backup the folder to a new server when the files change. In this case, you can run a cron job that checks for file modification, and only creates and sends the backup when there are updated files. You could make this check at any desired interval that you want; from hourly to daily to weekly.
The server which will store the backups can have a cron job that checks for a new backup tar or zip file within a specific directory. Then, if its date is within a specified time interval, you can run a command to extract the tar or zip file.
Make the Backup on Host Machine
The one-liner below shows how to check and make a backup tar ball for all of the new files within 1 day.
root# find /home/username/public_html/foldername -type f -mtime -1 | xargs tar -czf foldername.tar
Moving tar file to New Server
root# scp -P 22 /home/username/Desktop/foldername.tar test@example.com:/home/username/public_html/foldername.tar
Restore the Backup On Slave Machine
The line below shows how to extract the tar file from the machine which stores the backups. It will only overwrite the old files which have been modified and leave the rest intact.
root# tar -xvf foldername.tar
Alternatively, you could run the following code with a cron job. It will look for the file to see if it is less than 1 day old. If it is, the tar file is extracted. If it is not, output is redirected to the black hole ‘> /dev/null 2>&1’. With this bash command, the find command is run. After that, the ‘&&’ operator represents the if statement and the ‘||’ operator represents the else statement.
//Test
root# [ `find /home/username/public_html/foldername.tar -type f -mtime -1` ] && tar -xvf  /home/username/public_html/foldername.tar || echo "File is within 1 day"

//Production
root# [ `find /home/username/public_html/foldername.tar -type f -mtime -1` ] && tar -xvf  /home/username/public_html/foldername.tar || > /dev/null 2>&1
One more method to check the file created date and extract it if it is within 1 day old is shown below. This technique uses a single command. It looks for the file that was created within one day, then runs the ‘-exec’ action which is another linux command.
root# find /home/username/public_html/foldername.tar -type f -mtime -1 -exec tar -xvf /home/username/public_html/foldername.tar \;
The steps above can be used to backup and move new files. But, to do it automatically, you need to run cron jobs that use these commands as bash scripts. Also, you need to use SSH keys to transfer the files via SCP without a password or the transfer will not happen.
This tutorial will show the steps that can be used to backup a mySQL database, move it to a new server and restore it. Although this can be done very quickly with GUIs like Cpanel and phpMyAdmin, the tutorial explanations use the Linux command line. After all, if you want to do synched backups automatically with Cron jobs, the GUI cannot do that for you.
Simple One Time Move
//Copy It
username# mysqldump -u root -p mydb > mydb.sql
or with password
useraname# mysqldump -u root -pAddPasswordHere mydb > mydb.sql

Move It
scp -P 22 /home/username/Downloads/mydb.sql test@example.com:/home/test/public_html/mydb.sql

//Restore it
Create database, if necessary
mysql -u root -pAddPasswordHere -e "create database mydb"

//Add the tables
mysql -u root -pAddPasswordHere mydb < mydb.sql
Continual Backups
This setup can be used if you want to empty and overwrite existing databases. Unlike the example above, the -e flag allows you to write single or multiple mySQL commands. With the example below, the database is destroyed, recreated and dumped with a fresh set of data.
You could run a cron job on one host that will move the sql file to the new server. Meanwhile, you could run a cron job on the foreign host so that it dumps the desired data at your preferred time(s). In addition to these commands, you will need to use ssh keys so you can SCP the file without using a password.
//Copy It
username# mysqldump -u root -p mydb > mydb.sql
or with password
useraname# mysqldump -u root -pAddPasswordHere mydb > mydb.sql

//Move It
scp -P 22 /home/username/Downloads/mydb.sql test@example.com:/home/test/public_html/mydb.sql

//Restore it
mysql -u root -pAddPasswordHere -e "drop database if EXISTS mydb; create database mydb;" ;mysql -u root -pAddPasswordHere mydb < mydb.sql
Although this article is targeted at copying and restoring mySQL databases, moving files to another server can be done with similar methods. For example, you could create a tar or zip file on one server, SCP the file to another server and extract it when it reaches its destination.
The chkconfig command will allow you to start a service upon a boot or reboot. In most cases, it is very necessary to set this up properly so that everything will work as you want it to after a reboot. If it is not, services like Apache and mySQL will not start unless they are not instructed to do so.
With that said, the following simple set of steps can be used to start a service automatically when the Linux VPS or dedicated box is booted. The example will show how to add the service for checking, list its settings, make it start at boot time and remove it from starting at boot time.
To add the service to chkconfig,
root# /sbin/chkconfig --add monit
To see if the service was added to chkconfig,
 root# /sbin/chkconfig --list monit monit
0:off   1:off   2:off   3:off   4:off   5:off   6:off
To add the service to start upon boot,
root# /sbin/chkconfig monit on
To check that the service was changed with chkconfig,
 root# /sbin/chkconfig --list monit monit
0:off   1:off   2:on    3:on    4:on    5:on    6:off
Note: The values have for 2,3,4 and 5 are now on and this service will not run automatically upon a reboot. Those run levels of 2,3,4 and 5 are the relevant ones for the matter at at hand.
To remove the service from starting upon boot,
root# /sbin/chkconfig monit off
Varnish an http accelerator that can be installed on any Linux distro. Varnish allows your website files to be pulled from the cache if they exist. If the files do not exist, Apache, mySQL and PHP do their regular requests and load the files into the browser.
Although Varnish seems like the ultimate caching system, becoming familiar with its configurations, logging and commands can be quite a committment; especially if you run multiple dynamic websites and applications like Joomla, WordPress, Magento and custom php / mySQL scripts. However, asides from getting around those details, it kicks butt. You could see that slow loading Joomla or Drupal site loading as if it is plain html / css static files from a dedicated server. Once you see how well it performs, you probably never want to go back; unless you have some web applications that you absolutely don’t want to cache.
Installing Varnish on Centos
root# yum install varnish
Configuring Varnish
After you have installed Varnish, there are two main configuration files that you will edit; ‘/etc/varnish/default.vcl’ and ‘/etc/sysconfig/varnish’. The former file would take up most of your time, while the latter file may be rarely edited. The file ‘/etc/sysconfig/varnish’ is where you set varnish to cache to memory or disk, set the cache size, set the port for Varnish to listen on, and set the Varnish admin port. By default, many of these settings are usable. But, you will probably want to make adjustments. A lot of tips for Varnish can be found here https://www.varnish-cache.org/docs/trunk/tutorial/putting_varnish_on_port_80.html.
The other file, ‘default.vcl’ can end up getting very long and specialized. When you use the default.vcl file, you will want to make entries for every ip that is used on your server. You will also make very specific caching rules. Some examples are shown below.
The first major change that takes place is changing Apache’s default port 80 to something else which is usable.
Ip Address setup
The backends and acl will vary from server to server. Here is an example below. Another example can be found at https://gist.github.com/jeremyjbowers/1542949
backend default {
  .host = "ip#1";
  .port = "<apache new port number>";
}
backend default2 {
  .host = "ip#2";
  .port = "<apache new port number>";
}
backend default3 {
  .host = "ip#3";
  .port = "<apache new port number>";
}


 acl afirst_ip_quad_block {
"ip#1";
}
acl asecond_ip_quad_block {
"ip#2";
}
 acl athird_ip_quad_block {
"ip#3";
}
Customizations
The example below allows PHP to grab an ip with the variable $_SERVER[‘HTTP_X_FORWARDED_FOR’]. By default it is $_SERVER[‘REMOTE_ADDR’].
As a general rule, all conditions that are set in the sub vcl_recv {} and vcl_fetch() blocks. You will do most of the changes here. A good method for changing the default.vcl file is to back it up and reload it with the ‘/etc/init.d varnish reload’ command or restart varnish with ‘/etc/init.d/varnish restart’.
sub vcl_recv {
remove req.http.X-Forwarded-For;
set req.http.X-Forwarded-For = client.ip;
if (server.ip ~ afirst_ip_quad_block) {
set req.backend = default;
#return(lookup);
}
Unset a cookie and cache all images with the given extensions
if(req.http.host ~ "^(www\.)?example\.com" &&  req.url ~ "\.(jpg|jpeg|png|gif|css|js)$" ) {
unset req.http.cookie;
set req.backend = default2;
}
Do Not Cache Certain Pages
elsif (req.http.host ~ "^(www\.)?example\.com" && (req.url ~ "^/member\.php" ||
      req.url ~ "^/signup\.php" ||
      req.url ~ "^/newsletter\.php"
    ))
{
#     return(pass);
#remove req.http.cookie;
   }
Testing Varnish
With varnish, you can set custom headers and test to see if it hits or misses. A good example can be found at https://www.varnish-cache.org/trac/wiki/VCLExampleHitMissHeader.
After you have added this block, you can use Firebug with Firefox or use the network tab after inspecting the element with Google Chrome. Now, you can see the new headers and examine the hits, misses and amount of hits from the cache for that page.
Rebooting Varnish Script
The script below can be set as a cron job to restart Varnish at your desired internal.
#!/bin/bash

# Check if gedit is running
if ps aux | pgrep varnish >/dev/null 2>&1
then
    echo "Running"
else
    #echo "Stopped"
        /etc/init.d/varnish start
fi
Monitoring Varnish
You can check the activity of Varnish using the ‘varnishstat’, ‘varnishncsa’ and ‘varnishlog’. After seeing these, you can see visitors logs and see how well it caches. Once the ‘varnishncsa’ process is running, you can also write its output to your own custom log file. The command for that is varnishncsa -a -w /var/log/varnish/access.log. You can check the logrotate settings in ‘/etc/logrotate.d/varnish’ to make sure it creates rotated logs.
If you want to make sure Varnish stays up and running, you can use a service like Monit or Munit to monitor its process and make sure it goes up if somehow is not running.
Working With Varnish
If you have many websites and domains, you may find that you will edit files and want them refreshed. In order to do this with varnish, you will continually need to flush the cache for a specific url while you are conducting web maintenance.
The first line below would clear the entire cache for example.com. the second line would only remove the ‘.jpg’ files from the cache.
root# varnishadm "ban req.http.host ~ example.com"
root# varnishadm "ban req.http.host ~ example.com && req.url ~ .jpg"
Virtualbox makes it easy to host a website on your virtual machine. This tutorial will discuss the basic setup. It assumes you have already installed the usual Linux, Apache, PHP and mySQL. If you need help with that, please check out the page here.
Hosting at home can be easily done if you set the DNS to point to your IP address assigned by your Internet Service Provider.
After you have set the DNS, you need to run two wireless connections from your host pc. By doing this, your router will assign two local network IPs; one for each wireless connection. Note that you will want your host machine to use both wireless connections.
Now, you need to alter the settings with your Virtualbox guest machine so that it connects with one of the wireless adapters. In this case, you will use the Bridged Adapter. By default, the network adapter is set to ‘NAT’, which means it would use the same ip as your host pc. The setup is shown below.
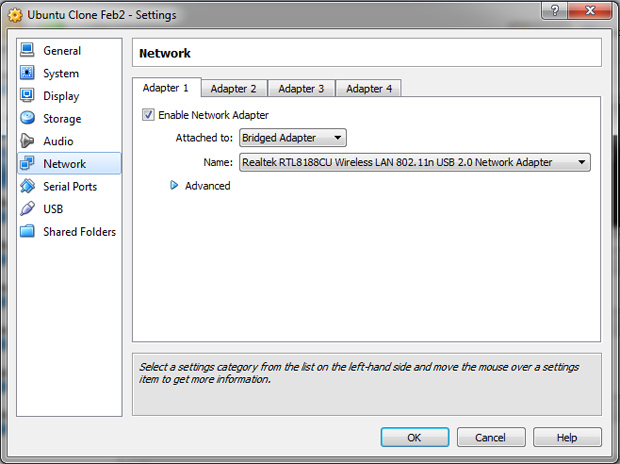
After you have made the changes, you can boot your virtual machine. Meanwhile, you can allow port forwarding for port 80 on your router to be set to the IP address that is used by the virtual machine. You router will show its connections and you should easily find the ip for your wireless(or wired) connection. When you do find it, make sure to allow port 80 to be forwarded for that ip address.
After you have set the port forwarding, you should easily be able to access the website with http://<myipaddress>.com or http://example.com.
Using this method is an easy and quick method to host private web applications on your local virtual machine.
When you connect to the Internet with a Live CD or Live USB, your connection to your router will create its own network ip address and use the mac address based on the hardware that is used to make the wifi connection. For example, after booting Live Ubuntu, Live Kali, or another Live Linux distro, you will make an Internet connection. If you use a wifi dongle to make the Internet connection, your router will use that as the mac address for your machine. Meanwhile, if you used the built in wifi network adapter, the mac address would be something else.
To test this for yourself, you can connect a second wifi dongle and boot your Linux live distro. Then, connect to the internet with either of your network adapters. Now, open a browser and login to the router. You should be able to see the ip address and mac address for your pc. Now, disconnect from the network adapter and connect with the other one. Now, you will see a new ip address and mac address for this connection.
Virtual machines have various means for which they can connect to the Internet. This lesson will discuss how Virtualbox can be used to connect to the router with its own IP address and mac address.
By default, a virtual machine connects to the Internet with NAT. This will allow you to connect through the same IP address as your host pc, although Virtualbox technically uses the Ethernet connection to make this happen. Essentially, if you browse the Internet and use your Virtual machine to do so, you will use the same IP address and mac address as the host machine.
But, what if I want to have my own network IP address and mac address for my Virtual machine? Well, if you want your Virtual Machine to act like a stand alone computer on the network you will need to alter two settings from the Network settings.
One setting is to change the setting ‘NAT’ to ‘Bridged Adapter’.
The second setting is a little more involved since it requires the usage of a second Wireless Internet card. You can pick up a wifi dongle for about $5-10 on Ebay(or ~$15 in a store). Once you have the dongle, you may have to install software and do a system reboot. Alternatively, it could be plug and play. Once your pc reads the new wireless device, you can connect to the Internet with either of the two wireless connections.
So, if you want to connect your Virtual machine to the Internet with the wifi dongle, you select it. Now, when you run your Virtual machine, it will use the mac address of the wifi dongle.
You should note that when you look at your mac address with the ‘ifconfig’ command with your Virtual machine, it will be the one that is listed in the network. It will not be the same mac address as the wifi dongle. But, the router will use the mac address of the wifi dongle.
When you develop web applications, you can use a single operating system of choice. Normally, that involves one of the big 3; Windows, Mac, or Linux. However, you may find that using more than one at the same time can be more effective and easier for your workflow than a using a single option. You can run multiple operating systems by running virtual machines with a program like VM Ware or Virtualbox. Both VM Ware and Virtualbox have free versions.
This article will explain how you may want to use two operating systems at once in order to accommodate your custom needs. Essentially, the overall criteria for knowing if you should use one or more systems at the same time is to determine which system has the best software and applications to do your desired task.
For example, you may have purchased programs like Camstasia and want to run them natively on Windows. A true Linux faithful may explain that anything you can do on Windows can be done on Linux. That may be good enough for him, but, you may just want to keep going on with your habits and use a system that is already fine-tuned. Adding Wine or another Linux package may just seem like adding another layer of complexity for a seasoned Windows user.
Windows / Mac Usages
Here a few instances where you may find running Windows or a Mac to be beneficial.
1. My software I have used for years
This is very self-explanatory. You have bought some well tuned software like Photoshop, Camstasia or Pinnacle Studio, and you are very used to how it works. This means the familiarity from opening the program, opening files and saving files is not something you are willing to adjust.
2. Word Processing
Microsoft Word does everything you want. After years of usage, you are not that interested in starting over. The free Linux alternative LibreOffice is a worthy alternative, but, it may miss the odd white space or spelling mistake.
3. Email
Linux has excellent email clients like Thunderbird. However, like many Linux programs, the usage can vary from that of Windows. In this case, you may just want to use the formula that has been working all along.
Linux Usages
If you have Linux experience with distros like Ubuntu or Centos, you will have no problem finding your way around the operating system. But, if you are new, you may experience that it is a much different beast than Windows or Mac. Linux is largely a programmer’s operating system.
Permissions on files and starting some programs can involve time spent with the command line. In all honesty, if you are new or do not have a desire to be good at Linux you may find running a second operating system an uphill battle. However, if you just want to edit and run a Lamp server, it should be rather easy to accomplish.
Nevertheless, if you are dedicated to learning and running Linux, you have a lot of powerful knowledge that can be used to be more effcicient with dedicated or VPS hosting accounts, and for using Linux at home where you find its benefits are high. Spin-offs from using Linux for a hobbyist are that you can setup home servers with Raspberry Pis that can allow you to test and run web applications and run other Linux applications.
One such application is a live motion security cam that stream live video and save swf files after motion is detected. On top of that, Linux machines and Raspberry Pis can be used to automate your house; like turning lights on and off, creating a weather station and watering plants on a schedule; all of which can be monitored in an online environment. Linux usage can go on and on.
Anyways, here a few instances where you may find running Linux to be beneficial.
1. Local Lamp Server
From a web developer point of view, Linux could stand out if you want to install and run a Lamp server. Wamp is good, but Lamp is really kick-ass. Since you will likely use Lamp online, using it locally has many benefits. As a web developer, it is an automatic arena to test scripts offline, or, to run custom applications on a localhost.
2. Using a Virtualbox For a Client
Virtualbox, by Oracle, allows you add Virtual Linux machines. Essentially, you can build an entire system that is specific to client. You can add an editor like PhpStorm, Netbeans, Gedit, and others.
Using Linux makes it easy to connect to foreign servers with the command line. Keeping a whole system to store files and run applications can make your workflow very efficient. It also makes backing up a very simple process since a Virtual Machine is essentially a large file.
Conclusion:
Under certain circumstances, using two systems can be very efficient. If you decide to avoid Linux, you may be able to make do. If you use many of its advantages like Lamp and home servers, you can get more done. Knowledge and practice of Linux is never a waste. As you learn more about it, you will be strengthening your web development and systems admin knowledge. As you can do more, more options and tasks are available to you. Being able to do more on the web is an advantage that Linux will deliver.
Finally, in addition to doing more, gaining a stronger knowledge of Linux can get you out of jams and keep your systems running smoothly. Therefore, when something does go wrong, you will have the basic troubleshooting skills to get things back to normal and find why things had gone wrong.
With Linux, you must keep an eye on the system health to ensure that your hard drive space and memory do not get eaten up. If you exhaust your limit, you end up with issues like websites that cannot be viewed and the inability to login to GUIs like Web Host Manager and Cpanel.
When you do run out of memory and attempt to login to a control panel like Web Host Manager, you could see the an error message that is displayed below.
Internal Server Error 500 No response from subprocess (whostmgr (cpanel)) with exit signal: 0
Running Out of Memory
If you run out of memory, you need to login to your host with SSH and stop or kill some services; like mySQL. If you use a service like Web Host Manager and Cpanel, you may need to reboot the cpanel service to have access to your control panels.
To restart Cpanel,
/etc/init.d/cpanel restart
Once you have been able to login to Web Host Manager, you can do a graceful system reboot and hopefully your memory slide back into a usable level.
To see how much memory you have available, run the following command in the shell.
free -m
Yslow is an addon you can add to a browser like Firefox or Chrome so that you can analyze web pages. With the analysis, you can determine some areas that require upgrading.
When Firebug and Yslow addons are installed in Firefox, you simply open Firebug and select the Yslow Tab.
To run a Yslow check,
1) Open the desired web page.
2) Select ‘Run test’
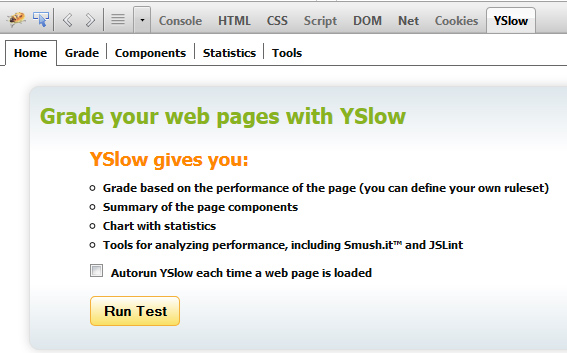
After a test is completed, you can see your score and a list of grades.
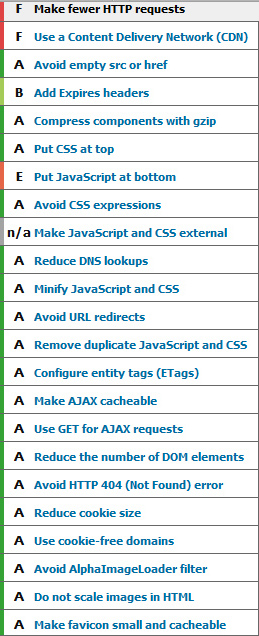
Upgrade Web Page(s)
To upgrade your web pages and get higher grades, you can select any link from the list shown above. Generally, there are a few quick fixes that can give instant results. The major changes are to add expires headers into your .htaccess file, enable compression (Cpanel can do this), minify css and javascript files, and set Etag in .htaccess file.
FileETag none
ExpiresActive On
<IfModule mod_expires.c>
ExpiresDefault “access plus 6 month”
ExpiresByType image/x-icon “access plus 6 month”
ExpiresByType image/jpeg “access plus 6 month”
ExpiresByType image/png “access plus 6 month”
ExpiresByType image/gif “access plus 6 month”
</IfModule>
Allowing visitors to cache images and files in their browser can make your website significantly faster to navigate. This post will explain how to use mod_expires and mod_headers to allow visitors to cache files in their browser. With browser caching, you can set the time for which files can be cached. The caching duration has pros and cons. For example, if you are blogging and you update content, but rarely change images, caching for long time periods can significantly decrease the load from your server and make the user’s experience much better. Alternatively, if you have a small website and make changes daily, caching for the long term can be detrimental if you want your visitors to always see the latest content.
For a larger game plan, you can use Varnish and mod_expires to keep your website running quickly.
Show Modules with Debian / Centos
Alternatively, a tool like Web Host Manager with Centos can show which Apache modules are installed and enabled. You can see that with Easy Apache.
Enable mod_expires (Debian / Ubuntu)
Now I can cache all the images on my site by adding this to .htaccess in my root directory.
1) Add code to .htaccess.
Using mod_headers
1) Enable mod_headers
To use mod_headers,
1) Add code to .htaccess file
#mod_headers
<FilesMatch “\.(ico)$”>
Header set Expires “Sat, 15 Dec 2015 20:00:00 GMT”
#Header set Cache-Control “public, max-age=3600, must-revalidate”
</FilesMatch>
<FilesMatch “\.(ico|pdf|flv|jpe?g|png)$”>
#Header set Cache-Control “public, max-age=3600, must-revalidate”
</FilesMatch>
Simple Check to See If caching Is Working
If you have Firebug and Yslow addons installed in your browser, you can fine tune your Expires Headers. All you must do is a run a Yslow test and check the Expires Headers. It will give you a grade and tell you what has ‘No Future’ expiry date. With a little tuning, you can fix the expires headers. You may need to add expires for specific file types like ‘.ico’. Or, you may need to remove links to non-existent images (or add 1 pixel transparent images to a folder). As you tune expires Headers your Yslow grade will climb instantly.
With Ubuntu, you have a couple ways to setup cron jobs. You can run the ‘crontab -e’ from the command line or, you can edit the /etc/crontab file. The /etc/crontab file will run no matter which user is logged into the system. If you are a single user, keeping everything in this file is a valid option.
Making Cron Job
root# cd /etc root# vi crontab or username# crontab -e
Sample Cron Job That Runs Every 5 Minutes
*/5 * * * * username /usr/bin/php -f /var/www/myhtml/filename.php
Eventually, you may install a script that has a directory with multiple folders and files. Unfortunately, the files and folders had been installed with inadequate permissions. For example, you may want to set the permissions for all folders to 755 and the permissions for all files to 644. The code code below will demonstrate two simple Linux command line statements that can do this.
root# find /home/user/public_html/mycrm/cache -type d | xargs chmod -v 755 root# find /home/user/public_html/mycrmr/cache -type f | xargs chmod -v 644
Virtual machines are operating systems that run through software which enables this to take place. For example, Virtualbox or VMware allows you to run other operating systems within its program while you are running your host operating system. The reasons why you would want to use Virtual machines can be long and exhaustive. But, this section will focus on five strong points for using virtual machines. Five reasons why you may want to run virtual machines are to try new operating systems, run old operating systems where your software is compatible or you have familiarity, easily backup and move custom setups to other machines and to run Linux and Windows (or mac and other OS) at once and testing software.
Try New Operating Systems
Within minutes, you can setup a new virtual machine and test out various operating systems. For Linux users, there are so many varied distros that you may want to have many virtual machines since they all have their strengths and weaknesses.
Run Old Operating Systems
You could need to setup an older operating system to run software which could have compatibility issues with your current software. Now, you have the option to take advantage of old and new software. Also, you may be lost with your new operating system. Therefore, running both can help you to be more efficient with your tasks.
Easily Backup and Move Custom Setups to Other Machines
So, you like to create custom setups and want them usable on other pcs. Backing up and cloning virtual machines is very quick and easy to do. In fact, you can backup 30GB virtual machines in a few minutes while saving them to an external disk for safekeeping can be done very quickly too.
Run Linux and Windows (or Mac and other OS) At Once
For many specialists like web developers, running Linux and Windows allows you to use both operating systems at once which is very convenient. You can easily flip back and forth between Linux and Windows. Personally, I like to run Windows software in Windows while using Linux virtual machines to build scripts which use both shell and php / mySQL programming.
Testing Software
For obvious reasons, using a virtual machine is a safer method to test software that is downloaded from the Internet.
So, you have spent hours and hours working with your Ubuntu Virtual machine to set it up just right. Meanwhile, your files and folders have grown to the point where you are running low on disk space. This should not have been a complete surprise since it probably has been a trend since you bought your first pc. Anyways, this post will help solve those issues and allow you to increase your disk space so you can move forward.
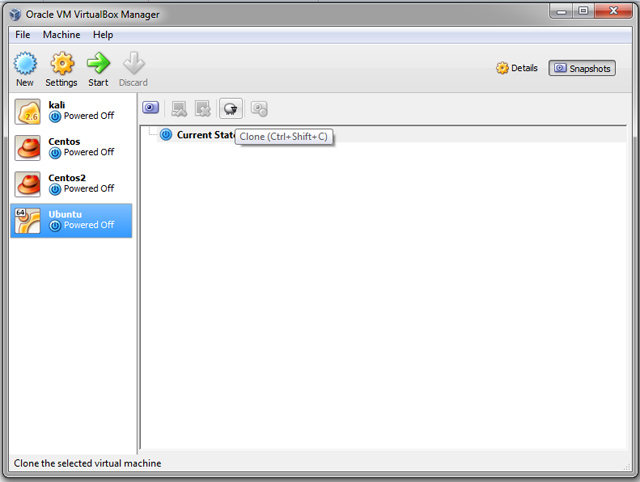
1) Make a clone.
2) Make sure you are not actively using the newly cloned virtual machine.
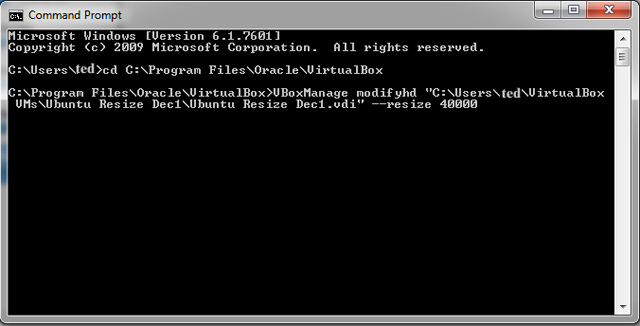
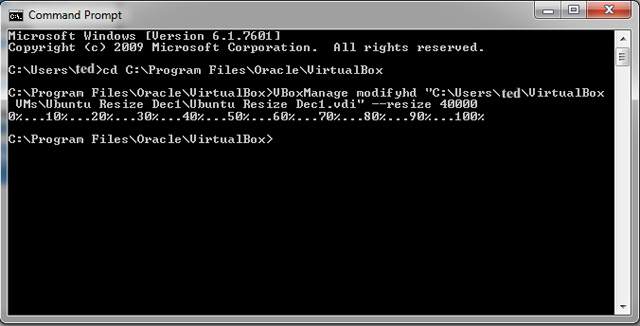
3) Increase disk space with the command prompt. This example uses Windows 7.
a) Open the folder with the Change Directory (cd) command. View images below, if necessary. cd C:\Program Files\Oracle\VirtualBox b) Run the VBoxManage file to resize the disk VBoxManage modifyhd "C:\users\ted\VirtualBox VMs\Ubuntu Resize Dec1\Ubuntu Resize Dec1.vdi" --resize 40000
4) Download the Gparted ‘Live’ iso. The file is about 165 MB. It can be downloaded here.
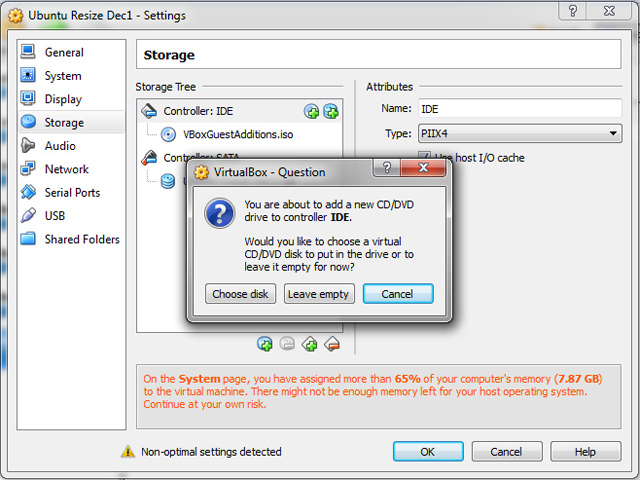
5) Add the Gparted ‘Live’ iso to the Controller: IDE list.
To add Gparted Live,
a) Select the clone > Settings > Storage > Under Controller IDE select ‘Add CD/DVD Device’ > Choose Disk >Select the Gparted live iso > OK.
Note: the disk size needs to be larger than the iso file. This example uses ~ 413 MB. See images below.


6) Start the virtual machine
Note: Gparted Live will boot
a) Select you language and all that jazz, Enlish may be somthing like 02 and your ‘GUI’ view may be something like ‘0’. Just hit ‘Enter’ on the keyboard after selecting your options.
Using Gparted
When Gparted opens, you will see the new unallocated space. In this case, 7.64 GB.
Now, here is where things get interesting because you want to increase the sda1 partition.
7) Increase the sda1 partition.
To increase the sda1 partition,
a) Delete the Logical partition (swap) > Select Apply. Make sure to run the operation.
b) Delete dev/sda2 extended partition from dev/sda > Select Apply. Make sure to run the operation.
c) Select partition /dev/sda1 >Resize / Move >
Note: Make sure to use all of the space. make sure to run the operation.
Altering the Virtual Machine Settings
8) Now, go back to your list of Virtaulbox machines and select your Virtual machine. In this example, the machine is called Ubuntu resize Dec1. Select ‘Settings’ >Storage and change Gparted from ‘Primary Master’ to something else. Change ‘VBoxGuestAdditions.iso’ to your ‘Primary Master’. The ‘Primary Master’ will be the iso which boots when you start a Virtual Machine. You want to start Ubuntu this time, not Gparted. Alternatively, you can remove gparted if you want.
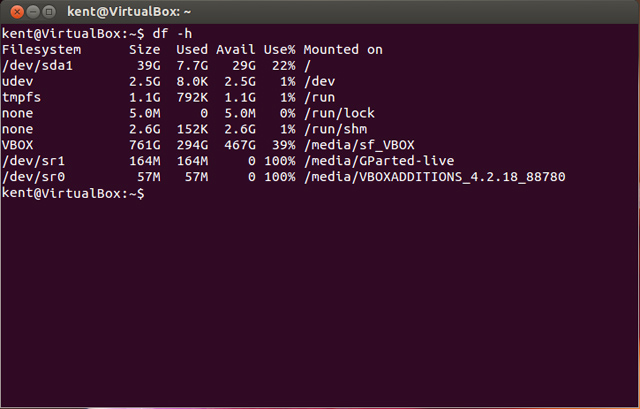
9) See the new changes in disk space. When you boot into Ubuntu and open the terminal, type df -h and you should see the newly added hard drive space.
Rsync is a very good package which allows use Linux users to synchronize files and folders on the same, or different machines. The concept behind Rsync is that is only updates files that have changed in date and file size. So, from a backup point of view, it can keep an accurate live backup when you run the command to synchronize the files.
Using Rsync On Same Computer
Using Rsync On Different Computers
Potential Problems:
Permissions. When you sync the files to the slave machine the folder should have adequate permissions. For example, if you login as pi@192.168.0.115 the files will transfer into the desired folder if the files or group is owned by pi. If you login as pi and attempt to move files into a folder owned by root, the sync will not happen.
When you boot into your Linux OS, the .bashrc file, an others will load variables and aliases which can be used within the command line. There are many reasons why users will want to add variables and aliases. One of the main reasons why users want to take advantage of these aliases and variables is to cut down on typing. If you are a web developer, you may find you will have files nested inside many folders, since the default file directory is /var/www. If you like to create may projects, the directories can find a way to grow and grow.
To make an alias,
user# alias mymaindir="cd /var/www/scrapers/website/"
To make the alias usable without rebooting,
user# source ~/.bashrc
To navigate to your chosen directory,
user# mymaindir
Although Raspberry Pis might seem cheap to buy, the costs can add up by the time you add on various accessories. At the very least, you need a power supply, an SD card (hard drive) and an hdm1 cable. This brings the tally up to $70 or so; depending where you buy the supplies. After you have these basic supplies, you can can turn on your tv, start your pi and install an operating system on your SD Card. If you are lucky, you have a mouse and keyboard that is compatible with the Raspberry Pi. Otherwise, you will need a compatible keyboard and mouse which can run $20 and up. At least now, you are up and running anywhere from $70-$100.
No Internet?
The Raspberry Pi comes without Internet, so add on another $5-30 for an Ethernet cable. A cheap dollar store model is usually sufficient. A wireless usb dongle is another $15.
Conclusion:
By the time your Raspberry Pi is up and running, you can expect to pay somewhere around $100. As an owner of 3 Raspberry Pis, I still find them very useful for my intended purposes. They use very little power, take up very little space, make excellent storage devices and can run local php / mySQL scripts.
Would I buy 3 again? Yes.
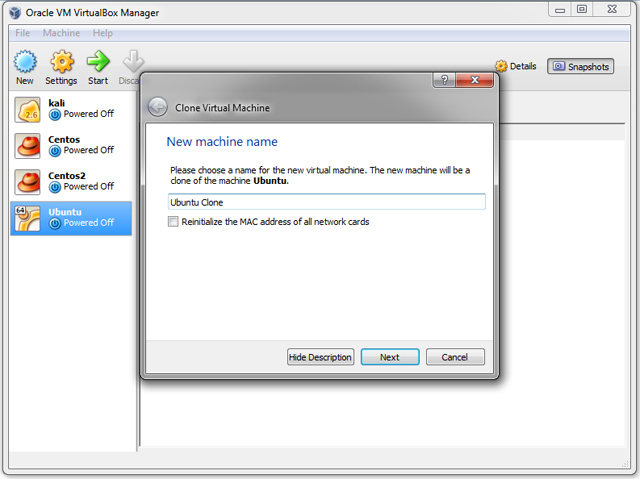
Although Virtualbox allows you to build up your Linux distro, it offers so many more features.One of its great features is that is allows you to create clones. Essentially, cloning can be used as a backup mechanism for which to store copies of virtual machines. Therefore, you can easily save a machine that is detailed to your personal specifications, then, create a clone and experiment.
The image sequence below shows how to clone a virtual machine with Virtrualbox.
1) Select the machine you want to clone >Select ‘Snapshots’ >Click the sheep.
2) Name the backup.
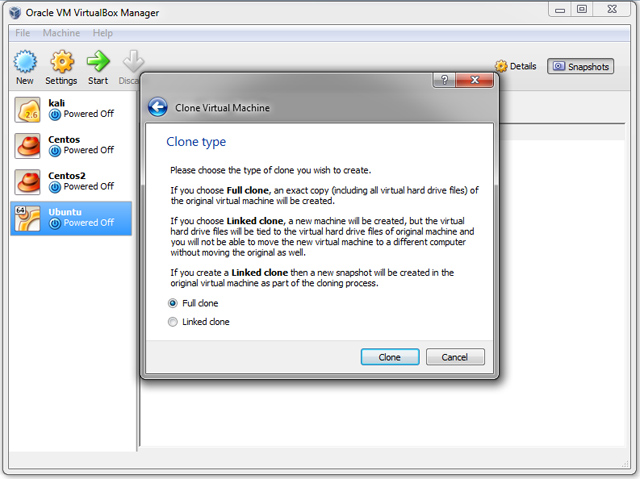
3) Make a full clone.
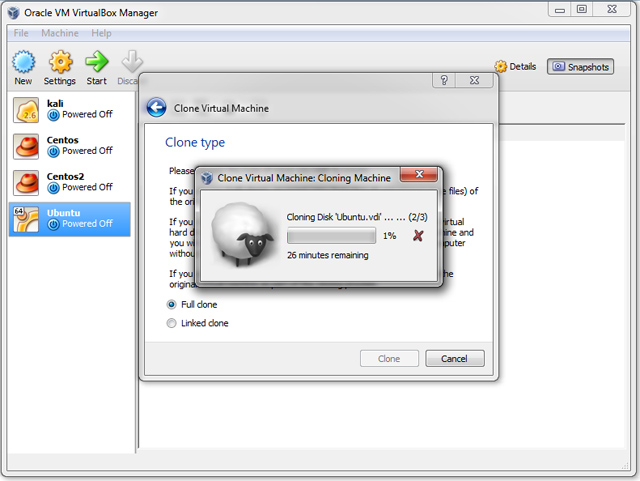
4) Let it clone.
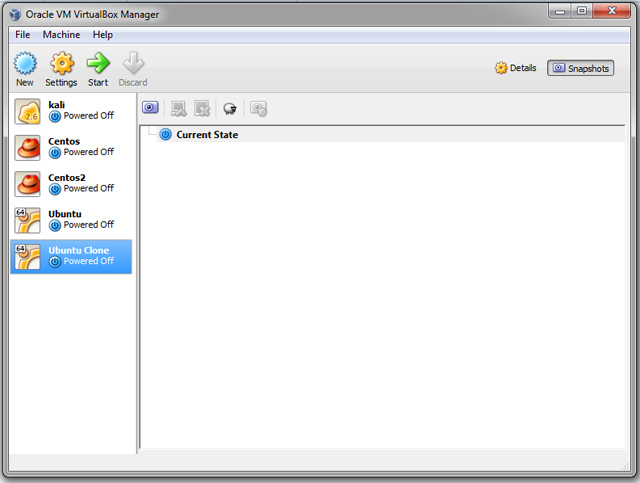
5) The new clone had been added and you can start it.
Using Virtualbox is a fantastic tool for which to write custom php / mySQL scripts, while making it easy to flip back and forth between some heavy duty Windows software like Pinnacle Studio, Camstasia, Adobe Captivate and Photoshop. However, you may want to backup some files on an external usb stick, hard drive or Raspberry Pi. Personally, I like a quick and easy backup device like a Raspberry Pi that is connected to the local network so I never have to plug any thing in. But, I also like my “Sacred Files” backed up outside of the home in case of fire and theft. Starting any long-winded project over is something you never want to do.
Moving on, here is a quick method for which you can store backups from your Virtual Machine. The sequence involves using a $35 Raspberry Pi which is connected to the router with an Ethernet cable. However, it would also work fine with a wireless connection.
To transfer the file(s) to a usb stick,
2) Open an ftp client in your Windows operating system.
3) Connect to the address of your Raspberry Pi. In this case, the address is 192.168.0.130. The default user for a Raspberry Pi is ‘pi’ and the default password is ‘raspberry’. Security minded people probably change the default password within minutes after an installation.
4) Use sftp or ftp and transfer the file to your usb drive.
You could make a zip or tar ball of a folder, scp the file to your Raspberry Pi and transfer them to your usb stick in less than a minute.
Alternatively, you could create a Samba server on a Raspberry Pi for which you can transfer files to and from the Samba server.
Virtualbox works very good if you add one or more virtual machines like Ubuntu, Centos, Mint, Puppy, Kali and Windows. Normally, a new virtual machine can connect to the Internet and be run in its own world. However, the time could come when you want to go back and for between you pc and the virtual machine, and, this includes copying and pasting files from one operating system to the other. Well, here is where ‘Guest Additions’ comes into play. ‘Guest Additions’ is included with Virtual box. Alternatively, you can download and install it with the Linux command line.Once you have ‘Guest Additions’ working, you can change the appearance of the screen and copy and paste text from your pc to the virtual machine. The ‘host’ key on your computer is the [right ctrl] key.
The commands below show how to change the appearance of your Virtualbox. Host F and Host L give nice, large screens. The default screen may be host C which may not be that desirable.
To copy and paste from pc to virtual machine,
1) Select Devices >Drag and Drop >Host To Guest
2) Select Devices >Shared Clipboard >Host To Guest
When you download and write a Live Kali linux distro to a usb stick, any changes you make will not be there the next time you boot the usb stick. However, you can add persistence to the installation if you want to build on to the installation, add and edit files and add databases. The following instructions and images will guide your through the steps that are required to create the Live usb distro with persistence.
To enable persistence for a live USB installation,
1) Download Kali Linux iso.
2) Download, install and open Win32 Disk Imager
3) Write the image to the usb stick.
4) Boot the live usb stick.
5) Open the terminal.
6) Run the command gparted
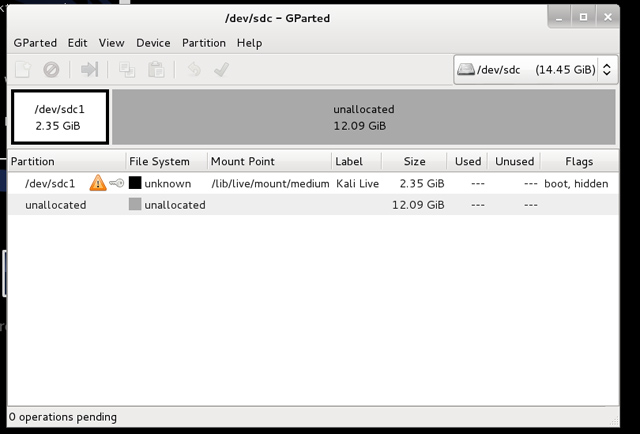
7) Create a new partition. In this example, a 16 gb usb is used. As you can see below, the installation used 2.35 gb and 12gb is unallocated. The primary partition that is used is sdc. The sdc partition is the usb stick. Sda and sdb partitions are on the physical hard drive. It is critical not to select the wrong disk or you could do serious hard drive damage.
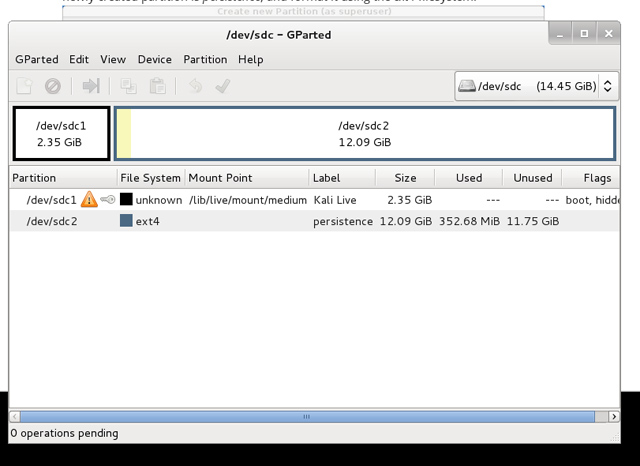
As you can see, gparted shows sdc1 uses 2.35 GB. This ia a logical partition. The unallocated space will become the sdc2 partition. Partitioning always works in a numberical sequence.
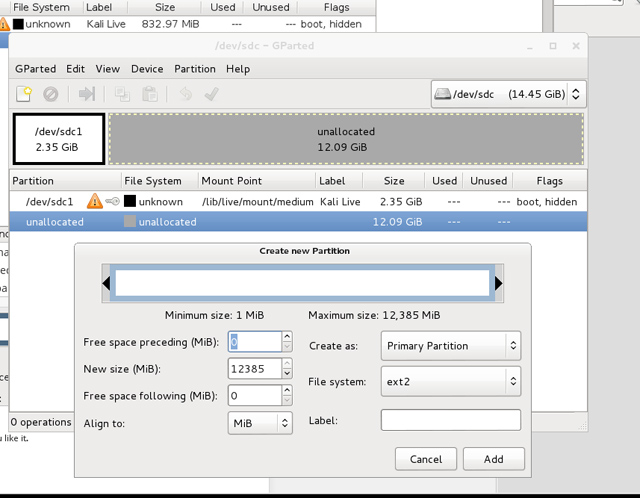
3) Select the Ext4 File System and add persistence to the Label field. Make sure unallocated is selected.
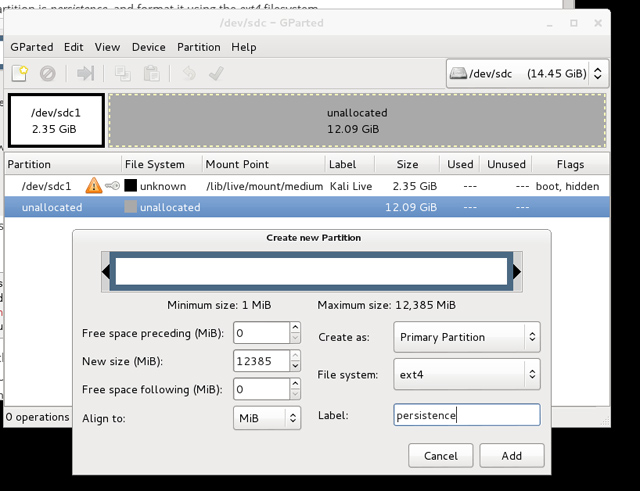
4) Select ‘Add’.
5) You now see the new partition on the list.
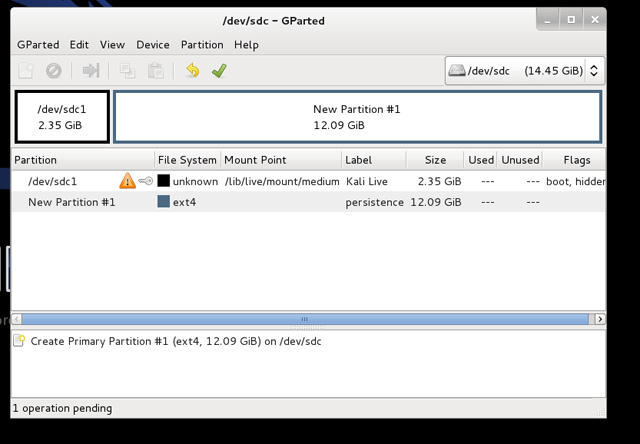
6) Run the operation.
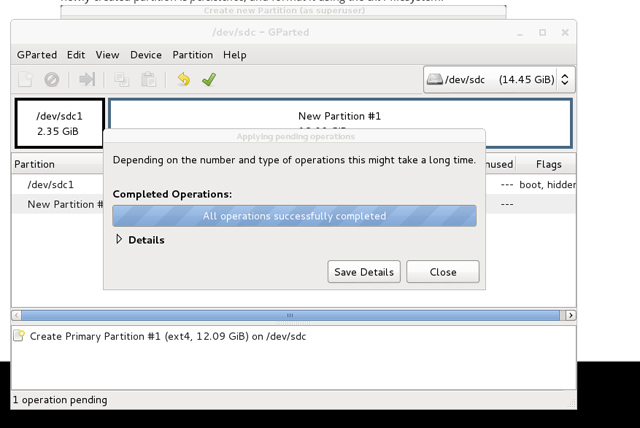
7) Select ‘Close’. Now, you see the new sdc2 partition added to the list and no pending operation.
Now, you need to open a terminal and add the following commands.
What did those commands do? Firstly, you created a new directory that will be used to mount the sdc2 partition. Then, the sdc2 partition is mounted at the location /mnt/usb. The ‘echo’ command appends a new line of text to the persistence.conf file. Finally, the partition is unmounted using the ‘umount’ command.
Now, you can reboot your computer with your usb plugged. As you should know, the boot order should have usb preceding the hard drive. When Kali boots up, you can select from a list of option. But, you select the ‘Tab’ key on your computer, then the space bar, and finally type ‘persistence’.
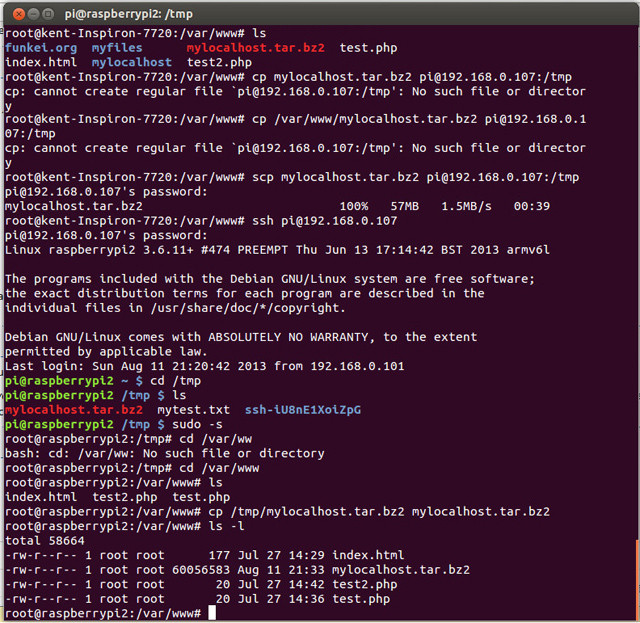
You may have multiple computers being used at home or work and you want to easily move files between them. You could have laptops, desktops, Raspberry Pis or any combination of the three. The simple solution is to use the command ‘SCP’. The commands are shown below.
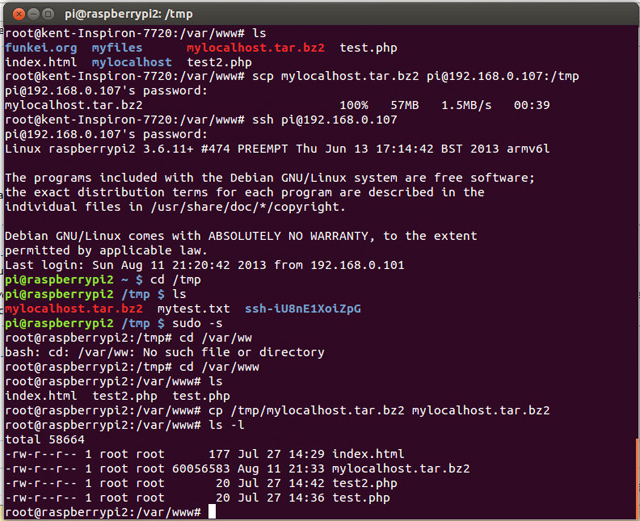
The image below is unnecessary. But, it shows what happens when you try to use the cp command between two different computers on the same network. CP is used to copy files with a single computer.
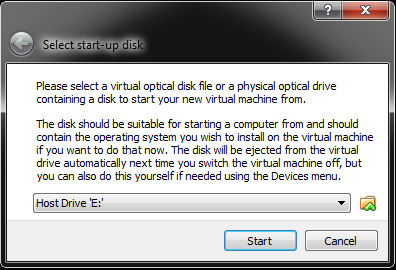
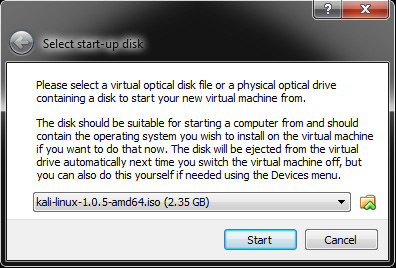
Virtualbox is free software from Oracle which can be downloaded and installed on Windows that can be used to run other operating systems.
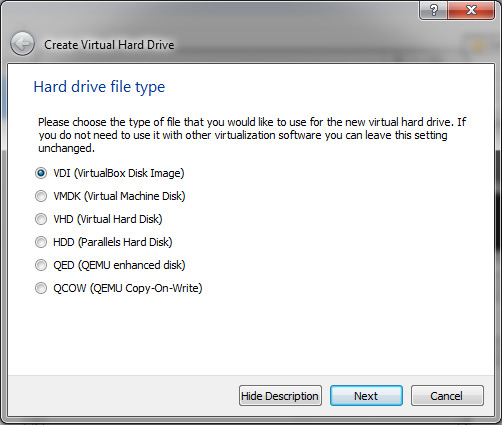
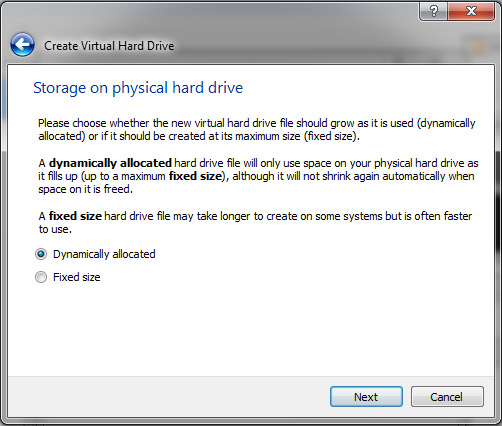
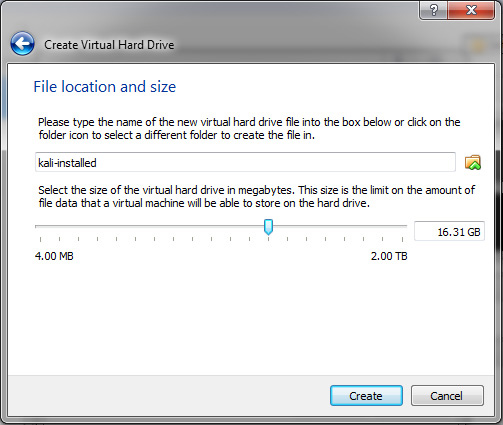
1) Select the option you want to use >Click Start

Operating System Specifics
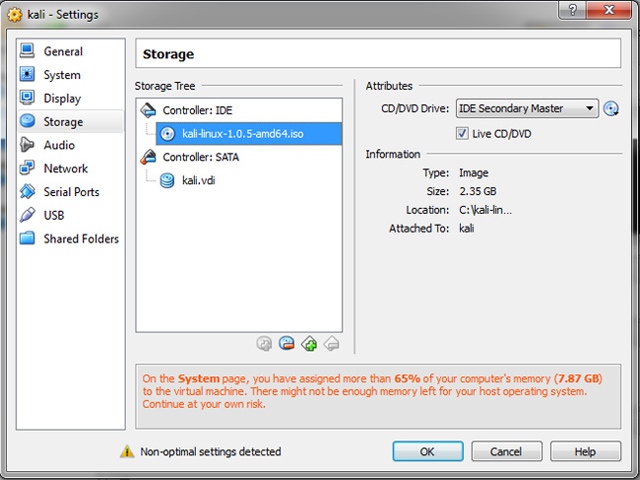
Linux Live Distro
If you plan to use a ‘Live’ version of Linux, you can select the operating system (ie. Centos) >Settings >Storage >Select the ‘iso’ file >Select ‘Live CD/DVD’
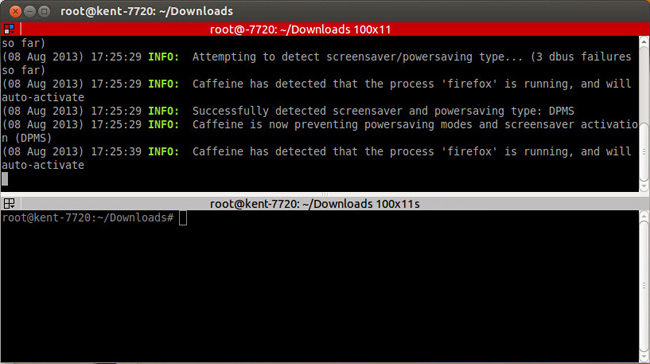
Opening a terminal with Linux allows you to command to your heart’s content. But, you may find the day has come when using one terminal at a time is just not enough. There could be many reasons for this possibility such as; you are running an application like Gedit or Caffeine that is using a process for which you do not want to quit, you want to connect to other multiple Raspberry Pis(or pcs) on your network at the same time and run separate commands on each one, and the list goes on.
Well, look no further because Terminator can allow you to open as many terminals as you want.
Installing Terminator on Ubuntu / Debian Distros
root# apt-get install terminator
Installing Terminator on Centos
root# yum install terminator
Terminator Usage
After Terminator is installed, you can open it at the command line with the ‘terminator’ command, or search for the application with a gui and open it.
To create multiple terminals,
1) Right click on the terminal
2) Select ‘Split Horizontally’
Note: The new shell will be used with the same user. Therefore, if you initially split the screen under a username like ‘mike’, the new terminal will maintain that user. But, if you switch to root, the new terminals will be used with root.
Ubuntu, or another Linux distro makes it very easy to connect to another Linux box or Raspberry Pi from your pc, a Raspberry Pi, or a Linux live usb using ssh. If you have the adequate ssh client installed, and know the passwords, you can make connect to the other machine and take over with shell commands.
Install SSH Client On Ubuntu or Linux Distro
root# sudo apt-get install openssh-client openssh-server
Connect To Remote Linux Machine With SSH
This example demonstrates how quick and easy it is to connect to a Raspberry Pi using SSH. The computer doing the connecting is Ubuntu.
root# ssh pi@192.168.0.102 pi@192.168.0.102's password: Linux raspberrypi 3.6.11+ #474 PREEMPT Thu Jun 13 17:14:42 BST 2013 armv6l
Caffeine is an application that can be used to ensure that your monitor stays active. Although you can disable the screen saver and sleep functionality, caffeine is still another option which you can use at your leisure. This way, you can open and use caffeine only when you want to make sure the monitor will not sleep and stays active. One instance you may want this to occur is for watching movies.
Install Caffeine
sudo add-apt-repository ppa:caffeine-developers/ppa sudo apt-get update sudo apt-get install caffeine
Activating Caffeine
caffeine -p &
The scp command in Linux is a fine way to download a file from a Linux Web Server. You can download a file if you know where it resides and you know the password for which to login. All you need to do is to login to the shell terminal with your pc. This example shows how it can be done with an Ubuntu PC.
The code below shows how you can download a tar file from the root directory on a Linux server to the desktop on a home PC running Ubuntu.
root# scp username@example.com:/myfile.tar /home/username/Desktop
As you may spend hours and hours configuring and setting your current installation, it is a good idea to make sure that you do not lose all that hard work and customization that enables you to use your Linux variant as you wish. There are many methods for which to backup your existing installation such as, making iso files, cloning the installation with Clonezilla and good old tar files.
The examples below show how to create backups of the entire file system or parts of the file system. If you are hoping to move a server to a new machine, you could clone the entire disk and make an iso file, or you could make a fresh installation and extract the tar ball and overwrite the files. Making tar backups is much faster and easier than making an iso, especially with a larger file system.
Tar Backups
Tar backups can be used to backup the entire file system “/” or various parts of the file system.
Backup the entire file system but do not include the tar backup file
root# tar cjvf ubuntu_backup.tar.bz2 --exclude=/ubuntu_backup.tar.bz2 .

Backup the file system but do not include some folders (Method A)
root# cd /
root# tar cjvf ubuntu_backup.tar.bz2 --exclude=/ubuntu_backup.tar.bz2 --exclude=/home/username/tunes --exclude=/media --exclude=/boot --exclude=/sys --exclude=/proc --exclude=/mnt /


Backup the file system but do not include some folders (Method B)
root# cd /
root# tar cjvf ubuntu_backup.tar.bz2 --exclude=ubuntu_backup.tar.bz2 --exclude=home/username/tunes --exclude=media --exclude=boot --exclude=sys --exclude=proc --exclude=mnt .
Checking Tar Backups
root# tar tjvf ubuntu_backup.tar.bz2 |less
or
root# tar tjvf ubuntu_backup.tar.bz2 | grep etc |less

To move the tar file,
1) Copy and paste to usb .. or use ssh and scp the file to another machine.
Install phpmyadmin
1) sudo apt-get install phpmyadmin
Select Y when necessary
Select Apache >Enter
Configure database for phpmyadmin with dbconfig-common?
> Select Yes >Enter
Add passwords, or leave empty and click Enter
2) Open file /etc/apache2/apache2.conf
At the bottom add the line:
Include /etc/phpmyadmin/apache.conf
3) Navigate to /etc/phpmyadmin
change this line
$cfg['Servers'][$i]['host'] = $dbserver;
to:
 :$cfg['Servers'][$i]['host'] = 'localhost';
to
Change
  $cfg['Servers'][$i]['controluser'] = $dbuser;
    $cfg['Servers'][$i]['controlpass'] = $dbpass;

to
  $cfg['Servers'][$i]['controluser'] = 'root';
    $cfg['Servers'][$i]['controlpass'] = '';

uncomment the line
//      $cfg['Servers'][$i]['AllowNoPassword'] = TRUE;
to
     $cfg['Servers'][$i]['AllowNoPassword'] = TRUE;

Restart apache and open your page in a browser to a url like:
example.com/phpmyadmin

You should be able to login with root and no password. If you login and see the databases, that is a good start. But, the security needs fixing right away.

Comment the AllowNoPassword line.
//      $cfg['Servers'][$i]['AllowNoPassword'] = TRUE;

Update your mysql root password
mysqladmin -u root password your-new-password
sudo /etc/init.d/mysql restart

Update a mysql user password:
SET PASSWORD FOR root@'localhost' = PASSWORD('password');

The mysql password is the one for which you will login to phpmyadmin.

Disable root logins
$cfg['Servers'][$i]['AllowRoot'] = FALSE;


Create a new user in mysql
mysql> CREATE USER 'test'@'localhost' IDENTIFIED BY 'mypassword';
mysql> GRANT ALL PRIVILEGES ON * . * TO 'test'@'localhost';
To remove a user
mysql> DROP user 'test'@'localhost'
Your home pc or home server running Ubuntu can easily be used to send email and run many web server applications such as phpMyAdmin and Squirrelmail. This tutorial will explain how to install and use Squirrelmail with Ubuntu.
1) root# apt-get install squirrelmail squirrelmail-locales
Type 'Y'
2) root# squirrelmail-configure
^C
3) root# ln -s /etc/squirrelmail/apache.conf /etc/apache2/conf.d/squirrelmail.conf

Restart apache
root# /etc/init.d/apache2 restart

4) Check browser to see if login shows up:
http://localhost/squirrelmail/src/login.php
5) Open browser and run configtest to troubleshoot. Often, some things need to be changed.
http://localhost/squirrelmail/src/configtest.php

You may see errors and warnings such as;
'ERROR: Error connecting to IMAP server "localhost:143".Server error: (111) Connection refused'


root# apt-get install nmap
root# nmap localhost

root# sudo iptables -A INPUT -p tcp --dport (143) -j ACCEPT
root# iptables-save

root# sudo apt-get install dovecot-postfix

Run this again:
http://localhost/squirrelmail/src/configtest.php

You should see:
Congratulations, your SquirrelMail setup looks fine to me!


Try logging in:
If unsuccessful, you will need to change owners and permissions

root# chown daemon:daemon data
root:/var/lib/squirrelmail# chmod -R 777 data


root:/var/lib/squirrelmail# mkdir attachments
root:/var/lib/squirrelmail# chmod -R 777 attachments
root:/var/lib/squirrelmail# chown daemon:daemon attachments
Now, you need to have a non-root user that can login.
root# useradd myusername
root# passwd add_password_here
At this point, you can attempt a login. If anything fails, you can find the errors in the /var/log/mail.log file. One possible error could be that the user does not have the mail directory setup in the proper location. What the error below is attempts to explain is that it cannot create mail directory. The reason for that is because the there is no /home/myusername. Under some Linux conditions and distros, the folder is created automatically. In this case, it was not.
Jul 23 11:09:59 NAME-VirtualBox dovecot: imap-login: Login: user=<myusername>, method=PLAIN, rip=127.0.0.1, lip=127.0.0.1, mpid=8117, secured
Jul 23 11:09:59 NAME-VirtualBox dovecot: imap(myusername): Error: user myusername: Initialization failed: Initializing mail storage from mail_location setting failed: mkdir(/home/myusername/Maildir) failed: Permission denied (euid=1001(myusername) egid=1001(myusername) missing +w perm: /home, dir owned by 0:0 mode=0755)
Jul 23 11:09:59 NAME-VirtualBox dovecot: imap(myusername): Error: Invalid user settings. Refer to server log for more information.
The code below shows how to setup the mail directory for a new user.The first step is to create the folder for the user and the second step is to create the folder for the email directory. After that, the permissions are set for that user.
root@NAME-VirtualBox:/home# mkdir myusername
root@NAME-VirtualBox:/home# cd myusername
root@NAME-VirtualBox:/home/myusername# mkdir Maildir
root@NAME-VirtualBox:/home# chown -R myusername:myusername myusername
At this point, you will like want to send email that is authenticated. In order to do this, you need to have the DNS for your domain name point to the IP at home. To make sure email is sent through a valid email address, add this line to the bottom of main.cf file.
smtp_generic_maps = hash:/etc/postfix/generic
After that, open and create the file /etc/postfix generic and add this line.
Now, you just need to reload the postfix service and you can send email. To receive email, you need to enable port forwarding on the router so that the local network ip of your machine or Virtual machine is forwarded through port 25.
If you plan to use Ubuntu for many desktop and server applications, you will probably find the need to install Adobe Reader at some point in time. This simple installation can be done with the terminal in just a few seconds.
Installing Adobe Reader in Ubuntu From Command Line
root# wget http://ardownload.adobe.com/pub/adobe/reader/unix/9.x/9.5.1/enu/AdbeRdr9.5.1-1_i386linux_enu.deb root# sudo dpkg -i name_of_package (ie. AdbeRdr9.5.1-1_i386linux_enu.deb)
Your home pc or home server running Ubuntu can easily be used to send email and run many web server applications such as phpMyAdmin and Squirrelmail. This tutorial will explain how to install and use Squirrelmail with Ubuntu.
1) root# apt-get install squirrelmail squirrelmail-locales
Type 'Y'
2) root# squirrelmail-configure
^C
3) root# ln -s /etc/squirrelmail/apache.conf /etc/apache2/conf.d/squirrelmail.conf

Restart apache
root# /etc/init.d/apache2 restart

4) Check browser to see if login shows up:
http://localhost/squirrelmail/src/login.php
5) Open browser and run configtest to troubleshoot. Often, some things need to be changed.
http://localhost/squirrelmail/src/configtest.php

You may see errors and warnings such as;
'ERROR: Error connecting to IMAP server "localhost:143".Server error: (111) Connection refused'


root# apt-get install nmap
root# nmap localhost

root# sudo iptables -A INPUT -p tcp --dport (143) -j ACCEPT
root# iptables-save

root# sudo apt-get install dovecot-postfix

Run this again:
http://localhost/squirrelmail/src/configtest.php

You should see:
Congratulations, your SquirrelMail setup looks fine to me!


Try logging in:
If unsuccessful, you will need to change owners and permissions

root# chown daemon:daemon data
root:/var/lib/squirrelmail# chmod -R 777 data


root:/var/lib/squirrelmail# mkdir attachments
root:/var/lib/squirrelmail# chmod -R 777 attachments
root:/var/lib/squirrelmail# chown daemon:daemon attachments
Now, you need to have a non-root user that can login.
root# useradd myusername
root# passwd add_password_here
At this point, you can attempt a login. If anything fails, you can find the errors in the /var/log/mail.log file. One possible error could be that the user does not have the mail directory setup in the proper location. What the error below is attempts to explain is that it cannot create mail directory. The reason for that is because the there is no /home/myusername. Under some Linux conditions and distros, the folder is created automatically. In this case, it was not.
Jul 23 11:09:59 NAME-VirtualBox dovecot: imap-login: Login: user=<myusername>, method=PLAIN, rip=127.0.0.1, lip=127.0.0.1, mpid=8117, secured
Jul 23 11:09:59 NAME-VirtualBox dovecot: imap(myusername): Error: user myusername: Initialization failed: Initializing mail storage from mail_location setting failed: mkdir(/home/myusername/Maildir) failed: Permission denied (euid=1001(myusername) egid=1001(myusername) missing +w perm: /home, dir owned by 0:0 mode=0755)
Jul 23 11:09:59 NAME-VirtualBox dovecot: imap(myusername): Error: Invalid user settings. Refer to server log for more information.
The code below shows how to setup the mail directory for a new user.The first step is to create the folder for the user and the second step is to create the folder for the email directory. After that, the permissions are set for that user.
root@NAME-VirtualBox:/home# mkdir myusername
root@NAME-VirtualBox:/home# cd myusername
root@NAME-VirtualBox:/home/myusername# mkdir Maildir
root@NAME-VirtualBox:/home# chown -R myusername:myusername myusername
At this point, you will like want to send email that is authenticated. In order to do this, you need to have the DNS for your domain name point to the IP at home. To make sure email is sent through a valid email address, add this line to the bottom of main.cf file.
smtp_generic_maps = hash:/etc/postfix/generic
After that, open and create the file /etc/postfix generic and add this line.
Now, you just need to reload the postfix service and you can send email. To receive email, you need to enable port forwarding on the router so that the local network ip of your machine or Virtual machine is forwarded through port 25.
Clonezilla is free software that can be used to make a cloned image (iso file) of your pc. After you make the clone, it can be used to replicate other installations on other pc and be used as a backup.
Clonezilla can be downloaded from clonezilla.org. Then, you can make a live cd or usb for which you run at boot time when you want to make your clone.
Key Points To Remember
1. When you make a a clone with Clonezilla, the first disk options you select will be the destination disk where you want to save the clone. The second option will be to select the source disk you want cloned . making a mistake here can destroy your data.
2. When you restore a clone with Clonezilla, your first selection will be to select the disk which holds the iso image. Your second option will be to select the disk where you want to add the cloned image.
Cloning USB Hard Drives With Clonezilla
After you boot from CD or usb with Clonezilla, you can insert two usb drives into other usb ports. One usb will be the iso file and one will be formatted and blank. Then, you just go along with Clonezilla instructions and clone one usb drive to another usb stick. This method can be used to clone persistent Linux installations from usb to usb. In fact, you can set up a server, a website and an email server on a usb stick. This is no way to host a website, but, it is a simple and cheap method to experiment with Linux installations on disk.
Setting up a ‘Linux Home Server’ requires using a Linux installation of choice. You can use a distribution like Ubuntu, Centos, Mint, Fedora, Debian, Puppy, etc. Regardless of which distribution you decide to use, you will need Apache, mySQL and PHP installed on the system. Then, you can alter and a few files within your installation. Finally, you need to configure your router and set up a dns zone which will point to your IP address. Then, when someone looks up example.com, they will find your website. A Linux home server may not be the best solution to host multiple websites, but, it can be a great testing ground or remote streaming video source.
A Centos Linux Home Server can easily be built after installation. Using Centos as a Linux Home Server is an excellent option because it is free and it is commonly used for web hosting. Based on Red Hat, Centos is the Linux variant which can run Cpanel at hosting data-centers. Therefore, using it will help you be familiar with its file system. Since Linux file systems vary from variant to variant, using Centos at home can make using command lines and running a VPS or dedicated server much easier. This tutorial will explain how to turn the newly installed Centos Installation into a home server which can host a website like example.com.
Install Apache, mySQL and PHP

4) Install mySQL.
a) $ yum install mysql-server mysql php-mysql
b) Select Yes(y) when necessary.

b) /etc/init.d/mysqld start

5) Login to mySQL to check it out
a) # mysql > Enter
Now, you have access to the mySQL console and can create and edit any database.
b) To leave mySQL type:
mysql>exit

6) Install php
a) #yum install php
a) Select Yes(y) when necessary

7) Restart the Apache service.
a) # service httpd start


[root@livedvd local]# cd /etc/httpd/conf/httpd.conf
Open the file in text editor and scroll to the bottom
Add: Include conf/conf/*.conf

[root@livedvd conf]# mkdir conf
[root@livedvd conf]# ls
conf  httpd.conf  magic

open conf/example.com.conf
<VirtualHost *:80>
ServerName www.example.com
ServerAlias example.com *.example.com
DocumentRoot /var/www/example.com
<Directory “/var/www/example.com”>
Order allow,deny
Allow from all
</Directory>
</VirtualHost>
Set the dns to point to your ip. You can do this with an online hosting account or free service like free dns.

[root@livedvd www]# cd /var/www
[root@livedvd www]# mkdir example.com
[root@livedvd www]# ls

Just add an index.html or index.php file to the folder and open the website in the browser. You should see your website hosted from home.
An Ubuntu Linux Home Server can be built with the server or home edition. Using Ubuntu for a Linux Home Server is an excellent option because it is free, the support and documentation is very good and updated and in general, it performs well. Furthermore, Ubuntu is such a good desktop operating system that using it as a server at the same time can offer the best of both worlds.
Install php and mysql

user# sudo -s

For all installations, type 'Y' when necessary
root# apt-get install mysql-server mysql-client
root# apt-get install apache2

root# apt-get install php5 libapache2-mod-php5
root# /etc/init.d/apache2 restart

Restart server and set the config to restart automatically (often, this is already the default setting).

Router Port Forwarding for your IP
Test your ip in browser.

Create a DNS zone for which the website points to your ip. Set the dns to point to your ip. You can do this with an online hosting account or free service like free dns.

root# /etc/apache2/apache2.conf
Open the file in text editor and scroll to the bottom
Add: Include conf.d/sites/*.conf

Make a new folder called sites
Now, open the directory /etc/apache2/conf.d and make a file for your website. For example, for the website example.com I will call the file example.com.conf. It is a good idea to give the file the same name as the top level domain since it is unique and you will be well organized.

root# vi example.com.conf
Add a virtual host entry to the file:
<VirtualHost *:80>
ServerName www.example.com
ServerAlias example.com *.example.com
DocumentRoot /var/www/example.com
<Directory “/var/www/example.com”>
Order allow,deny
Allow from all
</Directory>
</VirtualHost>
Now set up the folder for the site example.com
open /var/www/
root# cd /var/www
root:/var/www# mkdir example.com
Copy the original index.html file from www/index.html to www/example.com/index.html
root# cp index.html example.com/index.html
Edit the example.com/index.html so that you know it comes from this directory. Just add a simple line like "This is from example.com"


Access your firewall in browser (ie 192.168.0.1)
Select advanced > allow port 80 with tcp
This short, simple tutorial will explain how to install and use Clamav with Ubuntu.
To install Clamav,
Install Clam AV
root# sudo apt-get install clamav
Install Clam AV Automated Package
root:# sudo apt-get install clamav-daemon
Clam AV Usage
To use Clamav,
1) Open the terminal
2) Run a scan
Scan the home directory and recursive files and folders.
root# clamscan -r /home
Scan everything
root# clamscan -r /

Output Sample:

----------- SCAN SUMMARY -----------
Known viruses: 2304039
Engine version: 0.97.8
Scanned directories: 29545
Scanned files: 111854
Infected files: 0
Total errors: 18080
Data scanned: 3206.81 MB
Data read: 6249.99 MB (ratio 0.51:1)
Time: 307.823 sec (5 m 7 s)
root#
Clam GUI
If you want a gui for Clam you can download it from sourceforge. The current download url is http://sourceforge.net/projects/clamtk/files/ClamTk/4.44/clamtk_4.44-1_all.deb/download.
To install the gui tool,
1) Download the file and save it.
2) Open the terminal.
3) Go to the download folder.# cd /home/user/Downloads
4) Run the command for the specific version:
root# sudo dpkg -i clamtk_4.44-1_all.deb
With Ubuntu, the Universal Firewall(ufw) is install by default. You can run the command sudo ufw status to check it out. It is most like disabled.
If you want a simple gui for basic firewall rules, you can install the gui version ufgw. However, you need to have the the Universe repository enabled in order to install ufgw, which could be enabled by default. To install ufgw,
1) Open the terminal:
2) Run the command: sudo apt-get install gufw
3) When necessary, select 'Y' to complete the installation.
To use the Firewall and make rules,
1) Open System Settings >Firewall Configuation  or  Dash Home >Look for gufw >Select Firewall Configuration
2) Make rules. The image below shows a simple rule to allow incoming traffic to receive http requests from port 80; the web server.
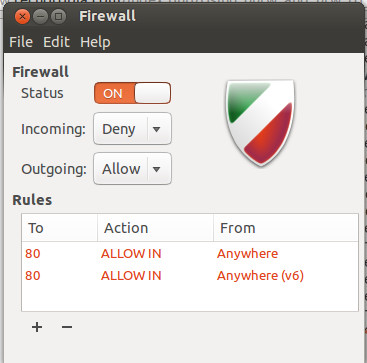
1) Download from phpmyadmin website
2) Extract the file from the directory (such as /tmp directory)
tar xvjf file.bz2
3) Rename the phpmyadmin folder after it is extracted
root# mv phpMyAdmin-4.0.0-all-languages.tar.bz2 phpmyadmin
4) Move the phpadmin folder to the /var/www/html folder, or, your virtual host folder such as a website called example.com. If you have a single website it will be in the html folder.
5) Open the phpmyadmin folder
cd phpmyadmin
6) cp config.sample.inc.php config.inc.php

If mysql has no root password, you can
change
$cfg['Servers'][$i]['AllowNoPassword'] = false;

to
$cfg['Servers'][$i]['AllowNoPassword'] = true;
But, that is a security risk.

You can alter the root password by logging into mysql and changing it.


[root@livedvd phpmyadmin]# mysql -u root
Welcome to the MySQL monitor.  Commands end with ; or \g.
Your MySQL connection id is 4
Server version: 5.1.69 Source distribution

Copyright (c) 2000, 2013, Oracle and/or its affiliates. All rights reserved.

Oracle is a registered trademark of Oracle Corporation and/or its
affiliates. Other names may be trademarks of their respective
owners.

Type 'help;' or '\h' for help. Type '\c' to clear the current input statement.

mysql> update mysql.user set password=PASSWORD('newpassword') WHERE user='root';

# service mysqld restart


Login to phpmyadmin
Look for errors and fix
ie)
The mbstring PHP extension was not found and you seem to be using a multibyte charset. Without the mbstring extension phpMyAdmin is unable to split strings correctly and it may result in unexpected results.
The mcrypt extension is missing. Please check your PHP configuration.
A Linux distribution can be installed directly onto a hard drive or it can be installed on a partition on the hard drive. When you partition a hard drive, you can have have the option to run either operating system when you boot the computer. The software EASEUS can be used to partition a hard drive with Windows for which the new partition can be used to install Linux. The key to partitioning a hard drive with EaseUS is to make the Linux partitions with the type ‘Ext 3’.
When you create the partition, the new Linux partition must have a status as ‘active’ and the type is ‘primary’. After you have created the partition you reboot the computer. The bios boot order should start with your installation media; such as cd or usb. Upon reboot, you will follow the simple Linux installation instructions. The only part that may need some tweaking is making sure the root ‘/’, boot and swap partitions are properly created and named.
Partitioning Tips For Linux
When you partition a hard drive to install Linux, you will need to make 3 ‘Ext’ partitions. The partitions can be made with EaseUS or they can be created when you install the iso image on the computer. One will be the large ‘root’ partition which will have the mount point ‘/’. Another partition will be the ‘boot’ partition’ that will have the mount point ‘boot’ and it will be about 200 mb in size. The final partition will be the type ‘swap’, and it should be twice the size of your computer’s memory. For example, a computer with 4gb of memory will have 8-9 GB of swap. If ou do not have the three partitions created, you will be prompted during installation that you must have them. Therefore, if this is the case, you simply create them.
Post Installation
After Linux is successfully installed, you reboot your computer (without the media installation disk or usb stick). You will be able to select your operating system of choice.
This example will demonstrate how to find files that are larger than a specified size. The example below will find files in the home directory which are larger than 20mb.
root# find /home -size +20480k -print
This tutorial will list files on your Linux system within a specific date range.
List Files Within 1 Day
root# find . -type f -mtime -1
root# find /myfolder -type f -mtime -1
List Files More Than 1 Day Old
root# find . -type f -mtime +1
root# find . -type f -mtime +1
root# find /home/user/public_html/example.com/myfolder -type f -mtime +1
This tutorial explains how to find list all files and directories on a Linux system that have a string of text within the name. The example below is looking for files or folders with database_connect in the name.
Find Text Within The Files and Folders
root# find /pathtofiles -name "database_connect*"
root# find /directory | grep "database_connect"
root# find . | grep "database_connect"
find /home/username | grep connect
This tutorial explains how to find data within files on a Linux system.
Find Text Within
root# find /pathtofiles | xargs grep "username"
This basic set of instructions can be used to remove an ip address of a device on your Linux system.
Show IP addresses.
root_user# ip addr show eth0
Remove the undesired ip.
root_user# ip addr del 192.168.0.1/21 dev eth0
Using SSH, you can find the word count of one or more files.
Word Count of A Particular File
# find . -name 'edit.php' | xargs wc -w 99 ./mobilesite/forms/system/scaffolding/views/edit.php 383 ./blogger/edit.php 164 ./edit.php 646 total
Word Count of All PHP Files
# find . -name '*.php' | xargs wc -w or # find . '*.php' | xargs wc -w
Total Word Count of All Files
find . -type f -print0 | xargs -0 cat | wc -w
When you use a Linux Live DVD like CentOS 6.3, you can easily setup and modify the Linux installation to suit your needs. However, the Live DVD or Live CD will not save any changes that are made because Live CDs or DVDs run on a virtual disk drive in memory. The benefit of using a Live installation is security against malware and its portability.
Nevertheless, you can easily take a Linux Live DVD like Centos and setup php / mySQL in minutes. Then, you restart httpd and you have a functioning localhost to test php / mySQL scripts. This tutorial expklains how to use a Live DVD to create and test php / mySQL scripts.
1) Open the console (Applications>System Tools>Konsole)
2) Change user to root
Type:
a) $ sudo passwd root
b) Add password and verify
c) $ su – root
d) Give Password > Click Enter
4) Install mySQL.
a) $ yum install mysql-server mysql php-mysql
b) Select Yes(y) when necessary.

b) /etc/init.d/mysqld start
5) Login to mySQL to check it out
a) # mysql > Enter
Now, you have access to the mySQL console and can create and edit any database.
b) To leave mySQL type:
mysql>exit
6) Install php
a) #yum install php
a) Select Yes(y) when necessary
7) Restart the Apache service.
a) # service httpd start
8) Type: localhost in a browser to see a test page.
9) Use Vi or Nano to create files and store them in the www folder. For example, the file test.php in the ww folder can be viewed in Firefox with http://localhost/test.php
To create a php page,
a) # cd /var/www/html
b) nano test.php

Sudo ‘Super User’ can be installed with Yum. The process to install sudo is shown below.
root# yum install sudo
You will be prompted to install. Select y and click ‘Enter’ on your keyboard.
root# sudo whoami root
Ctrl + Alt + f2
Ctrl + Alt + f7
Unlike the cp command, the mv command moves a file and the original file gets removed.
Moving a File
The command below will move the file from the current working directory into the username folder which is located within the home directory.
root@vps [/]# mv newtest.txt /home/username/
The ‘cp’ command can be used to copy files from one location to another. After a file is copied, there is the original file and the copied file.
Copying a File
The code below will copy the index.php file from the user directory into the current working directory which is user2
root@vps [/home/user2]# cp /home/user/index.php ./
Copying a File To a New Name
The code below will copy the oldfile file to a file named newfile
root@vps [/home/user2]# cp -r oldfile newfile root@vps [/]# cp -r newtest.txt newtest2.txt root@vps [/]# ls
Both files newtest.txt and newtest2.txt now exist.
Using the Vi Editor that comes with various Linux distributions is one of your options to create, edit and save files. Two other popular editors are Nano and Pico. Nano and Pico usage are almost identical, while Vi usage is different. This tutorial and listings of commands is for the Vi editor. Opening Vi Editor and Insert Mode
root@vps [~]# vi newfile Here is my new text ~ ~ ~ -- INSERT --
Exit Insert Mode and Enter Command Mode
1) Press 'Enter' and go to a new line
2) Press 'Esc' on the keyboard
Exit Command mode and go to Insert Mode
1) Press 'Insert' on the keyboard
Navigating the Vi Editor
1) Use the arrow keys.
Saving Files and Quitting the Editor In Command Mode
To save a file and quit in command mode,
1) Type: :wq

To save a file to another name,
1) Type: :w newfilename

To quit the vi editor,
1) Go to command mode.
2) Type:  :q or :q!
For more commands and usage, a Vi cheatsheet can be found here.
Sometimes, during testing or typos, Linux will hang up and it will seem as though you are stuck. At this point, you probable just want to return to the prompt.
The ^C command allows you to stop the command and return to the prompt. However, if you are using an editor like Nano or Pico, you will need to exit the editor with the appropriate commands like ^X.
The jobs command can be applied to see which jobs are executing in the Linux shell.
root@vps [~]# jobs [1]+ Stopped cat
Using the pipe operator ‘|’, you can send data from program to another. This example will show how to search for all files with ‘test’ in the name. It returns the names latest, test2.txt and test3.txt.
Search the current directory for files with the string ‘test’
root@vps [~]# ls | grep test
latest
test2.txt
test3.txt
root@vps [~]#
Searching A Single File for a String
root@vps [~]# grep "kent" newfile.txt
My name is kent.
root@vps [~]#
Searching All Files for Strings
root@vps [~]# grep -r "kent" .
./.bash_history:ls | grep kent
./.bash_history:grep kent newfile.txt
./.bash_history:grep kent ls
./.bash_history:grep -r kent
./.bash_history:grep -r "kent"
./newfile.txt:My name is kent.
root@vps [~]#
Linux uses three standard program communication streams; STDIN, STDOUT and STDERR. The three streams represent standard input, standard output and standard error. The tutorial will detail standard output.

With Linux, you can create a new file with an editor, or, you can redirect output into a file.

 Nano Sample

1) Create the file with nano
root@vps [~]# nano myfile.txt
2) Write text
3) Save file
^O
4) Exit nano
^X

 Standard Output Method To Create a File

1) Use > to redirect output to a file called myfile.txt
root@vps [~]# echo "New text goes here" > myfile.txt

Furthermore, with output streams, you can run a Linux command and output the results into a file

Sample #1
1)
root@vps [~]# echo $PATH > test2.txt
root@vps [~]# cat test2.txt
/usr/local/jdk/bin:/usr/kerberos/sbin:/usr/kerberos/bin:/usr/local/sbin:/usr/local/bin:/sbin:/bin:/usr/sbin:/usr/bin:/usr/local/bin:/usr/X11R6/bin:/root/bin

Sample #2
root@vps [~]# ls -lt > test3.txt
root@vps [~]# cat test3.txt
total 4576
drwxr-x--- 15 root root    4096 Dec 25 08:25 ./
-rw-r--r--  1 root root       0 Dec 25 08:25 test3.txt
-rw-r--r--  1 root root     157 Dec 25 08:23 test2.txt
  Adding Standard Output to a File
To add a new lines to a file,
1) Type the following commands.
root@vps [~]# echo "New line" >> test2.txt
root@vps [~]# cat test2.txt
/usr/local/jdk/bin:/usr/kerberos/sbin:/usr/kerberos/bin:/usr/local/sbin:/usr/local/bin:/sbin:/bin:/usr/sbin:/usr/bin:/usr/local/bin:/usr/X11R6/bin:/root/bin
New line
root@vps [~]#
The command below uses which rm to find the location of the nano editor.
root@vps [~]# which rm nano /usr/bin/nano root@vps [~]#
Note:
The editor is located in the bin folder.
Linux allows you to create aliases for commands. In this example, we will make an alias called md which can be used to run the mkdir command. If you run the command below, you will set an alias, create a new directory and see that the new directory was actually created.
alias root# md="mkdir" md test_directory ls -l
Linux has many environment variables. A few worth remembering are pwd, path, PS1, USER and VISUAL. These environment variables can be used during each session. Alternatively, you can create environment variables which will last for your SSH session.
Using Environment Variables
root@vps [~]# echo $PATH
/usr/local/jdl/bin:/usr/kberos/sbin:/usr/kerberos/bin:/usr/local/sbin:/usr/local/bin:/sbin:/bin:/usr/sbin:/usr/bin:/usr/local/bin:/usr/X11R7/bin:/root/bin

root@vps [~]# echo $USER
root
root@vps [~]# echo $VISUAL
pico
Creating Environment Variables
root@vps [~]# VAR="Hello"
root@vps [~]# export VAR
root@vps [~]# bash
root@vps [~]# echo $VAR
Hello
The ‘ls’ command is one which gets used quite frequently. The ‘ls’ command is used to display files. There are many ways for which you can display files; such as ls, ls -l , ls -a, ls a* and ls -lt.
ls (lists one file for each row)
root# ls
file1 .file2
ls -l (lists a long output with file permissions, date and file size)
root# ls -l -rw-r--r-- 1 root root 38473 Feb 22 2012 memcached-2.0.0b2.tgz -rw-r--r-- 1 root root 38473 Feb 22 2012 memcached-2.0.0b2.tgz.1
ls -a (lists all files including hidden files)
root# ls -a
file1 .file2
ls -a (lists all files beginning with a)
root# ls a*
afile .afile
ls -lt (lists all files with long output ordered by date desc)
root# ls -lt drwxr-x--- 15 root root 4096 Dec 24 22:28 ./ -rw------- 1 root root 17386 Dec 24 09:14 .bash_history
With the shell you can define your variables. When you define the variable, it is convention to use capital letters. When you want to use the variables, you add a ‘$’ in front of the variable name. You can use variables within double quotes, but, not within single quotes. In addition, you some characters cannot be used within double quotes since they take on a different meaning. Fore example, ‘!’ cannot be used within double quotes.
Declaring the Variable
root# VAR="Hello World"
Printing the Variable
root# echo $VAR Hello World
root# echo "$VAR" Hello World
Changing the Linux root password can be done with a GUI like Web Host Manager, or, it can be done with SSH. The code below shows the simple procedure to change the password with the shell.
root# passwd
Changing Password for user root.
New UNIX Password: Add_PASSWORD_HERE (Click Enter)
Retype new UNIX password: RETYPE_PASSWORD_HERE (Click Enter)
passwd: all authentication tokens updated successfully.

Owner of Fullstack Web Studio

Quality Coding

Digital Marketing
When Performance and Flexibility Matters
Affordable web design,custom web development and mobile apps for individuals and businesses.


Let us analyze your data and competition to acquire more traffic! Professional SEO content writer
© 2018 ALL Rights Reserved | Sitemap
Vancouver | North Vancouver | Burnaby | Richmond | Coquitlam | Port Coquitlam | Surrey | Langley | Maple Ridge | Mission | Abbotsford | Kamloops | Kelowna | Victoria | Squamish | Whistler | Pemberton